Recitation 8: Serial Communication

Exercise 1: Make a Processing Etch A Sketch

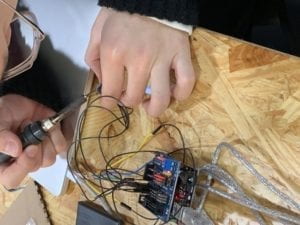
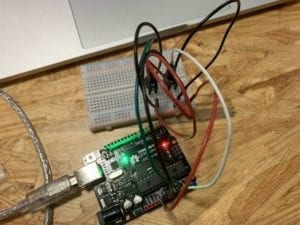
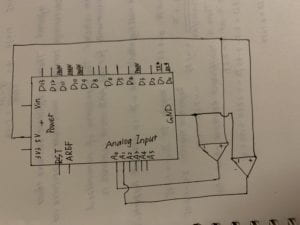
For the first exercise, the circuit was not hard to build and I used red color for jumper cables connecting potentiometers and the “5v” port and black color for jumper cables connecting potentiometers and the “GND” port, to make the whole circuit clearer and more straightforward. I then deleted the line of sensor 3 in Arduino since the exercise only involved two values, each one matched each potentiometer. In my first alternation, I simply set two variables and used them in the ellipse function. Even after adjusting the port number, the same error kept showing up. Therefore, I pressed each jumper cables to strengthen the connection and the port number together with its matching values. However, all the numbers turned out to be 0, so we transfer my attention to the code in both Arduino and processing. Then I realized the range of index in two codes was different, which made it hard for the processing to convey the exact number. The map function changed the value range of the two variables and the number successfully changed as when I rotated the potentiometers.

The interaction in this program was straightforward, following the listening, understanding, and responding steps. When the user rotates the potentiometers, the computer “listens” to the value that potentiometers inputted and “understands” those values by positioning it to the range I set. Then the device “responds” to the user by moving the ellipse in the canvas in the exact direction.

Code:  <script src=”https://gist.github.com/KayceeCC/ffa872ba860ac5d8d87b3db88470c5b6.js”></script>

Exercise 2: Make a musical instrument with Arduino

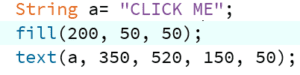
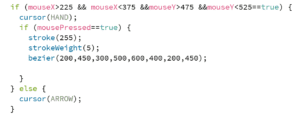
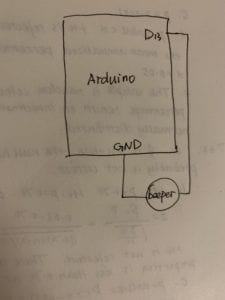
The circuit for the second exercise was even simpler with just one beeper and two jumper cables. I chose the mouse as the interactive part instead of the keyboard because using a mouse could easily create a continuous change of the tone of the beeper. This program also only involved two variables, which were mouseX and mouseY. Based on the mistakes that I had made in the first exercise, the process went much more smoothly. Under the guidance of the tone function posted online, I set value[0] that responded to mouseX that controlled the pitch of the sound and value[1] responded to mouseY that controlled the lasting time of the sound. When I moved the cursor in the canvas, the beeper would make different sound corresponding to the cursor position, changing continuously.

The interaction in the second exercise was similar to the first exercise. The cursor or the user and the beeper made up the two objects of the interaction. When the user moves the cursor in the canvas, the computer analyzed the position of the mouse and transferred the information to the Arduino in order to make the beeper makes the accurate sound.

Code:

<script src=”https://gist.github.com/KayceeCC/486e5c405644cf4e7f5b9f6c90843571.js”></script>

Preparatory Research and Analysis by Kaycee(Yijia Chen)

My definition of interaction evolved and altered at a large degree during my learning process of this term. The reading “The Art of Interaction Design” gave me the first reinforcing moment to render my definition of interaction a specific thing. Crawford uses metaphors in this article to compare interaction with the dialogues between actors. He thinks that to form a successful act, actors need to first listen to others’ words and then consider them before finally give them their responds. This process matched with three steps in interaction which are listening, understanding and responding. And my definition of interaction first got a vivid description. After reading this article, I defined the interaction as two or more objects listen, understand, and respond to each other’s actions.

The projects that I would like to include are the Anti-Drawing Machine project created by Soonho Kwon, Harsh Kedia and Akshat Prakash, and The chAIr Project which is a collaboration between Philipp Schmitt, Steffen Weiss, and two neural networks exploring the reversal of human and machine roles in the design process and industrial production. The former program, in my opinion, successfully aligns with my definition of interaction for the following reasons. First, there are two objects in each trial: the pen and the paper. The camera will first capture and analyze the movement of the pen, and then transfer message to the gears to rotate clockwise or the reverse. And the rotation of gears will move the paper in different direction from the pen so that it can prevent the pen holders from drawing the image they want. This progress evolves all the three steps of interaction in my definition. The process of the camera capturing the movement of the pen is the first step, listen. And the analyzing part is the camera thinking or understanding the movement. The demand the computer transports to the gears is the third step which is to respond.

However, The chAIr Project doesn’t align with my definition of interaction because the chairs will not respond to people, therefore, it is a one-way practice rather than interaction.

My definition of interaction also evolved by drawing experience from my group project and my midterm project. Comparing to my group project which is an interactive 4D billboard, my midterm project—the Chameleon is more realistic which can be achieved through current technology. What’s more, it involves real-time interaction with the environment around the device. The color sensor will first analyze the RGB indexes of the environment color and then respond to it by reflecting the same color it understands. From this experience, my definition of interaction further developed. Comparing to simple interactive process like users push buttons to require a response from a device, this kind of devices convey a more sense of interaction because it is real-time.

Recitation 7: Processing Animation by Kaycee(Yijia Chen)


For this recitation, I got the inspiration from one of the slides in class, with a red background and eyes on it. The eyeball moves freely. And I came up with the idea that I can connect the movement of eyeballs and the mouse so that the eyeballs will move in the same direction of the mouse, while always staying in the eye sockets.

I set the background red and eradicated the stroke of the circles representing eye sockets. I filled the two big circles with red like the background so that they can convey a sense of hollowness. To make the code shorter and simpler, I created a “drawcircle()” function so that I didn’t need to repeat the same long code for two eyes. I then drew two small circles to represent the eyeballs. To make the eyeballs respond to the movement of the mouse, I employed the map function, limiting the eyeballs range of activity within these two big hollow circles.

Then I created a rectangle with the four corners of it rounded. I also filled the rectangle with white color to make it compatible with the eyes. I typed “CLICK ME” in red in the center of the rectangle to inform the audience the correct way to interact with the rectangle is to use the mouse to click it. The red color also makes the characters striking. I also mimicked what the normal website and programs will do, which was to alter the icon of the cursor. Therefore, I set a range in which the icon of the mouse will change from an arrow to hand. At first, I only typed in the code which changed the arrow to hand, but when I ran it, I realized that it was a one-way change, and once the icon has altered to hand, it would not change back to arrow again, so I adjusted the code by adding the “else” function. By clicking the rectangle, I wanted to draw a mouth using “bezier” function.

To also include the keyboard in my project, I drew a nose and tried to move it by pressing the direction keys. I also filled the nose with white color. Applying this code was probably the most difficult part of my process. Because I put the “background” function in the setup loop, so every time I pressed the direction key, the white circle would not move along but always left its trace behind it. After seeking help from peers, I transferred the “background” function into the “keyPressed” loop and this alternation successfully achieved my purpose.

Code:

<script src=”https://gist.github.com/KayceeCC/178d86fcd149951ae380d8032ad5bf11.js”></script>

String[] lines;
int xpos=300;
int ypos=350;
void setup() {

size(600, 600);
background(200, 50, 50);
rectMode(CENTER);
}

void drawcircle(int x, int y, int c, int d) {
stroke(255);
strokeWeight(5);
fill(200, 50, 50);
ellipse(x, y, c, d);
}
void draw() {

drawcircle(200, 250, 100, 100);
drawcircle(400, 250, 100, 100);
float ex1= map (mouseX, 0, width, 170, 230);
float ey1= map (mouseY, 0, height, 220, 280);
noStroke();
fill(255);
ellipse(ex1, ey1, 25, 25);
float ex2= map (mouseX, 0, width, 370, 430);
float ey2= map (mouseY, 0, height, 220, 280);
noStroke();
fill(255);
ellipse(ex2, ey2, 25, 25);

noStroke();
fill(255);
rect(300, 500, 150, 50, 25);

String a= “CLICK ME”;
fill(200, 50, 50);
text(a, 350, 520, 150, 50);

if (mouseX>225 && mouseX<375 &&mouseY>475 &&mouseY<525==true) {
cursor(HAND);
if (mousePressed==true) {
stroke(255);
strokeWeight(5);
bezier(200,450,300,500,600,400,200,450);

}
} else {
cursor(ARROW);
}
}
void keyPressed() {
background(200, 50, 50);
fill(255);
ellipse(xpos,ypos,100,100);
if (keyCode==UP) {
ypos=ypos-5;
}
if (keyCode==DOWN) {
ypos=ypos+5;
}
if (keyCode==RIGHT) {
xpos=xpos+5;
}
if (keyCode==LEFT) {
xpos=xpos-5;
}

}

Additional homework:

For the third step, I first applied random function in all three indexes for RGB, but it turned out to be changing colors fiercely, which didn’t fulfill the requirement of smooth change. Therefore, I employed i++ to let the color change in a small range each time.

For the last step which required us to move the circle by the direction keys within the canvas limitation, I used many “if” functions to let it compare the numbers of the real-time center point position plus the circle’s radian and the width or height of the canvas.

Code:

<script src=”https://gist.github.com/KayceeCC/00dbd103200d90fd3d8bbc6329362a57.js”></script>

int r = 80;
int i = 1;
int a = 300;
int b = 300;
int c = 0;
void setup(){
size(600,600);
frameRate(150);
colorMode(HSB);
}
void draw(){
background(255);
strokeWeight(20);
stroke(c,c,200);
if(c < 255){
c ++;
}
ellipse(a,b,r,r);
r+= i;
if(r >= 300){
i*= -1;
r+= i;
}
if(r <= 80){
i = 1;
r += i;
}
if (keyCode==UP) {
b=b-5;
}
if (keyCode==DOWN) {
b=b+5;
}
if (keyCode==RIGHT) {
a=a+5;
}
if (keyCode==LEFT) {
a=a-5;
}
if(a+r>width){
a=width-r;
}
if(a-r<0){
a=r;
}
if(b+r>height){
b=height-r;
}
if(b-r<0){
b=r;
}
}

Things I’ve learned:

· String function

· Cursor function

Recitation 6: Processing Basic by Kaycee(Yijia Chen)

I chose the Wall Drawings by Sol Lewitt because it renders me a sense of the third dimension while the image itself is not complicated and I am able to produce the image using the knowledge I already possessed. The two irregular objects have similar but different colors on each side, conveying the message of the side which is illuminated by the light and the side which is in shadows. Comparing with other images, drawing this specific image requires precise connecting of different shapes and the proper choice of color, in order to produce a 3-D sense.

I mainly wanted to copy the exact two irregular objects as long as colors on each side. Because the 3-D objects can be embodied through plane figures, I would achieve my goal by drawing figures in accordance with each side of the irregular object. Since most of the plane figures are neither rectangles nor triangles, I used a lot of vertex functions to produce irregular objects. The very first product seemed somewhat distorted because I am not sure of the side ratio but focused too much on adapting to the size of the canvas. After several adjustments to the values of the lengths of lines, they ultimately matched. Then I tried several times to adjust the color of each figure to further develop the sense of the third dimension. Though the two objects looked the same with the two in the image, it lacked creativity and the sense of interactivity. Therefore, with the help of the cheat sheet, I added some code in order to make the background color change according to the position of the mouse.

My final creation possesses the same two irregular objects as the motif but has a different color-changeable background, which provides a sense of interactivity. For this particular piece of creation, drawing in Processing is a good tool in the color-changing part but was too complicated for drawing simply the two irregular objects. If only two fixed patterns were needed, we can just use rulers and pens or illustrator to produce them within a short period. However, Processing is a good tool to produce complicated and interactive creations, which drawing on papers will never do.

Code:

void setup()
{size(600,600);

}

void draw()
{
background(255*mouseX/width, 255*mouseY/height,0);
noStroke();
beginShape();
fill(211,211,211,200);
vertex(10,400);
vertex(50,200);
vertex(130,200);
vertex(90,300);
endShape();

noStroke();
fill(105,105,105,200);
beginShape();
vertex(10,400);
vertex(90,300);
vertex(130,350);
endShape();

noStroke();
fill(190,190,190,200);
beginShape();
vertex(50,200);
vertex(120,100);
vertex(210,100);
vertex(130,200);
endShape();

fill(80,80,80,200);
noStroke();
beginShape();
vertex(130,200);
vertex(90,300);
vertex(130,350);
vertex(170,300);
vertex(210,100);
endShape();

noStroke();
fill(211);
rect(310,300,120,90);

fill(190);
beginShape();
vertex(310,300);
vertex(410,150);
vertex(490,150);
vertex(430,300);
endShape();

fill(105);
beginShape();
vertex(410,150);
vertex(490,150);
vertex(530,100);
endShape();

fill(80);
beginShape();
vertex(530,100);
vertex(490,150);
vertex(430,300);
vertex(430,390);
vertex(490,315);
endShape();
}

Midterm Project: Chameleon by Kaycee(Yijia Chen)

Partner: Zhiqiu Wang

Before launching into the midterm project, we had come across several programs using LEDs to reflect the outsider environments, including the dimmable lights that can reflect the shade of the moving bodies in front of them. In these kinds of programs, my definition of interaction, which involves understanding and reacting, is perfectly embodied because the LEDs understand the outside environment and recognize people out of all other elements and then react to it by showing the exact part with the human in front of them. We’re interested in making a device which can also interact with the environment. What is unique about our project is that the reflection to the outside environment is in real-time, which means it is interacting all the time. When it comes to the target audience and its usage, at first, we thought of many broad ways to put such device into practice, including a billboard that will adjust its brightness according to the environment and clothes that can change color. Then we came up with a usage that will add more social effect to this project. At present, there are children with color weakness who in our opinion don’t get enough social focus. Chameleon can serve as a recovery method to train these kids’ sensitiveness to colors.

To let the users understand what they are going to do in order to interact with the device, we print “feed me with the energy bar” on the top of the box and design a face on the front side of the box so that users are clear that they should throw in the color bars through the mouth. We also drew many circles on each side of the box except the top so that the color of light that LED shows can be observed directly.

We used laser cutting to make our box cover the components inside, and special paper that is originally used for Chinese painting as the cover on the holes on the box to let the light better penetrate out. We used the Legos as our “energy bars” instead of the color stick made by our own. We rejected the self-made color bars because they were made by paperboard and were wrapped by colored paper. The shape of them was not stable and the color saturation of wrapped paper was too low for the color sensor to detect precisely.

I think the most significant steps in our production process would be coding and welding different components. Because we bought some of the components online, for instance, the color sensor, we had to do abundant research to understand how these components work and their matching code in Arduino form. This step took us a lot of time and after the countless time of adaption to the code, the RGB belt finally started to shine. What added to the difficulty of debugging our code each time was the unstable connection between some of the components that were connected by welding. Sometimes the failure arose from the code, but sometimes it was because of the loose connection. It was time-consuming to distinguish the exact problem each time.

We intended to make a device that can show all colors within the RGB range to reflect the color that it sensed. However, during the user testing, we found out that the data the color sensor stored wasn’t stable at all which will lead to the continuous blink of the RGB light belt. To cope with this problem, I added a delay in the code to try to make the color it reflects stable for a while but this directly led to the inaccuracy of the device. To further understand what went wrong, I added the serial print code to let the port show the RGB index that it detected. Though this adaption made the device less interactive and rough, it was effective and rendered the device more precise feedback.

The goal of “chameleon” is to reflect the environment light by shining the same color it senses. This device can be used in the process of recovery by the groups of people who have the color weakness to train their sensitiveness of color. Except for this usage which can have a positive social impact, “Chameleon” can also have commercial usages. For example, it can be installed as part of the components of clothes to change its color, making the clothes a color-changeable design, or be used on the billboard which can adjust its brightness and color in response to the environment to let the content on the billboard more clear to see. Since my definition of interaction involves two or more subjects who react to others on the basis of understanding others’ meaning, “Chameleon” in my opinion successfully fits in my definition of interaction. The RGB belt and the outside environment make up the two subjects of interaction. The RGB belt will first “understand” the other by sensing the environmental light and then analyze the RGB index and respond to it by shining the light of the color. The audience interacts with the device by using different color bars to change the environmental light color it senses.

This version of “Chameleon” actually cannot play an important role in our lives because its function and colors are too limited. If I have more time, I would do further research on the color sensor and improve my coding so that the device not only can shine red, green, and blue light but all the colors it senses. From the process of making the color changeable device, we are impressed by the importance of coordination. Not only the seemingly most technical-commanding code matters, but the basic circuit and connection can also lead to failures. Only when each part of the system functions properly can the final work be done. Apart from the practical gain, I and my partner also developed the awareness that no matter how commercialized the goods or technology seems, there are always social functions that can be explored to benefit for the weak groups of the society.

Code:

#define LED_R 5 

#define LED_G 6 

#define LED_B 3 

#include <SoftwareSerial.h>

SoftwareSerial mySerial(8, 9);

byte rBuf[8] = {};

byte R[10] = {};

byte G[10] = {};

byte B[10] = {};

byte final_R = 0;

byte final_G = 0;

byte final_B = 0;

int hist_pos = 0;

byte buf = 0;

byte last = 0;

void setup()

{

  Serial.begin(9600);

  mySerial.begin(9600);

  pinMode(LED_R, OUTPUT);

  pinMode(LED_G, OUTPUT);

  pinMode(LED_B, OUTPUT);

}

void loop()

{

  if (mySerial.available() > 0) {

    buf = mySerial.read();

    if (buf == 90 && last == 90) {

      //read!

      //Serial.println(“head arrived”);

      while (mySerial.available() < 6) {

        //Serial.println(“wait for next 6 bytes”);

        delay(5);

      }

      mySerial.read();

      mySerial.read();

      R[hist_pos] = mySerial.read();

      G[hist_pos] = mySerial.read();

      B[hist_pos] = mySerial.read();

      mySerial.read();

      //Serial.println(“RGB arrived”);

      /*

      */

      hist_pos++;

      if (hist_pos == 10) {

        hist_pos = 0;

      }

      final_R = R[0];

      final_G = G[0];

      final_B = B[0];

      for (int i = 1; i < 10; i++) {

        if (R[i] > final_R) {

          final_R = R[i];

        }

        if (G[i] > final_G) {

          final_G = G[i];

        }

        if (B[i] > final_B) {

          final_B = B[i];

        }

      }

      Serial.print(“R=”);

      Serial.print(final_R);

      Serial.print(” G=”);

      Serial.print(final_G);

      Serial.print(” B=”);

      Serial.println(final_B);

      /*

        final_R = map(final_R, 75, 185, 0, 255);

        final_G = map(final_G, 120, 136, 0, 255);

        final_B = map(final_B, 70, 200, 0, 255);

        analogWrite(LED_R, 255 – final_R);

        analogWrite(LED_G, 255 – final_G);

        analogWrite(LED_B, 255 – final_B);

      */


      if (final_R > final_G && final_R > final_B) {

        Serial.println(“RED”);

        analogWrite(LED_R, 0);

        analogWrite(LED_G, 255);

        analogWrite(LED_B, 255);

      }

      else if (final_G > final_R && final_G > final_B) {

        Serial.println(“GREEN”);

        analogWrite(LED_R, 255);

        analogWrite(LED_G, 0);

        analogWrite(LED_B, 255);

      }

      else if (final_B > final_R && final_B > final_G) {

        Serial.println(“BLUE”);

        analogWrite(LED_R, 255);

        analogWrite(LED_G, 255);

        analogWrite(LED_B, 0);

      }


      delay(10);

    }

    last = buf;

  }

}