Final Project Essay by Yuru Chen

Project Title: Hand Pen

For my final, I’m going to make a project using Arduino and Processing. Basically, I’m thinking of making a device with a sensor on it which can be tied to the users’ hands. This sensor will be connected to Arduino and will send values it detects to processing. This project is designed for people who like to draw, and also would like a more virtual representation of their art. 

I did some research on interactive projects, and I found some interesting projects, as I stated in the last blog post. Basically, the interactive project I found was asking the users to draw whatever they were thinking and let the computer “guess” what they were drawing. I was inspired by that and thought maybe I can do something else based on the drawing idea. What’s different is that I’m thinking of drawing on the screen without touching it by using sensors to connect the users to the computer. Simply put, I’m going to create a device which the users can draw “in the air”. What’s more, in my project, the users can make their own art pieces with not only lines or dots, but also other shapes, for example, squares, circles, triangles, etc. 

I think there will be challenges in the process of making this project. The most concerning one would be that how I can make the value Processing receives become a “pen” which can draw on the screen. Also, how to switch between different shapes are also challenging. 

For people who love drawing, I think it will be an very interesting device for them to practice their drawing skills or even just for fun. For further steps, I think this device can be developed to a kind of 3D drawing with a projector, which will be helpful in lots of areas in life. 

During the process, I will first connect the circuit. Then I will test how to use the sensor to transmit the value to processing. Next, I will write codes for both arduilno and processing. I will try to make a button which can be used as a switch. Last I will make a glove like cover to decorate the sensor and make it more user-friendly. 

The most important part that I will emphasis is the button. My initial intention is to make it convenient and multifunctional. So the button part is where I will make the whole project better meet the requirement. This button is used to switch the shape of the pen. For example, if the user press the button, the shape of the pen will change from a dot to a small square, which can draw a series of squares on the screen. This makes the drawing more multifunctional, and the user can use this function to make a more forms of drawing. 

I will start my project from now on. By the end of next week, which is the week of April 29 to May 3, I will finish collecting all the materials I need and try to connect them together to test if the sensor works. By the end of week of May 6-10, I will write codes for both processing and Arduino and start testing the whole project. By the end of the weekend of May11-12, I will decorate the interface of my project and make it more user-friendly. 

As far as I’m concerned, my final project is aligned with my definition of interaction because for me, interaction is a process of performance where people communicate with the machine in a specific language, and can only be completed with both the people and the machine together. For my final project, if either part of it is missing from the project, the process would not be completed, or interactive. It can only be completed by both people and my computer. 

Recitation 8: Serial Communication by Yuru Chen

Exercise 1: Make a Processing Etch A Sketch

Demo:

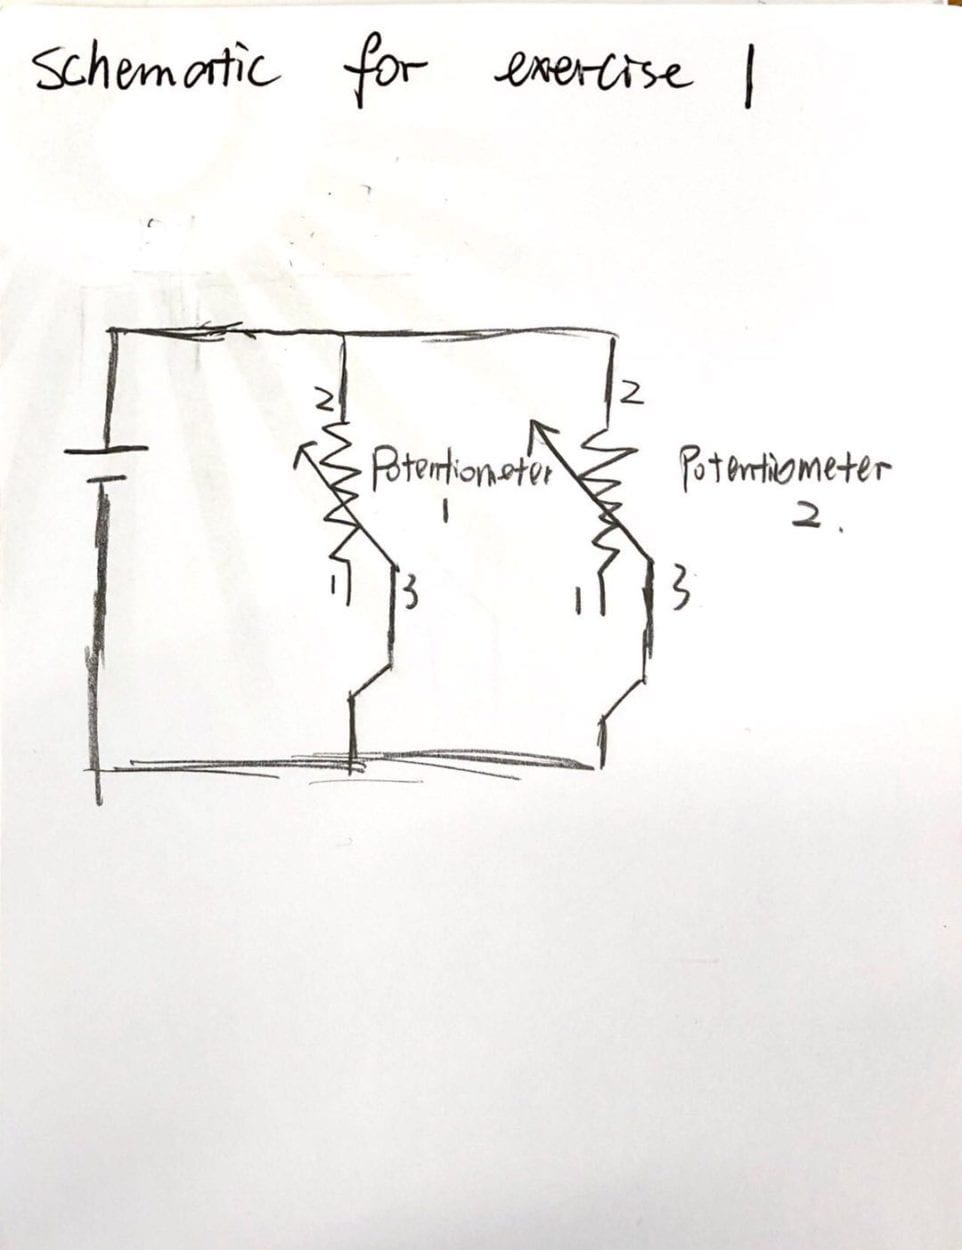
For this exercise, we are required to make a drawing sketch by sending values from potentiometers to Arduino and processing. 

 Schematic:
Lindsay

Arduino Code:

// IMA NYU Shanghai
// Interaction Lab
//excercise 1

/**
This example is to send multiple values from Processing to Arduino.
You can find the Processing example file in the same folder which works with this Arduino file.
Please note that the echo case (when char c is ‘e’ in the getSerialData function below)
checks if Arduino is receiving the correct bytes from the Processing sketch
by sending the values array back to the Processing sketch.
**/

#define NUM_OF_VALUES 2 /** YOU MUST CHANGE THIS ACCORDING TO YOUR PROJECT **/

/** DO NOT REMOVE THESE **/
int tempValue = 0;
int valueIndex = 0;

/* This is the array of values storing the data from Processing. */
int values[NUM_OF_VALUES];

void setup() {
Serial.begin(9600);
pinMode(9, OUTPUT);
}

void loop() {
getSerialData();
tone(9,values[0],values[1]);

// add your code here
// use elements in the values array
// values[0] // values[1] }

//recieve serial data from Processing
void getSerialData() {
if (Serial.available()) {
char c = Serial.read();
//switch – case checks the value of the variable in the switch function
//in this case, the char c, then runs one of the cases that fit the value of the variable
//for more information, visit the reference page: https://www.arduino.cc/en/Reference/SwitchCase
switch (c) {
//if the char c from Processing is a number between 0 and 9
case ‘0’…’9′:
//save the value of char c to tempValue
//but simultaneously rearrange the existing values saved in tempValue
//for the digits received through char c to remain coherent
//if this does not make sense and would like to know more, send an email to me!
tempValue = tempValue * 10 + c – ‘0’;
break;
//if the char c from Processing is a comma
//indicating that the following values of char c is for the next element in the values array
case ‘,’:
values[valueIndex] = tempValue;
//reset tempValue value
tempValue = 0;
//increment valuesIndex by 1
valueIndex++;
break;
//if the char c from Processing is character ‘n’
//which signals that it is the end of data
case ‘n’:
//save the tempValue
//this will b the last element in the values array
values[valueIndex] = tempValue;
//reset tempValue and valueIndex values
//to clear out the values array for the next round of readings from Processing
tempValue = 0;
valueIndex = 0;
break;
//if the char c from Processing is character ‘e’
//it is signalling for the Arduino to send Processing the elements saved in the values array
//this case is triggered and processed by the echoSerialData function in the Processing sketch
case ‘e’: // to echo
for (int i = 0; i < NUM_OF_VALUES; i++) {
Serial.print(values[i]);
if (i < NUM_OF_VALUES – 1) {
Serial.print(‘,’);
}
else {
Serial.println();
}
}
break;
}
}
}

Processing Code:

// IMA NYU Shanghai
// Interaction Lab
//excercise1

/**
* This example is to send multiple values from Processing to Arduino.
* You can find the arduino example file in the same folder which works with this Processing file.
* Please note that the echoSerialData function asks Arduino to send the data saved in the values array
* to check if it is receiving the correct bytes.
**/

import processing.serial.*;

int NUM_OF_VALUES = 2; /** YOU MUST CHANGE THIS ACCORDING TO YOUR PROJECT **/

Serial myPort;
String myString;

// This is the array of values you might want to send to Arduino.
int values[] = new int[NUM_OF_VALUES];

void setup() {
size(500, 500);
background(0);

printArray(Serial.list());
myPort = new Serial(this, Serial.list()[ 1 ], 9600);
// check the list of the ports,
// find the port “/dev/cu.usbmodem—-” or “/dev/tty.usbmodem—-”
// and replace PORT_INDEX above with the index of the port

myPort.clear();
// Throw out the first reading,
// in case we started reading in the middle of a string from the sender.
myString = myPort.readStringUntil( 10 ); // 10 = ‘\n’ Linefeed in ASCII
myString = null;
}

void draw() {
background(0);

// changes the values
for (int i=0; i<values.length; i++) {
values[0] = mouseX;
values[1] = mouseY;
/** Feel free to change this!! **/
}

// sends the values to Arduino.
sendSerialData();

// This causess the communication to become slow and unstable.
// You might want to comment this out when everything is ready.
// The parameter 200 is the frequency of echoing.
// The higher this number, the slower the program will be
// but the higher this number, the more stable it will be.
echoSerialData(200);
}

void sendSerialData() {
String data = “”;
for (int i=0; i<values.length; i++) {
data += values[i];
//if i is less than the index number of the last element in the values array
if (i < values.length-1) {
data += “,”; // add splitter character “,” between each values element
}
//if it is the last element in the values array
else {
data += “n”; // add the end of data character “n”
}
}
//write to Arduino
myPort.write(data);
}

void echoSerialData(int frequency) {
//write character ‘e’ at the given frequency
//to request Arduino to send back the values array
if (frameCount % frequency == 0) myPort.write(‘e’);

String incomingBytes = “”;
while (myPort.available() > 0) {
//add on all the characters received from the Arduino to the incomingBytes string
incomingBytes += char(myPort.read());
}
//print what Arduino sent back to Processing
print( incomingBytes );
}

Interaction:

In this exercise, we use potentiometer to send values to the Arduino, and then to Processing. In the code, we let processing draw ellipses depending on the values it receives from the Arduino, so that we can actually control where to draw the ellipses. 

Exercise 2: Make a musical instrument with Arduino

Demo:

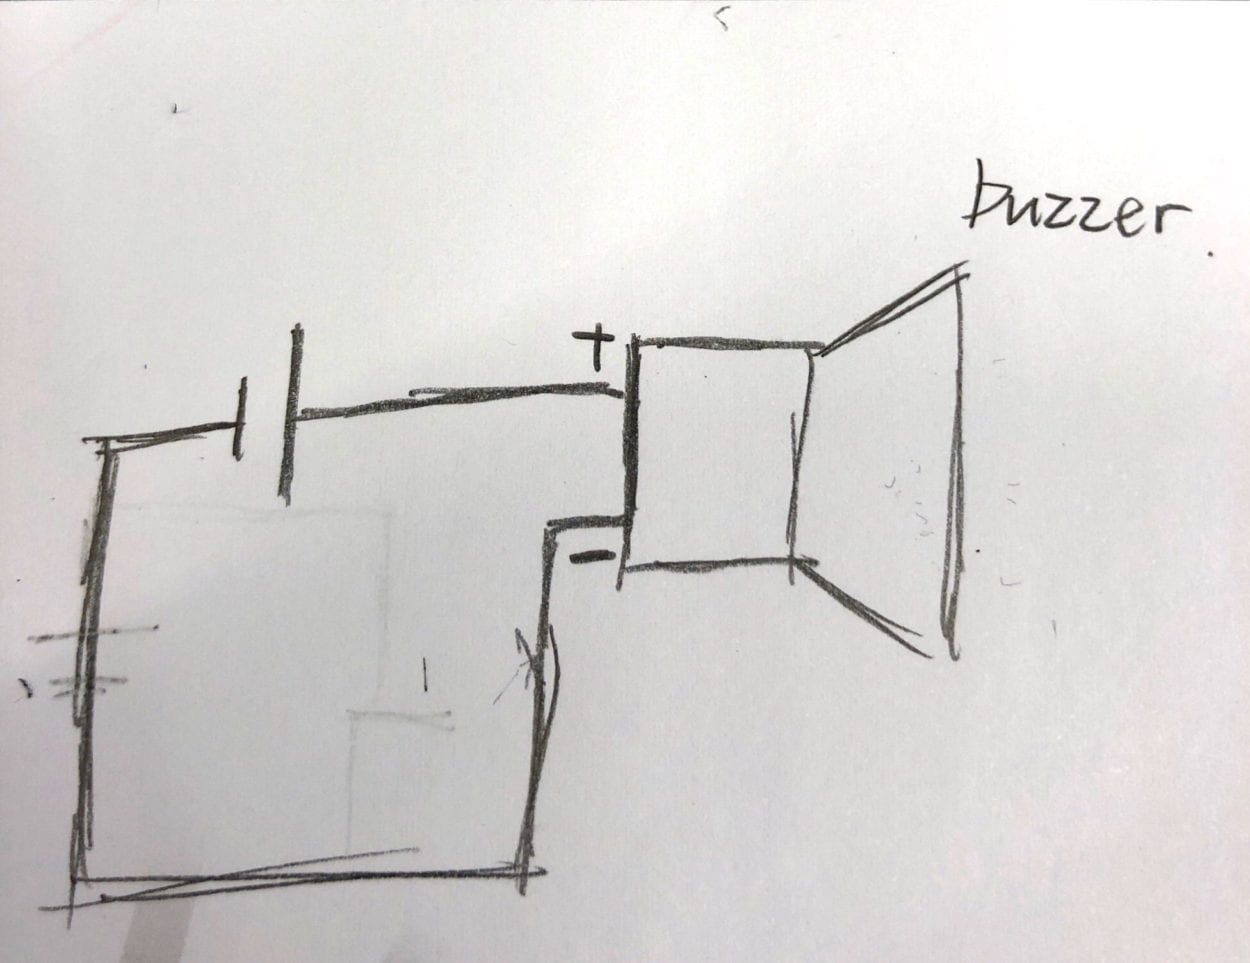
For this exercise, I made a circuit using Arduino and Processing, sending values from processing to Arduino depending on the position of my mouse, thus made the buzzer, which is connected to the Arduino, sound. 

Schematic:
Lindsay

Arduino Code:

// IMA NYU Shanghai
// Interaction Lab
//Excercise 2

/**
This example is to send multiple values from Processing to Arduino.
You can find the Processing example file in the same folder which works with this Arduino file.
Please note that the echo case (when char c is ‘e’ in the getSerialData function below)
checks if Arduino is receiving the correct bytes from the Processing sketch
by sending the values array back to the Processing sketch.
**/

#define NUM_OF_VALUES 2 /** YOU MUST CHANGE THIS ACCORDING TO YOUR PROJECT **/

/** DO NOT REMOVE THESE **/
int tempValue = 0;
int valueIndex = 0;

/* This is the array of values storing the data from Processing. */
int values[NUM_OF_VALUES];

void setup() {
Serial.begin(9600);
pinMode(9, OUTPUT);
}

void loop() {
getSerialData();
tone(9,values[0],values[1]);

// add your code here
// use elements in the values array
// values[0] // values[1] }

//recieve serial data from Processing
void getSerialData() {
if (Serial.available()) {
char c = Serial.read();
//switch – case checks the value of the variable in the switch function
//in this case, the char c, then runs one of the cases that fit the value of the variable
//for more information, visit the reference page: https://www.arduino.cc/en/Reference/SwitchCase
switch (c) {
//if the char c from Processing is a number between 0 and 9
case ‘0’…’9′:
//save the value of char c to tempValue
//but simultaneously rearrange the existing values saved in tempValue
//for the digits received through char c to remain coherent
//if this does not make sense and would like to know more, send an email to me!
tempValue = tempValue * 10 + c – ‘0’;
break;
//if the char c from Processing is a comma
//indicating that the following values of char c is for the next element in the values array
case ‘,’:
values[valueIndex] = tempValue;
//reset tempValue value
tempValue = 0;
//increment valuesIndex by 1
valueIndex++;
break;
//if the char c from Processing is character ‘n’
//which signals that it is the end of data
case ‘n’:
//save the tempValue
//this will b the last element in the values array
values[valueIndex] = tempValue;
//reset tempValue and valueIndex values
//to clear out the values array for the next round of readings from Processing
tempValue = 0;
valueIndex = 0;
break;
//if the char c from Processing is character ‘e’
//it is signalling for the Arduino to send Processing the elements saved in the values array
//this case is triggered and processed by the echoSerialData function in the Processing sketch
case ‘e’: // to echo
for (int i = 0; i < NUM_OF_VALUES; i++) {
Serial.print(values[i]);
if (i < NUM_OF_VALUES – 1) {
Serial.print(‘,’);
}
else {
Serial.println();
}
}
break;
}
}
}

Processing Code:

// IMA NYU Shanghai
// Interaction Lab
//exercise 2

/**
* This example is to send multiple values from Processing to Arduino.
* You can find the arduino example file in the same folder which works with this Processing file.
* Please note that the echoSerialData function asks Arduino to send the data saved in the values array
* to check if it is receiving the correct bytes.
**/

import processing.serial.*;

int NUM_OF_VALUES = 2; /** YOU MUST CHANGE THIS ACCORDING TO YOUR PROJECT **/

Serial myPort;
String myString;

// This is the array of values you might want to send to Arduino.
int values[] = new int[NUM_OF_VALUES];

void setup() {
size(500, 500);
background(0);

printArray(Serial.list());
myPort = new Serial(this, Serial.list()[ 4 ], 9600);
// check the list of the ports,
// find the port “/dev/cu.usbmodem—-” or “/dev/tty.usbmodem—-”
// and replace PORT_INDEX above with the index of the port

myPort.clear();
// Throw out the first reading,
// in case we started reading in the middle of a string from the sender.
myString = myPort.readStringUntil( 10 ); // 10 = ‘\n’ Linefeed in ASCII
myString = null;
}

void draw() {
background(0);

// changes the values
for (int i=0; i<values.length; i++) {
values[0] = mouseX;
values[1] = mouseY;
/** Feel free to change this!! **/
}

// sends the values to Arduino.
sendSerialData();

// This causess the communication to become slow and unstable.
// You might want to comment this out when everything is ready.
// The parameter 200 is the frequency of echoing.
// The higher this number, the slower the program will be
// but the higher this number, the more stable it will be.
echoSerialData(200);
}

void sendSerialData() {
String data = “”;
for (int i=0; i<values.length; i++) {
data += values[i];
//if i is less than the index number of the last element in the values array
if (i < values.length-1) {
data += “,”; // add splitter character “,” between each values element
}
//if it is the last element in the values array
else {
data += “n”; // add the end of data character “n”
}
}
//write to Arduino
myPort.write(data);
}

void echoSerialData(int frequency) {
//write character ‘e’ at the given frequency
//to request Arduino to send back the values array
if (frameCount % frequency == 0) myPort.write(‘e’);

String incomingBytes = “”;
while (myPort.available() > 0) {
//add on all the characters received from the Arduino to the incomingBytes string
incomingBytes += char(myPort.read());
}
//print what Arduino sent back to Processing
print( incomingBytes );
}

Interaction:

In this exercise, we make the buzzer sound by moving our mouse. Processing reads the value depending on the position of the mouse and send those values to Arduino. And then Arduino reads those values and make the buzzer sound. 

Preparatory Research and Analysis by Yuru Chen(Lindsay)

What’s interaction?

Interaction, as I defined during my group project, was the communication between human and computer with thinking and reflecting involved. However, with time goes by and I’ve learned more about interaction in the classes, thus my definition of interaction has evolved. Now, I would say that interaction is not only a process which involves thinking and reflecting but more like a dialogue. During the dialogue, we think base on what we see and listen, and then reflect on it. 

Otehr projects:
  1. First, I found a project that align with what I define as interactive.

NORAA (Machinic Doodles)

Basically, this machine can show you the most similar images it imagines based on what you draw on the screen. As far as I’m concerned, this is an interactive project, because it is like people “talking” to the computer, and the computer shows different images to match what we draw, which is like thinking, and then we reflect on what the computer shows. 

Here is the demo:

Reference: https://vimeo.com/297579544

2. Second, I found a project that is not aligned with what I defined as interactive. 

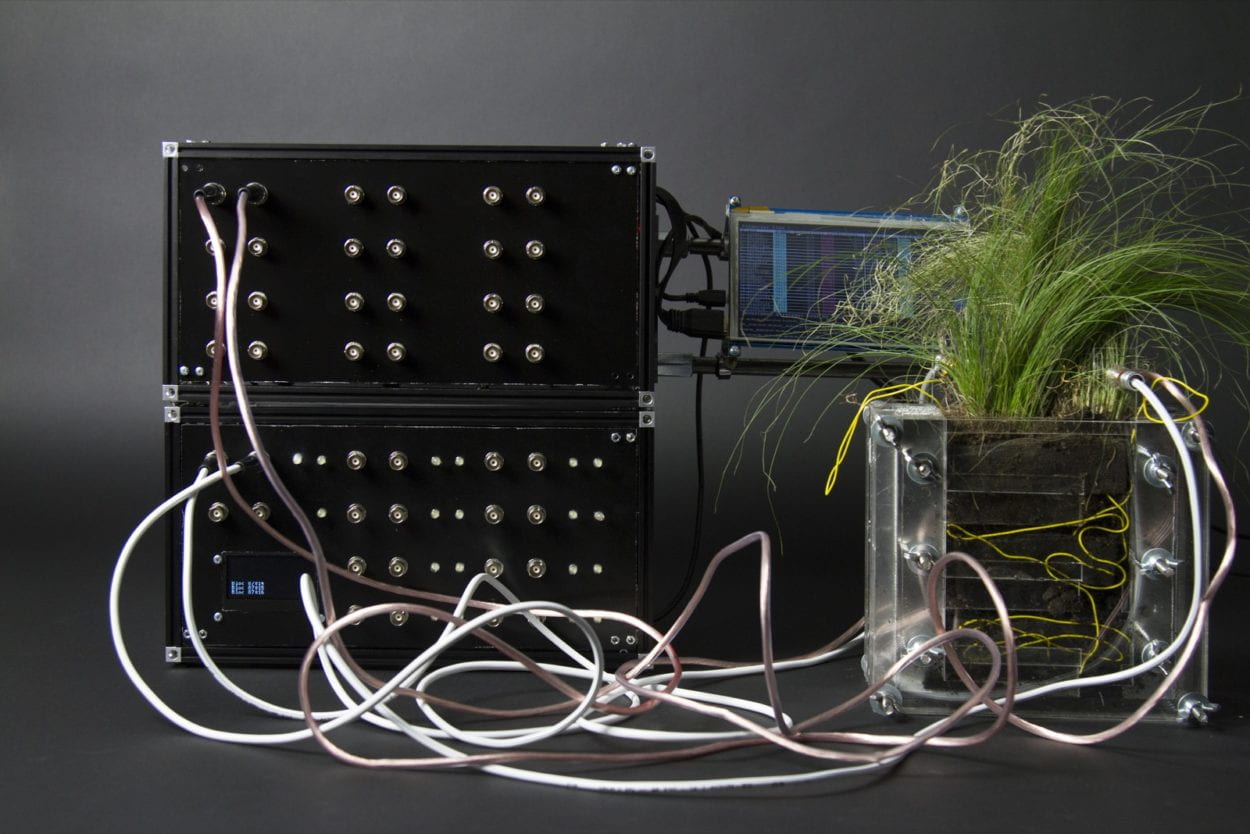
Alt-C – Designing for synergy between our ecosystems and network economics

This Alt-C is an project which uses the electricity plants produces to initiate a small computer. I don’t think this is interactive because there is no “communication” and “dialogue” between people and the computer. The only thing that matters here is that the electricity the plant produces, which will initiate the computer that connects to it. 

Here is the picture of how it works:

alt-c
https://www.creativeapplications.net/vvvv/alt-c-designing-for-synergy-between-our-ecosystems-and-network-economics/
New Definition

So far, we have read several readings about what interaction is. However, the most impressive one to me would be “Making Interactive Art: Set the Stage, Then Shut Up and Listen” by Tom Igoe. In his article, he said that “So if you’re thinking of an interactive artwork, don’t think of it like a finished painting or sculpture.  Think of it more as a performance. Your audience completes the work through what they do when they see what you’ve made”(Igoe). His words gave me huge inspiration and helped me develop my own definition of what interaction is. So now, I would like to say that I have a new definition of interaction–The conversation with the computer using a special language in a user-friendly way. Here, the conversation already involves listening and speaking. What I mean by user-friendly is that the project made must be intuitive enough for the user to know how to use it without any verbal explanation. The new definition include speaking, listening and thinking, which is the most important elements that make a project interactive. 

Work cited:

Igoe, Tom. “Making Interactive Art: Set the Stage, Then Shut Up and Listen.” Tigoe, http://www.tigoe.com/blog/category/physicalcomputing/405/. Accessed 16 April 2019.

“NORAA”, Vimeo, uploaded by jessin. December, 2018. https://vimeo.com/297579544. Accessed 16 April 2019. 

Visnjic, Filip. “Alt-C – Designing for synergy between our ecosystems and network economics”, Creative Applications Network, https://www.creativeapplications.net/vvvv/alt-c-designing-for-synergy-between-our-ecosystems-and-network-economics/. Accessed 16 April, 2019. 

Recitation 7: Processing Animation by Yuru Chen(Lindsay)

My code:

float x;
float y;
float stepsX =5;
float stepsY =3;

void setup(){
size(600, 600);
background(#106A3D);
x = random(0, width);
y = random(0, height);

}

void draw(){
background(#106A3D);
fill(#DBA4B5);
arc(x/2, y/2, 150, 150, PI+HALF_PI, TWO_PI);

fill(#89B797);
arc(x/2, y/2, 150, 150, PI, PI+HALF_PI);
fill(#75AF92);
arc(x/2, y/2, 150, 150, PI/4, PI, OPEN);

if(keyPressed == true){
fill(#05311B);
ellipse(x, y, 20, 20);
}
else{
fill(#05311B);
ellipse(x, y, 20, 20);
x = x + stepsX;
y = y + stepsY;
if (x > width || x < 0){
stepsX = – stepsX;
}
if (y > height || y < 0){
stepsY = – stepsY;
}
}

fill(#03240D);
triangle(x/2-75, y/2, x/2-125, y/2, x/2-125, y/2-50);
rect(x/2-175, y/2-50, 50, 50);
noStroke();

fill(#BAC190);
triangle(x/2-75, y/2, x/2-105, y/2, x/2-105, y/2+50);
rect(x/2-125, y/2, 20, 20);
rect(x/2-145, y/2, 20, 50);
triangle(x/2-145, y/2, x/2-175, y/2, x/2-175, y/2+50);

fill(#EA772F);
triangle(x/2-175, y/2, x/2-200, y/2-25, x/2-200, y/2+25);
}

Demo:

During this recitation I have learned that I can move the big image which is composed by several small images all together at the same time by changing their variables to the same one.

The most interesting function that I used is the “if” function. This allows the computer to make a specific different decisions under different circumstances, and act exactly as what I wanted it to do. Also, I think “random” is very interesting as well, because every time it gives me new image and you never now what will come out next time. 

Homework:

Code:

int radius=100;
int length=150;
int x = 300;
int y = 300;
float c;//c is for color

boolean ellipseIsShrinking = false;
boolean circleIsShrinking = true;

void setup() {
size(600, 600);
ellipseMode(CENTER);
colorMode(HSB);
frameRate(250);

}

void draw() {
background(255);
noStroke();
if (c >= 255) c = 0;
else c++;
fill(c, 255, 255);
ellipse(x, y, length, length);

if (ellipseIsShrinking) length–;
else length++;

if (length == 150 || length == 300) ellipseIsShrinking = !ellipseIsShrinking;

fill(255);
ellipse(x, y, radius, radius);

if (circleIsShrinking) radius++;
else radius–;

if (radius == 100 || radius == 250) circleIsShrinking = !circleIsShrinking;
}

void keyPressed(){
if (key == CODED){
if (keyCode == UP){
y = y – 50;
}else if (keyCode == DOWN){
y = y + 50;
}else if (keyCode == LEFT){
x = x – 50;
}else if (keyCode == RIGHT){
x = x + 50;

}else {
x = 300;
y = 300;
}
if(x >= 600) x = 600;
if(x <= 0) x = 0;
if(y >= 600) y = 600;
if(y <= 0) y = 0;
}

}

Demo:

Recitation 6: Processing Basics by Yuru Chen(Lindsay)

Yuru Chen(Lindsay)

Interaction Lab

Professor Marcela Godoy

2 April 2019

Recitation 6: Processing Basics

Lindsay
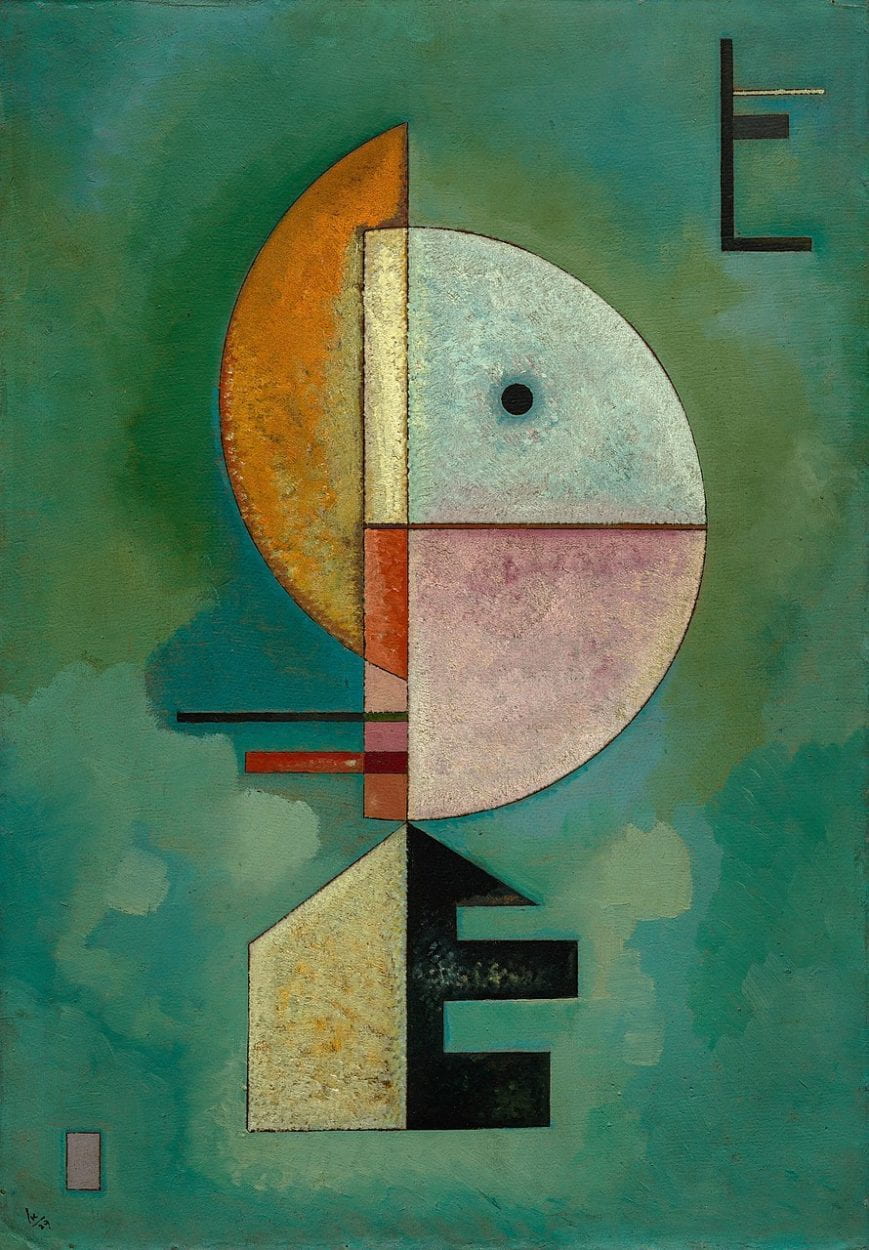
Upward by Vasily Kandinsky

This is the motif I chose to be the inspiration of my own work. It is “Upward” by Vasily Kandinsky. I chose this image because I was fully attracted by the colors used to create this. The artist uses light green as the background color and combines black, orange, pink, dark green so well that the whole image looks so harmonious. In addition, another point that caught my attention was the shapes. There are several kinds of shapes in the image–triangles, rectangles, and circles. What’s interesting is that the artist does not use complete shapes, instead, he combines parts of the circles to create a complete new one. The whole image is mainly shaped upward.

I wanted to draw something similar to the motif I chose because I really like the concept of combining different things to make a new one. However, I decided to make a change of the original one, which is that I would shape my image rightward. I planned to achieve my goal by drawing some of the basic shapes that I knew–circles, rectangles triangles first, and then connect them together to create something complete new.

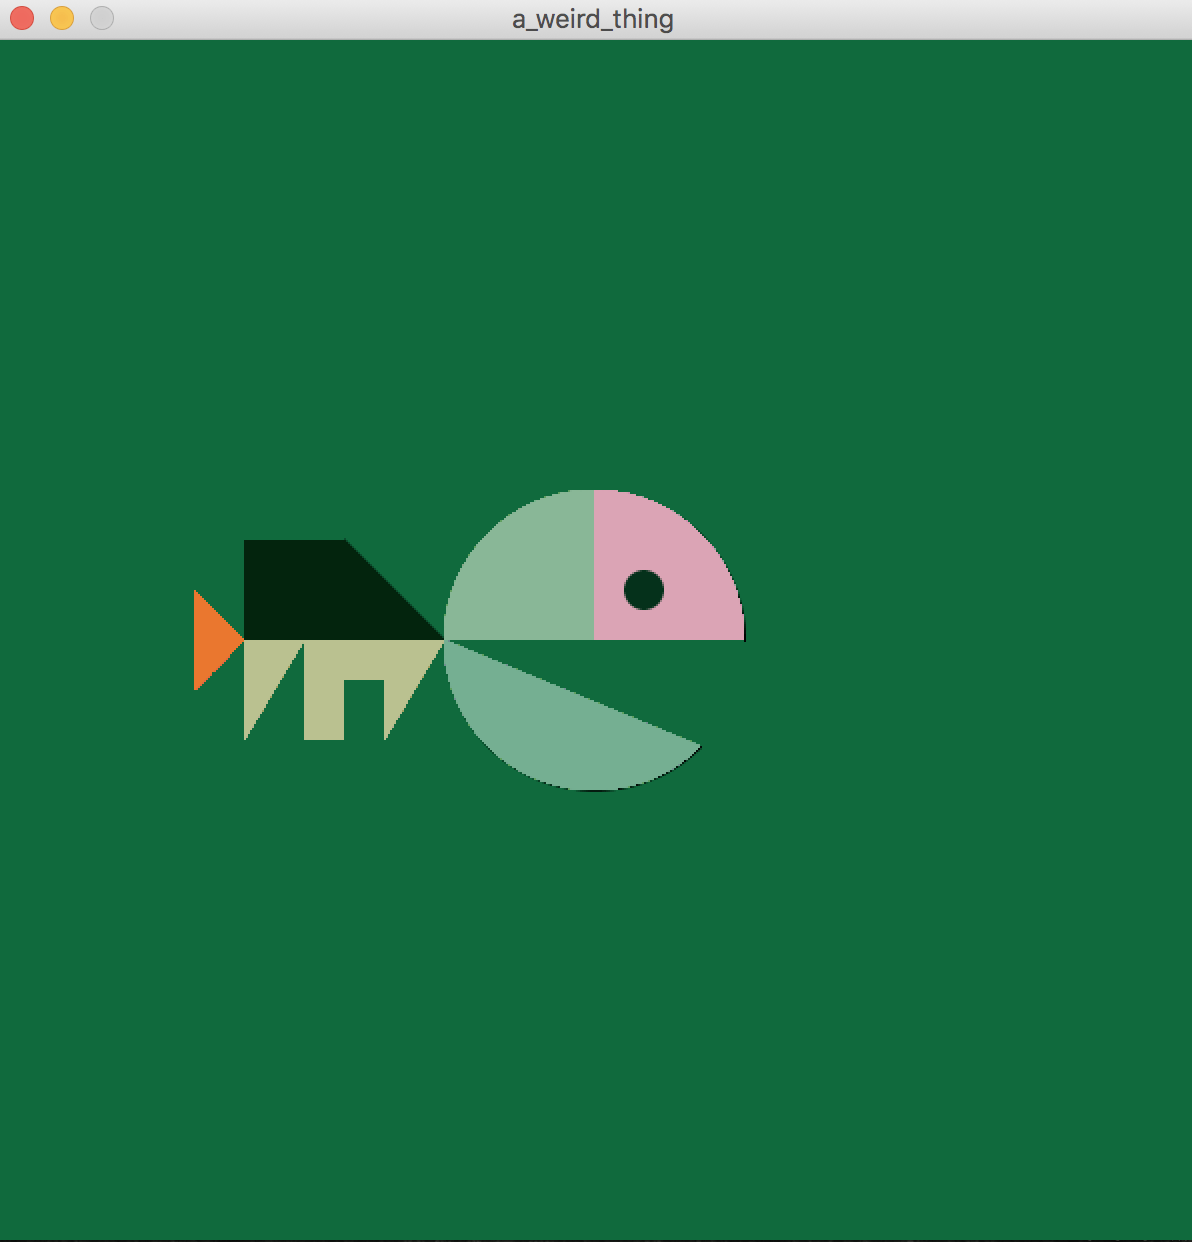
Here is my final work:

Lindsay

My final work is linked to my motif in the ways that they both has the greenish background, similar colors for all the shapes because they look harmonious on the original one and I like it very much. However, they are different in the ways that my work is rightward and my motif is upward. Also, for the motif, you cannot really tell what the shape is, but for my final work, people can tell that it looks like a fish, however, it is not exactly a fish, which is why I name it “A weird thing”. I think drawing in Processing is a good means to realize my design, because it is convenient, easy to learn and straightforward. I can use several lines of codes to present an image, which is to say, turn imagination into reality. 

Here is my code:

void setup(){
size(600, 600);
background(#106A3D);
}

void draw(){
fill(#DBA4B5);
arc(width/2, height/2, 150, 150, PI+HALF_PI, TWO_PI);
fill(#89B797);
arc(width/2, height/2, 150, 150, PI, PI+HALF_PI);
float rad = PI/4;
float deg = degrees(90);
println(rad + “90” + deg + “90”);
fill(#75AF92);
arc(width/2, height/2, 150, 150, PI/4, PI, OPEN);

fill(#05311B);
ellipse(width/2+25, height/2-25, 20, 20);

fill(#03240D);
triangle(width/2-75, height/2, width/2-125, height/2, width/2-125, height/2-50);
rect(width/2-175, height/2-50, 50, 50);
noStroke();

fill(#BAC190);
triangle(width/2-75, height/2, width/2-105, height/2, width/2-105, height/2+50);
rect(width/2-125, height/2, 20, 20);
rect(width/2-145, height/2, 20, 50);
triangle(width/2-145, height/2, width/2-175, height/2, width/2-175, height/2+50);

fill(#EA772F);
triangle(width/2-175, height/2, width/2-200, height/2-25, width/2-200, height/2+25);
}