HelloBot–Tao Wen–Rudi

Before we arrived at our final project idea, we went through a long way. Our initial idea came from my group project “The smart floor”, in which a floor creates either pleasing visual effect to protect children from crawling around, or scary settings to prevent thieves from breaking into a house. Following the logic of “negative feedback”, I came up with the idea of an interactive piggy bank. The animal-like bank would do spins, sing a song or do other funny things to reward the act of dropping in coins. However, learning that some upperclass students have already created something like that, a battery-eating robot, we decided to move on. We then evolved the idea to a scaring box, then a helmet. Here, my partner and I had trouble reaching an agreement, for we had completely different idea about the purpose of a design, in general. For the sheer joy of it, we built a cat-like helmet, whose eyes would light up and a bamboo dragonfly would rotate once someone puts it on. I could not help laughing when we first tested it,  and I insisted on keeping the fundamental logic of the design. Contrarily, my partner considered it too silly, useless and pointless, coming up the idea of a helmet for the blind, which warns them before bumping into an obstacle. However, after consulting with our instructor, we could not explain how our design would outperform a walking stick. What is more, we learned that a design does not necessarily have to be “functional”. We saw a rabbit-like hat, whose ears would move when someone presses the small hand hanging down. From a pragmatism perspective, the hat is of no utility at all, but the sales volumn of it can actually be a five-digit number. It certainly has some value—-it brings fun. Therefore, making clear the goal of our design, we moved straight ahead towards a funny, pleasing, and somewhat decorative helmet.
 
 
Although there exist numerous cases of interactive helmet that interacts with people, our design is still unique in some sense. By research, we have found that most helmets lie in the two ends of technology—-either it is the rabbit-like hat that invovles hardly any technology, or it is a neuroelectric helmet, which produces outcome when it senses your brain activity. As is said in an introduction article, it is being researched as a possible way to help with pain, depression, addiction and post-stroke rehabilitation. In other words, it is not for entertainment. Therefore, our helmet would be engaged with technology to a certain extent, and it interacts with people in and outside the helmet. It could be just a toy, or part of a costume for festivals like Holloween.
        
 
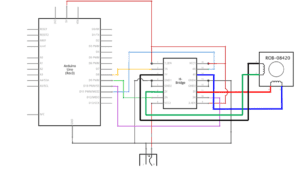
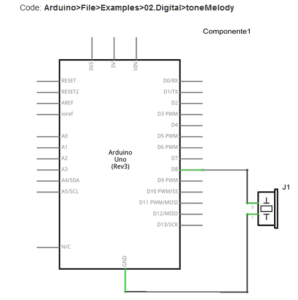
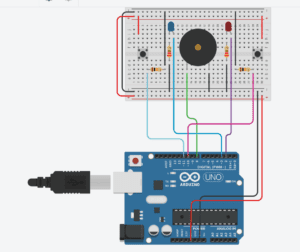
Once we have reached consensus on our goal,  it became clear what materials and methods to choose. Our input would be “digital”. Whether to trigger reactions to the helmet-wearer or the watcher, we need only to know if the person is there or not. In other words, it was a “yes or no” question. Based on this, we chose distance sensors, including an IR sensor for the inside part and an ultrasonic sensor for the outside, for the outside part faces more complexity and requires more accuracy. For devices producing output, we chose three parts—-eyes that would light up, the bamboo dragonfly and a hand that can wave. The criteria here includes relevance to the animal, to what extent it is funny or cute, and whether it can reach the effect with our given electronic devices.
 
It was not until we actually began to create the project that we realized what was the hardest part. Questions rose one after another—-How should we organize the wires? Where should we place our devices to compromise both the outlook and portability?However, we learned the biggest problem of our design until user test. During user test, everyone read the nametag, waved at the machine and were intrigued by the immediate feedback. But no one realized it was wearable! When I explained that it was actually a helmet, people’s reaction was like “it had better be just a greeting machine”. For, no one would associate it with a helmet, or even if they do, they have no interest in wearing it. Neither the size nor the outlook of our box indicated that it was a helmet. Besides, if the design were to please people, then its outlook had to be pleasing, too. Therefore, we decided that our next move would be to work on the outlook. The trouble was mitigated by laser-cutting a head-sized cardboard. Also, we added more features to it such as ears, nose (ultrasonic ranger) and cheek. It worked to some extent. Everyone who has seen our project before commented, “Now it looks so much nicer!”.
 

Before closing the reflection, I would like to illustrate more on the goal of our project and room for improvement. Our project is to bring fun to people—-and in some sense, it does. During presentation, someone in other groups answered to the question “why does this project matter”, saying that it could be part of constume that interacts with people during festivals such as the upcoming Holloween. However, it seems to me that we still need to improve on the user experience. If given more time, we will definitely make the helmet more inviting for people to put on. For example, the shape could be round, and we can add handles to it to let users grab it more easily. Also, the helmet is too heavy and fragile, for there are wires, batteries, breadboard and many other things that are not firmly glued to the box, and it could be uncomfortable for the wearer. Therefore, what I take away from the whole experience is to stand in the shoes of users. Every detail in our design has to deliver precisely our idea, and we just cannot assume our user to knoow everything. Even so, I still belive in the fundamental idea of our project—-by being interactive, it brings so much joy to people.

Reference

Recitation 4:Drawing Machines——Tao Wen

Step 1: Build the circuit

Materials:

1 * 42STH33-0404AC stepper motor
1 * L293D ic chip
1 * power jack
1 * 12 VDC power supply
1 * Arduino kit and its contents

The most important part here (also in most recitation projects), is to be as careful as possible.

For a chart as complex as this one, it is better that we read through the lines and have an overall idea of what to do next. Another crucial part is to color-code the lines. In fact, I realized that at the beginning, but I was confident with my carefulness so I chose the cables arbitrarily, which not only confused the instructors, but also caused great trouble to my double-check.

One other thing to remember is to plug in the feet of the electric components! This happened twice, that I was not “brave” enough to push in the feet and therefore the circuit did not work.

Finally, after the two problems were solved, my motor worked.

Step 2: Control rotation with a potentiometer

Materials: Same as step 1

This was the second time that I didn’t push in the feet of the components hard. I have to remember this! For mistakes like this rather than some fundamental mistake can be really upsetting.

Step 3: Build a Drawing Machine!

Materials:

2 * Laser-cut short arms
2 * Laser-cut long arms
1* Laser-cut motor holder
2 * 3D printed motor coupling
5 * Paper Fasteners
1 * Pen that fits the laser-cut mechanisms
Paper

Everything went smoothly, but I was upset that we couldn’t draw a painting that makes sense.

Also, there was something wrong with my partner’s circuit, for her motor was moving automatically, but we didn’t have time to figure that out.

Question 1:What kind of machines would you be interested in building? Add a reflection about the use of actuators, the digital manipulation of art, and the creative process to your blog post.

I want to build a “smell recorder”. I go to and back from school by bikes, and everytime I ride pass the osmanthus trees, I feel soothing and upset at the same time for I can’t keep the smell. The machine can contain a certain amount of chemical elements such as arene. When you record a smell, the proportion of each type of chemical  molecule is tested, and the next time you want to smell that fragrence again, the molecules would be released calculatively. The actuators would be chemicals. The sense of art here, I think, is the idea to keep asthetic things in life.

Question 2:

The choice of actuator partly depends on whether the input would be analog or digital. For example, in Daniel Rozin’s Wooden Mirror, the actuators are little wood blocks. The choice of this depends largely on the fact that the input is an “yes” or “no” question. For an image is broken down into millions of units, each of which is black or white (or 1 or 0). Therefore, wooden block is an ideal actuator.

With regard to our drawing machine, for it is continuing lines that we want for output, we need devices that can answer more than “yes or no” questions. Therefore, the motors are used.

Individual reflection—-Tao Wen

Understanding “interaction” 

  According to the readings, interaction includes three parts: input, process and output. In soe interactive designs, the changing value of variables has to be reflected in the output in one way or another. One project that aligns with this definition is Netflix’s new interactive episode of Blackmirror. It allows the viewer to decide how the story would develop at several points, and therefore what you are offered with is one of the many versions of the story. This is not a typical kind of interactive design, for the logic of processing is very simple without any code involved, but I do consider it an interactive design. In this new form of TV show, the decision-making is an input, then the computer processes the “click”, and it offers plots that change correspondingly with the viewer’s choice. What is worth noting that the whole story would not be complete without the participation of the viewer, which triggers my understanding of interaction. As is written in the news report, “It could be a wacky comedy. It could be a romance, where the audience gets to choose: Should she go out with him, or him?”

  As for a counterexample, it is easier to find since basically most of the art designs we can see is not interactive. This artist, Brandi Twilley, painted her miserable childhood. One might argue that the viewer is “communicating” with the artwork mentally, but the truth is the painting would not be any different with or without the viewer. There is no input, no processing and no output at all, which makes it a great piece of art but not interactive art.

About our group project

    The idea of our group, Smart Floors, is inspired by an interactive design showed on our class, the piano step. When one steps on the keys, the steps would actually produce piano sound, which makes people prefer to walk on the steps rather than use the elevator right next to it. The principle behind this, is that the output (music) is rewarding enough to tempt people into putting in input over and over again. How about the reverse version of this principle? Therefore, we came up with the Smart Floors idea—-the feedback can be so repulsive that no one wants to step onto it again. It could be used in house safety, or it could be used to protect babies or animals from entering into a more dangerous place.

    Smart Floors aligns with the definition of interaction because it contains the complete procedure of input, processing and output. Also, its output changes correspondingly with the input. When a baby or a pet steps onto the ground, the “pleasure” setting is triggered, which keeps the subject inside and keeps entertaining it. If a thief enters, then he would be momentarily traumatized by the “scary” setting, which prevents him from ever intruding again. In other words, the input is the action of a subject and variables including height, weight, etc. Then, Smart Floors processes the data and chooses to please or to scare the subject. Finally, it produces output that affects on the subject psychologically and physically.


References

https://www.vice.com/en_us/article/7xnq3a/netflix-more-interactive-movies-like-bandersnatch-rom-coms-todd-yellin-interview-vgtrn

https://www.vice.com/en_us/article/kzzg4e/artist-paints-the-fire-that-destroyed-her-childhood-home

Piano Staircase:

https://www.youtube.com/watch?v=SByymar3bds

Recitation 3: Build sensors by Tao Wen

Infrared Distance Sensor

Following the instructions, we did quickly and well.

The sound was very low but detectable. There’s a little buzzing sound. I want to figure out how to copy the melody program here to make it a more decent circuit.

reference:https://wiki.dfrobot.com/SHARP_GP2Y0A41SK0F_IR_ranger_sensor__4-30cm__SKU_SEN0143

Joystick Module

Later, we built another circuit with joystick module. The first problem we ran into was to figure out how to plug the various wires into the right pin, since there’s a difference between the reference chart and the real thing.

We moved step by step. Firstly, we got one LED in the circuit, and programed it to light up as long as the button moves towards the left side. However, we failed at first to read the [X,Y] data, since we used the wrong Baud Rate section (15600 instead of 9600, corresponding with the sample code]. After this, we got it.

Then, we added one more LED, and later a third one. The final version worked like this: three LEDs refer to three directions, left, right and up. It wasn’t a nicely calculated program, so two lights would turn on at the same time when we move the button towards the area in between the two directions.

reference: https://www.brainy-bits.com/arduino-joystick-tutorial/

[There’s an error with uploading the videos and photos, I will try that tomorrow and republish it. Please don’t grade me for missing the deadline.]

Question 1:

We intended to build a distance sensor. It can be used in the subway station. When a person gets too close to the edge of the platform, the buzzer would go on. It can effectively warn people around him (if he’s attempting suicide) or the person himself (if he was just careless), and thus protecting him.

Question 2:

Code is read line by line in sequence, just like recipe or tutorial. The result would go differently if you miss one step or one element (ingredient).

Question 3:

Computers itself has become a part of human body language. For instance, on a meeting or lecture, when one is using the laptop, he is distanting himself from the speaker or others psychologically, which can affect the way other people treat him.

Recitation 2: Arduino Circuits by Tao Wen

Building the circuit:

Materials:

From Arduino Kit:

1 * Arduino Uno
1 * USB A to B cable
1 * breadboard
1 * buzzer
2 * LEDs
2 * 220 ohm resistors
2 * 10K ohm resistors
2 * pushbuttons
A handful of jumper cables

From cart:

2 * arcade buttons
1 * Multimeter (optional)

Circuit 1: Fade

The first two circuits are really easy, everything went well.


Circuit 2: toneMelody

I didn’t have time to do this in class, but I will definitely find time to study how the code of this program, e.g how to express tone using code, and then try different melodies myself.

Circuit 3: Speed Game

At first, the cirucuit didn’t go as the instructions required, for even if I pressed button 2 more times, the light conncted with button 1 lit up. It was because I forgot to connect one cable with the light.

If the circuit is rather complicated, what’s the way of building it orderly without missing any connection? Maybe I can try dissecting the whole circuit into different units.

Question 1:

According to Physical Comuting, interaction includes “input, output and processing”. In other words, people have to do something with the interaction device, otherwise nothing would happen. Also, the device has to do something in response (output). It cannot just be fed with information. 

The third circuit we built corresponds with the definition. Two players’ pressing the button is a form of input, feeding the program with the number of times. 10 seconds later, after comparing which side pressed more times, the program gives output, in the form of lighting up one of the lights and making noise from a buzzer.

Question 2:

If we simply look at the button in the circuit, we would find that it is connected with itself without a resistor, in which case a short circuit is created and the button would be burnt. The resistor is there for protection.

Question 3:

I would build an invisible cloak with LEDs clinging to it. The color of each LED changes spontaneously with the changing of environment, and therefore the color of the person hidden in it would not be seen.