Recitation 4: Drawing Machines by Theresa Lin

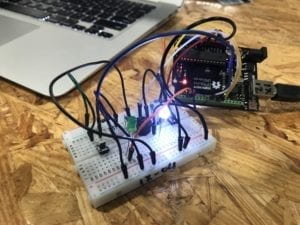
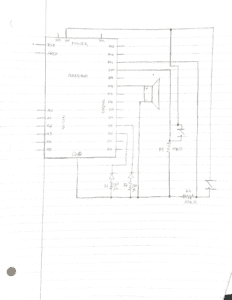
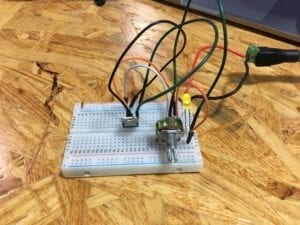
Step 1: Building the Circuit and Step 2: Control Rotation with the Potentiometer

Materials:
1 * 42STH33-0404AC stepper motor
1 * SN754410NE ic chip
1 * power jack
1 * 12 VDC power supply
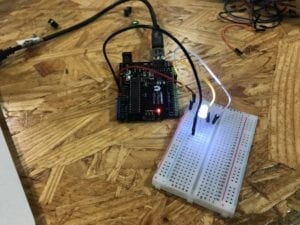
1 * Arduino kit and its contents

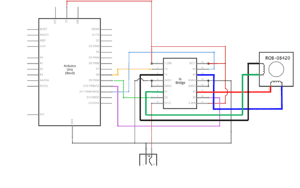
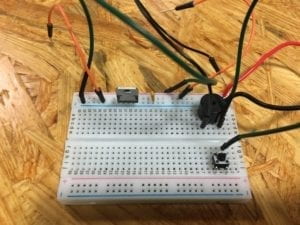
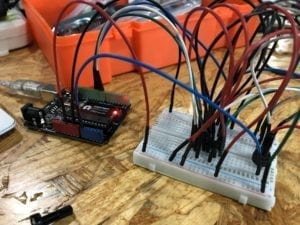
When I first built the circuit, I didn’t notice that I forgot to connect the jump cable from 3A on the H-bridge to the Arduino. When I tried to run the code, I thought the motor made one revolution so I moved on to step 2.


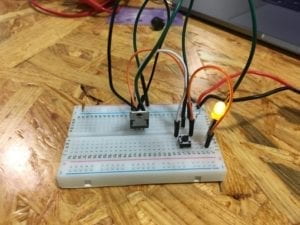
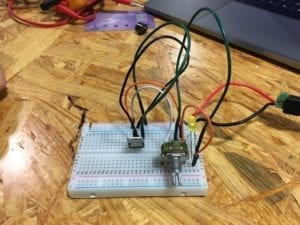
When I tried to run the code in step 2 was when I noticed that the motor wasn’t working like it should. It was vibrating the moment I plugged the outlet in. I checked the potentiometer for any mistakes but it was plugged in properly. Then with the help of some fellows, we ran the SerialReader to check and see what was not working properly. We made sure all the wires were plugged in and not loose, then we finally noticed that the one jump cable wasn’t plugged in. When that was plugged in the motor could finally be rotated with the potentiometer and it stopped vibrating.


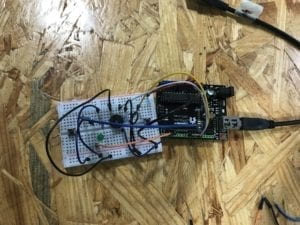
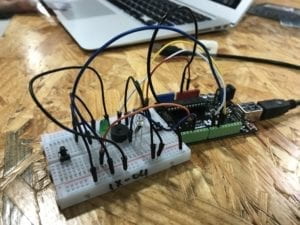
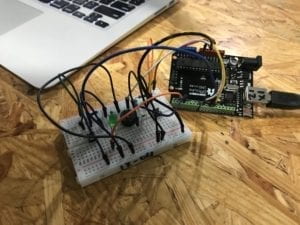
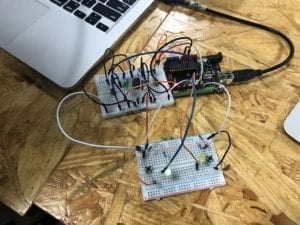
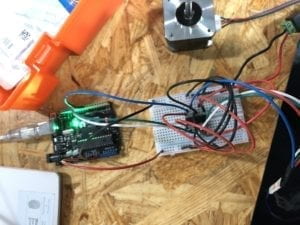
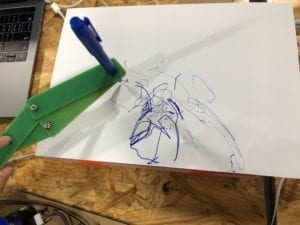
Step 3: Build the Drawing Machine

Materials:
2 * Laser-cut short arms
2 * Laser-cut long arms
1* Laser-cut motor holder
2 * 3D printed motor coupling
5 * Paper Fasteners
1 * Pen that fits the laser-cut mechanisms
Paper

Building the draw machine went smoothly. My partner and I did notice the two motors should be rotated in the same direction for more control over the pen, but it’s quite difficult to control.

Question 1:

I would be interested in building a portable machine that can hold my cup and heat up my drinks such as coffee and also be able to make drinks cold. Some would argue I could use a insulated cup but I want something portable that can make my drink hotter or colder, rather than just keep the drink at the same temperature. Actuators is a device that takes electricity and converts it to a form of motion.

Digital manipulation is growing more and more popular especially through the programs that allow people to create artworks that were previously a tedious process or even close to impossible. To name a few, some of these digital manipulation tools include Photoshop, Rhino, and Illustrator. I think the use of digital manipulation creates more opportunities and methods for people to express art. People’s creativity process can be extended with the possibility and ability of digital tools of manipulation.

Question 2:

I found Aoki Takafumi’s 2005 Kobito: Virtual Brownies particularly interesting. It’s a bit similar to virtual reality. Small creatures on the digital screen can be affected by real life physical objects. For example if a user manipulates a physical block and pushes it around, on the digital screen the small creatures would be knocked around by the block in the digital screen. If the creatures in the screen pushes the block, the physical block would also move. Aoki Takafumi used magnetic under-table actuators to manipulate the physical objects. Compared to Kobito, the drawing machine we built during recitation uses actuators to control the movement of the pen. His project also reminds me of video games that incorporate the physical world as backgrounds in the games.

Group Research Project by Theresa Lin

Definition of Interaction:

The first thing that comes to my mind when speaking of interactivity is interaction between two or more people. However in this world where technology is involved in every aspect of human life, we forced to also examine the interaction aspect of the relationship between humans and computers. After reading Igoe and O’sullivan’s “Introduction to Physical Computing” and Crawford’s “The Art of Interactive Design,” I would define interactivity as a process of input, processing, and output or listening, thinking, and speaking between either human and human or human and computer. Personally, I consider feedback as the most important aspect in and interaction. Without any feedback, the interaction cycle is not complete nor can it even be considered interactivity.

Projects that don’t align:

The Hanging Garden uses moisture sensors and Arduino to create an array of LED lights that light up when the plant needs moisture. I feel like this project doesn’t align with my definition because the user has to wait for output from the garden. It’s not an interaction, rather, the garden just lights up whenever the plants needs water.

https://www.creativeapplications.net/android/the-hanging-garden-arduino/

Projects that do align:

Alias, a smart home assistant, can receive feedback and can react to users. However, unlike other smart home assistant tech such as Amazon’s Alexa, Alias allows the users more customization. Alias can be programmed to send any speech commands that the user desires.

https://www.creativeapplications.net/objects/alias-a-teachable-parasite-for-your-smart-assistant/

Group Project:

Our project, the Dream Catcher, is a notebook that can record the users’ dreams. It allows the user to read and see the dreams they had because people tend to forget the moment they wake up.  Additionally, the user can choose to expand a specific dream into a narrative. The option to create a narrative is the feedback that completes this cycle of interactivity.

Recitation 2: Arduino Basics by Theresa Lin

Circuit 1: Fade

Materials:  1 * Arduino Uno, 1 * USB A to B cable, 1 * breadboard, 1 * LED, 1 * 220 ohm resistor, wires

When we first built the circuit, we had the LED light connected to the power so when we uploaded the Arduino code for ‘fade’ it didn’t work. The LED light was constantly lit instead of fading. Then we unplugged the wire going from the LED to the voltage and it started to fade.

Circuit 2: toneMelody

Materials: 1 * Arduino Uno, 1 * Speaker/Buzzer, wires

This circuit was relatively easy to build since we only had to connect the speaker to the the Arduino. The melody played as intended when we ran the code.

Circuit 3: Speed Game

Materials: 1 * Arduino Uno, 1 * USB A to B cable, 1 * breadboard, 1 * buzzer, 2 * LEDs, 2 * 220 ohm resistors, 2 * 10K ohm resistors, 2 * pushbuttons, wires

Building this circuit was very confusing because of the amount of wires and connection the components had. It was definitely a more complex circuit than the ones from previous exercises. The way the resistor and switch connected with the voltage and ground was especially confusing when we were looking at the schematic. The first time we uploaded the Arduino code, the buttons wouldn’t work because we didn’t connect the switches to the power.


Schematic:

Circuit 4: Four-Player Speed Game

For this circuit, we teamed up with another group. In the Arduino code, we added player3 and player4 and added two more conditions to make four total for it to work with four buttons.

Questions:

  1. Reflect how you use technology in your daily life and on the circuits you just built. Use the text Physical Computing and your own observations to define interaction.

Usually when speaking of technology, I think of smartphones and computers. However, after reading Physical Computing, it has me thinking that things such as vending machines and elevators are also considered as technology. I think interaction with technology can been seen in two ways, one with just the technology itself and the other, interacting with another person through technology. The circuits we built today, especially the speed game, was interactive both with the technology through the process of building it and with another person by playing the game.

  1. If you have 100,000 LEDs of any brightness and color at your disposal, what would you make and where would you put it?

If I had 1000,000 LEDs of any brightness and color I would put them all on the ceiling in my room. I would use black and white LEDs and then adjust the brightness of some and then arrange it in a way that looks like stars in the night sky.

Week 2: Mapping- Theresa Lin

For this assignment, I chose to create a data visualization of the amount of chocolate I ate last week. Instead of drawing it out, I collected the wrappers of the chocolate I ate and put them together. Since the chocolate I had were all from the same bag and had the same wrapper design, I cut them into pieces and put them together to make one wrapper. I cut each wrapper into seven, horizontal strips to represent the seven days I observed starting from Monday to Sunday. Each strip would them be split into however many sections that represented the number of chocolate I ate and the sections would be from those wrappers. Then I taped all the sections together to put them together as one wrapper. Representing the data this way, I can see what kind of chocolate I ate the most in that week at a glance.

Week 1: Recitation Documentation – Theresa Lin (Marcela)

Recitation Date: 2/15/19

Instructor: Marcela Godoy


Circuit 1: Door Bell

Materials:

1 * Breadboard,  1 * Buzzer,  1 * LM7805 Voltage Regulator,  1 * Push-Button Switch,  1 * 100 nF (0.1uF) Capacitor,  1 * 12 volt power supply,  1 * Multimeter,  Several Jumper Cables (Hook-up Wires),  1 * Barrel Jack

At first, we had no idea how to use the breadboard. So instead of using it, we tried to connect each component directly with the wires and quickly realized that was a mistake. With the help of some fellows, we were given a quick rundown on how to use the breadboard.

When the circuit was first completed, it did not work because the voltage regulator was not properly connected to the speaker and capacitor. We only connected one wire from the regulator to the voltage, and tried to connect the regulator with the speaker and capacitor without wires.

After finally fully grasping how to use wires and the breadboard, the circuit was properly completed. Although the speaker did go off, the switch did not work. When we pressed the switch, it couldn’t turn the speaker on and off like it should. So after some close inspection and help from the fellows, we noticed that the switch was not put in correctly. After that was solved, the switch finally worked.

Circuit 2: Lamp

Materials:

1 * Arcade Button,  1 * 220 ohm1 * Breadboard,  1 * LM7805 Voltage Regulator,  1 * Push-Button Switch,  1 * 100 nF (0.1uF) Capacitor,  1 * 12 volt power supply,  1 * Multimeter,  Several Jumper Cables (Hook-up Wires),  1 * Barrel Jack

This time, building the circuit went smoothly. Before constructing the circuit though, we tested to see which resistor had 220 Ohms with the multimeter. After we built the circuit, we tested it but the LED didn’t light up so we double checked all the wires and position of the components. It turned out that the LED light was not put in correctly. The positive and negative was put in the other way around. After we fixed that, the LED lighted up and the switch also worked. For this circuit, we tried replacing the switch with the arcade button we soldered and that also went smoothly.

Circuit 3: Dimmable Lamp

Materials:

1 * Arcade Button,  1 * 220 ohm1 * Breadboard,  1 * LM7805 Voltage Regulator,  1 * Push-Button Switch,  1 * 100 nF (0.1uF) Capacitor,  1 * 12 volt power supply,  1 * Multimeter, Several Jumper Cables (Hook-up Wires),  1 * Barrel Jack, 1 * 10K ohm Variable Resistor (Potentiometer)

By now, we had no problem putting together the circuit. We tested how the dimness of the LED light would change if we plugged the wire into the different parts of the variable resistor. We found out that the dimness level actually changes.


Reading Response:

The circuits that we built during recitation included interactivity because the LED light gave feedback when we pressed the button. However, as mentioned in “The Art of Interactive Design” feedback from machines like a light lighting up in a fridge or from the LED light in our case, is an example of a low level of interactivity. The circuit with the highest interactivity would probably be the last circuit where we were able to change the level of dimness by plugging the wire into different parts that were connected to the variable resistor.

Interaction design and physical computing can act as tools to create interactive art. The product that Zack Lieberman created the EyeWriter which enables Tony, a graffiti writer, who is paralyzed to be able to write graffiti with just his eye. The Eyewriter allows Tony to once again be able to interact with his environment by writing graffiti. This just shows that physical computing can create tools that allow humans to interact with their surrounding.