Recitation 8: Serial Communication by Tiana Lui

Etch a Sketch

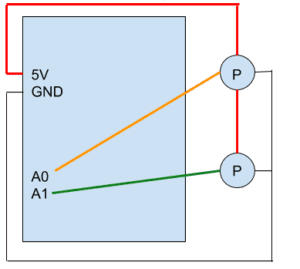
For the first exercise, etch a sketch, I used Arduino to send two analog values to Processing via serial communication. During my makeup recitation I first went over the code example line by line with the help of Nick. After going through the code and understanding what each line/ variable/ function was used for, I went into the Arduino code and removed one sensor variable, because I only needed 2 sensors for the 2 potentiometers. Next I used the map function to map both sensor values to a range of 1-255, to keep my drawings within the size of the processing canvas. I also removed the Serial.print(“,”) and Serial.print(sensor3). I removed the comma, Serial.print(“,”), because processing reads in all the sensor values and commas into one string, stops reading once it reaches the linefeed character, then it splices the String by comma, turns each sensor value into an int, and stores the int values into an array. If there is an extra comma, splicing the string via commas will generate an extra empty value and store that empty value into the array.

In processing, I changed the NUM_OF_VALUES to 2, to make the array only store 2 values, because we were only receiving two sensor values from the 2 potentiometers. Under draw, I added a fill line and an ellipse line, with the x and y position set to sensorValues[0], and sensorValues[1], respectively to allow the potentiometer values control where the ellipse was drawn on the canvas. I then tested my code to check which port I was using for the arduino and set up the port in the setupSerial function.

The interaction involved in both circuits (etch a sketch and buzzer) was a classic example of input, processing, and output. In this circuit the user was manipulating and sending values from the potentiometer to the arduino, processing interpreting this information, and outputting a series of ellipses with positioning based on the potentiometer values received.

circuit schematic etch a sketch

Arduino Code

// IMA NYU Shanghai

// Interaction Lab

// For sending multiple values from Arduino to Processing

void setup() {

 Serial.begin(9600);

}

void loop() {

 int sensor1 = analogRead(A0);

 int sensor2 = analogRead(A1);

 sensor1=map(sensor1,1,1023,1,255);

 sensor2=map(sensor2,1,1023,1,255);

 //int sensor3 = analogRead(A2);

 // keep this format

 Serial.print(sensor1);

 Serial.print(“,”);  // put comma between sensor values

 Serial.print(sensor2);

 //Serial.print(“,”);

 //Serial.print(sensor3);

 Serial.println(); // add linefeed after sending the last sensor value

 // too fast communication might cause some latency in Processing

 // this delay resolves the issue.

 delay(100);

}

Processing Code

// IMA NYU Shanghai

// Interaction Lab

// For receiving multiple values from Arduino to Processing

/*

* Based on the readStringUntil() example by Tom Igoe

* https://processing.org/reference/libraries/serial/Serial_readStringUntil_.html

*/

import processing.serial.*;

String myString = null;

Serial myPort;

int NUM_OF_VALUES = 2;   /** YOU MUST CHANGE THIS ACCORDING TO YOUR PROJECT **/

int[] sensorValues;      /** this array stores values from Arduino **/

void setup() {

 size(500, 500);

 background(0);

 setupSerial();

}

void draw() {

 updateSerial();

 printArray(sensorValues);

 fill(255);

 ellipse(sensorValues[0],sensorValues[1],5,5);

 // use the values like this!

 // sensorValues[0]

 // add your code

 //

}

void setupSerial() {

 printArray(Serial.list());

 myPort = new Serial(this, Serial.list()[ 3 ], 9600);

 // WARNING!

 // You will definitely get an error here.

 // Change the PORT_INDEX to 0 and try running it again.

 // And then, check the list of the ports,

 // find the port “/dev/cu.usbmodem—-” or “/dev/tty.usbmodem—-”

 // and replace PORT_INDEX above with the index number of the port.

 myPort.clear();

 // Throw out the first reading,

 // in case we started reading in the middle of a string from the sender.

 myString = myPort.readStringUntil( 10 );  // 10 = ‘\n’ Linefeed in ASCII

 myString = null;

 sensorValues = new int[NUM_OF_VALUES];

}

void updateSerial() {

 while (myPort.available() > 0) {

   myString = myPort.readStringUntil( 10 ); // 10 = ‘\n’  Linefeed in ASCII

   if (myString != null) {

     String[] serialInArray = split(trim(myString), “,”);

     if (serialInArray.length == NUM_OF_VALUES) {

       for (int i=0; i<serialInArray.length; i++) {

         sensorValues[i] = int(serialInArray[i]);

       }

     }

   }

 }

}

Buzzer

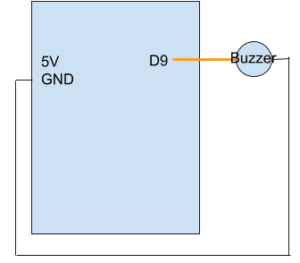
For the buzzer, in arduino I defined the number of values as 2 again, and in the setup I set up one pinMode to pin 9. Under void loop, I used the tone function with one potentiometer value controlling the pitch, and the other potentiometer value controlling the duration. Ie. tone(9,values[0],values[1])

In processing, under void draw, I set the values[0] to mouseX, and values[1] to mouseY, so that my mouseX position controlled pitch, and mouseY controlled the duration of the pitch.

For the buzzer, instead of inputting turning/rotation of potentiometer, which was translated into integer numbers for the computer to read, the interaction took using computer mouse inputs, trackpad movements. And instead of processing outputting information, this time, arduino was used to output information.

buzzer

Arduino Code

// IMA NYU Shanghai

// Interaction Lab

/**

 This example is to send multiple values from Processing to Arduino.

 You can find the Processing example file in the same folder which works with this Arduino file.

 Please note that the echo case (when char c is ‘e’ in the getSerialData function below)

 checks if Arduino is receiving the correct bytes from the Processing sketch

 by sending the values array back to the Processing sketch.

**/

#define NUM_OF_VALUES 2    /** YOU MUST CHANGE THIS ACCORDING TO YOUR PROJECT **/

/** DO NOT REMOVE THESE **/

int tempValue = 0;

int valueIndex = 0;

/* This is the array of values storing the data from Processing. */

int values[NUM_OF_VALUES];

void setup() {

 Serial.begin(9600);

 //pinMode(13, OUTPUT);

 pinMode(9, OUTPUT);

}

void loop() {

 getSerialData();

 // add your code here

 // use elements in the values array

 // values[0]

 // values[1]

 tone(9, values[0], values[1]);

}

//receive serial data from Processing

void getSerialData() {

 if (Serial.available()) {

   char c = Serial.read();

   //switch – case checks the value of the variable in the switch function

   //in this case, the char c, then runs one of the cases that fit the value of the variable

   //for more information, visit the reference page: https://www.arduino.cc/en/Reference/SwitchCase

   switch (c) {

     //if the char c from Processing is a number between 0 and 9

     case ‘0’…’9′:

       //save the value of char c to tempValue

       //but simultaneously rearrange the existing values saved in tempValue

       //for the digits received through char c to remain coherent

       //if this does not make sense and would like to know more, send an email to me!

       tempValue = tempValue * 10 + c – ‘0’;

       break;

     //if the char c from Processing is a comma

     //indicating that the following values of char c is for the next element in the values array

     case ‘,’:

       values[valueIndex] = tempValue;

       //reset tempValue value

       tempValue = 0;

       //increment valuesIndex by 1

       valueIndex++;

       break;

     //if the char c from Processing is character ‘n’

     //which signals that it is the end of data

     case ‘n’:

       //save the tempValue

       //this will b the last element in the values array

       values[valueIndex] = tempValue;

       //reset tempValue and valueIndex values

       //to clear out the values array for the next round of readings from Processing

       tempValue = 0;

       valueIndex = 0;

       break;

     //if the char c from Processing is character ‘e’

     //it is signalling for the Arduino to send Processing the elements saved in the values array

     //this case is triggered and processed by the echoSerialData function in the Processing sketch

     case ‘e’: // to echo

       for (int i = 0; i < NUM_OF_VALUES; i++) {

         Serial.print(values[i]);

         if (i < NUM_OF_VALUES – 1) {

           Serial.print(‘,’);

         }

         else {

           Serial.println();

         }

       }

       break;

   }

 }

}

Processing Code

// IMA NYU Shanghai

// Interaction Lab

/**

* This example is to send multiple values from Processing to Arduino.

* You can find the arduino example file in the same folder which works with this Processing file.

* Please note that the echoSerialData function asks Arduino to send the data saved in the values array

* to check if it is receiving the correct bytes.

**/

import processing.serial.*;

int NUM_OF_VALUES = 2;  /** YOU MUST CHANGE THIS ACCORDING TO YOUR PROJECT **/

Serial myPort;

String myString;

// This is the array of values you might want to send to Arduino.

int values[] = new int[NUM_OF_VALUES];

void setup() {

 size(500, 500);

 background(0);

 printArray(Serial.list());

 myPort = new Serial(this, Serial.list()[ 3 ], 9600);

 // check the list of the ports,

 // find the port “/dev/cu.usbmodem—-” or “/dev/tty.usbmodem—-”

 // and replace PORT_INDEX above with the index of the port

 myPort.clear();

 // Throw out the first reading,

 // in case we started reading in the middle of a string from the sender.

 myString = myPort.readStringUntil( 10 );  // 10 = ‘\n’ Linefeed in ASCII

 myString = null;

}

void draw() {

 background(0);

 // changes the values

 values[0]=mouseX;

 values[1]=mouseY;

 // sends the values to Arduino.

 sendSerialData();

 // This causess the communication to become slow and unstable.

 // You might want to comment this out when everything is ready.

 // The parameter 200 is the frequency of echoing.

 // The higher this number, the slower the program will be

 // but the higher this number, the more stable it will be.

 echoSerialData(200);

}

void sendSerialData() {

 String data = “”;

 for (int i=0; i<values.length; i++) {

   data += values[i];

   //if i is less than the index number of the last element in the values array

   if (i < values.length-1) {

     data += “,”; // add splitter character “,” between each values element

   }

   //if it is the last element in the values array

   else {

     data += “n”; // add the end of data character “n”

   }

 }

 //write to Arduino

 myPort.write(data);

}

void echoSerialData(int frequency) {

 //write character ‘e’ at the given frequency

 //to request Arduino to send back the values array

 if (frameCount % frequency == 0) myPort.write(‘e’);

 String incomingBytes = “”;

 while (myPort.available() > 0) {

   //add on all the characters received from the Arduino to the incomingBytes string

   incomingBytes += char(myPort.read());

 }

 //print what Arduino sent back to Processing

 print( incomingBytes );

}
Data Consumption Gif Thermometer Final Project Essay by Tiana Lui

  1. Data Consumption Gif Thermometer
  2. Because data consumption is so seamless, we who frequently use information receiving devices overlook the amount of data we use and the time we spend consuming data. Xxx, inspired by Hélène Portier’s 20°C, a project that brings to light the labor required to fetch data, will seek to make users aware of their data consumption levels and how data consumption affects their behaviors through displaying gifs of increasing intensity the longer the user uses his/her screen.
  3. Plan: I will prompt users to recognize their data consumption by displaying gifs of increasing intensity the longer they use their device. For example, 10 minutes would display a chill gif, 20 minutes would display a heating up gif, 30 minutes would display a times up/alarm gif, and 60 minutes would display an explode gif. I will use processing to display the gifs, and arduino time variables/functions to capture the amount of time the user is on his/her laptop. I would also implement a buzzer and led that increases in pitch and intensity the longer the user uses their device, corresponded to the same time intervals a gif is displayed on the screen. The gifs will be displayed on a laptop monitor and the buzzer and leds will be housed in a laser cut box that acts as an alarm system.
  4. The issue I would like to focus on is the amount of data we consume and the amount of time we spend on our phones or laptops. The inspiration and insight for this project was largely from my research on creativeapplications.net, where I found Hélène Portier’s 20°C, a project that questioned our relationship to data by forcing users to complete a physical task before being able to access the newsfeed on their mobile devices. Hélène Portier’s project prompted its audience to recognize and realize the amount of work/electricity required for data consumption. Similar to Portier’s project, I aim to raise awareness of data consumption, but in terms of the amount of data being used and the amount of time we spend consuming data. So while Portier focuses on the labor of data consumption, my project aims to remind users of how much data they are using and how data consumption affects human behavior (the tradeoff of time we spend on our devices vs on other things in life). This project aligns to my definition of interaction in that information is inputted (the time we spend on our screen), processed (computer decides which gif to output and which pitch and brightness level to output), and outputted (a gif, pitch, and light intensity). The project also attempts to make a mundane task, data consumption, more humanized, by allowing the computer to react to a user’s data consumption with greater expression (gifs, buzzers, and lights). While there are already apps that track our data consumption, the uniqueness of this project lies in its multiple modes of expression and multiple possible actions, derived from the use of gifs, buzzers, and lights, which allows for more complex interaction, which prompts screen users to pay conscious attention to, and think about data consumption in new ways. I think that this idea of using expressiveness beyond words and keyboard input can be applied in many future instances, for example, implementing more expression into IoT devices and devices like google home/alexa.

Final Research Paper by Tiana Lui

In my group project, my definition was largely understood in conjunction to Crawford’s text, where he states that interaction is, “a cyclic process in which two actors alternately listen, think, and speak.” In more technical terms, “If we want to get academic, I suppose we could replace listen, think, and speak with input, process, and output….” My previous interpretation of interaction was receiving, processing, and communication between two or more parties/objects.

Through my midterm project, I designed a PesKey bot that would remind users to take their keys by making alert sounds, lighting up, and flapping servo motor arms up and down. The inspiration for my midterm project was Lumiere from beauty and the beast, and I wanted to animate/have a static object come to life through angry gestures. My midterm project helped me liken interaction to giving life to something: giving something the ability to receive information, and the ability to make decisions and act. PesKey’s limited decision-making abilities and rudimentary interactions made me realize the complexity interaction can reach and the untapped potential of interaction humans can program into inanimate objects.

The increase in products involving interaction is perhaps rooted in our desire for stimulation and for new, interesting happenings, as well as our social nature. So, aside from interaction being literally defined as input, processing, and output, we can look more broadly at object interaction as our attempts to give static objects/phenomena more complicated, human like qualities, so that we humans can experience even more exciting new happenings. Hence, my new definition of interaction looks at interaction in both a broad and narrow context; interaction is the receiving, interpreting, and outputting of information, and in relation to static objects, interaction is humans’ attempts at giving objects complicated human abilities such as thinking and socializing, in order to experience new exciting encounters.

For my final project, I researched projects on creativeapplications.net and found two projects that were tagged with the keyword ‘interaction’, the first project being Hélène Portier’s 20°C, “a collection of devices designed to question our relationship to data through a series of physical challenges that enable/disable access.” and the second project being Rafael Lozano-Hemmer’s “Call on Water”. 20 degrees C brings to light and makes us think about the complex machinery and processes behind fetching website data by forcing users first light a candle to run the motor of a toy boat, and only until the motor is running will the user’s news feed download. This project aligns to my definition of interaction in that the user’s phone interprets data (whether the boat motor is running or not) and makes a decision (to show or hide the user’s news feed) and acts accordingly. Like my midterm project, it also brought to light how complex interaction can be and how we attempt to make simple objects more humanized/give objects the ability to “think” in order to experience new things. While fetching data is normally a mundane, 1 second process, Portier’s project gave new meaning to what fetching data can be.

However, Rafael Lozano-Hemmer’s  “Call on Water” did not align to my definition of interaction. While Rafael’s work seeks to create platforms for public participation, and his “Call on Water” certainly produces an audience reaction, the device itself in Call on Water does not actually interact with users. It is the humans’ actions that are interactive, not the device that is interactive.

Rafael Lozano-Hemmer did not give “life” to his art installation, or allow his device to make more complicated decisions. Rather, he relied on humans interacting with other humans to make his device “interactive”.

Links

INSTINT – a Gathering Exploring Art, Technology & Interaction

20°C – Devices for tangible interaction with data

Recitation 7: Processing Animation by Tiana Lui

For this recitation, we worked individually to create an interactive animation in Processing. In the beginning, I had the idea of creating a keyboard that would play twinkle twinkle little star by graying out certain keys at certain times. However, the keyboard would only have black and white colors, and I wanted to include shapes with more color. Then, I had the idea of dance dance revolution but using fingers, however, dance dance revolution would only use square shapes. In the end, I came up with a random shape and color generator using the four arrow keys. Up was correlated to the color red and triangles. Down was associated with green and squares. Left was blue and ellipses. Right was orange/yellow and quadrilaterals. Then, to make the animation interactive, I added a game function, which would print out UP, DOWN, LEFT or RIGHT,  randomly, on the console. If the user hit the correct corresponding arrow, the computer would store that value in the number of correct hits for that specific arrow. If the user hit the key ‘s’, they would be able to see their score (number of hits/total times word appears) for each arrow key. I also implemented an exit function coded to the ESC key. When I tested my game, at times it would work perfectly, but at other times, the shapes would not appear on the screen when I pressed my arrow keys.

//This is the code for my game animation

int value=0;
int rNum;
String up=”UP”;
int countUp=0;
int totalUp=0;
String down=”DOWN”;
int countDown=0;
int totalDown=0;
String left=”LEFT”;
int countLeft=0;
int totalLeft=0;
String right=”RIGHT”;
int countRight=0;
int totalRight=0;
//choose a random number 1-4, each number corresponds to 1 text
//if string is UP and user hits UP, keep track of number of times he gets it right

//color rRed=color(random(0,255),0,0);
//color rGreen=color(0,floor(random(0,255)),0);
//color rBlue=color(0,0,random(0,255));
//color rOrange=color(random(125,255),random(125,255),0);

void setup() {
fill(0);
size(1000, 1000);
println(“Press esc to exit.”);
}

void draw() {
rNum=floor(random(1, 4));
if (rNum==1) {
totalUp++;
println(up);
}
if (rNum==2) {
totalDown++;
println(down);
}
if (rNum==3) {
totalLeft++;
println(left);
}
if (rNum==4) {
totalRight++;
println(right);
}
keyPressed();
printScore();
escape();
}

void keyPressed() {
if (key==CODED) {
if (keyCode==UP) {
color rRed=color(random(0, 255), 0, 0);
fill(rRed);
triangle(random(0, 1000), random(0, 1000), random(0, 1000),
random(0, 1000), random(0, 1000), random(0, 1000));
if (rNum==1) {
countUp++;
}
}
if (keyCode==DOWN) {
fill(0, floor(random(0, 255)), 0);
rect(random(0, 1000), random(0, 1000), random(0, 500), random(0, 500));
if (rNum==2) {
countDown++;
}
}
if (keyCode==LEFT) {
fill(0, 0, floor(random(0, 255)));
ellipse(random(0, 1000), random(0, 1000), random(0, 500), random(0, 500));
if (rNum==3) {
countLeft++;
}
}
if (keyCode==RIGHT) {
fill(floor(random(125, 255)), floor(random(125, 255)), 0);
quad(random(0, 1000), random(0, 1000), random(0, 1000), random(0, 1000),
random(0, 1000), random(0, 1000), random(0, 1000), random(0, 1000));
if (rNum==4) {
countRight++;
}
}
}
}

void escape() {
while (key==ESC) {
break;
}
}
void printScore() {
if (keyPressed) {
if (key==’s’) {
println(“Your score…”);
println(“UP: “, countUp, “/”, totalUp);
println(“DOWN: “, countDown, “/”, totalDown);
println(“LEFT: “, countLeft, “/”, totalLeft);
println(“RIGHT: “, countRight, “/”, totalRight);
}
}
}

Through coding this assignment, I learned that in processing, order matters a lot.  Additionally, I completed the expanding and contracting circle, which showed me how to use booleans instead of if statements and loops. I find it frustrating that I can’t store shapes into variables to use later, however, I found a way around that by storing the numbers used inside the shape function to variables. I also found functions quite useful, as it made my main body of code clean and easy to read. 

//My code for the circle

boolean isContracting=true;
int d=400;
boolean iMin=true;
int i=0;
int j=0;
int moveU=0;
int moveD=0;
int moveL=0;
int moveR=0;
int currentX=300;
int currentY=300;
void setup() {
size(600, 600);
background(100);
ellipseMode(CENTER);
strokeWeight(20);
colorMode(HSB, 100);
}

void draw() {
background(100);
fill(255);
stroke(i, j, 100);

keyPressed();
hsbControl();
shapeSizeControl();
}
void keyPressed() {
if (keyPressed) {
if (keyCode==UP) {
translate(0, moveU-=5);
ellipse(width/2, height/2, d, d);
currentY=height/2+moveU;
}
if (keyCode==DOWN) {
translate(0, moveD+=5);
ellipse(width/2, height/2, d, d);
currentY=height/2+moveD;
}
if (keyCode==LEFT) {
translate(moveL-=5, 0);
ellipse(width/2, height/2, d, d);
currentX=width/2+moveL;
}
if (keyCode==RIGHT) {
translate(moveR+=5, 0);
ellipse(width/2, height/2, d, d);
currentX=width/2+moveR;
}
}
else{
ellipse(currentX, currentY, d, d);
}
}
void hsbControl() {
if (iMin) {
i++;
j++;
} else {
i–;
j–;
}
if (i==0||i==100||j==0||j==100) {
iMin=!iMin;
}
}

void shapeSizeControl() {
if (isContracting) {
d-=3;
} else {
d+=3;
}
if (d<=150||d>=400) {
isContracting=!isContracting;
}
}

Recitation 6: Processing Basics By Tiana Lui

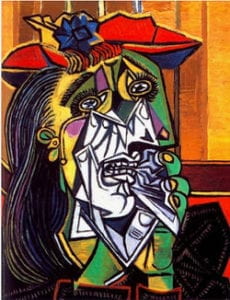
In this recitation, we individually worked on drawing an image in Processing using simple shapes. I chose to draw a motif based on La Mujer Que Llora by Pablo Picasso because Pablo Picasso is known for cubism and utilizing shapes in his paintings, and because this specific painting was brought up in our lecture the other day. I liked this painting because it’s very expressive and though it is very abstract, it accurately portrays the sorrow of the woman inside the painting.

La Mujer Que Llora

To recreate this painting in Processing, first, I found an image on Google images, opened the image in Photoshop, created gridlines to better calculate where every shape’s relative position was, and created a relatively similar sized canvas in Processing using size(700,1000);

Snip 1 of code

I focused on the face of the woman inside the painting and used functions like rect(), triangle(), fill(), color(), stroke(), and strokeWeight(). I reviewed the processing website to understand each function’s syntax. Then, I created the woman’s face by breaking her face down into simple shape areas, which translated into endless blocks of color, fill, stroke, strokeWeight, rect/triangle/ellipse code. The later the code, the closer the shape was to the front of the image. 

FINAL CODE

size(700,1000);

color yellow=color(255,255,0);
color red=color(255,0,0);
color blue=color(0,0,255);
color green=color(0,255,0);
color purple=color(139,0,139);
color white=color(255,255,255);

fill(yellow);
stroke(0,0,0);
strokeWeight(5);
triangle(87,62,262,62,262,200);

fill(red);
stroke(0,0,0);
strokeWeight(5);
ellipse(120,170,190,130);

fill(red);
stroke(0,0,0);
rect(300,60,200,90);

fill(blue);
stroke(0,0,0);
strokeWeight(5);
rect(230,80,90,90);

fill(blue);
stroke(0,0,0);
strokeWeight(5);
triangle(500,150,350,150,470,200);

fill(green);
stroke(0,0,0);
strokeWeight(5);
triangle(470,200,350,150,400,250);

fill(green);
stroke(0,0,0);
strokeWeight(5);
rect(390,210,80,200);

fill(yellow);
stroke(0,0,0);
strokeWeight(5);
ellipse(270,250,250,250);

fill(green);
stroke(0,0,0);
strokeWeight(5);
triangle(220,200,220,290,150,290);

fill(purple);
stroke(0,0,0);
strokeWeight(5);
rect(220,180,30,80);

fill(yellow);
stroke(0,0,0);
strokeWeight(5);
ellipse(350,230,70,100);

fill(white);
stroke(0,0,0);
strokeWeight(5);
triangle(370,230,400,410,300,350);

fill(white);
stroke(0,0,0);
strokeWeight(5);
rect(180,390,150,160);

fill(white);
noStroke();
triangle(220,280,400,408,200,400);

fill(0,0,0);
triangle(220,280,180,550,140,550);

fill(0,0,0);
triangle(220,280,180,420,150,420);

// eyes
fill(white);
stroke(0,0,0);
strokeWeight(5);
ellipse(220,280,60,30);

fill(white);
stroke(0,0,0);
strokeWeight(5);
ellipse(370,230,60,30);

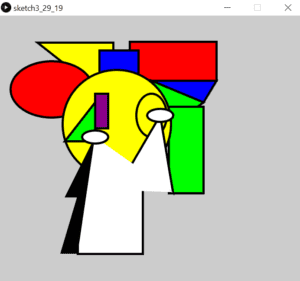
I hit a bump in the road as soon as I realized that the rotate function rotated the whole canvas and not individual shapes. In the beginning, I was looking to recreate the painting as accurately as possible, however, in the end, my recreation turned into a distillation of Picasso’s La Mujer Que Llora. My recreation is similar to the original in that it is abstract and uses shapes to form a composite figure, however, due to the 90-degree rectangle orientation limitations and the complication of finding the relative x, y positions of the shapes and dots, my recreation turned out more abstract, more 2D, and a different style from Picasso’s original painting.

final output

Drawing in Processing was highly inefficient and not a good means of realizing my design. I had to rewrite the same functions over and over again and estimate where each of my shapes had to go.