Interactive Story: Home Sweet Home

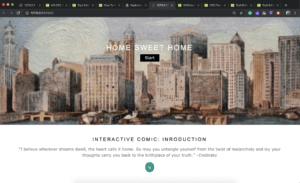
Website: Home Sweet Home 

Process:

  • Brainstorming: Before any programming took place, we first brainstormed how we wanted to style and layout our website. Since we had already collected the visuals for our interactive comic, we realized we needed our website to correspond with our minimalistic theme. Our comic is intended to relate to the struggles of homesickness and we wanted to keep our visual aspects as the primary focus while keeping the overall website neat and pastel. With this in mind, we created a basic template for our website and continued to the coding.  

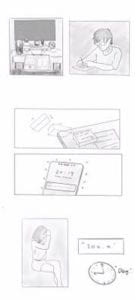
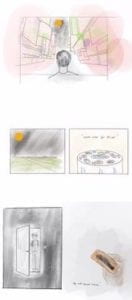
  • Coding: We started with a very bland website layout, which contained a home page and several image slots beneath it. We wanted our comic to read in a vertical direction, starting at the top of the page and finishing at the bottom. From here, I continued to add small layers of detail, such as font adjustments and button designs. I primarily used https://www.w3schools.com/default.asp as my reference for certain problems, as well as for picking a button design (w3schools offers their own library of buttons for free use). It became apparent while programing that the most difficult aspect was creating animations while keeping our website design intact. As you can see on the website, keeping the minimalistic theme made it more restrictive when considering the number of visual elements we could use.  During the coding process, we tweaked our original design in certain areas, especially after Interaction Day.  The feedback we received from others really assisted in recognizing areas we could improve in.  I took a lot of time addressing all the advice given to us, such as including a quote relating to the comic as well as making the cellphone vibrate. The most useful command that I discovered while programming was the scrollTo() function, which ended up serving as the backbone of our entire comic.  After some modifications, it offered a smooth scrolling effect throughout the website when buttons were pressed. While working towards the end of our website development, the code became quite complicated to keep track of, which has since made me realize the importance of prioritizing organization. The last changellged encountered was the atom-live sever using the scrollTo() function differently when compared to the file uploaded to IMA NAS sever. This was one of a few issues which were very difficult to solve but ultimately overcame with some tedious adjustments to the code. 

  • Post-Mortem: The final website is not exactly what we envisioned at the start, however, with the time given, I feel our website was reasonably executed. If I was to improve our website, I would prioritize making the user interactions more interesting. I feel that with more animation-like comic strips and additional interacting elements our website would more closely convey our comics message.  Additionally, I would definitely add music to the comic in the future. I think sound effects would help engage the user more throughout a handful of our comic strips,  especially if a mellow song was playing in the background.

Interaction Day Feedback

Overall, I think we’re good with our visual assets and we need more words to lead our readers to comprehend the story that we are trying to state. We also need more interactions with the readers. I intend on applying the advice given to us throughout our website as we proceed with development this weekend. 

Intro to Robotics: Science Fiction Story

Interstellar (2014): TARS replaced by my cardboard mini-bot

Scene from the movie:

https://www.youtube.com/watch?v=v7OVqXm7_Pk

Cooper, Doyle, Brand, and TARS board Ranger 1, preparing for their journey to Miller’s Planet. The purpose of their mission is to gather data from the last crew that embarked to Miller’s Planet, which never returned. Romilly, who volunteers to stay onboard on the main ship during their mission, explains the planet’s geography to the crew: 

“Miller is a waterworld, covered in a seemingly endless, shallow ocean. The planet’s gravity is described to be “punishing” at 130% of Earth’s, forcing human astronauts to move slowly and with some difficulty while on its surface. Time on the surface of Miller’s planet passes very slowly relative to the time experienced by myself and that experienced on Earth. I’ve calculated that a single hour on Miller would equate to seven years back on Earth. Because of the planet’s proximity to Gargantua, the immense gravity of the black hole causes the planet to be roiled by massive tidal waves as tall as 4,000 feet.” 

With this knowledge at hand, the crew departs from the main ship to start their mission. They descend into Miller’s atmosphere, searching for remains of the last crew. Due to the slow nature of time on Miller’s planet, the first crew had only recently landed, even though years have passed since there departure from Earth. Shortly upon entry, Cooper is able to gather an approximate location of the remains of the first crew through a signaling beacon. They quickly land in the corresponding area of the planet, however, they must search through a large perimeter in order to pinpoint the exact location of the beacon. Brand exits the aircraft and began treading away from the ship, scanning for any clue of remains. She eventually sees a promising piece of debris in the distance and sets off to investigate. As she approaches the target, Cooper notices a massive navy blue wall growing in the distance. Immediately, Cooper screams at Brand, telling her to return to the ship as soon as possible, as this navy colored wall was actually the massive tidal wave Romiley warned them about. Determined to not come back empty-handed, Brand attempts to carry the debris, however, it’s merely impossible due to the weight. Thankfully, she had the TAR device (my mini robot) in hand, which was able to navigate through the narrow cracks of the tarnished metal and retrieve the small valuable components. Thanks to its slick brass wire legs,  TAR was able to shimmy its way in efficiently and quickly. TAR returned the surface with the data, in which Brand collected and sprinted towards the ship, avoiding the massive tidal wave with only seconds to spare. 

source:

https://interstellarfilm.fandom.com/wiki/Miller_(planet) 

Lab 1: BEAM Inspired Robots

Lab Template 1: BEAM inspired robots

Description

Through this guide, we will get familiar with parameters and instruments to understand basic analog circuits and tools to work with electromechanical components. 

From the set of experiments described below, This will help us establish the connection between the electrical current and magnetic field. 

Goal

By the end of these experiments, students are expected to submit evidence of the process be able to reproduce experiments that use power supplies, multimeters and tools to work with copper wire. At the same time, we will acquire a working knowledge of concepts of electricity as Joule’s effect or Ohm’s law.

Outline

Experiment 1: Calculations 2

Experiment 2: A moving circuit 2

Experiment 3: Iterate 2

Experiment 4: Build a light sensor 2

Experiment 5: Design and build a mini-robot 3

———————————————————————————————–

Experiment 1: Calculations

Using a multimeter, measure resistance and voltage with one battery and one motor. With Ohm’s law, calculate the current in the circuit. 

Utilizing a multimeter or using indirect measurement, read the real current in the circuit. Read also the voltage applied to the circuit.

Draw an equivalent circuit to your battery-motor circuit. Explain in your own words what makes theoretical and real currents different.

Using this information, calculate the duration that the battery capacity will allow the motor to run in real conditions.

Battery: CR2032 (Datasheet)

Voltage: 3.05 V

Resistance: 6.5 ohm 

Ohms Law: 3/6 = 0.5A

Multimeter Current:10.3 mA

Theoretical Current VS Actual Current:

Theoretical current displays the mathematical interpretation of the circuit, which is great for approximations and predictions. However, it cannot account for certain factors such as additional sources of resistance, which could appear in a variety of ways.  Poorly connected leads, wire composition, and other components could contribute to effecting the current; Therefore, measuring the actual current with a multimeter allows for more of a precise reading of the circuit. 

Battery Duration:

According to the actual current, if it is drawing 10.3 mA, the duration of the battery should be roughly 19 hours. Whereas, if the motor is drawing 500 mA, the duration will be around 25 minutes.

Experiment 2: A moving circuit

Using a soldering iron, pliers, wire cutters and other tools, make a small prototype that has:

  • switch
  • battery
  • motor

Document the process of this small creation, the materials and processes you went through and any information that other roboticists might need to replicate your experiment. 

Material list:

  • 1 CR2032 Battery
  • Battery Casing
  • Mini Switch
  • Mini circular vibrating motor
  • Wires
  • Cardboard
  • Brass Wire

I began constructing my circuit with solely a battery, battery casing, a single motor, and a switch. As minimalistic as it was, it assisted in visualizing the different directions I could move towards with the materials at hand. I soldered the wires together as necessary, creating a simple circuit between the battery, switch, and motor. My next step was constructing some sort of body that would allow these components to stay in place.  I could tell that the power provided by the motor was minimal, so I opted to use cardboard as the framework for the device due to its lightweight nature. I continued to attach the components to a small 3x3in of cardboard, leaving the battery and switch visible and the motors and wires pressed behind another 3x3in of cardboard. The result was a cardboard sandwich-like robot, however, it lacked any significant movement. To combat this, I cut a 4in piece of brass wire evenly into 4 pieces and glued them to the bottom of the cardboard, giving the device mini legs and eliminating the cardboard friction. By decreasing the surface friction, the robot moved at a significantly greater pace but lacked movement in any particular direction. 

Experiment 3: Iterate

Create a table with at least three different iterations of the robotic structure. You can try with different locomotion methods. Test them under different conditions you think useful for it, such as weight it can curry or different surfaces. Make sure your table include annotations for future analysis. 

Iterations Results
Wooden Table Testing https://drive.google.com/file/d/10TcJjjNVbieOUGhXxez9VLXVCTbnfBan/view?usp=sharing

As shown in the video above, the robot had difficulty moving while on the wooden table surface. I believe that the grooves in the wood prohibited the robot for moving at its full potential. 

IMA Floor Testing https://drive.google.com/file/d/10Rm5xNdzACC7DV2RCIvyUu43J_2SdD99/view?usp=sharing

As shown in this video, the robot functioned best when test on the IMA floor.  The smooth surface allowed for the robot to maneuver in random directions at a semi-constant speed. 

Change of Surface Contact: Brass to Plastic During the testing face, I decided to add a tad bit of glue to the end of each leg, as I was curious whether it would improve or worsen the mobility of the robot. I contemplated that maybe the brass endings were puncturing the surface too much, however, I discovered that the robot’s functionality was dampened with the glue.  I shortly realized that the glue increased the surface friction, in hence slowing down the speed of the robot. 

Experiment 4: Build a light sensor

Use a Light Dependent Resistor to build a circuit that gets activated by the presence (or absence) of light. Hand-draw your circuit and annotate the behavior. 

As a help for this step, you might need to do a bit of research on LDR circuits. It might be handy to use http://www.ermicro.com/blog/?p=1097 as a reference.


As shown in the photo of the breadboard and circuit diagram above, the electricity traveled from the battery source to the transistor, and if the LDR value was high enough (which depends on the amount of light it receives), the transistor would then release enough current to spin the motor and complete the circuit.

*******************************************************

Experiment 5: Design and build a mini-robot (Postponed)