Sarah Chung Drawing machines

INTRODUCTION

In this recitation we built a drawing machine by utilizing actuators and Arduinos. We also utilized a H-bridge powered by a stepper motor.


MATERIALS

For Steps 1 and 2

1 * 42STH33-0404AC stepper motor
1 * L293D ic chip
1 * power jack
1 * 12 VDC power supply
1 * Arduino kit and its contents

For Step 3

2 * Laser-cut short arms
2 * Laser-cut long arms
1* Laser-cut motor holder
2 * 3D printed motor coupling
5 * Paper Fasteners
1 * Pen that fits the laser-cut mechanisms
Paper

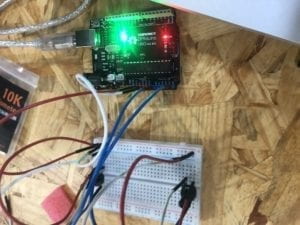
         For step one the circuit building was more or less easy as clear instructions were given on the recitation page, we had no trouble incorporating the H-bridge onto out breadboard. The H-bridge was important as it allowed the DC (direct current) stepper to run both forwards and backwards .Our only worry was that this was our first time using a 12V power instead of 5V and we were scared of the damage that could have been done to the Arduino and our computer. My partner and I colour coded our wires to avoid confusion in case we had to track back our work and to ensure we wired everything correctly to avoid damage to the Arduino or the laptop. Finally when we ran our code the project worked perfectly.


In step 2 we added a potentiometer to the circuit, so we could control the rotation of the machine. We mapped the machine to the minimum and maximum values of both the analog and the stepper motor. We programmed the Arduino with analogRead so that the motor could move via the input from the potentiometer. With all this done we finally could control the rotation of the motor with the knob of the potentiometer. After this we were ready to move onto step 3.

In step 3 we assembled the laser cut short & long arms with paper fasteners and mounted them onto our potentiometers. We them laid out a piece of paper and inserted the pencil onto the drawing machine. Though step 1 and 2 were completed successfully and the drawing machine was mounted as instructed we found it hard to control it to draw a fixed pattern.

Question 1

What kind of machines would you be interested in building? Add a reflection about the use of actuators, the digital manipulation of art, and the creative process to your blog post.

I would be interested in building machines that can enhance human creativity, much like drawing machines. I would like to build something that allows others to express themselves in ways they couldn’t before (like the machine that allowed the paralyzed graffiti artist to write with his eyes).I believe that in projects like this (digital manipulation of art), humans rely on the machines in a healthy way, they use it to heighten their skills. The machine is not used as a substitute for creativity, there is a great deal of thought and processing on both sides of the interaction. Actuators were an integral part of this project and are integral for any moving machine. When a creator understands how to make proper use of actuators it allows for limitless avenues of creativity.

Question 2

Choose an art installation mentioned in the reading ART + Science NOW, Stephen Wilson (Kinetics chapter). Post your thoughts about it and make a comparison with the work you did during this recitation. How do you think that the artist selected those specific actuators for his project?

Douglas Irving Repetto’s Giant Painting Machine/San Mateo reminded me of our drawing machine project. In both projects (Repetto’s and ours) a motor was used to allow a drawing tool to mark a canvas. However, our project was controlled by direct human interaction (us controlling with the knob of the potentiometer) whereas Repetto’s machine was controlled by electronics (code).I believe he chose those specific actuators as it allowed the machine the most fluid and erratic movement.

Final Project Essay – Sarah Chung

Our final research project is titled, The Better Reader. It aims to test concentration and focus as well as memory retention. Inspired by games and exercises that help with dyslexia, our project hopes to create a fun way for anyone to exercise their brain in an educational and interactive way. The Better Reader though inspired by exercises to help for dyslexia, hopes to appeal to a range of people as well.

From personal experience with family members suffering with Alzheimer’s, mental games allow for much needed mental exercise and is not only encouraged for those who suffer with the illness but also those who don’t. Brain and memory recall not only becomes more relevant as persons get older but to students as well. Long-term memory is something we as students need to utilize every day and The Better Reader hopes to exercise that skill to lead to better information retention. With technology allowing us information at the touch of a screen, these days it seems as though all you really need to remember are the passwords to your devices. With that in mind , our project hopes to bring to light that we need to take time to challenge ourselves to exercise not only our bodies but also our minds. This aligns with my idea of interaction as it is cyclic, it is like a conversation in which the two parties think, listen and speak , there is an input and output and processing of information in between (Crawford, 1).

We want to input a range of words into our game’s memory and have them appear onscreen. Each word will be highlighted and the computer will randomly stop on a word. The player will be shown all the words played and must remember which word the computer stopped on and select it. The further the players gets the faster the words will appear and will consequently be harder to remember. For this part of the project we will utilize the random function on Arduino as well as processing. Processing will be utilized to make the words appear on screen as well as to highlight them. Arduino will be utilized for the hardware of the project. It will handle the users input through the buttons and assess whether the inputted value by the user matches the correct answer and send the information to processing .

         We realized getting persons to interact with our project may be a challenge as mental exercise is just as attractive as doing physical exercise. To combat this we hope to make our project attractive to users by creating a “flashy” or interesting interface that draws persons in. This can be achieved by incorporating pictures, sound and other media in our processing. We also hope to make the physical appearance (buttons, casing etc.) attractive as well by getting buttons similar to that of a video game. We hope to start the coding for the project within the week and test it out using the buttons from the lab. After this we hope to move onto designing the physical aspect of the project by the end of next week into the following week and making appointments to laser cut the housing for the buttons as well as purchasing more attractive buttons.

Serial Communication – Sarah Chung

Project 1

For this project we re-created an “Etch-a-sketch” using two potentiometers (one controlling the Y axis and the other the X) to control the drawing.Using an outline of a code given in class I changed the AnalogRead so I was able to map the two sensors, I also modified my pin numbers etc. I also did the same for processing inputting and modifying things like the void setup size and defining the x and y accordingly. I also added the voidDraw to my processing.A challenge I encountered was modifying so that the line drawn previously was saved as the drawing continued.I was able to correct this and successfully complete the project.

Arduino project 1 wiringArduino project 1 wiring

My code for Arduino

/*
AnalogReadSerial

Reads an analog input on pin 0, prints the result to the Serial Monitor.
Graphical representation is available using Serial Plotter (Tools > Serial Plotter menu).
Attach the center pin of a potentiometer to pin A0, and the outside pins to +5V and ground.

This example code is in the public domain.

http://www.arduino.cc/en/Tutorial/AnalogReadSerial
*/

// the setup routine runs once when you press reset:
void setup() {
// initialize serial communication at 9600 bits per second:
Serial.begin(9600);
}

// the loop routine runs over and over again forever:
void loop() {
// read the input on analog pin 0:
int sensorValue1 = analogRead(A0);
int sensorValue2 = analogRead(A5);
sensorValue1 = map(sensorValue1, 0, 1023, 0, 500);
sensorValue2 = map(sensorValue2, 0, 1023, 0, 500);
// print out the value you read:
Serial.print(sensorValue1);
Serial.print(“,”);
Serial.print(sensorValue2);
Serial.println();
delay(1); // delay in between reads for stability
}

My code for Processing

// IMA NYU Shanghai
// Interaction Lab
// For receiving multiple values from Arduino to Processing

/*
* Based on the readStringUntil() example by Tom Igoe
* https://processing.org/reference/libraries/serial/Serial_readStringUntil_.html
*/

import processing.serial.*;

String myString = null;
Serial myPort;

int posx2;
int posy2;

int NUM_OF_VALUES = 2; /** YOU MUST CHANGE THIS ACCORDING TO YOUR PROJECT **/
int[] sensorValues; /** this array stores values from Arduino **/

void setup() {
size(500, 500);
background(0);
setupSerial();
}

void draw() {
updateSerial();
printArray(sensorValues);
stroke(255);
line(sensorValues[0], sensorValues[1], posx2, posy2);

posx2 = sensorValues[0];
posy2 = sensorValues[1];

// use the values like this!
// sensorValues[0]

// add your code

//
}

void setupSerial() {
printArray(Serial.list());
myPort = new Serial(this, Serial.list()[ 3 ], 9600);
// WARNING!
// You will definitely get an error here.
// Change the PORT_INDEX to 0 and try running it again.
// And then, check the list of the ports,
// find the port “/dev/cu.usbmodem—-” or “/dev/tty.usbmodem—-”
// and replace PORT_INDEX above with the index number of the port.

myPort.clear();
// Throw out the first reading,
// in case we started reading in the middle of a string from the sender.
myString = myPort.readStringUntil( 10 ); // 10 = ‘\n’ Linefeed in ASCII
myString = null;

sensorValues = new int[NUM_OF_VALUES];
}

void updateSerial() {
while (myPort.available() > 0) {
myString = myPort.readStringUntil( 10 ); // 10 = ‘\n’ Linefeed in ASCII
if (myString != null) {
String[] serialInArray = split(trim(myString), “,”);
if (serialInArray.length == NUM_OF_VALUES) {
for (int i=0; i<serialInArray.length; i++) {
sensorValues[i] = int(serialInArray[i]);
}
}
}
}
}

etch a sketch video

Project 2

For this project we used a speaker to create a musical instrument that would make a sound when the mouse was pressed.This one was a bit more challenging for me as there were a lot of different elements coming together. We incorporated tones as well as mouse press. I encountered many troubles with this project, firstly I had a lot of trouble as my Arduino was not uploading to my board, after a quick reset this was solved and in the end was unable to ensure that for different parts of the screen distinct sounds would be outputted.

My code for Arduino 

// IMA NYU Shanghai

// Interaction Lab
// This code receives one value from Processing to Arduino
int valueFromProcessing;

void setup() {
Serial.begin(9600);
pinMode(9, OUTPUT);

}
//
//void draw() {
// if (mouseX > width / 2) {
// myPort.write(‘H’);
// } else {
// myPort.write(‘L’);
// }
//}

void loop() {
// to receive a value from Processing
while (Serial.available()) {
valueFromProcessing = Serial.read();
}
analogWrite(9, valueFromProcessing);

if (valueFromProcessing == ‘H’) {
//digitalWrite(8, HIGH);
tone(9, 3000);
} else if (valueFromProcessing == ‘N’) {
// digitalWrite(8, LOW);
noTone(9);
}
else if (valueFromProcessing == ‘M’) {
//digitalWrite(8, HIGH);
tone(9, 2000);
}
else if (valueFromProcessing == ‘L’) {
//digitalWrite(8, HIGH);
tone(9, 1000);
}
// something esle

// too fast communication might cause some latency in Processing
// this delay resolves the issue.
delay(100);
}

My code for Processing

// IMA NYU Shanghai
// Interaction Lab
// This code sends one value from Processing to Arduino

import processing.serial.*;

Serial myPort;
int valueFromArduino;

int High;
int Med;
int Low;

void setup() {
size(500, 500);
background(0);

printArray(Serial.list());
// this prints out the list of all available serial ports on your computer.

myPort = new Serial(this, Serial.list()[3], 9600);
// WARNING!
// You will definitely get an error here.
// Change the PORT_INDEX to 0 and try running it again.
// And then, check the list of the ports,
// find the port “/dev/cu.usbmodem—-” or “/dev/tty.usbmodem—-”
// and replace PORT_INDEX above with the index number of the port.
}

void draw() {
// to send a value to the Arduino
High = height;
Med = 2*height/3;
Low = height/3;
if (mousePressed && mouseY > 0 && mouseY < Low) {
myPort.write(‘L’);
} else if (mousePressed && mouseY > Low && mouseY < Med) {
myPort.write(‘M’);
} else if (mousePressed && mouseY > Med && mouseY < High) {
myPort.write(‘H’);
} else {
myPort.write(‘N’);
}
//if (mouseX > width/2) {
// myPort.write(‘H’);
//} else {
// myPort.write(‘L’);
//}
}

Video for project 2

Reflection

Although this recitation was particularly difficult, I found it interesting utilizing these two programs to make fun and random projects. Both of which required a lot of help from friends and fellows, however in the end I was able to get both projects to (kind of) work.

Project Proposal – Sarah Chung

1) Race to the finish

We will have two different characters which is made through processing, each player is given one button which generates a movement (when pressed they either move forward or backward) (the result of the button is randomly selected by Arduino) the first person to get to the finish line wins. The game will be shown through a screen using avatars generated through processing.This project is inspired by the popular game “Derby classic”  and gives it a modern twist. The hope for the project is to reinvent a classic game that invites people for collaboration and friendly competition. It hopes to bring forward popular and conventional ways of interaction with technology from the past so that there is a pathway to connect interaction from the past to interaction today.

2) Pattern

An image will appear on the screen and the player  must click the correct button that matches that image (square, triangle, circle). The further the player gets into the game the faster the images will appear and the shorter time they’ll have to press the correct key.  If they run out of time or press an incorrect symbol they’ll lose. The game will test speed and accuracy, my hope is that it will encourage players to do better and play multiple times as well as challenge their peers to beat their score. This is inspired by popular game, whack-a-mole.

3) Build a Tower

Using processing a vertical bar will appear on the screen moving left and right. Players will press a button to stop the movement of the bar, after this another bar will appear.The aim of the game is to stack bars directly on top of each other to make the tower as tall as possible.The further player’s reach into the game the faster the bars move horizontally. This game is aimed to test user’s hand eye coordination and hopefully encourages people to engage in friendly competition as they try to beat each other’s top score. This game is inspired by the common American arcade game, “Stack to the top”.