Final Proposal: Preparatory Research and Analysis 006 Stephanie Anderson

I had a lot of fun at the Chronus exhibition. It reminded me of this particular exhibit in the Reina Sofia (it is a museum more notably known for housing The Guernica in Madrid, Spain).  The only reason that I was at the Reina Sofia was to see The Guernica, but, of course, I could not go directly to the only piece in the entire museum that I wanted to see. Naturally, I wandered around a little bit. I think it is rather comical in my head why I compared these two houses of art mostly because I did not particularly “get” either of them. I think instills this inquisitive nature in me and true desire to understand and to even attempt to put myself in the shoes of the creator. I think visiting the Chronus exhibit was extremely interesting because it was certainly technology based art, but I do not think that any of the exhibits were particularly interactive. One of the pieces that I keep going back to in my mind at the Chronus exhibit was Turing piece. For something like that, I don’t know if you could say that it is “above my level of comprehension” so to say, but looking at it really made me think that whoever created this put countless hours of time and effort into this piece. Something this also made me realize is that when I am creating things, I want to make sure that people “get” it. I do not, at least right now, have the desire to create something seemingly so sophisticated that I am the only one with the intellectual capability to understand it. I love art museums, but in the case of exploring the Reina Sofia, many of the pieces – I could attempt to make up a story about what they meant – but I some of them were abstract even for me. I want to make sure that my projects have meaning and send a clear message. Even if I design something that people have to “explore” to figure it out, I want their to be a sense of adventure in their journey to interacting with my work. 

Turing Experiment
Turing Experiment

This might sound ambitious, but for my final project, I want to create a device that allows people the ability to bend one of the four basic elements (water, earth, fire, air) of their choice. Avatar the Last Airbender style. I have listed the link below for reference to the projects from which I am drawing inspiration. In regards to my project, I think the University of Dayton Interactive Wall and Cleveland Art Museum Collection Wall are on the right track for what I am looking for. Both of these pieces create immersive experiences that inspire joy and curiosity in the people who interact with them. I want my project to have these qualities; even if people are not familiar with the show, I want to create something that allows everyone the ability to purely enjoy the magic that they are creating through their movements.

video on UD display

The second set of projects that I researched are part of a collection of exhibits in Rotterdamn used to allow people to experience what I would be like to work on an off-shore oil rig. This particular project is interesting because it is being used to train people, but I think the processes behind what is going on in the project is what I am looking for. In my head, I am thinking that a camera or some sort of sensor would see the person and would wait for certain poses to be made or positions to be held in order to create the effect of having control of the element. This project simulates the actions that people would actually be doing in this job; therefore, the camera is monitoring the actions of the participant and acting based on the signals he or she is sending. When I create my final project, I want my device to be able to respond to the actions of the person and not have a set order of actions forcing someone to interact in a certain way. 

.
Simulation in Rotterdam

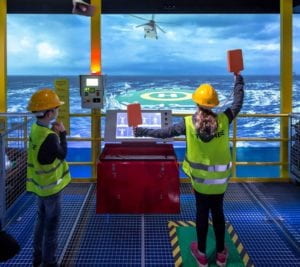
After looking at various projects in combination with all the experiences and projects we have seen so far in Interaction Lab, in my interaction projects, I value the freedom of choice for the interacter. I think now that we have progressed thus far in the course that we now have the tools and capabilities to create something more than just one step yields this result. I want to be able to something that is fluid and allows the user unlimited interaction until he or she is satisfied. In the case of the exhibits in Rotterdam, if the correct stance is not made, or not made in ample time, then the user will fail. While the purpose of my device will not necessarily be for education purposes as this device was, I want my users to take away an experience and not simply an interaction which I think should be the heart of interactive projects.  

Referenced Works

Avatar the Last Airbender

Exhibitions at Rotterdamn – https://www.kossmanndejong.nl/project/offshore-experience/

Interactive wall displays – https://medium.com/mouth-watering-media/the-top-10-digital-interactive-display-walls-40b96066477c

Individual Reflection – Stephanie Anderson Recitation 006

After being in this class for a month and reading articles on interaction, watching videos of successful projects that incorporate an interactive element, and experiencing interaction in class, all together has led me to synthesize a definition of interaction. In order for an interaction to take place, there has to be an action done onto one object which results in a different output action thus creating an interaction. 

The first project I have chosen to reference is the project we witnessed in class on one of the first weeks of school. The project that involved the technology that granted the ability to an artist unable to use his limbs the ability to paint again. This project – at its core –  used the input of the movement of the man’s pupil’s which in turn interacted with his movements by producing a method for him to be able to create his art. The movement of his eyes were directly translated by the software they were using to then appear on a computer screen that allowed him to use his eyes instead of his hands to create his art. The results of the man’s actions directly result in a completely unrelated output that the technology allows him to do. For example, he only moves his eyes which then creates a work of art in the process which is a completely unrelated action to the movement of his eyes thus the act of interaction. The process to get to the final result changed the input to form a completely different output. 

Eyewriter user
Eyewriter user

The second project that provides a good example to counter my definition is another project we were originally shown in class: Hit Me. The basis of this project is a game where the players are attempting to hit a button on top of the other’s head which will result in a picture being taken of the space in front of the losing opponent’s head. The action is a hit of a button which simply takes a picture. For my proposed definition of interaction, this project does not align as strongly as the one previously stated because this is essentially a single-step process. If this project is classified as interaction, then it is the most basic form and would then prove that the simple act of me typing a key on a keyboard would be considered an “interaction”. As stated by the writing in the chapter, “What Exactly is Interactivity,” there are degrees of interactivity and if this project is to be considered an interaction, then this author would agree with the sentiment that it can only be considered the lowest degree of interaction (and arguably only an “action” versus an “interaction”) which would defeat the purpose of the big question: what is interactivity (6). 

Hit Me! in action
Hit Me! in action

The project that my group came up with tried to build up from a problem we would face or an idea that would be practical for the future. The end result of the project is a painting that is compiled from various bodily readings collected by a watch throughout your day. The point of the painting – aside from the fact of its potential beauty – is that the walls in the future will have thousands of LEDs where you can upload the output of your day onto your wall therefore solving the problem of having too much white space. The process to achieve this desired output is throughout your day your watch will collect data of your heartbeat, temperature, steps, and speed throughout the day. There will be an algorithm that will calculate the distance and length of each stroke based on a function of your steps and speed; the colors of the painting will be drawn from a previously constructed library that uses a combination of the function of heart rate and temperature to calculate your current mood which a human will assign as a certain color. These two processes together will create the movement and appropriate colors of your paintings thus “Painting your day.” Our project demonstrates our proposed definition of interactivity because the input has a clearly unrelated output that would not have resulted from a single-step action. 

My team and our project

Works Cited

Crawford, “What Exactly is Interactivity,” The Art of Interactive Design,  pp. 1-5.

http://Eyewriter.org

http://kahoabe.net/portfolio/hit-me/

Recitation 006: Arduino Basics by Stephanie Anderson

Introduction:

Get familiar with the components in our Arduino kits and begin to build basic circuits with sensors.

Objectives:

  1. Learn how to build a circuit while incorporating a buzzer and button
  2. Get accustomed to the materials in the Arduino kit and how to build the required circuits

Materials (as listed on the IMA website):

From Arduino Kit:

1 * Arduino Uno
1 * USB A to B cable
1 * breadboard
1 * buzzer
2 * LEDs
2 * 220 ohm resistors
2 * 10K ohm resistors
2 * pushbuttons
A handful of jumper cables

From cart:

2 * arcade buttons
1 * Multimeter (optional)

Process:

This week I worked with Sass and we begin by building a circuit which incorporated an LED under the code Fade.

https://drive.google.com/open?id=1EbXupCLWU93ykYfNz-icmRmQRxBCk1TD

The next circuit we built included a buzzer. This code was a little different from the previous ones because this code required an external file for the sound files, so we had to learn how to set up the Arduino window in a way that the code was able to reference this extra file. 

This image requires alt text, but the alt text is currently blank. Either add alt text or mark the image as decorative. 
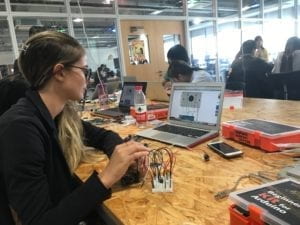
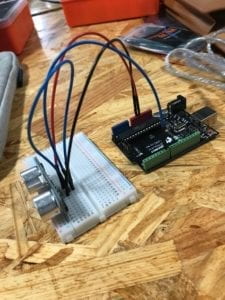
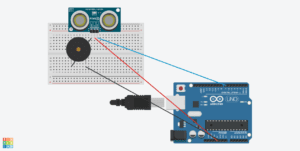
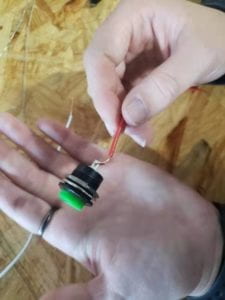
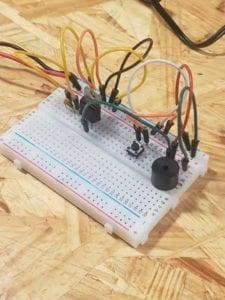
Sass finishing up the circuit with the buzzer and LED
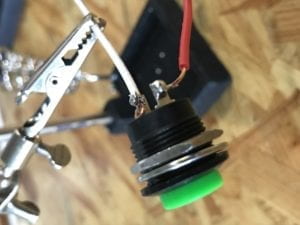
Finally, we began the task of navigating the sea of wires that was the speed game. After finally finding the correct resistors, we were able to build this circuit! The first time we had misplaced the ground wire into the row adjacent to where it should have been; this was an easy fix and then our circuit functioned properly.

https://drive.google.com/open?id=1gd32HQQ314P3S1dIa08y024E8SxEfQLv

.

Reflection:

Getting our kits
Getting our Arduino Kits!

WE FINALLY GOT OUR ARDUINO KITS :)))

After Sass and I played a few rounds, I noticed that my registered reaction speed was not as high as it should have been. I came to find that the wire end of the button that had been soldered last week had not been stripped high enough up the wire and, therefore, it did not have a strong enough connection down into the nodes. After I stripped in a little bit more, the connection was stronger and we got to have a real competition!

Questions:

1. Reflect how you use technology in your daily life and on the circuits you just built. Use the text Physical Computing and your own observations to define interaction.

In this modern age, I am never not surrounded by technology from the lights in our rooms to the watch on my wrist. The results of these circuits are no different in the sense that these basic functions are incorporated into our every day lives from the sound of our alarms in the morning to lights posted at the top of tall buildings at night to alert aircraft of their location.  As stated in physical computing,  interaction is not simply a + b = c but rather a*b= interaction.  The input in combination of the action with which you offered an input results in a completely different action is therefore and interaction.

2. Why did we use the 10K resistor with the push button?

We were required to use the 10K resistor with the push button so that the appropriate voltage was sent to the push button. If more voltage had gone to the button than the circuit would have short circuited, thus we used the 10k resistor.

3. If you have 100,000 LEDs of any brightness and color at your disposal, what would you make and where would you put it?

If I had 100,000 LEDs, I would use them to make an Avatar forest like the one from the movie. Every step, touch, and movement would result in a burst of colors and magic to fill the air. 

Recitation 006: Sensors by Stephanie Anderson

Introduction: on with ultra and buzzer

This recitation on this delightful Sunday afternoon focused on the introduction to sensors: incorporating them into circuits, coding with them, and practically using their function.

Objectives:

  1.  Create a working circuit with a sensor 
  2. Develop code that allows you to interact with the sensor and thus affect a LED, buzzer, or Servo 

Materials (as listed on the IMA website):

1 * Arduino Uno
1 * USB A to B cable
1 * breadboard
1 * buzzer
1* AKA Ultrasonic Sensor OR  HC-SR04
A handful of jumper cables

Process:

Today I worked with Emily on this recitation and we chose to use an ultrasonic sensor. We began with pulling up the suggested schematic for incorporating just the ultrasonic sensor and then made sure it was working properly

This image requires alt text, but the alt text is currently blank. Either add alt text or mark the image as decorative. Circuit with just the Ultrasonic

Emily then proceeded to incorporate the buzzer into our circuit while I created the code by using the foundation of the ‘ping’ code and adding in some lines with tone() in order to get an action from the buzzer because of the interaction with the ultrasonic sensor.

.
The Circuit diagram for the circuit with the sensor and buzzer

I found this website to be particularly helpful when I was refreshing myself on how to write tone()

Use tone() with Arduino for an Easy Way to Make Noise

Here is the code we came up with:

int sound = 7;
const int pingPin = 7;

void setup() {

Serial.begin(9600);
}
void loop() {

long duration, inches, cm;

pinMode(pingPin, OUTPUT);
digitalWrite(pingPin, LOW);
delayMicroseconds(2);
digitalWrite(pingPin, HIGH);
delayMicroseconds(5);
digitalWrite(pingPin, LOW);

pinMode(pingPin, INPUT);
duration = pulseIn(pingPin, HIGH);

inches = microsecondsToInches(duration);
cm = microsecondsToCentimeters(duration);

Serial.print(inches);
Serial.print(“in, “);
Serial.print(cm);
Serial.print(“cm”);
Serial.println();

delay(100);

if (cm >= 20)
{
tone(sound, 1000, 1000);
delay(1000);

}
else {
tone(sound, 2000, 1000);
delay(1000);
}

}

long microsecondsToInches(long microseconds) {
return microseconds / 74 / 2;
}

long microsecondsToCentimeters(long microseconds) {
return microseconds / 29 / 2;
}

Here is a link to the final working product. I narrate in the video, but you can see Emily’s hand moving closer and farther away from the sensor and the resulting change in tone from the buzzer due to her interaction with the ultrasonic sensor.

https://drive.google.com/file/d/1Bdc9exdpjyWZxH6BdQTjNo0KxiO1H4dZ/view?usp=sharing

Reflection:

The process of creating the code probably took a little longer than necessary because I originally was trying to build one from scratch and I was merging the wrong two files meaning I was trying to merge ‘ping’ with ‘toneMelody’ which was just extra. I did have a lot of fun with this recitation, however, because this was our first day writing our own code!

Questions:

1 )What did you intend to assemble in the recitation exercise? If your sensor/actuator combination were to be used for pragmatic purposes, who would use it, why would they use it, and how could it be used?

We used the ultrasonic sensor and saw how the values changed when we would move objects at certain distances away from it.  Because we built this sensor in a circuit with a buzzer, this technology could be used to deter intruders into a property. For example, if you had the ultrasonic sensor pointed out into the distance in the other direction of the door of the complex –  and when someone comes within a certain distance of the house – then the buzzer will go off; thus, deterring the intruder.

2) Code is often compared to following a recipe or tutorial.  Why do you think that is?

Code is defiantly like a recipe because it tells the computer at a specific time when to do what, where to do it, how to do it, and for how long. Without the specific steps completed in the recipe, then the final product would not be finished, just as is the case with code.

3) In Language of New Media, Manovich describes the influence of computers on new media. In what ways do you believe the computer influences our human behaviors?

Manovich brings up a interesting point on page 16 of his writing where he synthesizes that by the end of the 20th century, the problem was not how to create a new media object such as an image, but rather where to find the object that already exists. While we have the seemingly infinite knowledge of the world at our very fingertips (granted, when we are connected to wifi), we are not always the most productive of people and – instead of creating our own media – we  search for that which has already been made, thus, making us lazy.  In a way, with the support of Manovich’s implied messages, I agree and concur that computers negatively influence our human behavior. 

First Interaction Lab Recitation (building circuits) – Stephanie Anderson – Eric 006

Introduction:

The assignment for the first Interaction Lab Recitation was to follow the provided schematics of basic circuits and then build them. 

Objectives:

  1. Learn how to read a circuit diagram
  2. Complete the circuits
  3. Learn to Solder
  4. Create a button comprised of button and soldered wires

Materials (as listed on the IMA website):

  • 1 * Breadboard
  • 1 * LM7805 Voltage Regulator
  • 1 * Buzzer
  • 1 * Push-Button Switch
  • 1 * Arcade Button
  • 1 * 220 ohm Resistor
  • 1 * 10K ohm Resistor
  • 1 * 10K ohm Variable Resistor (Potentiometer)
  • 1 * LED
  • 1 * 100 nF (0.1uF) Capacitor
  • 1 * 12 volt power supply
  • 1 * Barrel Jack
  • 1 * Multimeter
  • Several Jumper Cables (Hook-up Wires)

Process:

Before we began to work with the circuits, we learned from Marcela how to solder where we then soldered wires to a button. We were able to complete objective 3 and 4 with no problems.

Hooking the wire on the button foot to prepare for soldering
Alligator clip holding button to prepare for soldering
Soldered button
doorbell
Picture taken from IMA website – Schematic of first circuit

After the successful creation of our battery, we went on to begin our circuits. This section was less fruitful. Initially, we came to a pause trying to figure how to finish the circuit loop and “ground” it.

lining up the components before wires
progress picture of circuit
Completed first circuit

  We struggled time-wise to complete our circuits and were unable to complete the other two circuits. Through the assistants of learning assistance we were able to understand all the appropriate wiring and complete our circuit.

Reflection:

I am disappointed that it took us so long to complete the first circuit and therefore were unable to work on the other ones and experiment without own ideas. It has been well over four years since I have worked with a breadboard and I was a busy rusty. I really enjoyed getting to work with the components and refreshing my memory of how to build a working circuit and look forward to building more (and my own designs) in the future!

Questions:

  1.  After reading The Art of Interactive Design, I think that the component of the circuit that includes the switch or button includes interactivity because the functions of the circuits depends on how we interact with them thus defining interactivity. 
  2. In Zach Lieberman’s talk about interactive art makes me think that if our work has the ability to change function based on human act, then were are therefore creating an “interaction” and thus interactive art. In his case, he uses the input movements of his hands to move the art which outputs the art moving. We create interactive art when we combine in the human or some other real work action in which the end product varies based on initial action.