Final Project Process – Stephanie Anderson 006

SORT YOUR TRASH; SAVE THE WORLD

Stephanie Anderson and Salome Demangeot

Eric Parren

Concept and Design

I think a component of this project that made it so fun to work on is that our project ended up looking completely different from how we initially began working on it.  

Original design for the physical component of the project
Concept design for how the sensors would recognize if you were sorting trash

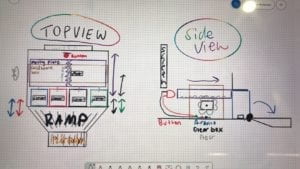
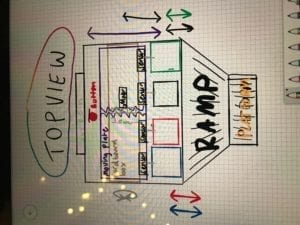
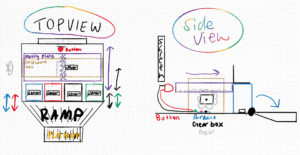
When we first began working on this project, I started to design it coming from a robotics background. The original design incorporated elements that would involve numerous robotic processes and give this project a physical interface like an arcade game. There would be gears, buttons, and many other physical pieces that would all need to be created in order to make this interaction successful. Another element of the initial designs were that we would use chips (like tokens) and you would put a chip in the correct bin in order to “sort your trash”. As I was creating various design, Salome was giving feed back and she suggested that we use light sensors as a means to record how the user sorts his or her trash. 

Once we agreed on using the light sensors, the design began to evolve. When starting to work on our final, I knew that I wanted to create a project that would have a practical, real-world use.  When we were starting this project, I took reference to the current games that China has available to help people learn how to sort their trash.  A popular version that I found included one that had four physical bins labelled according to the four sorting bins, and it had a deck of cards that contained images of items to sort. We were going to try and make four individual bins, but ended up just making the tops of each bins. This allowed us to save materials, conceal the wires and Arduino, and prevent extra variables that might have posed a problem with the user. For example, if we had physical bins with chips, how would we get the chips out of the bin at the end? This process would probably prove to be clunky for the user so we scrapped the idea of having the user use physical pieces. 

We ended up having a physical component that mirrored what a user would actually be doing with a trash bin which is to open it. This proved to be logical, and the most straight-forward approach to this project. 

Fabrication and Production:

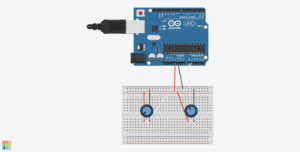
In terms of the Ardunio, the process was fairly straight-forward. We created our circuit with 4 photo-light sensors. We did not required too many additional components and we were able to use the wires provided from the kit because they did not require extra length. 

One of the main parts of our project included the cards. I used the Shanghai Government’s Trash Sorting poster as a reference, and I chose 40 items to make into cards. Some of the items that the poster offered I felt were repetitive, so not every object got a card. I used Photoshop and was able to cartoonize each card. 

Stephanie creating the cards in Photoshop while Salome creates the circuit

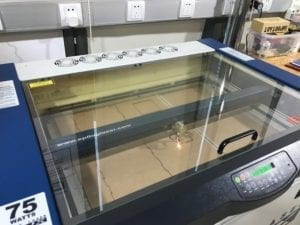
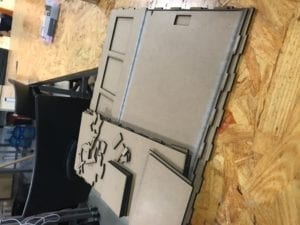
I created the physical interface using Makerbox.com to generate a laser cut box. When I had this schematic in Illustrator, I was able to put in my own design features such as the bin openings, Arduino upload cable openings, laptop space, and the insides of the box which made the “bins”.  Salome found trash bins online which were already 3D models, so we used those as our tops and we proceeded to cut the rest. 

3D Trash Bin Lins
Laser cutting our box and logos
Finished laser cuts
Assembly

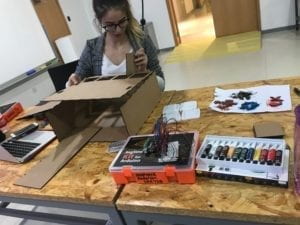
The code was probably the most exciting part of the project!! We included various classes, for loops, if and while statements, and long nights of thinking! The basis of our code lies in boolean statements that were necessary in the first part to being the progression of the game.  We originally were unsuccessful in our attempts to create a “intro sequence”. We went everywhere from if statements where it would read the sensor values, to switch cases, and then eventually to boolean statements at the suggestion of Eric. It was so rewarding and satisfying once we were able to finally bring all of the pieces together!!

User Testing

This project was very important to me and Salome, not just because it was our final, but also because of its practical use. Moving forward with it, I would like to make it available to our students and community at NYUSH so that people can better understand how to sort his or her trash. With that said, with such a sort amount of time, the success of this project was based in checklists and things to do!

as
Checklists for daysss
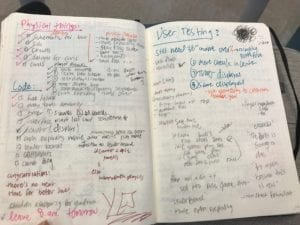
and usertesting.notes

Going into user testing there were things that we knew that we needed to improve/ work on. To start with, we had not really decorated our box or knew what we wanted it to look like yet. We taped together our best design and found that the users would appreciate having labels and more clear signs of what bins were what on top. This was helpful because originally we would have assumed that the users want this on the front face so that they could see these as they walked up. Another big task that we needed to finish was the starting sequence. We were not really sure how to properly code that as our previous attempts had not been working. I think that the basis of this problem had been that we were making the code too complicated and including too many statements which ended up confusing the computer and us. 

By the time we go to the final presentation day, I was really happy with our progress especially with how much that we had done. There is always more to do, but I was really proud of the fact that our project will work every time and we do not have to hope that one wire is plugged in or that the code will work this particular time or anything. It just works. It is reliable. I really appreciate this because growing up when I had robotics projects or coding projects, it would not always work 100% of the time, so I am really proud of how far I have come as well. 

Final Product

To get to the final product from user testing, we were able to debug our existing code to make it 100% reliable and create the boolean sequence that allowed the user to get used to how the game worked and understand the instructions. We were also able to construct that the code would reloop and restart as soon as the user had finished his or her own turn. 

Working through the code: https://drive.google.com/open?id=1m7EKRfjvRmtbmeqrjS6lo03qv6IH6gI8

Putting together the painted pieces
The finishing touches on our final!

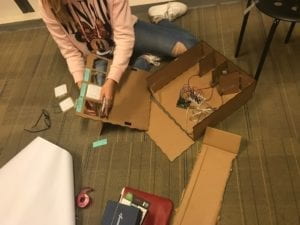
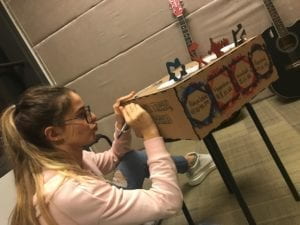
As far as the physical components, we painted and decorated our box. We also finalized the design for the bins by using our logos at the handles for our bins. In addition, we labeled and color coordinated the tops and bottoms of the bins in order to make it as clear as possible to the user where everything should go. It was also suggested to us that we have some sort of “cheat sheet” so that people could be studying while a friend was going. We included which cards should be sorted where on the insides of the bins. This works two fold: they can look at it while they are reading the instructions, or, at the end, they can open all of the lids and practice before they start again. 

Final product: https://drive.google.com/open?id=1IDJdS__sR7KRQ9HmcXO98l8x6TSF6mU_

Conclusion

This project was successful because of the teamwork and chemistry that Salome and I had. I can honestly say that I have never worked on a more efficient team. We were both on top of our game and equally shared the responsibilities and took initiative for what we needed to get done. There were several parts of the code and other steps in the process that I was really thankful to have Salome as my teammate, and I hope I can work with her again in the future!!

Once the project was actually over, it was fun to see how people originally thought an item should be sorted and see where it actually goes. I  think that with our project we were able to create a meaningful interaction that allowed users full control of their destiny. I hope that this also translates into real life when the next time they are thinking about just throwing everything into the residual waste bin. I think that once a user has completed their experience with our project, they are able to reflect on some of the “out-of-the-ordinary” cards. From interacting with our project, I think that people are able to learn about how to more appropriately sort their trash, and also pay attention to certain items they normally sort incorrectly. For example, I would have though that glass should be sorted as hazardous waste when it is, in fact, supposed to be sorted into recyclable waste. I think an important part of the end of this project is that it starts a conversation. Whether it is with me or Sass or it is with people around them, people are able to have a conversation about how they have been sorting their trash, or how they intend to do so from now on. In our society, people sorting their trash in correctly, or not at all has been a huge problem. When you do it once, you will not start to notice it, but in 20 years when you are seeing trash all over the streets and in our communities, you do not need to look far when you start asking who to blame. 

Moving forward, I would like to include leader boards where people can include their names and grade/staff.  I would like to be able to make this available for freshman to play during orientation or for RA’s to use as a game to see who gets free boba. Not only does creating this into a game give people an incentive to win, but, practically, it gives them a platform to learn how to do these things. I think one of the biggest challenges we face when it comes to sorting our trash correctly is a combination of not knowing where something goes and also using the excuse that it takes too much time. With “Sort Your Trash; Save the World,” you not only learn where to sort your trash, but that it only takes a few seconds to save the world from exploding. 

Recitation 10 Workshops – Stephanie Anderson – 006

Introduction:

This week during recitation, we first received a workshop about the map function, and then we were able to chose which workshop we wanted to go to. 

I chose to go to the Media Manipulation workshop while my final project partner, Salome, chose to go to the Object Oriented Programming workshop.  In regards to our final project, we are creating an interactive learning device (sort of like a game, but for the more desired outcome that you are able to learn from it), where we will be relying on media and images to teach people about how to sort their trash. I chose to go to this workshop, but I am focusing more on the design aspect of our interface and our project. Part of my responsibilities include designing the interface we will use for the project as well as designing the playing cards and other physical elements. From previous recitations and in-class assignments, I was having issues regarding how to call images and also how to play videos and manipulate image data. After the workshop, however, I feel I am more comfortable with the functions and how to write them. 

For my recitation project, I created a “Tom and Jerry” short 🙂

I used case() and switch() to make it more interactive, so that people had to press certain keys in order to make certain images appear. I thought this was fun also because the effect is a flip-book effect but also like a “jumping-old-timey-camera” which is more representative of the era from which Tom and Jerry were born.

Here is the video:

https://drive.google.com/open?id=1dTdVN7FLOc1goxONO67BEBH7_Vb6ynrv

Code:

PImage photo;
PImage photo1;
PImage photo2;
PImage photo3;
PImage photo4;
PImage photo5;

void setup() {
size(1000, 1000);
photo = loadImage(“TOM.jpg”);
photo1 = loadImage(“house.jpg”);
photo2 = loadImage(“bell.jpg”);
photo3 = loadImage(“knife.jpg”);
photo4 = loadImage(“tj.jpg”);
photo5 = loadImage(“mouse.jpg”);

println(“Press these keys on your keyboard: s , h , a, w, a, d, e , r, q , f, t, g”);
println(“hint: hold the keys down for full effect”);
//load image from your laptop
}
void draw() {
background(0);
//int image = 20;
map(0, 0, 255, 0, 1023);

}

void keyPressed(){
switch(key){
case’a’:
image(photo, 200, 400);
break;

case ‘s’:
image(photo1, 800, 800);
break;

case ‘d’:
image(photo2, 600, 200);
break;

case ‘e’:
image(photo2, 600, 400);
break;

case ‘r’:
image(photo2, 600, 600);
break;

case ‘f’:
image(photo5, 300, 800);
image(photo3, 100, 800 );
break;

case ‘g’:
image(photo4, 450, 450);
break;

case ‘h’:
image(photo5, 600, 800);
image(photo1, 800, 800);
break;

case ‘w’:
image(photo5, 600, 800);
image(photo1, 800, 800);
image(photo, 200, 400);
break;

case ‘q’:
image(photo5, 300, 800);
break;

case ‘t’:
image(photo, 100, 500);
image(photo3, 300, 500);
break;

}
}

Analysis:

The command of these functions will definitely be useful in our final projects when we are displaying our “cards” on the screen. 

Media Controller – Stephanie Anderson 003

The Process

For this week’s recitation, I was starting ambitious and was originally going to create a program that would allow me to adjust the tint of a picture using a light sensor. I was going to make boundaries using different ranges of the light and then try and adjust the tint on a smoother scale. The first problem that I ran into was that the light sensor I checkout required a special bread board which I was not familiar with. The next attempt at using a light sensor included using the one given to us in our kit. Unfortunately, I was not successful in this venture either. I ended up creating a program that allowed me to control the speed of a video with a potentiometer. In theory, this should have been pretty simple, but it took me a while to figure out how to write all the code that I needed. 

I ran into problems with being able to manipulate the speed of the video. I figured out that the issue was that I needed to switch two lines of code:  myMovie.loop() and myMovie.speed(). When I switched these lines in my setup() function then I was able to manually adjust the speed for the video. After this, I ran into another problem where I was unable to variablize the speed function. I originally made my own class, but then I realized that was ineffective. I was not able to call the class I created in the setup() function. I ended up creating a while loop that allowed me to have the sensorValue from the Ardunio potentiometer to manipulate the speed of the video. 

ARDUNIO CODE:

// IMA NYU Shanghai
// Interaction Lab
// This code sends one value from Arduino to Processing

void setup() {
Serial.begin(9600);
}

void loop() {
int sensorValue = analogRead(A0) / 4;
Serial.write(sensorValue);
map(sensorValue, 0, 255, 0, 10);
// too fast communication might cause some latency in Processing
// this delay resolves the issue.
Serial.print(sensorValue);
delay(10);
}

////////////////////////////////////////////////////

PROCESSING CODE:

import processing.video.*;
import processing.serial.*;
Serial myPort;
int sensorValue;

Movie myMovie;
void setup() {
size(700 , 1100);
frameRate(200);
myMovie = new Movie(this, “lilydumb.mp4”);
// myMovie.play();
myMovie.loop();

while(sensorValue> 0){
int x = sensorValue;

myMovie.speed(x);

}

printArray(Serial.list());

myPort = new Serial(this, Serial.list()[ 2 ], 9600);

}

void fastness(int x){
while(sensorValue > 0){
x = sensorValue;

}
}

void draw() {
if (myMovie.available()) {
myMovie.read();
}

image(myMovie, 0, 0);

while ( myPort.available() > 0) {
sensorValue = myPort.read();
}
println(sensorValue);//This prints out the values from Arduino
}

VIDEO:

https://drive.google.com/open?id=1kAzAEmWEq-JeKoO3K3kIbpL3thKqEagZ

After reading through the article, “Computer Vision for Artists and Designers,” by Levin, it made me think about some of the presentations from the past weekend from the “Machine Art” workshops. Simone spoke very passionately about his belief that  machines are only as smart as we make them. In the article, Levin articulates the power of the machine, but says how, in the past, the power of machines have been predominately used by the military and other government powers. Levin does mention, however, that the rise of modern technology has led to more open-sourcing and more community efforts on home-made projects.  I think this concept that he is referencing here is why I love working with Ardunio and Processing so much. They both have such diverse communities that include people of all backgrounds who are willing to anyone who presents a problem. Taking open-ended questions like our recitation and using our imagination to come up with projects that will be helpful is the magic of design and the benefit of engineering. 

Sources:

Levin, G. “Computer Vision for Artists and Designers: Pedagogic Tools and Techniques for Novice Programmers”. Journal of Artificial Intelligence and Society, Vol. 20.4. Springer Verlag, 2006. Reas, Casey and Fry, Ben. Processing: A Programming Handbook for Visual Designers and Artists. MIT Press, 9/2007. ISBN: 978­026218262. 

Final Project Proposal – Stephanie Anderson – 006

Sort your Trash; Save the World

Sort Your Trash; Save the World is a project with an intended purpose to help people better understand how to sort their trash. While many people do not see the effects in the short-term, the long-term effects of their carelessness will more than likely end in the destruction of the Earth and, consequently, the human race (not to be dramatic). In collaboration with Salome, we aim to create a project with an educational purpose of having a fun and interactive way for people (I say people broadly to mean people of ALL ages) to learn how to sort their trash. 

Final Schematic Design

Above, I have posted my design idea. The interface will appear as that of an arcade-style game.  There will be a screen behind the game that will act as a display. Here, cards will pop up with an image and the name of the item. Next to the cards will be a globe that will appear as a bomb with a fuse slowly getting shorter and shorter. The aim of the game is to sort x number of cards before the Earth explodes. The beginning of the game will start with the user selecting, 10, 20, 30, or 40 cards to sort in 30 seconds. You will be able to choose the number based on which can lid you close. Each bin (there are 4) will have a light sensor at the bottom. When you close the lid, the sensor will sense “darkness” and this range will be used to select. There will be a countdown and the game will begin. An image will appear and then you must close the lid or open the lid depending on if that is the appropriate bin. Your score count will increase as you get more and more correct. You will have three strikes. The first time you try to sort one item incorrectly, then a BIG red “X” will appear on the screen and you have to try again. Once you get 3 red “X”s then the bins will fall forward and you will have lost the game. If you are able to get the number sorted in time, then the same level used to slam the bins forward, will push the button to defuse the bomb. 

If we have adequate time and are able to complete the project this far, I would like to implement a “progress” page that will show the cards you sorted incorrectly and tell you which bin to place them in. 

Here is the master schedule for our plan of attack:

Sunday Monday Tuesday Wednesday Thrursday Friday Saturday
        21

final proposal

22 23


24

design playing field: bins/ box/ gear

25

print/create game field

26

design “ticking time bomb globe”

27

print/create game field

28

steph away

card design

29

steph away

card design

30

steph away

card design

1

draft circuit

2

assemble: sensors/ bins

3

assemble: sensors/ bins

4

code: sensors/ bins

5

assemble: gears / button

6

code: interface for game on screen

7

have project finished

8 9 10

project due

11 12

blog post

13 14

Basically, the first week will be designing the physical aspect of our project as well as the images that will be displayed. If they are simple, then we can figure out how to create them ourselves as doodles in Processing, or we can import images into a library. The second week will be coding and assembly week. We will make our circuits as well as coding the interface for our device. 

From the projects that I have researched (such as the Interactive Walls), interactive design projects tend to be the most successful when people are smiling. In Daniel Shiffman’s book, Learning Processing – while the majority of the book is written about coding certain examples for processing – one of the chapters entitled, “The World Revolves Around You,”  emphasizes the reason for doing your projects. For me, if your device can make someone smile, then I think you have accomplished your task. We will accomplish this through stylish interface as well as an aesthetically pleasing physical design that the users enjoy touching and manipulating. I think something we need to be careful of is that often times with projects like these, they are not built very strong; this means that you as the designer are worried every time someone touches your project that a wire will become loose or something falls off. I want to build this project in confidence of my design and of 100% accuracy. While trashing sorting is currently an on-going affair in China, it should be a more commonly done practice around the world. The overall goal of having this device is to show people how easy it is to sort your trash if you just take a few seconds to do it correctly. 

Sources:

Shiffman, Daniel. Learning Processing : A Beginner’s Guide to Programming Images, Animation, and Interaction, Elsevier Science & Technology, 2015. ProQuest Ebook Central, https://ebookcentral-proquest-com.proxy.library.nyu.edu/lib/nyulibrary-ebooks/detail.action?docID=4003651.

Serial Communication – Stephanie Anderson – 006

Introduction:

Working on combining the power of Processing and Arduino

Objectives:

  1. Combine Arudunio and Processing to create a program to carry out a desired function

Materials (as listed on the IMA website):

From Arduino Kit:

1 * Arduino Uno
1 * USB A to B cable
1 * breadboard
1 * buzzer
2 * Potentiometer
A handful of jumper cables

Process:

Exercise 1: Create an Etch-A-Sketch


For this first exercise, I created my circuit which consisted of two potentiometers. The main idea of this exercise with the basic code was to get used to having one input that would convert this input to ACIIS. Once I was able to get one synced up appropriately, I worked on getting the second potentiometer to be able to do the same thing. The fun part of this recitation was actually being able to combine the codes from the samples and then creating a device that allowed us to create our own sketches (although mine were rather abstract since I am not too adept at using the device).

The link below has a video attached of the success from connecting one potentiometer to a screen. This first part acted as one of the feet in the soon-to-be Etch A Sketch.

https://drive.google.com/open?id=1tAASJk-ovaka6x8ehbgKtQZ-73zTAIdt

The last video is of the final product and actually being able to draw with the Etch A Sketch. One problem that I had was that my lines were not so stable. I think this was due to loose connections on the part of the potentiometer.  In the future, I think that ideally I would like to use a bigger bread board in order to make this the most efficient because then I would have to bump into the wires in order to manipulate the potentiometer. 

https://drive.google.com/open?id=1aJ1z28cJ4BcI-ksfdA43ZYKV8FvIOLDh

Circuit Schematic:

The circuit below is for part one that was used to create the Etch A Sketch. The circuitry for this lab was simple compared to some of our projects; the main challenge was the code and getting Arduino and Processing to work together. 

,
Potentiometers

Final Etch A Sketch

https://drive.google.com/open?id=1tLvEg0kdJSAtoCiQVA-3-TZzHMRSRw6u

Exercise 2: Make a Musical Instrument

Again, the circuitry for this code, as seen below, was extremely simple. The fun part came with creating the code. I think the most fun I had was with figuring out how to get an object to follow my mouse. Ideally, I would have wanted an object with a fade behind it, but I think the process that looked the cleanest and clearest was when I had a shape such as an ellipse follow my mouse. This combined with the processing function of “mousePressed” allowed me to connect the buzzer to create a “music” (if you define that as poorly timed beeps). 

Screen record of object following mouse:

https://drive.google.com/open?id=1ivEejIAoaid_UXD05emhxW5A3RQuFdfX

Reflection:

The interaction for Etch A Sketch is pretty clear cut and obvious. Your movements result in the object on the screen consequently moving and creating whatever it is you want to make. This interaction is a high performance-level of interaction because there is not just an input action and then an output action. The device responds with how you respond which creates a more meaningful interaction.

In the same way, creating the instrument does the same thing. Depending on where you move will depend on where you your object goes. In addition, whenever you feel compelled to press your mouse, then the buzzer will make a noise. I do not think that creating this so-to-say is as “interactive” as the Etch A Sketch because you are merely pressing a button which in turn has one action. I think an additional component to make this device more interactive would be if moving your mouse up and down the screen made the subsequent note from the buzzer higher or lower.