Final Project: “Echo”- Kurt Xu- Eric Parren

The concept comes from the manipulation of sound, in which I want to achieve an effect which can help people release their pressure. To achieve that goal, I think that we can deign a proper reason for the users to let out their tension, which they may have concerns and worries to express. In the actual game, we use a series of command to make the users experience its similarity with the tension they feel in the real life and end it with a final scene in which they can scream freely and release all the pressures they gain previously, whether in game or in reality. In selection of the materials, we used the cupboard to make the outfit as it is relatively easier to get and as a pure, colorful and visually impactful expression. The pity is that we could have used some more materials to cover all the devices in a whole shell and construct a more unified impression if time had permitted. In the brainstorming part we went astray for several times, as at first, we want both visual magnificence and interactivity, which leads us to a deviation to our original goal which should be our core. Soon we realized that and returned to our initials. Some comptonization is made, but the overall effect of the finished project is satisfying.
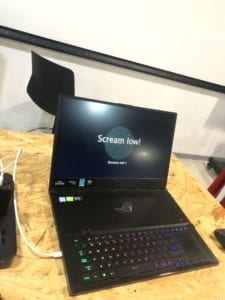
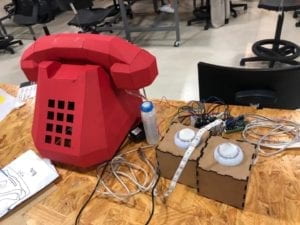
In the group project, I’m responsible for the programming part. The most difficult part is the shifting of stages on the basis of time, and I actually use a special variable to mark the stage time and increase its value at the end of every loop. The user text session provided us with valuable advises that we should be more informative, have more visual expression and add variation to the current process, like randomizing the sequence of the standard. Moreover, we redesigned our final scene and make it more delightful to enhance the comforting effect. The first scene is a test scene for the users to test their voice and the microphone and simultaneously understand the standard set of the game afterwards. We designed a red bar as the indicator of the amplitude and the rainbow bar below as the chart. The process accounts for the demonstration part. The second scene, which is the actual game scene, consists of 5 big stages and each stage have 10 minor levels for 0.8 seconds long each. This scene accounts for the mechanic and stressful repetitive work from which people may get their pressure. The final scene is a free-play scene designed to release the pressure of the users, which we use the colorful stripes and vortex to accomplish. In the IMA show, we also learned some deficiency of our project as the former stress-taking scene may be too long for some people and the whole intention of the program may not be easily understood. However, we are also pretty glad to hear some words of delightfulness and gratitude. We thank every user who had tried our devices. Your support is indispensable.
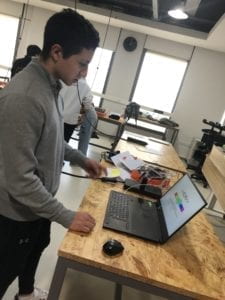
Our goal is to relieve people from everyday pressure. We define the sources of pressure, stimulate it with metaphor and provide a optimistic scene as the ending of the story. Everybody interacts with it differently, surprisingly. For example, a child picked up the speaker first as he thought that it should be the most important part of the project, while most of the adults stayed with the computer screen. But the reaction is similar. According to our audience, or to say, our “patient”, they may show baffled or at guard at first and leave with a sincere smile. I really wish that our project had brought the relief to people who really need it. The society can still function properly without the happiness of everybody, yet we still believe that as a society made up of living humans rather than machines, we should pay more attention on the benefit of people who are living in it, who may be troubled with the need of survival or the pressure of assignments. And I think though our attempt to reduce the burden which is artificially put on the back of people is not essential nor dramatically effective, it still worth a try and I shall follow that path.
Interaction Lab Documentation 10-Kurt Xu

WorkShop: Serial Communication

Exercise:

Arduino to Processing

processing

import processing.serial.*;

String myString = null;
Serial myPort;


int NUM_OF_VALUES = 3;
int[] sensorValues;
float cl=255;

void setup() 
{
  size(500, 500);
  background(0);
  setupSerial();
}


void draw() 
{
  updateSerial();
  printArray(sensorValues);
  background(0);
  colorMode(HSB);
  if (sensorValues[2]==1) 
  {
    cl=random(20, 255);
    fill(cl);
    ellipse(250, 250, sensorValues[0]/2.048, sensorValues[1]/2.048);
  }
}


void setupSerial() 
{
  printArray(Serial.list());
  myPort = new Serial(this, Serial.list()[0], 9600);
  myPort.clear();
  myString = myPort.readStringUntil( 10 );
  myString = null;
  sensorValues = new int[NUM_OF_VALUES];
}

void updateSerial() 
{
  while (myPort.available() > 0) 
  {
    myString = myPort.readStringUntil( 10 );
    if (myString != null) 
    {
      String[] serialInArray = split(trim(myString), ",");
      if (serialInArray.length == NUM_OF_VALUES) 
      {
        for (int i=0; i<serialInArray.length; i++) 
        {
          sensorValues[i] = int(serialInArray[i]);
        }
      }
    }
  }
}

Arduino

void setup() 
{
  Serial.begin(9600);
  pinMode(9, INPUT);
  pinMode(3, OUTPUT);
}

void loop() 
{
  int sensor1 = analogRead(A0)+1;
  int sensor2 = analogRead(A1)+1;
  int sensor3 = digitalRead(9);
  Serial.print(sensor1);
  Serial.print(","); 
  Serial.print(sensor2);
  Serial.print(",");
  Serial.print(sensor3);
  Serial.println();
  if (sensor3==1)
  {
    analogWrite(3, HIGH);
  } else
  {
    analogWrite(3, LOW);
  }
  delay(100);
}

Interaction Lab Documentation 9-Kurt Xu

Documentation

In this section, we dig deeper in Arduino’s capability to manipulate the moving pictures, from existing documents, webcam or websites though the Processing.

To the whole project, the key idea is the communication between the Processing and the Arduino. As the transimission is from Arduino to the Processing, we give value in the Arduino and transfer the variarables to the Processing through this function:

1.start the serial library

import processing.serial.*;
Serial myPort;
void setup() {
  myPort = new Serial(this, Serial.list()[ PORT_INDEX ], 9600);

the PORT_INDEX depends on the port that Arduino occupies, which can be identified with this fuction:

printArray(Serial.list());

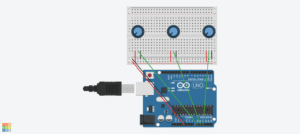
In my function i used three potentiometer to each control the speed, shade and the location of the video (if any key is pressed).

The main problem i face is that the potentiometers are not accurate enough to change the speed of the video, so i divide it for 100 times, and through the map() function, i fix the range of the location and the shade to (0,138) and (0,255) repectively.

Reflection:

In recent years, the art creation with technology involved is becoming more and more popular. Artists are trying to expand the way they can express themselves through their art works, and computers are also trying to expand their recognition of their operators from barely keyboard typing to a more multidimentional aspect, like sound, motion and even video itself, etc. The computer vision is a word that can conclude what i mentioned above, and is widely used “to track people’s activities”(VI,9). I’m deeply interested in that project which stimulates the development of interaction between human and computer, which should be a trend in the coming several decades.

About the project we do in the recitation, it’s actually a semi-computer vision as the computer is translating our manipulation and then manipulate the video accordingly. To improve that, we can expand our way of input, making it less intentional and endow the computer with more autonomy, which means, allowing it to process more on its own.

Work Cited:

Computer Vision for Artists and Designers: Pedagogic Tools and Techniques for Novice Programmers

Video Used:

Final Project Essay-Kurt Xu

Project Name: “Echo”

The inspiration comes from the shouting’s decompression effect by natural, yet people are restrained from actually doing that by various reasons, usually the fear of disturbing others. So we try to provide the user a reason to justify their act of screaming, which is to say, providing a place for people to release their pressure. And following that thought, we consider that the use of technology to provide feedback may possibly help people understand how stressful the status they are in and thus help them to confirm the relieving effect.

The project “Echo” will mainly translate your audio input into the visual output on the computer screen and simutaneously, keep monitoring your heartrate to estimate your stage of nervousness. Considering the resources we have, the latter one may be much harder, so it may be the main problem we may face. What we are trying to solve is the lack of related knowledge and possible equipment. Besides, as the main aim is not to encourage people to keep screaming or make noise but to achieve the conforting effect through that mean.The key issue is that we focus on is the visualization of the signal, which should aim to render a relaxing atmosphere. About that points, according to the pervious research we’ve made about the existing decompression softwares’ methodologyies, they usually use gentle movement of simple objects like circles/rectangles/triangles accompanied with generally relaxing soft music. We are considering taking the similar ideology as guidance in designing the program for the patterns.

To expand our project futher, we wish to translate the movement of the users simutanously. With viberation sensor and pressure sensor, we may also take the physical movement of the tester as a mean of input, thus expanding its interactivity. We also want to persuade our audience to wear or experience our device, so we decided to design something more appealing with a more desginated visual guidance. To achieve that, we decide to adopt a the idea our classmate suggested in class that we can design a device to control the elevation of the helmet to enhance the ceremonial sense.

To me, the definition of interaction is similar to the communication between human beings, as we convey messages through not only words but gesture, facial expression and body language as well, and the process to improve the interactivity of a certain project is to expand the way it reads and expresses itself, in other words, to intercept and to output.

Interaction Lab Documentation 8

In this week’s learning, shown the examples, we managed to establish a connection between the Arduino and the Processing programs, and in the recitation, we made some further attempts, like using the arduino to build a Etch A Sketch or a music instrument. I did the latter one, and my program and the video are below:

Processing:

import processing.serial.*;
int NUM_OF_VALUES = 2; 

Serial myPort;
String myString;
int values[] = new int[NUM_OF_VALUES];

void setup() {
  size(500, 500);
  printArray(Serial.list());
  myPort = new Serial(this, Serial.list()[0], 9600);
  myPort.clear();
  myString = myPort.readStringUntil( 10 );
  myString = null;
}

void draw() {
  noStroke();
  colorMode(HSB, 100);
  for (int i = 0; i < 500; i++) {
      stroke(i/6,255,255);
      line(i,0,i,500);
  }
  for(int k=0;k<10;k++){
    strokeWeight(1);
    stroke(0);
    line(k*50,15,k*50,500);
    fill(0);
    textSize(12);
    text("Fqz."+(131+k*50),k*50,10);
  }
  line(499,0,499,500);
  fill(0);
  rectMode(CENTER);
  rect(mouseX,mouseY,10,20);
  values[0]=int(map(mouseX,0,500,131,631));
  values[1]=int(keyPressed);
  sendSerialData();
  echoSerialData(200);
}

void sendSerialData() {
  String data = "";
  for (int i=0; i<values.length; i++) {
    data += values[i];
    if (i < values.length-1) {
      data += ","; 
    }else {
      data += "n";
    }
  }
  myPort.write(data);
}


void echoSerialData(int frequency) {
  if (frameCount % frequency == 0) myPort.write('e');
  String incomingBytes = "";
  while (myPort.available() > 0) {
    incomingBytes += char(myPort.read());
  }
  print( incomingBytes );
}

Arduino:

#define NUM_OF_VALUES 2 
int tempValue = 0;
int valueIndex = 0;
int values[NUM_OF_VALUES];

void setup() {
  Serial.begin(9600);
  pinMode(3, OUTPUT);
}

void loop() {
  getSerialData();
  if (values[1] == 0) {
    noTone(3);
  }else{
    tone(3, values[0]);
  } 
}

void getSerialData() {
  if (Serial.available()) {
    char c = Serial.read();
    switch (c) {
      case '0'...'9':
        tempValue = tempValue * 10 + c - '0';
        break;
      case ',':
        values[valueIndex] = tempValue;
        tempValue = 0;
        valueIndex++;
        break;
      case 'n':
        values[valueIndex] = tempValue;
        tempValue = 0;
        valueIndex = 0;
        break;
      case 'e': 
        for (int i = 0; i < NUM_OF_VALUES; i++) {
          Serial.print(values[i]);
          if (i < NUM_OF_VALUES - 1) {
            Serial.print(',');
          }else {
            Serial.println();
          }
        }
        break;
    }
  }
}

Also, i made some modification to the prototype, like the black rectangle tracing the mouse movement. Besides, in decoration, i added the rainbow strips and i also added the interval lines with numbers above to indicate the range of frequency for the practical part.

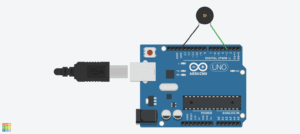
The circuit, on the other hand, is rather simple. As is shown in the program, i take port 3 as OUTPUT and GND as ground, and the whole circuit only consist of that two wire. The schemata is as follows.