Final Project Step 2 Proposal

Final Project Proposal 

Sortinator : 

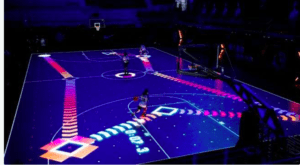
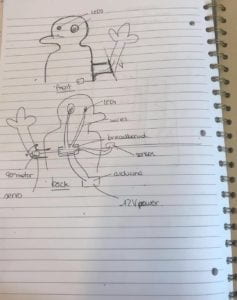
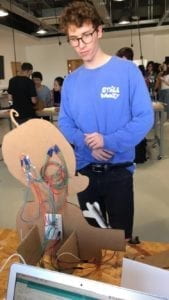
Recently China implied a sorting system for the trash, which I realised is confusing for many people, mainly the three trashes at school. This game would have three platforms made of cardboard with the shapes from the trash cans around the school (two circle and one rectangle) incrusted on it. 

The game has six components (a metal cup, pasta box, coke can..) already set out specially for the game, processing randomly puts up on the screen a picture of one of the component (let’s say the metal cup) and the player has to put the component on the right platform. The platforms have a pressure sensor/weigh sensor (to be figured out) which will tell wether it was placed on the right platform. If it’s correct then another component will appear. You are timed so you have to put the six components in the right platforms as fast as possible. 

This project would have a very significant impact as it is educational but remains fun to play and competitive. Inspiration for it comes from this WeChat game too teach Chinese people how to sort their trash in order to promote recycling and the new applicable law. 

∞ puzzle :

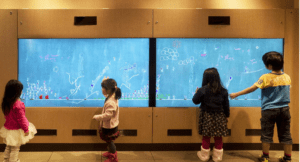
In front of you are nine squared pieces of cardboard on the table. Processing shows on the screen an image divided in six, with the six divisions mixed around randomly on the screen. Each piece of cardboard in front of you represent a section of the image on the screen. As quickly as possible you have to move around the pieces to figure out which piece corresponds to which division of the image and put it in the correct order just like a puzzle. When it is complete, you have won and want the score to be the lowest. 

I called this puzzle ∞ puzzle because you could potentially change the image to any image you want and divide it into nine pieces in order to make it a puzzle, so you can have as many puzzles as you want and never get bored. It can be repeatedly use.  It is intended as a form of entertainment. 

copycat: 

The aim of copy cat is to be a drawing competitive game played by two . The set up would consist of a screen split into two (left and right) displaying a random figure/drawing in light grey, the same on both screens. Both player have two controllers (such as more evolved potentiometer) and by making it go left/right/up/down, they can draw on the screen a black line over the drawing in one minute. The most accurate drawing of the two when the time has passed is the winner. Practically, there would need to be research of coding to make this work as I am unsure this can be done through coding and processing. 

The intended impact is purely a form of entertainment and competition amongst participants. 

Recitation 7 Processing Functions and Arrays

Functions and Arrays 

During the recitation: 

Step 1. 

We had to create a function to make up a design of our own with at least three different shapes. I made a house, with the a rectangle as a base, a triangle as a roof, a rectangular door and a squared window. 

Step 2: 

Create a loop to display the function 100 times with a variety of positions and colours.

Step 3: 

Create the arrays to make the 100 displayed houses with random positions and random colours and to have little movement:

Step 4 

For the last time, I made sure that the movement was staying on the canvas by adding the if condition:

if(xpositions[i] >= width-100) {
xpositions[i]=width-100;
}
if(xpositions[i] <= 0) {
xpositions[i]=0;
}
if(ypositions[i] >= height-100) {
ypositions[i]=height-100;
}
if(ypositions[i] <= 75) {
ypositions[i]=75;
}

The overall code is as followed: 

int number = 100;

float[] xpositions = new float[number];
float[] ypositions = new float[number];
color[] ccolor = new color[number];

void setup() {
  size (800, 800);
 for(int i = 0; i < number; i++) {
   xpositions[i] = random(width);
   ypositions[i] = random(height);
   ccolor[i] = color(random(255), random(255), random(255));
 
  printArray(xpositions);
  println();
  printArray(ypositions);
 }
 
}
void draw() {
  background(255);
  for(int i=0; i<xpositions.length; i++) {
    display(xpositions[i], ypositions[i], ccolor[i]);
    xpositions[i] += random(-5, 5);
    ypositions[i] += random(-5, 5);
    if(xpositions[i] >= width-100) { 
      xpositions[i]=width-100;
    }
     if(xpositions[i] <= 0) { 
      xpositions[i]=0;
    }
    if(ypositions[i] >= height-100) { 
      ypositions[i]=height-100;
    }
    if(ypositions[i] <= 75) { 
      ypositions[i]=75;
    }
    }
}


void display(float x, float y, color c ) {
fill(c);
  triangle(x, y, x+50, y-75, x+100, y); //roof
  fill(255,175,0);
  rect(x, y, 100, 100); //house
  fill(255);
  rect(x+40, y+70, 20, 30); //door
  rect(x+70, y+20, 20, 20); //window

}

Question 1:

When putting the for loop in Step up in setup() instead of in draw(), the loop only runs once, whereas when I put it in draw(), the loop ran over and over. 

Question 2:

The benefit of using arrays is that instead of having many long functions, it can display your design using variables which makes your code much shorter. To do so, it stores values in order to use them later on in the coding. In this way, to change a value, we can just change it at the top, instead of in the entire code. 

Final Project Step 1 Salomé Demangeot

Step 1 Final Project

A. Upon visiting the chronic exhibition where we saw technology based art pieces, I realised how important it was for the art’s purpose to be explanatory without having us, the creators, explaining the project by itself. For the final project, I really want my piece, whatever it is, to be understood as explicitly as possible without needing me saying “no, do that, not here, go here, yea that’s it”. The interesting thing about interactive exhibitions is that our first reaction is based on the physical aspect of the piece and trying to make it work, and then trying to understand its purpose and how it achieves it. 

B. An interactive project that I find compelling and useful in real life is a new game that is at the nike shops such as the one on Nanjinglu in Shanghai. It is an interactive a game because it lets one person play basketball on an interactive basketball court by himself as if there was another player there.

https://www.fitness-gaming.com/news/fitness-and-sports/nike-rise-digital-basketball-training-court.html

“basketball training system that combines an interactive digital court with advanced tracking technologies and a coaching app to track, assess and improve players’ performance.” (fitness&sports website) 

They use LEDs to light up the floor to let the player know where the defence is, track the steps the player makes, and when he scores which enables the device to assess how effective the player was. I find this a good research project as it really shows that interaction is a advancement of our human capacities through technology as technology replaces other players who are absent and replaces the coach who trains them in a more accurate and effective way as a coach can be wrong, but the trackers can’t. This inspires me to find a project that can be useful and fun for people to try and enjoy. 

Another interactive project is an interactive blackboard where there are small men displayed on the board who walk along the board from one side to the other, when they get to the other side, they reappear on the first end of the board. From there, when the people draw on the board, this affects the little people, so if they draw a wall, then the men won’t be able to walk to the other end of the board, or a little bump, the men will walk over it.

https://www.teamlab.art/w/blackboard/

A less interesting project  in my opinion, although still interactive device is this device which shows the level of theartifical  landscapes which does impact the people as they realise about climate change and the effect on the landscape, but the fact that they can’t touch the device really makes it less interesting in my opinion. So in my final project, I would like something to do with actually touching and having a reaction from that motion.

Artificial Arcadia – Measured and adjustable landscapes

C. My definition of interaction in the first research project was as such: “In my opinion, interaction is a repetitive process between two agents where a thought turns into an action with a response. It is a prolongation of our senses through means of advancing technology.” (from research project). Following my own definition, I would say that what makes it more interesting is not necessarily that the audience learns something new, but that there is some sort of motion and creativity for the audience to feel free to explore and play around, not just a repetitive  “I do this so the reaction is that” kind of project. This is what I’ve seen when analysing the “blackboard project” which is a lot of fun as you get to be creative. The basketball device from nike is an interesting combination of both teaching and challenging the player, but also just making it fun for him to visualise the defence and think in a short amount of time how he could react. 

Recitation 6 processing Animation and Homework

In red : code added to the previous step 

In black: code remaining the same as the previous step 

In green: voids to identify categories

Processing Animation and Homework 

In the recitation we had to animate a creation with a level of interaction. I made a square which moved diagonally on the screen and bumped on the upper corner’s edge. When the mouse is pressed, the collars of the square are randomly selected.

int x = 0;
int y = 0;
int x1 = 200;
int y1 = 0;
int x2 = 200;
int y2 = 200;
int x3 = 0;
int y3 = 200;
int w = 50;
int speed= 5;

void setup (){
size (800, 800);
}

void draw () {
background (250,221,199);

fill(149,59,59);
int r = int(random(0, 255));
int g = int(random(0, 255));
int b = int(random(0, 255));
if(mousePressed){fill(r,g,b); }
quad(x,y,x1,y1,x2,y2,x3,y3);
x = x+ speed;
y = y+ speed;
x1 = x1+ speed;
y1 = y1+ speed;
x2 = x2+ speed;
y2 = y2+ speed;
x3 = x3+ speed;
y3 = y3+ speed;

if(x >= height) {
speed= -speed; }
if(x ==0) { speed= -speed; }
}

Homework

Step 1: make the ellipse:

void setup (){
size (600, 600);
}

void draw() {
background(255);
ellipse(300,300, 50, 50);
strokeWeight(10);

}

Step 2: 

Make the ellipse shrink and expand: 


int circleDiameter=50;
boolean circShrink=false;

void setup (){
size (600, 600);
}

void draw() {
background(255);
ellipse(300,300, circleDiameter, circleDiameter);
strokeWeight(10);

if (circShrink) circleDiameter–;
else circleDiameter++;

if (circleDiameter==50|| circleDiameter==100)circShrink=!circShrink;
}

Step 3: 

Make the ellipse be coloured in HSB colours: 


int circleDiameter=50;
boolean circShrink=false;
int c = 0;

void setup (){
size (600, 600);
colorMode (HSB, 360, 100, 100);
}

void draw() {
background(360);
stroke(c, 100, 100);
ellipse(300,300, circleDiameter, circleDiameter);
strokeWeight(10);

c++;
if(c>360) {
c=0;
}

if (circShrink) circleDiameter–;
else circleDiameter++;

if (circleDiameter==50|| circleDiameter==100)circShrink=!circShrink; }
}

Step 4: 

Make the ellipse move around the screen depending on the arrows keys pressed. 

int circleDiameter=50;
boolean circShrink=false;
int y=300;
int x =300;
int c = 0;

void setup (){
size (600, 600);
colorMode (HSB, 360, 100, 100); }

void draw() {
background(360);
stroke(c, 100, 100);
ellipse(x,y, circleDiameter, circleDiameter);
strokeWeight(10);

c++;
if(c>360) {
c=0; }

if (circShrink) circleDiameter–;
else circleDiameter++;

if (circleDiameter==50|| circleDiameter==100)circShrink=!circShrink;

if (key == CODED) {
if (keyCode == UP) {
y–;
} else if (keyCode == DOWN) {
y++; }

if (key == CODED) {
if (keyCode == LEFT) {
x–;
} else if (keyCode == RIGHT) {
x++; } }
}
}

Documentation

During the recitation I learned to adapt myself to the Processing Animations which I was unfamiliar with. I am slowly starting to understand it, however after learning more about the processing function, the squares I drew in the first recitation on the basics of processing with different x y and height values could have been done much faster using a for loop which I was unaware of at the time. The functions that I find most useful are: 

mousePressed and keyPressed, they enable the user to change a variable (location points, color, speed…) when pressing on a key or the mouse. I find it useful as it can be combined with if statements quite easily and it will create a sort of game easy to interact with.

I found the colorMode with HSB quite difficult to code for the homework, but now that I found how to do it, I think it is quite useful and interesting to play around with the values and  by correspondence the shades. 

Midterm Project – Hello Hermi – Salomé Demangeot – Eric

 Hermi Halloween 

CONTEXT AND SIGNIFICANCE
In the spirit of Halloween, my project partner and I decided to make an interactive Halloween decoration. We thought about it after our lesson on rotation motors as it meant we could have movements interacting with kids trick or treating. Our project specifically pleased me because it was broad enough to be able to start from a simple creation,  using basic LEDs and motors and as we moved along in our creation process we could add difficulty and more technicalities. In my understanding, interaction is a repetitive process between two agents, with an action and a response, in such way it is a prolongation of our senses through means of advancing technology. Our project fits my definition as we aimed for kids to walk up to a house on halloween and depending on the distance, some sort of interaction would happen between them and the decoration. As we thought more about interaction, we came up with using the distance sensors, in theory when the kid is for instance 2-5meters away, Hermi would start waving and his eyes would be green, and as the kid approaches, Hermi would wave faster and his eyes would turn green. 

  • CONCEPTION AND DESIGN:

We started bringing our Halloween decoration by designing it, we wanted him to look friendly and not scary despite the horror theme of halloween as our target audience were kids, and the goal of halloween decoration is to invite kids to come to the house. We decided to make him using the laser cuter machine as it would enable us to choose and design how we wanted him to look. 


As our design was finalised, I started sketching how it would work on the technical side of things: what material we would need, where we would put them, how it would work together, so I made a rough draft in such way of his front and back: 

FABRICATION AND PRODUCTION:

Following the conception and design process, I decided to focus on the circuit part of things by using tinkercad.com while my project partner focused on the laser cutting design as we could not be two on one computer designing, we thought it would be more time efficient.


As we can see from this photo, tinkercad helped us design our circuit as it told us when there would be a short circuit so we were able to make modifications accordingly. On this picture for instance, we thought we were going to need a 12V input in order to make all the LEDs, motor and sensor work, however the 5V were sufficient, hence the short circuit on the motor shown by the red and yellow star. 

Tinkercad also enabled me to start writing a code that would be the guideline for the real code on Arduino: 

We then glued support to our foundation and soldered our LED’s as we needed to make them longer to reach the eyes: 

And proceed to building the circuit using a micro servo instead of the big servo and short LEDs first in order to make it as simple and check that our code would work. 


We then ran into a few technical difficulties such as finding the right angle servo which would not do full rotations, but actually make the angles which we coded as seen below, and also for reasons yet to be understood by TAs and professors, our Arduino board would not connect to our computer for hours which made us quite late on our schedule. 

Came the user-testing session, we did not have time to glue the right servo to the arm, so we used a micro servo and a piece of paper so that testers would understand the purpose. 

We retrieve many useful feedbacks in the user-testing session. From seeing people’s reaction to Hermi, we realised that the sensor would have to be moved because people would be drawn to his face and wave their hands in front of his eyes when the sensor was below on the table which we proceeded to change by hiding the sensor in a created bow tie made out of cardboard. Feedbacks such as adding sound, making the jaw drop, making Hermi scarier we attempted over the weekend but we ran into similar technical complications as our code would not upload on our Arduino for hours on. We tried to ask many teachers and TAs as to why that was,  but none figured out what was wrong, since a few hours later it started working again, and then the same issue would occur. Despite our best efforts to fix the issue such as adding tape around wires in case there was a shortcut, fixing the code and such, this issue was time consuming and so we decided to not add sound as we could not test wether it was working as our new code would not upload. Instead, we worked on changing the delay of reaction for when Hermi detected the change in position of the users in order to make it faster and be more effective, paint his body part, make his bow tie and attach his arm and balance him so that he could stand without us holding. 

By then, the project was finalised and worked effectively during the presentation. 

  • CONCLUSIONS:

In conclusion, we achieved our goal of making a friendly halloween decoration that would invite kids to come to houses for trick or treating. Overall, potential improvements could be made in the future to create more contrast using the infrared distance sensor such as adding sound, or making Hermi immobile and then suddenly move when they approach, but due to the technical difficulties, not related to coding or circuiting as our Arduino board would simply not work, we were unable to make those changes that we wanted which is upsetting for creators but has to be accepted as it is part of the experience. We valued having a working project over one which had many ambitions but was not working by the deadline so made our decisions based on our priorities. 

I think the designing aspect of a project is one of the most efficient, as the physical aspect of it accounted for a lot as it is an interaction project, the users first interact with the device by seeing it, so the fact that we worked a lot on the design, the laser cutting, and making the body parts work accordingly with the interaction accounted for a lot. Indeed, if the design of the project is not appealing, or the cardboard is obviously there and not painted over, then it does not seem finish and that will affect the interaction of the user and the device. This is mostly important as our project had for goal to entertain, and therefore needed to be entertaining to look at and seem professional, which we achieved.