Sort your trash; save the world – Salomé – Eric

Sort your trash; save the world 

Salomé Demangeot and Stephanie Anderson,

Eric Parren

CONCEPTION AND DESIGN:

The interaction aspect of our project came along with a lot of brainstorming ideas. In my project proposal, I imagined physical objects to place on sensors such as weight sensors or pressure sensors that would indicate wether the right object was put in the right bin. however that was ruled out since we don’t have weight sensors.

Then we thought of a lay out which would make the design look like a casino coin game such as : 

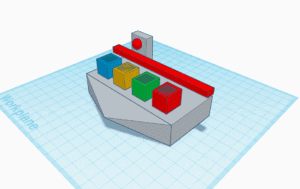
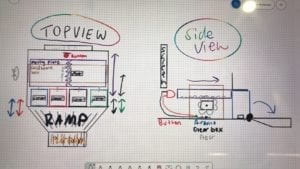
In such ways you would have the four bins in which the player would insert coins to indicate which bin they want to sort the image of the trash in. The red stick would be used to rotate and tip off the bins if the user sorts an image wrongly, and he would have to play again, if we wins then the stick would rotate backwards and press on the red button behind it which would indicate that the user won. Although we liked the interaction that came with this design, it was quite intricate and still did not solve our issue when it came to which sensor we needed to use.

As we brainstormed, we came up with the idea to use light sensors as they are reliable and in our opinion more interesting than buttons to press. Once we had chosen the sensors, it was much easier to come up with the design, to make it understandable we originally wanted to 3D print four trash cans such as this example https://www.thingiverse.com/thing:3377785 

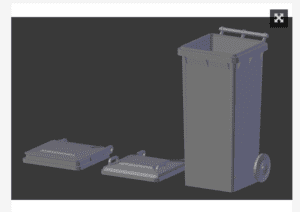
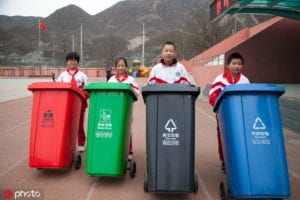
But we figured it would take a lot of the 3D printing materials, so we decided that the lid would be enough and we could design ourselves a clean platform to have the computer on, the lids, and the Arduino inside with the sensors. With the light sensors, we wouldn’t need the physical chips so the design would be very clean and the rest would be done through coding. Additionally for the sensors to detect the light, the users have to open the trash can, which meant they had to get used to the real life motion of opening and closing the bins. This is ideal for our project as we wanted to convey the importance of recycling in China, as I realised when coming up with these project ideas that at school, students struggle to know which bins to put their trash in as it is sometimes confusing. 

FABRICATION AND PRODUCTION:

Our coding strategy was divided as so: the sensors linked to Arduino, and on processing: instruction and cards displayed on the screen, fuse shrinking of one minute linked to a planet earth (to convey the end of the world if you lose the game), a timer displayed on the side, a counter of the player’s points, cross/check images when the player is right or wrong, and videos to show at the end depending on wether you won lost. 

While Stephanie focused on designing the cards and the platform, I 3d printed 4 of the lids of the trashcans shown above, designed the Arduino circuit that we would need and started on the coding. After user testing, the design slightly changed again upon the suggestions of testers.  As I did not have the cards yet, I focused on the one minute fuse with the earth and the countdown which looked like this: 


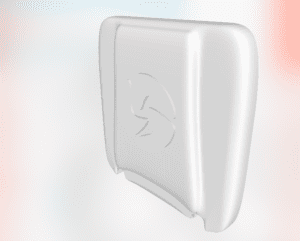
This is the lid used from https://www.thingiverse.com/thing:3377785

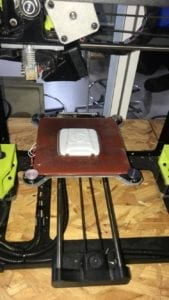
picture from the 3D lab printing the bin lids 

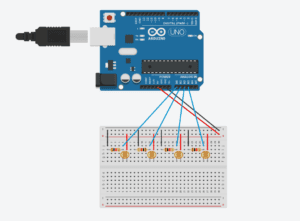
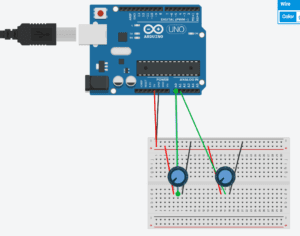
Designed circuit for 4 light sensors to Arduino 

Fuse of 1 minute and earth design video 

Countdown displayed video 

The coding for the game itself was fascinating, in order to have a functioning game we had to create numerous variables, if statements, for loops and booleans. Dividing our code in steps such as making the cards, the fuse of 1 minute, the timer etc really helped to be strategic about it and not messy. There came many challenges, from the creation of many timers (for the fuse, the timer of the game, the millis function taking into consideration the time of the intro, and the inability to add “delays” as it would delay all of our times). Something that we came up with during the coding was that we wanted the card to change to another one, only when the user got the right answer so they would keep going until they won. This was done to further highlight the pedagogic aspects of our project. 

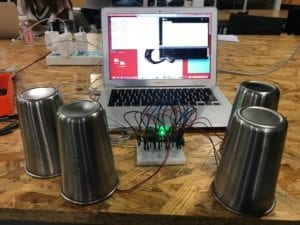
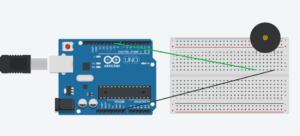
First test after coding for the sensors, the circuit and the cards code. Cups used to bring darkness to the sensors to check the cards were displaying correctly. 

User testing session 

By the time user testing came around, we had most of our project done, the design still needed finishing up pieces and we still needed to code the intro and the end videos so that the game would loop back. The feedbacks were useful for us to realise that we needed handles on the bins to make it easier for the players, perhaps add sound (which we did afterwards whenever the user made the answer correct). Additionally to add information following Tristan’s recommendation, we added “cheat sheets” in the back of the lid so that the users could see during the intro part of our game what goes in each bin. Overall, user testing was useful to polish our entire project and help achieve what I believe is reached its entire potential and more than what I ordinary thought it could be. 

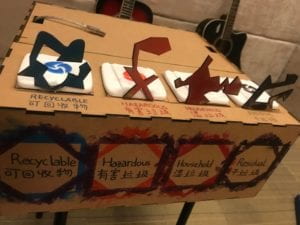
Designing using the official designs for the recycling trash cans as handles and writing the names of the bins in both languages to make it as clear as possible

CONCLUSIONS:

Our project had for goals to be a didactic interactive project where the user learns about recycling through a catchy and slightly competitive game without noticing that they learn. This was achieved through many of our coding and design techniques such making the cards reappear (not in a sequence but enough to make them learn), putting a timer with a goal of reaching 10 cards under one minute… Difficulties came with the fact that our game is for all age and all nationalities so we realised that surprisingly, young national Chinese kids tend to play better than international young-adult population who tried our game. During the IMA show, we saw many people wanting to try again to attempt “saving the earth”, and by seeing some of the cards again we could clearly see that they learned during the game. The interaction using light sensors was very effective as people were quite often surprised, almost amazed at seeing it working during the IMA show and often asked us question about how it worked.

An improvement suggested was to add a leaderboard to the game to make it more competitive but with hindsight I believe it was better done without as the game is meant to be didactic, a challenge with yourself to win, and not with others as it would create incentive to cheat and skip over learning potential.  The fast response of the game, without lagging due to the effectiveness of the sensors was a highlight. Furthermore, my project partner and I really worked well together as we both had similar ambitions, challenged ourselves with the coding and each of our qualities built on the other one’s weaknesses; combined we managed to make a well functioning interactive game. 

Stephanie and I strongly believe that this game could be more useful within the school, for example during orientation week or earth week during the semesters where we could make students play to win a prize a small prize at the end in the lunch-hall. In fact, we were approached during the IMA show by people wanting to further discuss our project and its potential.

Recitation 10

Workshop

I attended the workshop on Object Oriented Programming organised by Tristan. This workshop went over the class category in Processing and when to use them. 

We made an example in order to create an emoji: 

float x;

ArrayList<Emoji> emojiList;

void setup() {
size(600,600);

emojiList = new ArrayList<Emoji>();
for(int i=0; i<100; i++) {
emojiList.add( new Emoji(random(width), random(height), color(random(255), random(255), random(255)) ));
}}

void draw() {
background(255);
for(int i=0; i<emojiList.size(); i++) {
Emoji temp= emojiList.get(i);
temp.display();
}}

void mousePressed() {
emojiList.add( new Emoji(mouseX, mouseY, color(random(255), random(255), random(255))) );
float x = map(mouseX,0,width,width/4,3*width/4);
}

And in another class file called Emoji: 

class Emoji {
float x,y;
float size;
color clr;

Emoji(float startingX, float startingY, color startingColor) {
x= startingX;
y= startingY;
size= random(50,200);
clr = startingColor;
}

void display() {
fill(clr);
ellipse(x,y, size,size);
fill(255);
ellipse(x-size/4, y-size/6, size/4, size/2);
ellipse(x+size/4, y-size/6, size/4, size/2); }
}

The void mouse pressed was added in order to display a new emoji each time I click on the Canva, a new emoji appears:

We made an in class example using the map () function, in order to display the emojis only in a limited space on the canvas, no matter where we pressed on the canvas. 

For the exercise, I made a project which I will use in my final project of a fuse, so a line which would decrease in size from one side under a time constraint of one minute. I added an ‘if’ statement in order to make the line stop shrinking once its reached the other point (the position 0): 

Fuse f;

void setup() {
size(1000,800);
background(0,0,50);
f = new Fuse(width-290, height-250); //new Fuse
}

void draw() {
background(0,0,50);
f.display();
f.shrink();
}

and the Fuse class: 

class Fuse {
float x, y, fuseWidth, speed;
long iLength, itime;

Fuse(float tempX, float tempY) {
x= tempX;
y= height-250;

iLength = 600;
itime = millis() ;
speed = – iLength/6000.0;}

void display () {
stroke(255);
strokeWeight(10);
line(x-fuseWidth, y, x, y);}

void shrink () {
fuseWidth = speed * (millis()- itime) +iLength ;
if(fuseWidth<0) {
fuseWidth=0;
}} }

The result is as follows: 

Recitation 9 Media Controller

Recitation 9 Media Controller 

During this recitation I used a potentiometer connected to Arduino as the controller of the speed of a video file uploaded to processing. 

(Video used uploaded by Charles Icay )

For the Arduino code, I used the class example code for one variable from Arduino to processing. while the code for processing is as follows:

import processing.serial.*;
import processing.video.*;
Movie myMovie;

Serial myPort;
int valueFromArduino;

void setup() {
fullScreen();
// size(800,800);
background(0);
myMovie = new Movie(this, “dog.mp4”);
myMovie.loop();

printArray(Serial.list());
// this prints out the list of all available serial ports on your computer.

myPort = new Serial(this, Serial.list()[24], 9600);}

void movieEvent(Movie movie) {
myMovie.read(); }

void draw() {
while ( myPort.available() > 0) {
valueFromArduino = myPort.read(); }
println(valueFromArduino);//This prints out the values from Arduino

background (0);
image(myMovie, 0, 0);
float newSpeed = map(valueFromArduino, 0, 255, 0.1, 5);
myMovie.speed(newSpeed);}

The result was successful as I managed to make the video go faster and slower depending on the potentiometer values as show in the screen video below that was taken while I made the potentiometer values smaller and higher. 

As the reading Computer Vision for Artist and Designers,  explained “The intervening decades of research have yielded a great wealth of well­understood, low­level techniques that are able, under controlled circumstances, to extract meaningful information from a camera scene. These techniques are indeed elementary enough to be implemented by novice
programmers at the undergraduate or even high­school level.” which can be applied to today’s recitation, as just using a potentiometer, the computer vision can be modified as the user pleases. The ability for the user to change the computer vision as he pleases is the substance of interactivity as there is communication between the participant and the computer. 

Final Project Step 3 Essay

Sortinator

After discussing our six project ideas with my project partner, we decided on one I called the sortinator. After further discussion together about the technicalities of the project, we drastically changed the concept of the game and how we want to make it, but kept the overarching goal. Indeed, the original idea is based on the fact that recently China implied a sorting system for the trash, which I realised is confusing for many people, considering the four trashes at school. The purpose of the interactive project is to teach to everyone who participates, no matter the age, how to sort out the trash in China based on the four trash cans. It would tackle a situation that is current and in everyone’s daily lives here in Shanghai as it is a recurring problem around the school and dorms as we have received many emails about our difficulties to sort the trash correctly. 

The original game idea from the project proposals included four platforms made of cardboard with the shapes from the trash cans around the school (two circle and two rectangle) incrusted on the cardboard. In front of the participant there would be six elements and when a picture of one of them shows up on the screen, they’d have to put the element on the correct platform under time constraints. However, though the concept of the game is interactive and works theoretically, practically it is a different situation. The sensors that we would have to use are weight sensors in order for the computer to differentiate which element is put on which platform which are unavailable at school, and having only a few components to sort is very limiting for the game and not too hard. My project partner came up with a whole different game which would involved coins just like an arcade game that we would but in the correct box (representing the trash), and we thought of a system so that if you got one wrong then the boxes would tip over and the coins would fall back down to the player. However, we again ran into multiple issues regarding the lack of sensors that we’d want to use and the practicality of where to put them so that the boxes tipping over to release the coins would not affect the sensor wires and the whole circuit. 

Our final and for now most practical idea that we came up with is to have four trash cans similar to the ones found on the streets or at the dorms with the lids on , that we would 3D print in smaller versions (as seen on the picture below). We would put a light sensor in the four trashcans so that when an image pops up on the screen, the participant has to open the lid of the trash can which it would go in. Upon the light entering in the trash can, the sensor would detect wether it is the right trashcan or not that is opened. If the light is in the correct on, then the image border would light up green and in order to get another picture, the participant has to put the lid of the bin back down in order to get another picture. 

http://global.chinadaily.com.cn/a/201907/20/WS5d326f77a310d830564000c0.html ) 

This game would be under time constraints and the aim would have to get ten done in the amount of time set and the pictures could be randomly put amongst thirty (so that not everyone has the same pictures). In order to make the time constraint interactive we would design on processing a ticking time bomb where the bomb is the earth (as shown in the image). This would send the message that if you don’t get the ten objects in the right trash on time, then the earth dies. 

The significance of this project is quite straightforward: teach about recycling in an entertaining and competitive way while promoting the idea that the earth dies a little each time someone does not recycle. This successfully targets my interpretation of interaction as there is a clear communication between the participant and the bin they choose to put the trash in and the computer. The physicality of the movement of opening and closing the bin correctly is significantly the same as one would do in the streets so that it forms a habit to quickly know which bin to put it in. The competitive aspect that comes with the time constraint is interactive as the line burning shows the amount of time the participant has left to “save” the earth. 

Recitation 8 Serial communication

Recitation 8 Serial Communication 

Step 1 Make an ellipse with potentiometers: 

Using the multiple values in class example, here are the changes I made: 

(Arduino)

void loop() {
int sensor1 = analogRead(A0);
int sensor2 = analogRead(A1);

int mappedValue1 = map(sensor1, 0, 1023, 0,255);
int mappedValue2 = map(sensor2, 0, 1023, 0,255);

Serial.print(mappedValue1);
Serial.print(“,”); 
Serial.print(mappedValue2);
Serial.println()

(Processing)

int NUM_OF_VALUES = 2;

background(0);
ellipse(sensorValues[0], sensorValues[1],50,50);

Step 2 Make a line etch-a-sketch: 

Still using the in class example of multiple values: 

(processing)

float xoldvalue;
float yoldvalue;

stroke(255);
line(xoldvalue, yoldvalue, sensorValues[0], sensorValues[1] );
xoldvalue = sensorValues[0];
yoldvalue = sensorValues[1];

Make an instrument 

I used the one value file to do this

(processing)

if (mousePressed && mouseY>250 ) {

}

(Arduino: 

if (valueFromProcessing == ‘H’) {
digitalWrite(ledPin, HIGH);
tone(ledPin, 2000);

} else if (valueFromProcessing == ‘L’) {
digitalWrite(ledPin, LOW);
tone(ledPin, 8000);
} else {
digitalWrite(ledPin, LOW);
noTone(ledPin);

}

Result: this made the sound of the buzzer, and when the mouse went above 250 (half) of the canvas, then the tone of the buzzer was higher pitched (8000).