Dancing Digits-Shina Chang- Eric Parren

  • Conception and Design

Dancing Digits was an interactive project that utilized full-hand motion in order to play. A big factor to the design of the game required a comfortable and eye-catching stage or platform. The stage was created so that players would know to use their fingers to press the corresponding keys they see displayed on the screen.

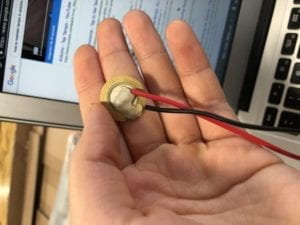
The stage was first designed to cover the keyboard half of a laptop to simulate the feel of an arcade game where it is just the player, the screen, and the dancefloor. The first design also incorporated three buttons a leaderboard button, reset, and start. As for the sensors we first thought about using piezo vibration sensors with the hopes of allowing players to just tap the sensor and not have to push a button

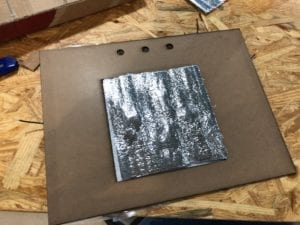
We then went forward with laser cutting the stage and first, we used the brown, really opaque wood with the center stage cut out and attempted to add in a flashy stage made of foam and under it, the piezo vibration sensor would be attached. But this design was rejected as it did not portray the dark and neon theme we had in mind for the game.

To fulfill the flashy theme the game was to have lights shine from the inside of the stage piece, so in order for the light to show through the platform we had to laser cut again but with less opaque acrylic. This time the platform had the game’s title along with instructions cut out from it on either side of the center stage. Then the platform was painted black except for the stage and the front panel.

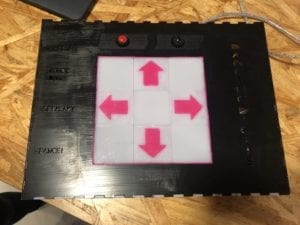
This look was the final decision as it was the most practical and matched the theme. This time the stage was not cut out but rather sketched out (engraved into the acrylic) which made tracing it with the neon pink paint easier.  

  • Fabrication and Production

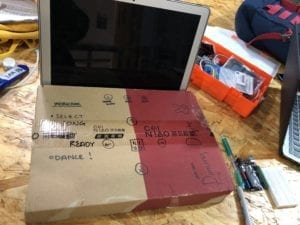
The most significant aspects of the game were the visual appeal and the ability to maintain the user’s attention with proper song choice, adequate engagement, and competitiveness. Finding the right visual design took a lot of trial and error as well as three attempts of laser cutting the platform. We first printed the platform out on the brown stiff cardboard material but during the user testing we had the actual cardboard prototype on display and it’s visuals were not well-liked. The user testing session could have been more helpful if more of the game completed at the time. However, with what little was done it has received a lot of helpful constructive criticism. Most users enjoyed the aesthetics of the game on the screen so that is how the dark and neon platform theme came to be. Users also asked for the game to be faster and more challenging which was a success. The game soon worked well at a reasonable tempo but was difficult to play and master on the first and sometimes second tries. 

This is what users during user testing had to work with. Not very engaging the prototype did not portray what the game meant to. 

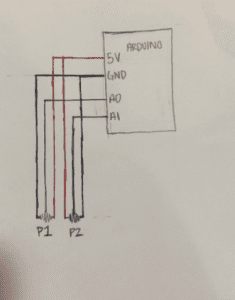
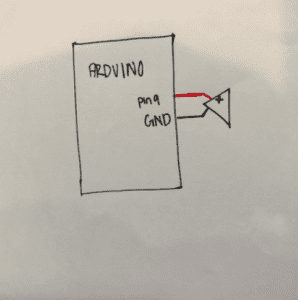
The list of suggestions was pretty extensive but the most important one was the suggestion for better instant feedback for the player. This suggestion influenced the changes from piezo vibration sensors to the usage of buttons, more bright colors on the screen when the player does something whether it be good or bad, an attempt to implant lights onto the platform. 

User testing led to the addition of mini push buttons to be placed underneath each corresponding directional arrow key. The buttons gave the user instant physical feedback. As the user pressed on the arrow key they felt a click indicating they have successfully clicked the arrow and that whether or not they timed it well would be the deciding factor of receiving points. This feedback coupled with the visual instant feedback was beneficial for a game like Dancing Digits.

  • Conclusion

The goal of Dancing Digits was to allow music loving gamers to have their own portable version of the famous Dance Dance Revolution. In terms of interaction, this game seems to be quite interactive as you have to use Arduino sensors to interact with what is being visualized on the screen. The platform in which the sensors are placed allows for an increase of interaction as the game gets more difficult. The user would have to improve over time to be able to accomplish harder levels. I think that if a user did not care for having the cool and eye-catching platform piece of the game then Dancing DIgits can be denoted to being just another rhythm computer game. However, it is difficult to do so because the platform is a part of the Dancing Digits experience.

When audiences interact with the game they know without further explanation of what they are expected to do. Some questions may stem from when they should be pressing buttons, but to add to the difficulty of the game I believe the player should be wise enough to figure out the timing of the game eventually. 

To improve Dancing DIgits I would like to incorporate working lights into the platform so it is more enticing for the users. I would also like to expand the song library and song difficulty. For example, allow users to press two directional arrows at the same time rather than only one at a time. I have learned to plan thoroughly before starting to build parts for projects. I felt as if this project could have been much less wasteful if I had better planned the visual aspect of the game much earlier and quicker than when I made the platform. 

I believe that the platform is what separates Dancing Digits from just being classified as a computer-friendly version of Dance Dance Revolution. Despite the platform use, Dancing Digits is a tribute to the dying arcade game Dance Dance Revolution, however, Dancing Digits is just a more modern and office friendly version. I believe that making miniature more portable versions of vintage or soon-to-be vintage games allows the game’s legacy to continue to live. Dance Dance Revolution for me holds a lot of sentimental memories of having fun as a very little girl and would hate to see it disappear, so this project was very fun. It was also quite touching to witness my personal growth from being a young girl who played the original version to a student who made her own version of the childhood favorite. 

  • Code

Arduino

// IMA NYU Shanghai
// Interaction Lab
// For sending multiple values from Arduino to Processing
const int LEFT = 4;
const int RIGHT = 5;
const int UP = 6;
const int DOWN = 7;
int start = 12;
int restart = 13;

void setup() {
Serial.begin(9600);

pinMode(start, INPUT);
pinMode(restart, INPUT);
pinMode(LEFT, INPUT);
pinMode(RIGHT, INPUT);
pinMode(UP, INPUT);
pinMode(DOWN, INPUT);
}

void loop() {

int l=digitalRead(LEFT);
int r=digitalRead(RIGHT);
int u=digitalRead(UP);
int d=digitalRead(DOWN);

int startState = digitalRead(start);
int restartState = digitalRead(restart);

// keep this format
//Serial.print(pause);
Serial.print(l);
Serial.print(“,”); // put comma between sensor values
Serial.print(r);
Serial.print(“,”);
Serial.print(u);
Serial.print(“,”); // add linefeed after sending the last sensor value
Serial.print(d);
Serial.print(“,”);
Serial.print(startState);
Serial.print(“,”);
Serial.print(restartState);
Serial.println();
// too fast communication might cause some latency in Processing
// this delay resolves the issue.
delay(100);
}

Processing

      • Final Code
        • import ddf.minim.*;
          Minim minim;
          AudioPlayer file;// IMA NYU Shanghai
          // Interaction Lab
          // For receiving multiple values from Arduino to Processing

          /*
          * Based on the readStringUntil() example by Tom Igoe
          * https://processing.org/reference/libraries/serial/Serial_readStringUntil_.html
          */

          import processing.serial.*;

          String myString = null;
          Serial myPort;

          int NUM_OF_VALUES = 6; /** YOU MUST CHANGE THIS ACCORDING TO YOUR PROJECT **/
          float[] sensorValues; /** this array stores values from Arduino **/

          Arrow left;
          Arrow right;
          Arrow up;
          Arrow down;
          int screenState;

          void setup() {
          size(1400, 800);
          smooth();
          setupSerial();
          PFont font;
          font = loadFont(“AvenirNext-Heavy-48.vlw”);
          textFont(font);
          left = new Arrow(0, -50, -60, 0, 0, 50, 0, -30, 80, 60, width/2, 600);
          right = new Arrow(0, -50, 60, 0, 0, +50, -80, -30, 80, 60, width/2, 600);
          up = new Arrow(+60, +80, -60, +80, 0, 0, -30, 80, 60, 80, width/2, 600);
          down = new Arrow(-60, +80, 0, +160, 60, 80, -30, 0, 60, 80, width/2, 600);
          score=0;
          back = loadImage(“background.jpg”);
          sback =loadImage(“sback.jpg”);
          screenState=0;
          minim = new Minim(this);
          file = minim.loadFile(“Erebus.aiff”);
          }

          void draw() {
          updateSerial();
          printArray(sensorValues);

          if (screenState==0) {
          startScreen();
          } else if (screenState==1) {
          //file.rewind();
          //file.play();
          gamePlay();
          } else if (screenState==2) {
          //file.pause();
          endScreen();
          }
          // use the values like this!
          // sensorValues[0]

          // add your code

          //
          //if (sensorValues[4]==1) {
          // if (screenState==0) {
          // gamePlay();
          // }
          //}

          //if(screenState==0&&sensorValues[2]>0){ //works without buttons
          // screenState=1;
          //}

          //if (sensorValues[5]==1) {
          // screenState=0;
          //}

          //if(screenState==2&&sensorValues[3]>0){ //works without buttons
          // screenState=0;
          //}

          if (onScreen==true) {

          if (sensorValues[2]>0&&dir==3) { //UP ARROW

          float cPX= up.x;
          float cPY= up.y;
          int tDist = int(dist(700, 50, cPX, cPY));
          if (tDist<100) {
          fill(250, 255, 13);
          rect(600, 50, 200, 100);
          score+=100;
          if (tDist<50) {
          fill(48, 255, 31);
          rect(600, 50, 200, 100);
          score+=100;
          }
          }
          }
          }
          if (sensorValues[3]>0&&dir==4) { //DOWN ARROW
          float cPX= down.x;
          float cPY= down.y;
          int tDist = int(dist(700, 50, cPX, cPY));
          if (tDist<100) {
          fill(250, 255, 13);
          rect(600, 50, 200, 100);
          score+=100;
          if (tDist<50) {
          fill(48, 255, 31);
          rect(600, 50, 200, 100);
          score+=100;
          }
          }
          }

          if (sensorValues[0]>0&&dir==1) { //LEFT ARROW
          float cPX= left.x;
          float cPY= left.y;
          int tDist = int(dist(700, 50, cPX, cPY));
          if (tDist<100) {
          fill(250, 255, 13);
          rect(600, 50, 200, 100);
          score+=100;
          if (tDist<50) {
          fill(48, 255, 31);
          rect(600, 50, 200, 100);
          score+=100;
          }
          }
          }

          if (sensorValues[2]>0&&dir==2) { //RIGHT ARROW
          float cPX= right.x;
          float cPY= right.y;
          int tDist = int(dist(700, 50, cPX, cPY));
          if (tDist<100) {
          fill(250, 255, 13);
          rect(600, 50, 200, 100);
          score+=100;
          if (tDist<50) {
          fill(48, 255, 31);
          rect(600, 50, 200, 100);
          score+=100;
          }
          }
          }
          }

          void keyPressed(){
          if(key==’r’||key==’R’){
          screenState=0;
          }

          if(key==’s’||key==’R’){
          screenState=1;
          }

          }

          void setupSerial() {
          printArray(Serial.list());
          myPort = new Serial(this, Serial.list()[ 3 ], 9600);
          // WARNING!
          // You will definitely get an error here.
          // Change the PORT_INDEX to 0 and try running it again.
          // And then, check the list of the ports,
          // find the port “/dev/cu.usbmodem—-” or “/dev/tty.usbmodem—-”
          // and replace PORT_INDEX above with the index number of the port.

          myPort.clear();
          // Throw out the first reading,
          // in case we started reading in the middle of a string from the sender.
          myString = myPort.readStringUntil( 10 ); // 10 = ‘\n’ Linefeed in ASCII
          myString = null;

          sensorValues = new float[NUM_OF_VALUES];
          }

          void updateSerial() {
          while (myPort.available() > 0) {
          myString = myPort.readStringUntil( 10 ); // 10 = ‘\n’ Linefeed in ASCII
          if (myString != null) {
          String[] serialInArray = split(trim(myString), “,”);
          if (serialInArray.length == NUM_OF_VALUES) {
          for (int i=0; i<serialInArray.length; i++) {
          sensorValues[i] = int(serialInArray[i]);
          }
          }
          }
          }
          }

          void great(){

          }

          void good(){

          }

      • Arrows
        • class Arrow {
          //feilds
          float x, y, xp, yp, a, b, c, d, e, f, m, n, o, p;//constructor
          Arrow(float _a, float _b, float _c, float _d, float _e, float _f, float _m, float _n, float _o, float _p, float _x, float _y) {
          x=_x;
          y=_y;

          a=_a;
          b=_b;
          c=_c;
          d=_d;
          e=_e;
          f=_f;

          m=_m;
          n=_n;
          o=_o;
          p=_p;
          }
          //methods
          void display() {
          pushMatrix();
          noStroke();
          fill(255, 31, 188);
          triangle(x+a, y+b, x+c, y+d, x+e, y+f);
          rect(x+m, y+n, o, p);
          y-=54;
          popMatrix();
          //}
          }
          }

      • End Screen
        • void endScreen() {
          image(sback,0,0,width,height);
          fill(0);
          rect(0,height/2.3,width,150);
          file.rewind();
          //background(0);
          textAlign(CENTER);
          fill(255, 31, 188);
          textSize(50);
          text(“Game over”, width/2, height/2);
          textSize(40);
          text(“Score: ” + score, width/2, (height/2)+50);
          textSize(28);
          text(“Press R to play again”, width/2, (height/2)+85);
          if (keyPressed==true) {
          if (key==’r’||key==’R’) {
          screenState=0;
          }
          }
          }
      • Game Play
        • float time;
          int score;
          PImage back;
          PImage sback;
          int interval = 100;
          float lastAddTime = 0;
          boolean start = false;
          boolean onScreen = true;
          int dir =int(random(1, 5));void gamePlay() {

          file.play();
          screenState=1;
          background(255);
          image(back, 0, 0, width, height);
          line(0, 100, width, 100);
          //rectMode(CENTER);
          fill(0);
          rect(600, 50, 200, 100);
          fill(255);
          textSize(40);
          text(“Score: ” + score, width/3, 600);
          time++;
          if (time==300) { //fix time for song
          file.pause();
          screenState=2;
          }

          if (onScreen==true) {
          if (dir==1) {
          left.display();
          if (left.y<=50) {
          onScreen=false;
          arrows();
          }
          } else if (dir==2) {
          right.display();
          if (right.y<=50) {
          onScreen=false;
          arrows();
          }
          } else if (dir==3) {
          up.display();
          if (up.y<=5) {
          onScreen=false;
          arrows();
          }
          } else if (dir==4) {
          down.display();
          if (down.y<=5) {
          onScreen=false;
          arrows();
          }
          }
          } else if (onScreen==false) {
          dir=int(random(1, 5));
          onScreen=true;
          }
          }

          void arrows() {
          left = new Arrow(0, -50, -60, 0, 0, 50, 0, -30, 80, 60, width/2, 600);
          right = new Arrow(0, -50, 60, 0, 0, +50, -80, -30, 80, 60, width/2, 600);
          up = new Arrow(+60, +80, -60, +80, 0, 0, -30, 80, 60, 80, width/2, 600);
          down = new Arrow(-60, +80, 0, +160, 60, 80, -30, 0, 60, 80, width/2, 600);
          }

      • Start Screen
        • void startScreen() {
          image(sback,0,0,width,height);
          fill(0);
          rect(0,height/2.3,width,130);
          score=0;
          //background(0);
          fill(255, 31, 188);
          textAlign(CENTER);
          textSize(40);
          text(“Dancing Digits”, width/2, height/2);
          textSize(30);
          text(“Press S to Start”, width/2, height/2+50);
          time=0;
          }

Recitation 11: Serial Communication Workshop by Shina Chang

I attended professor Young’s Serial Communication workshop with the hopes to improve my serial communication skills. The course was catered towards the student’s final projects, so we mainly worked with circuits that go from Arduino to Processing but we also covered Processing to Arduino. I chose to document the Processing to Arduino circuit. Hopefully, I can try to incorporate some type of feedback for my projects user when they play my final project game. Maybe when players touch a sensor lights will flash or turn on to indicate to the player that they are using the game correctly. 

Code:

Processing:

import processing.serial.*;

int NUM_OF_VALUES = 2; /** YOU MUST CHANGE THIS ACCORDING TO YOUR PROJECT **/

Serial myPort;
String myString;

int values[] = new int[NUM_OF_VALUES];

void setup() {
size(500, 500);
background(0);

printArray(Serial.list());
myPort = new Serial(this, Serial.list()[ 3 ], 9600);

myPort.clear();
myString = myPort.readStringUntil( 10 ); // 10 = ‘\n’ Linefeed in ASCII
myString = null;
}

void draw() {
background(0);

values[0] = mouseX;
values[1] = mouseY;

// sends the values to Arduino.
sendSerialData();

echoSerialData(200);
}

void sendSerialData() {
String data = “”;
for (int i=0; i<values.length; i++) {
data += values[i];
//if i is less than the index number of the last element in the values array
if (i < values.length-1) {
data += “,”; // add splitter character “,” between each values element
}
//if it is the last element in the values array
else {
data += “n”; // add the end of data character “n”
}
}
//write to Arduino
myPort.write(data);
}

void echoSerialData(int frequency) {

if (frameCount % frequency == 0) myPort.write(‘e’);

String incomingBytes = “”;
while (myPort.available() > 0) {

incomingBytes += char(myPort.read());
}

print( incomingBytes );
}

Arduino:

#define NUM_OF_VALUES 2 /** YOU MUST CHANGE THIS ACCORDING TO YOUR PROJECT **/

/** DO NOT REMOVE THESE **/
int tempValue = 0;
int valueIndex = 0;

/* This is the array of values storing the data from Processing. */
int values[NUM_OF_VALUES];

void setup() {
Serial.begin(9600);
pinMode(9, OUTPUT);
pinMode(11, OUTPUT);
}

void loop() {
getSerialData();

int brightness1 = map(values[0], 0, 500, 0, 255);
int bightness2 = map(values[1], 0, 500, 0, 255);

analogWrite(9, values[0]);
analogWrite(11, values[1]);

}

//recieve serial data from Processing
void getSerialData() {
if (Serial.available()) {
char c = Serial.read();

switch (c) {

case ‘0’…’9′:

tempValue = tempValue * 10 + c – ‘0’;
break;

case ‘,’:
values[valueIndex] = tempValue;

tempValue = 0;

valueIndex++;
break;

case ‘n’:

values[valueIndex] = tempValue;

tempValue = 0;
valueIndex = 0;
break;

case ‘e’: // to echo
for (int i = 0; i < NUM_OF_VALUES; i++) {
Serial.print(values[i]);
if (i < NUM_OF_VALUES – 1) {
Serial.print(‘,’);
}
else {
Serial.println();
}
}
break;
}
}
}

Recitation 9: Final Project Feedback by Shina Chang

Project 1:  Pick Your Pokemon!

This project is an interactive game that has a mystical feel to it much like the scene in Harry Potter when the hat chooses which house a student is put into. It consists of four boxes with a different pokemon type inside of each box and a center box where a heartbeat sensor is located. The users have to answer questions that are designed to provoke different heart rates and after the set of questions, the game will compile the information gathered and choose the ideal pokemon type for the user. A question that was asked was how are they going to create questions so provoking that it would change someone heart rate while answering it. My feedback to help them with this challenge is to add a timer to the question that way the player is pressured to think quickly. One problem with this proposal, however, is the timer could just make the user nervous and anxious which could affect their heart rate. 

Project 2: Ball of Confusion

This project is also an interactive game that utilizes questions for the user to answer. In this case, the game is designed to bring awareness about the bad in the world. As the user is a ball that rolls around the goal of the user is to purposefully encounter these worldly issues. Similarly to Super Mario the ball, the user, will be able to maneuver as Mario can in Super Mario. The feedback that was given was about the questions that the makers of the game intend to ask. There are many issues in the world and it is very difficult to have a successful game centered around all of them. So we suggested that they are to choose one specific topic and focus the questions on that. 

Project 3: Anger Visualizer 

This project’s vision is to make the user angry with the hopes that anger increases their heart rate, and then the increased heart rate levels trigger a contraption that blows out steam from it whilst it is worn like a headband. This seems like a cool concept however there are too many uncertainties within the project. Everyone reacts to anger differently so it would be nearly impossible this project, with the resources available, to use anger. A suggestion was to make this project into an interactive toy. As the user provokes a toy and makes it “angry” then once it reaches a certain level it will blow steam from its ears like cartoon characters. 

Project 4: Super Bow 

This project is also an interactive game. The goal of the game is to create human versus human interaction using machinery. It also incorporates the athleticism of an archer and requires trivial intelligence. As the user goes to answer the question that is shown on the screen the player must pull back the arrow and shoot at the correct target with the correct answer on it. A suggestion for this project was to make it a multiplayer game to create fun competition. Also to add different types of questions similarly to Jeopardy, this way it makes the game fairer as some people may be more knowledgable in certain topics than others. 

Dancing Digits:

Feedback for my project was to utilize sensors that make playing Dancing Digits easier. At first, the game was going to use either pressure sensors or buttons until we were suggested capacitive sensors. This was a really helpful suggestion as I was not aware of these sensors. These sensors really give the user the full experience of a game similar to Dance Dance Revolution because they do not require to be pushed on. The next suggestion was to utilize a pattern from a song to make the workload a little smaller than what is expected. I think this is a good suggestion to keep as a back up because I would like to keep as much of this project original. 

Final Project Essay by Shina Chang

Title:

Dancing Digits

Project Statement:

While researching fun and interactive games I found that small and portable is an attractive attribute when it comes to toys and games. For example, the TechDeck was a very popular toy made specifically for the fingers, so taking the concept I want to make a smaller version of popular dancing game Dance Dance Revolution  (DDR) by Konami. This is a full-body engaging game that is great to play alone or with a group of friends. So combining the appeal of a smaller version of a game similar to Dance Dance Revolution will be the optimal type of game to carry around. This game would be advertised towards students who seek a new and unique way to spend their leisure time. 

Project Plan:

The plan for this project is to form the code to respond musically, in other words, there will be a lot of timing between Arduino and processing. Because we are working with music everything must work at the proper times or else it will take away from the playing experience. To start off we will work with the stage and its capacitive sensors and then the code to make sure that they are working properly. and then inserting music will be our next challenge. I hope to have a song choice of at lest 1 or 2 songs but by the user testing date the project will most likely only have one. We will have to laser cut out the stage we plan to use for our mini version of DDR.

The stage will be small enough to be transported around easily while it has enough space for someone to place their hand on it mimicking a person’s legs with their fingers. the stage will consist of four directional arrows one pointing forward, backward, right, and left. The starting position for the user’s fingers will be the center of the stage. The stage will have lights that make the game more visually attractive. 

Context and Significance:

After doing research on projects like TechDeck and DDR I realized I want to incorporate the attractive features of both projects into this project. From TechDecks the idea of creating a finger=friendly version of a skateboard to make it more portable is brilliant and then the whole aspect of an at-home musical entertainment system like DDR is very profound. So to combine these two game attributes into one will create a unique game that is memorable on its own. This game will be similar to DDR in the sense that our project takes into account the hands accessibility. It is difficult to “step back” with fingers propped vertically like human legs, so only the hard version of a song will incorporate the use of the backward pointing arrow. 

Recitation 8: Serial Communication by Shina Chang

Week eight’s recitation required us to make two circuits and use both Arduino and Processing to build two mini projects. The most challenging part I found was deciphering which parts of the code had to be processed through either Arduino or processing, but as I continued to work on the two projects I learned to ask myself what am I trying to do and to what part of the circuit? So if I was trying to make a buzzer go off I knew the coding for it had to take place in Arduino and if I wanted something to be drawn on my computer screen it had to go through Processing. 

Exercise 1:

My first project was building an etch-a-sketch using two potentiometers and processing. One major flaw I encountered was that the “sketch” always starts at point (0,0), so there is a line from (0,0) to wherever the sketch is starting. 

Code:

Arduino:

// IMA NYU Shanghai
// Interaction Lab
// For sending multiple values from Arduino to Processing

void setup() {
Serial.begin(9600);

}

void loop() {
int pot1 = analogRead(A0);
int pot2 = analogRead(A2);
//int xCoord = map(pot1, 0, 1023, 0, 255); //would this be the size of my screen in processing?

//int yCoord = map(pot2, 0, 1023, 0, 255);

// keep this format
Serial.print(pot1);
Serial.print(“,”); // put comma between sensor values
Serial.print(pot2);
Serial.println();

// too fast communication might cause some latency in Processing
// this delay resolves the issue.
delay(100);
}

Processing:

// IMA NYU Shanghai
// Interaction Lab
// For receiving multiple values from Arduino to Processing

/*
* Based on the readStringUntil() example by Tom Igoe
* https://processing.org/reference/libraries/serial/Serial_readStringUntil_.html
*/

import processing.serial.*;

String myString = null;
Serial myPort;

int NUM_OF_VALUES = 2;
int[] sensorValues;
int xCoord;
int yCoord;

int pxCoord;
int pyCoord;

void setup() {
size(500, 500);
background(255);
setupSerial();
}

void draw() {
updateSerial();
printArray(sensorValues);

xCoord = int( map(sensorValues[0], 0, 1023, 0, 500));
yCoord = int (map(sensorValues[1], 0, 1023, 0, height));

strokeWeight(2);

line(pxCoord, pyCoord, xCoord, yCoord);

pxCoord = xCoord;
pyCoord = yCoord;

}

void setupSerial() {
printArray(Serial.list());
myPort = new Serial(this, Serial.list()[ 3 ], 9600);

myPort.clear();

myString = myPort.readStringUntil( 10 );
myString = null;

sensorValues = new int[NUM_OF_VALUES];
}

void updateSerial() {
while (myPort.available() > 0) {
myString = myPort.readStringUntil( 10 );
if (myString != null) {
String[] serialInArray = split(trim(myString), “,”);
if (serialInArray.length == NUM_OF_VALUES) {
for (int i=0; i<serialInArray.length; i++) {
sensorValues[i] = int(serialInArray[i]);
}
}
}
}
}

Exercise 2:

This exercise took me a bit longer than anticipated. For me it was hard at first to decide wether or not my project had multple values or just one. Once I figured out it was just one it was easier from there. I did have trouble with my processing code when I tried to make different rings have different pitches. At first the frequency would only go up one “step” instead of the intended 3 or 4 steps. I soon found out it was because I said if any value above the initial value is pressed on then the buzzer will sound, but it had to be any number less than the pressed value so that the frequency associated to that specific value is made. 

Code:

Arduino:

// IMA NYU Shanghai
// Interaction Lab
// This code receives one value from Processing to Arduino

char valueFromProcessing;

void setup() {
Serial.begin(9600);
pinMode(9, OUTPUT);
}

void loop() {
// to receive a value from Processing
while (Serial.available()) {
valueFromProcessing = Serial.read();
}

if (valueFromProcessing == ‘S’) {
noTone(9);
} else if (valueFromProcessing == ‘H’) {
tone(9, 500, 100);
} else if (valueFromProcessing == ‘L’) {
tone(9, 1000, 100);
} else if (valueFromProcessing == ‘M’) {
tone(9, 2000, 100);

delay(10);
}
}

Processing:

// IMA NYU Shanghai
// Interaction Lab
// This code receives one value from Arduino to Processing

import processing.serial.*;

Serial myPort;
int valueFromArduino;
int x = 250;
int y = 250;

void setup() {
size(500, 500);
background(0);

printArray(Serial.list());

myPort = new Serial(this, Serial.list()[ 3 ], 9600);

}

void draw() {
noStroke();
fill(255, 0, 0);
ellipse(x, y, 3, 3);
stroke(255, 0, 0);
strokeWeight(3);
noFill();
ellipse(x, y, 50, 50);
noFill();
stroke(255);
strokeWeight(5);
ellipse(x, y, 100, 100);
noFill();
stroke(0, 255, 0);
strokeWeight(8);
ellipse(x, y, 150, 150);
// to read the value from the Arduino
while ( myPort.available() > 0) {
valueFromArduino = myPort.read();
}
println(valueFromArduino);//This prints out the values from Arduino
println(mouseX, mouseY);
}

void mousePressed() {
if(mouseX == x){
myPort.write(‘S’);
}else if (dist(x, y, mouseX, mouseY) <26) {
myPort.write(‘H’);
} else if (dist(x, y, mouseX, mouseY)<51) {
myPort.write(‘L’);
} else if (dist(x, y, mouseX, mouseY)<76) {
myPort.write(‘M’);

}
}