In the first recitation of the interaction lab, my partner and I were given two tasks. The first one is to solder long wires to an arcade button, and the second one is to build three electronic circuits based on the diagrams given online.
The materials given are listed below.
- Breadboard
- 1 * LM7805 Voltage Regulator
- 1 * Buzzer
- 1 * Push-Button Switch
- 1 * Arcade Button
- 1 * 220 ohm Resistor
- 1 * 10K ohm Resistor
- 1 * 10K ohm Variable Resistor (Potentiometer)
- 1 * LED
- 1 * 100 nF (0.1uF) Capacitor
- 1 * 12 volt power supply
- 1 * Barrel Jack
- 1 * Multimeter
- Several Jumper Cables (Hook-up Wires)
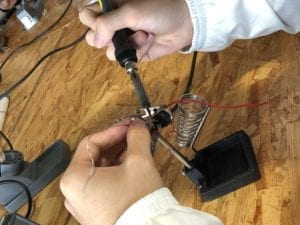
The solder section is not that difficult for my partner and me, because we both have tried soldering in our high school. Under the guidance of the IMA assistant, we defined the specific tasks to be done, and the do’s and dont’s in the soldering section. We had to be really cautious during the work since the temperature of the electronic soldering iron is extremely high. I finished my part first, and my partner met some problems that the temperature of his soldering iron is not high enough, which took him long to find out what was wrong. I gave him mine, and we finally soldered the wires to an arcade button successfully.

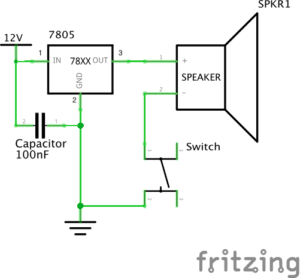
After we finished the solder section, we started to build the three circuits. The first task was to build a door bell on the breadboard, and it was actually the most difficult one, because neither my partner nor I had ever used bread boards to build circuits. We didn’t know where to start, so we decided to consult the IMA assistant. With her detailed explanation, we had a general understanding of the principle of breadboard and began to build the circuit step by step according to the diagram. After the completion of the circuit, we found that the sound of the speaker was faint. Therefore, we changed the speaker and finally completed our first task successfully.

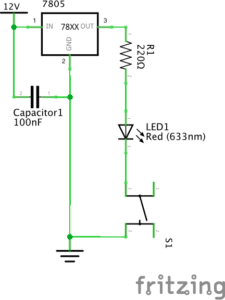
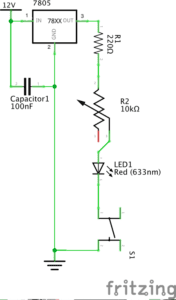
After completing the first circuit, my partner and I became more proficient. The second and the third task were to build two circuits with lamp and dimmable lamp respectively. We used a multimeter to measure the resistance values of the two resistors, and selected the resistor of 220 ohms according to the diagram, and connected it to the circuit. We made adjustments on the basis of the original circuit and completed these two tasks smoothly.


Answer to question 1:
The author of The Art of Interactive Design define interactivity in terms of a conversation: a cyclic process in which two actors alternately listen, think, and speak. To apply this idea to our work, I consider my partner and I as a group, and all the components of the circuit work as the other group. The two groups are similar to the concept of “actors”. We used our fingers as a signal to the circuit, and after a series of processes through different components, the circuit gave its response, such as ringing, lighting, and so on. In my opinion, that’s what interactivity is about in this case.
Answer to question 2:
Interaction design requires imagination and creativity, while physical computing serves as a tool to realize people’s conception. These two combine romantic humanistic feelings and rational science, thus interactive art will be born.