The complete version is here: https://drive.google.com/open?id=1PJePD4xGHVjOKV4HEffk7oLUqKAOKHSd
Conception and Design:
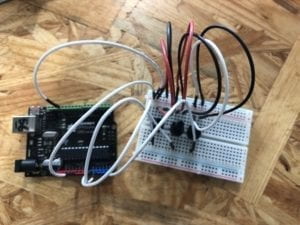
Our final project is an interactive horror game, where users find their way out in a dark maze by pressing a button to hear the melody that shows the correct direction, and then move around with arrow keys. If the player is moving in the correct direction, the volume of the melody would go up and vice versa. Besides, there are monsters in the maze making finger-snapping sound, which works the same as the melodies. The player gets a jump scare if going the wrong way. In the beginning, we used only the keyboard for input, but later we changed the “L” key for “listen” into a big button connected to the computer controlled by Arduino. In that way, the user can use both hands together which improves operability. Also, the button is placed in a wooden box with a religious symbol that stands for sound, which makes it more interesting and mysterious.
button and its box:
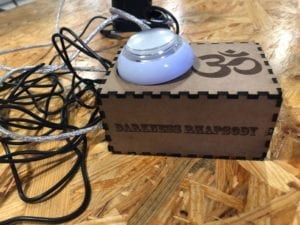
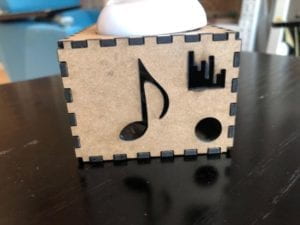
We thought about making the button into a necklace-like design so that it would look like an amulet and give users a more immersive experience, However, the button turned out to be oversized for an amulet. To match our title which is a parody of Bohemian Rhapsody, all of the melodies come from Queen songs.
Fabrication and Production:
We expected the game to be calming and relaxing before, but we soon found that the unknown things behind the darkness make it quite a good choice to be a horror game.
The main point is on coding. It took me several days to learn creating customized functions and integrate them in a logical structure by myself.

We started from designing a maze map with several turnings and areas where monsters hide.

At first, I wrote functions to keep the player outside certain areas without using the picture of the map. But later I realized that I could let the program detect the color of the pixels nearby to form obstacles instead of making the maze all over again. For monsters, I still needed to mention their position because no one would bump into them if the areas were colored.
To edit the sound effect and make them work as expected, I drew boundaries on the map and fit the melodies and monster sound into the program one by one.
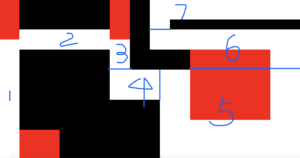
I learned how to have stereo sound and 3D audio effect before these knowledges were taught in class. Since the effect of Processing library was not satisfying enough, I also used software like Adobe Audition and FL Studio to have a better listening experience. For the melodies from Queen, I either recorded some solo parts or played them with online virtual piano. As for the finger-snapping sound, it comes from the beginning of the song Killer Queen.
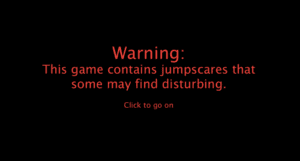
The whole process was sometimes scary, for I needed to test the trigger areas of the monsters and often got a surprise jump scare. I drew the inspiration of making jump scare from the game Five Nights at Freddy’s and used the designs of animatronics from the game, which turned out quite entertaining and effective.
What happens when you go the wrong way:
During the user test, almost everyone spoke highly of our project, and many of them were scared out of their wits. By the way, the horror effect worked as well in the IMA Show.
A student gets scared by the project on IMA Show:
After the user test, we added a tutorial in the hope that it would help users learn about the basic game controls. However, we ignored that we were actually explaining too much during the user test and thus overlooked the vagueness of game instructions. The tutorial itself was in fact not easy to understand, and people tended to skip instruction texts. We could have made a more detailed tutorial containing voice instructions and simpler maze design, but we did not make it due to the lack of time.
Conclusions:
The goal of our project was purely to scare horror-game lovers as much as possible to entertain them. It is also great fun to watch others play and gets scared. When you are highly focused, it is easy to scare you by having something weird jumping out of the screen, even if the thing itself is not quite terrifying. As a game with a lot of input, calculation and decision-making, it is a good match for my definition of interaction. The users need to pay a lot of attention and can be extremely nervous when moving around or standing at a crossroad, which shows the charm of a horror game. The only regret was the inefficiency of the tutorial. But after all, I made an amazing horror game that scares people and devoted a lot of time and effort to polish it up, using songs from the favourite band to make it more interesting. I hope I could learn more about game design to make the project a real work of art that attracts everyone and is easy to learn about.
code:
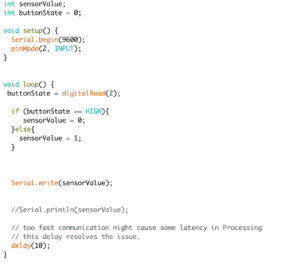
Arduino:
Processing:
Main Strcture:
import processing.serial.*;
Serial myPort;
int val;
import processing.sound.*;
SoundFile file1;
SoundFile file2;
SoundFile file3;
SoundFile file4;
SoundFile file5;
SoundFile file6;
SoundFile file7;
SoundFile win;
SoundFile mons;
SoundFile scream;
SoundFile tut1;
SoundFile tut2;
SoundFile tut3;
int sentinel = 0;
int rad = 10;
int PosX= rad;
int PosY = 750 – rad;
int PosXt= 720;
int PosYt = 770;
float speed = 4;
color b = color(0);
PImage map;
PImage map2;
PImage tardis;
PImage freddy;
PImage chicken;
PImage spring;
PImage foxy;
PImage toyBonnie;
PImage BB;
float size = 0.6;
void setup() {
printArray(Serial.list());
myPort = new Serial(this, Serial.list()[ 2 ], 9600);
size(1440, 790);
map = loadImage(“map.jpg”);
map2 = loadImage(“map2.jpg”);
tardis = loadImage(“tardis.jpg”);
freddy = loadImage(“freddy.jpg”);
chicken = loadImage(“chicken.jpg”);
spring = loadImage(“springtrap.jpg”);
foxy = loadImage(“foxy.jpg”);
toyBonnie = loadImage(“toyBonnie.jpg”);
BB = loadImage(“BB.jpg”);
file1 = new SoundFile(this, “sent1.aif”);
file2 = new SoundFile(this, “sent2.aif”);
file3 = new SoundFile(this, “sent3.aif”);
file4 = new SoundFile(this, “sent4.aif”);
file5 = new SoundFile(this, “sent5.aif”);
file6 = new SoundFile(this, “sent6.wav”);
file7 = new SoundFile(this, “sent7.wav”);
win = new SoundFile(this, “Seven Seas Of Rhye.wav”);
mons = new SoundFile(this, “knock.aif”);
scream = new SoundFile(this, “scream.wav”);
tut1 = new SoundFile(this, “breakFree.wav”);
tut2 = new SoundFile(this, “underPressure.wav”);
tut3 = new SoundFile(this, “noStop.wav”);
}
void draw() {
if (sentinel == 0) {
initScreen();
} else if (sentinel == 1) {
gameScreen();
} else if (sentinel == 2) {
bearjump();
} else if (sentinel == 3) {
chickenjump();
} else if (sentinel == 4) {
springtrap();
} else if (sentinel == 5) {
foxjump();
} else if (sentinel == 6) {
gameOverScreen();
} else if (sentinel == 7) {
winningScreen();
} else if (sentinel == 8) {
warnScreen();
} else if (sentinel == 9) {
infoScreen();
} else if (sentinel == 10) {
tutorial();
} else if (sentinel == 11) {
rabbitjump();
} else if (sentinel == 12) {
bbjump();
} else if (sentinel == 13) {
TutOverScreen();
} else if (sentinel == 14) {
TutContinue();
}
}
void initScreen() {
background(0, 0, 0);
textAlign(CENTER);
fill(#F5453B);
textSize(70);
text(“Darkness Rhapsody”, width/2, height/2);
textSize(15);
text(“Click to start”, width/2, height-30);
}
void warnScreen() {
background(0, 0, 0);
textAlign(CENTER);
fill(#F5453B);
textSize(70);
text(“Warning:”, width/2, height/3);
textSize(50);
text(“This game contains jumpscares that”, width/2, height/3 + 60);
text(“some may find disturbing.”, width/2, height/3 + 120);
textSize(30);
text(“Click to go on”, width/2, height/3 + 200);
}
void infoScreen() {
background(255);
textAlign(CORNER);
fill(#CB7C2B);
textSize(40);
text(“How to play:”, width/10, height/4);
text(“Use arrowkeys to move;”, width/10, height/4+70);
text(“The music shows the direction of the exit,”, width/10, height/4+130);
text(“Press the button to listen.”, width/10, height/4+190);
text(“Monsters make finger-snapping sound.”, width/10, height/4+260);
text(“Stay away from them.”, width/10, height/4+320);
textAlign(CENTER);
text(“Click to continue”, width/2, height/4+400);
}
void gameScreen() {
loadPixels();
map.loadPixels();
flashlight();
fill(0);
direction();
musicsound();
ellipse(PosX, PosY, rad*2, rad*2);
monsterSound();
decide();
}
void gameOverScreen() {
background(0);
textAlign(CENTER);
fill(255);
textSize(30);
text(“Game Over”, height/2, width/2 – 20);
textSize(15);
text(“Click to Restart”, height/2, width/2 + 10);
}
void winningScreen() {
winning();
background(255);
textAlign(CENTER);
fill(0);
textSize(30);
text(“Congratulations! You’ve found your way out!”, width/2, height/2);
textSize(15);
text(“Click to go back”, width/2, height/2 + 40);
}
void tutorial() {
loadPixels();
map2.loadPixels();
flashlightT();
fill(0);
directionT();
tutorialSound();
ellipse(PosXt, PosYt, rad*2, rad*2);
tuMonSound();
tuDecide();
tuText();
}
void TutOverScreen() {
background(255);
textAlign(CENTER);
fill(#F5453B);
textSize(70);
text(“Told you not to go there…”, width/2, height/2);
textSize(15);
text(“Click to restart”, width/2, height-30);
}
void TutContinue() {
background(255);
textAlign(CORNER);
fill(#CB7C2B);
textSize(40);
text(“Great! You’ve finished the tutorial.”, width/10, height/4);
text(“Now let’s keep moving.”, width/10, height/4+70);
text(“Click to continue”, width/2, height/4+400);
}
void mouseClicked() {
if (sentinel == 0) {
sentinel = 8;
} else if (sentinel == 6 ||sentinel == 7 || sentinel == 13) {
win.stop();
sentinel = 0;
PosX= rad;
PosY = 750 – rad;
PosXt = 720;
PosYt = 770;
} else if (sentinel == 8) {
sentinel = 9;
} else if (sentinel == 9) {
sentinel = 10;
} else if (sentinel == 10) {
sentinel = 14;
}else if (sentinel == 14) {
sentinel = 1;
}
}
Change between Game Stages:
void decide(){
if (PosX >= 120 && PosY >= 650 && PosX <= 300){
sentinel = 2;
}
else if (PosX >= 0 && PosX <= 100 && PosY <= 180){
sentinel = 3;
}
else if (PosX > 550 && PosX <= 650 && PosY <= 180){
sentinel = 4;
}
else if (PosX >= 950 && PosX <= 1350 && PosY <= 600 && PosY >= 250){
sentinel = 5;
}
else if (PosX >= width && PosY <= 100){
sentinel = 7;
}
}
Move around:
void direction(){
//control
if (keyPressed){
if (key == CODED) {
if ((get(PosX,PosY-10) == color(b) || PosY-rad <= 0) && keyCode == UP){
PosY-=0;
}else if ((get(PosX,PosY+10) == color(b) || PosY+rad >= height) && keyCode == DOWN){
PosY+=0;
}else if ((get(PosX-10,PosY) == color(b) || PosX-rad <= 0) && keyCode == LEFT){
PosX-=0;
}else if ((get(PosX+10,PosY) == color(b) || PosX+rad >= width && PosY >= 100) && keyCode == RIGHT){
PosX+=0;
}else if(keyCode == UP) {
PosY -= speed;
} else if (keyCode == DOWN){
PosY += speed;
} else if (keyCode == LEFT){
PosX -= speed;
} else if (keyCode == RIGHT){
PosX += speed;
}
}
}
}
Flashlight Effect:
void flashlight(){
// We must also call loadPixels() on the PImage since we are going to read its pixels. map.loadPixels();
for (int x = 0; x < map.width; x++ ) {
for (int y = 0; y < map.height; y++ ) {
// Calculate the 1D pixel location
int loc = x + y*map.width;
// Get the R,G,B values from image
float r = red (map.pixels[loc]);
float g = green(map.pixels[loc]);
float b = blue (map.pixels[loc]);
// Calculate an amount to change brightness
// based on proximity to the mouse
float distance = dist(x, y, PosX, PosY);
// The closer the pixel is to the mouse, the lower the value of “distance”
// We want closer pixels to be brighter, however, so we invert the value using map()
// Pixels with a distance of 50 (or greater) have a brightness of 0.0 (or negative which is equivalent to 0 here)
// Pixels with a distance of 0 have a brightness of 1.0.
float adjustBrightness = map(distance, 0, 50, 8, 0);
r *= adjustBrightness;
g *= adjustBrightness;
b *= adjustBrightness;
// Constrain RGB to between 0-255
r = constrain(r, 0, 255);
g = constrain(g, 0, 255);
b = constrain(b, 0, 255);
// Make a new color and set pixel in the window
color c = color(r, g, b);
pixels[loc] = c;
}
}
updatePixels();
}
Make the Monster Jump (one example):
void foxjump() {
mons.stop();
imageMode(CENTER);
translate(width/2, height/2);
if (size < 1.6) {
scream.play();
scale(size);
image(foxy, 0, 0, foxy.width, foxy.height);
size += 0.2;
image(foxy, 0, 0);
}
if (size >= 1.6 && scream.isPlaying() == false){
delay(1000);
sentinel = 6;
size = 1;
}
}
Play the Music When the Button is Pressed:
void musicsound() {
while (myPort.available() > 0) {
val = myPort.read();
println(val);
}
if (val == 1) {
if (PosX <= 100 && PosY >= 250) {
file1.amp(map(PosY, height, 250, 0.01, 1));
file1.play();
//delay(6000);
}
if (PosX >= 0 && PosX <= 550 && PosY <= 250) {
file2.pan(1); // map(PosX, 0,550,1,0)
file2.amp(map(PosX, 0, 550, 0, 1));
file2.play();
//delay(6000);
}
if (PosX > 550 && PosX <= 650 && PosY >= 150 && PosY <= 350) {
file3.amp(map(PosY, 150, 500, 0, 1));
file3.play();
//delay(3000);
} else if (PosX > 550 && PosX <= 800 && PosY > 350 && PosY <= 500) {
file4.amp(map(PosX, 550, 800, 0, 1));
file4.pan(map(PosX, 550, 800, 1, 0));
file4.play();
//delay(3000);
} else if (PosX > 800 && PosY > 350 && PosY <= height) {
file5.amp(map(dist(PosX, PosY, width, 500), dist(800, height, width, 500), 0, 0, 1));
file5.pan(map(PosX, 800, width, 1, 0.5));
file5.play();
} else if (PosX <= width && PosX >= 750 && PosY <= 350 && PosY >= 150) {
file6.amp(map(dist(PosX, PosY, 750, 150), dist(width, 350, 750, 150), 0, 0, 1));
file6.pan(-1); // map(PosX, width, 750, -1, 0)
file6.play();
} else if (PosX <= width && PosX >= 750 && PosY <= 150 && PosY >= 0) {
file7.amp(map(dist(PosX, PosY, width, 0), dist(750, 150, width, 75), 0, 0.1, 1));
file7.pan(map(PosX, width, 750, 1, 0.1));
file7.play();
} else if (sentinel == 7) {
win.play();
}
}
}
Make Monster’s sound Loop as Background:
void monsterSound() {
boolean isPlaying = false;
boolean wasPlaying = false;
// freddy
if (PosX <= 100 && PosY >= 550) {
isPlaying = true;
mons.pan(1);
mons.amp(map(PosY, height, 550, 1, 0));
//chica
} else if (PosX <= 100 && PosY < 450 ) {
isPlaying = true;
mons.pan(0);
mons.amp(map(PosY, 450, 200, 0, 1));
//chica 2
} else if (PosX >= 100 && PosX <= 250 && PosY <= 250) {
isPlaying = true;
mons.pan(-1);
mons.amp(map(PosX, 100, 250, 1, 0));
//springtrap 1
} else if (PosX >= 400 && PosX <= 650 && PosY <= 250) {
isPlaying = true;
mons.pan(map(PosX, 400, 650, 1, 0));
mons.amp(map(PosX, 400, 650, 0, 1));
//springtrap 2
} else if (PosX > 550 && PosX <= 650 && PosY <= 350) {
isPlaying = true;
mons.pan(0);
mons.amp(map(PosY, 250, 350, 1, 0));
//foxy 1 (L shape) area: 950,250,400,350
} else if (PosX >= 650 && PosX <= 950 && PosY >= 350 && PosY <= 600) {
isPlaying = true;
mons.pan(1);
mons.amp(map(PosX, 650, 950, 0, 1));
//foxy 2
} else if (PosX >= 800 && PosX <= width && PosY > 600 && PosY <= height) {
isPlaying = true;
mons.pan(map(PosX, 800, width, 1, -1));
mons.amp(map(PosY, 600, height, 1, 0.3));
//foxy 3
} else if (PosX >= 1350 && PosX <= width && PosY <= 600 && PosY >= 250) {
isPlaying = true;
mons.pan(-1);
mons.amp(map(PosX, 1350, width, 1, 0.3));
// foxy 4
} else if (PosX >= 750 && PosX <= width && PosY <= 350 && PosY >= 150) {
isPlaying = true;
mons.pan(map(PosX, 750, width, 1,-1));
mons.amp(map(PosY, 350,150, 1,0.3));
} else {
isPlaying = false;
}
if (isPlaying == true && wasPlaying == false) {
if (!mons.isPlaying()) {
mons.play();
}
} else {
mons.stop();
}
wasPlaying = isPlaying;
}
