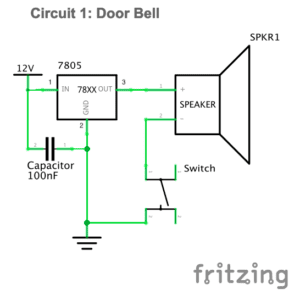
Circuit 1: Door Bell
Components:
1*Buzzer: Creates sound with electric current flow.
1*100 nF Capacitor: Stores electric charge.
1*Switch: Builds or breaks the connection in the electric circuit.
1*LM7805 Voltage regulator: Transfers the voltage level. Used to transfer 12V into 5V in our circuit.
1*12volt power supply: Provides 12volt power for our circuit.
1*Breadboard: A base board for us to build the model of electric circuit.
Several jumper cables: Build connection between components in the circuit.
1*Barrel jack: Connect the power supply and the circuit.
diagram:
video:
Process:
My partner Amily and I both knew little about building an electric circuit. So, we just followed the given diagram of the circuit and the instructions of the components at first. The speaker didn’t make any sound when I pressed the switch. Then we asked Jingyi for help. It turned out that we made several mistakes. One of the problems is that we set the ground and power wrong at the beginning, which is a big problem because many components need to be connected to the ground. Also, the directions of the current flow in the breadboard are different for the parts in the middle and the other parts on two sides. Another thing is that the switch with four legs is self-connected between the two diagonal legs, not the parallel legs. After figuring out these, we rebuilt the circuit and it worked this time.
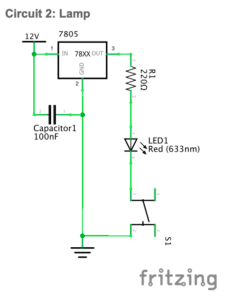
Circuit 2: Lamp
Components:
1*220ohm Resistor: Provides resistance and opposes the flow of electricity.
1*LED: Emits light with electric current flow.
1*Multimeter (missed): Used to measure resistance.
1*LM7805 voltage regulator,1*switch,1*100 nF capacitor,1*12volt power supply, several jumper cables,1*barrel jack,1*breadboard.
diagram:
video:
Process:
After the practice of the first circuit, Amily and I were clearer about each component’s function and how to connect them in the circuit. One thing we missed is that we forgot to connect the multimeter because we just focused on the diagram of the circuit in which the multimeter is not shown. We were not aware of this until we turned it in at the end of the recitation. But the circuit still worked well.
Circuit 3: Dimmable Lamp
Components:
1*10K ohm Variable Resistor (Potentiometer): Provides variable resistance to oppose the flow of electricity. It can change the brightness of the LED in the circuit.
1*Breadboard,1*220ohm resistor,1*LM7805 voltage regulator,1* switch,1*LED,1*100 nF capacitor,1*12volt power supply,1* barrel jack, several jumper cables,1*multimeter (missed).
diagram:
video:
Process:
The circuit is similar to the second circuit so we built this one quickly. It didn’t work at first. We then found that there was a small problem of the connection of variable resistor. The middle branch should connect to resistor. We fixed this and made the circuit work. The brightness of the light changed accordingly when we rotated the variable resistor. We forgot the second task of switch the switches. Both of us missed the instructions for this part and simply thought that we only had the task of building the three circuits. To replace the push button, we can just take it off and leave the jumper cables as the same. Each jumper cables of the arcade button should be set in the same row as one of the other jumper cables left on the breadboard in order to allow the current flow.
Soldering task:
Reflection: My partner and I encountered many problems in our first recitation. We also missed some steps for our tasks. But after this recitation, both of us became more familiar with different components and the structure of circuits. More importantly, I learnt the lesson of doing preparation before class and paying more attention to the materials and instructions. Also, the sense of achievement that a successful circuit gives is awesome.
Question1:
After reading The Art of Interactive Design, in what way do you think that the circuits you built today include interactivity? Please explain your answer.
I think that the circuits we built include interactivity because they reacted to our actions. But I do not consider the action between the circuits and us as interaction. Similar to the refrigerator situation, when I press the button, they listened (to the pressed button), thought (with electric current through the circuits), and spoke (by creating sounds or emitting lights). These are the input, process, and output. The third circuit seemed to be more interactive than the other two because it can react to different actions accordingly. However, in all of the simple interactivity, we design the other actor so that we can predict their exact response. They are not actually thinking. What they do is mechanical process that built by us.
Question 2:
How can Interaction Design and Physical Computing be used to create Interactive Art? You can reference Zack Lieberman’s video or any other artist that you know.
In my opinion, interaction design and physical computing are both of great importance in interactive art. Interaction design is more like an inspiration while the physical computing is the process that transforms the theory into reality. Zach said that art is a form of research. I think that only during the process of conducting research could people find problems and then to create something new to solve the problems. In his third interactive art, Zack Lieberman together with other artists sought to create a new form for disabled graffiti artist to draw again. This is something that inspired them. Later by physical computing, they made their idea come true, and also made Tony’s come true. Being paralyzed could be considered as being largely disconnected to the outside world. The eye-writer enables Tony to build interactions again. One of my friends likes graffiti as well. Once I went out with him, watching him drawing on the wall. I felt like for them, the meaning of drawing is much about tagging, showing, sending messages and interacting with others with their drawings. So, I think that these values were acknowledged by Zach’s team and inspired their design.