Midterm Project: Pokebuddy

The goal of this midterm project was to give the user a pokemon friend, or a pokebuddy based on some input. The pokebuddy would then sit on your shoulder and you’d have a photobooth like experience where you could click a picture and download it. 

Evolution of idea:

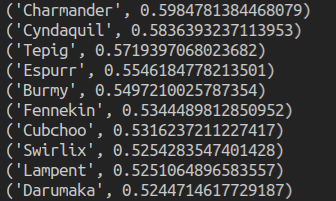
Moving from collecting some feautres of pokemon to map to a buddy, I decided to have some machine learning fun here as well. After reading and researching, I decided to use Doc2Vec model to convert pokemon descriptions into vectors. The user would then be prompted to type in the description of the kind of pokemon they would want. This user description would also be turned into a vector. I would then try and find the closest vector to the user’s description and return the corresponding pokemon. 

Process:

  1. Data collection and cleanup. First, I needed to be realistic about the pokemon that could be a buddy (size-wise). So I imported a dataset with pokemon features to MySQL, and ran a query that would only return the pokemon that were 75cm or below in height. I stored this in a text file. 
  2. The next step was to actually collect pokemon description data. I searched and searched and searched but could not find ANY pokemon dataset which had descriptions or pokedex entries in there. So I did what any natural human would do – I wrote a scraper that would get this data from pokemondb.net. 
  3. Scraping the data: I used requests and BeautifulSoup to get the data of the pokemon from the text file that I had created from step 1. The result was a text file with pokedex entries of each pokemon from different versions. There were roughly 10 or so descriptions for each pokemon so it was decent enough in terms of size of a dataset. 
  4. Next, I had to create the actual Document vectors using doc2vec. I found out about gensim, which had an implementation of Doc2Vec, which seemed perfect for what I needed to do. Using some clever python code, I trained my model using the pokemon I had and used the model’s cosine similarity function to get the closest pokemon to it. 
  5. I was now stuck – all my code was in python and I needed to create a way to get user input on the front end, pass it to the back end where the python logic would work and then return back to the front-end. On the front end would be the photobooth. This sounded like a dynamic web application. Flask was the framework of choice. 
  6. Before actually creating a web-app that would combine the front and back end, I decided to nail the logic of what happens in the front-end. I used p5js to get a canvas and process video stuff. ml5js would be used for the poseNet model. 
  7. I used poseNet to get the user’s shoulder and ear positions. using these and some simple mathematics, I was able to create a box on the users shoulder where the pokemon image would go. 
  8. Finally, it was time to bring it all together. There are 2 different pages. The user enters a paragraph or document and this is sent to the backend to process. After classifying the user input, the server would load a new page where the front end would take video input. The user would then click a button and voila – two (not one, TWO!) pokemon buddies, one on each shoulder. There’s also a button to snap the image and download it. 

Phew, that was quite long. Here’s how it looked:

*insert picture/video*

Improvements and moving forward:

No project is complete without problems and things that could be done better.

  • The pokemon shakes too much! I’ve tried to change the parameters of poseNet so that the keypoint tracking would work better and not fluctuate so much, but no success. That’s the reason for the shaking. 
  • The design and layout. I’ve spent all my time working on functionality. I’d like to make it look a little better too, front end styling with css. 

Concluding:

Overall this project was a fun and demanding experience at the same time. I’ve learned a lot, mostly through reading official documentation. Here’s a list of all the frameworks I used:

  • Requests to GET webpages to scrape data off of.
  • Beautiful Soup to parse the webpages and extract relavant data
  • NLTK for word tokenization
  • Gensim for Doc2Vec
  • p5js for front end, the canvas, and the video input feed. 
  • ml5js for the poseNet model.
  • Flask, a python microframework to bring it all together. 

The code is here

Midterm Project Progress

(This post is 3 days late, my bad!) – I forgot to publish my saved draft. 

Progress on Midterm Project: 

Data Collection

I managed to scrape pokemon data off pokemondb.net. The data that was most necessary for me was a compilation of the pokedex entries from each season. The scraped data was collected into a CSV file which I processed late. 

Choosing and Training the model

I planned to use a Doc2Vec model to get a vector representation of each pokemon’s description. The idea is to get the user to input a paragraph or some kind of text, convert that to a vector using the same model, and compare cosine similarity between vectors to give the closest pokemon to the paragraph they typed. To accomplish this, I used a python library called “gensim”. They have an implementation of a doc2vec model which seemed like the exact thing I wanted to use.

I trained the data and figured out how to use the model to find the closest input document, and now I get the 10 closest pokemon to the document I type. An example below: 

With the input document as “super hot fire pokemon. burns everything to ash!”, here’s the output I get:

charmander

Next Steps:

Moving forward, I want to create an interface with a webcam where after a user has typed in some text, they can see their pokemon budyy (or buddies) on the screen with them and be able to take a picture as well. For this, I’ll use ml5’s PoseNet to get the keypoints of different body parts and place pokemon around the user. Since data needs to be sent from a server to an interface (frontend) I’ll have to create a Web App which I will do most likely in Flask (a python framework). 

CIFAR – Week 5

I started off by trying to get tensorflow to run on my gpu with cuda and whatnot, but things got way too complex real fast. It’s now on my to-do list.  So I did my testing by just running the example on my CPU.  I played around with epochs and batchsizes. 

Here are the most significant results: 

BATCH SIZE EPOCHS LOSS ACCURACY
32 3 1.24 0.56
128 15 0.94 0.67
128 3 1.49 0.46
16 15 0.75 0.74

It’d definitely be interesting to train the model using the intel server, which I assume would be much faster, allowing to try and run for more epochs. As I was curious about epochs and why increasing them increases the accuracy, I did a little reading. Each epoch is basically an iteration over the data set. The weights get updated with each epoch and running through the data more times gives more accurate results (naturally). The batch size on the other hand, is how many training examples to run through before making an update. Making the batch size too large would thus cause a lower accuracy because it would seem as though you’re averaging out more. A batch size that’s too low will potentially be more accurate, but then again, would be super slow. I think 16/32 seemed like the ideal batch size for this particular example. Once I can get my intel cloud server running, I would be interested to even plot some graphs comparing accuracy, epochs, and batch size for larger number of epochs. 

Week 3: Emojify

For the project this week, I decided to have an alternate take on censorship. The post below is the exact same thing that’s on my Github

What is this?

Have you ever felt tired of your face on camera? Do you feel the need to express yourself but without showing your face? Great! This is the perfect solution to your problems.

Meet Emojify! It uses machine learning to read your facial expression and understand what you are feeling. And using the magic of drawing, it covers your face with an emoji instead. Voila!

Examples

You can’t see my face, but you can understand my expression 🙂

neutral face

neutral face

happy face

happy face

surprised face

surprised face

How it works

This project uses face-api.js and p5.js. P5JS provides the video input and the html canvas on which the video is displayed.

All the code that makes it work is in script.js

Face-api.js, which is built on top of tensorflow.js has various pre-trained models that can be used for different purposes. This project uses a mobilenet model trained with faces from the internet (the SsdMobileNetv1 model). Along with face expression classification, the api also provides a bounding box for the face, using the coordinates of which an emoji is drawn on top of the face. The model has seven choices of emotions –

  • Neutral
  • Happy
  • Sad
  • Angry
  • Surprise
  • Fear
  • Disgust

Given an input video image, it recognises the face(s), reads the expression(s) and returns an Array of probabilities of each emotion.

console log

My code loops over this array, finds the maximum probability emotion. I have an image file corresponding to each emotion that is preloaded. Using the x and y coordinates of the bounding box, my code as able to draw the image corresponding to the emotion almost exactly over the face of the person.

Why I did this

I thought this was a really cool way to do something fun with machine learning. I hope that someday, instead of blurring people’s faces out on media when consent is not given, someone could emojify their face instead. At least we’d be able to tell what the person is thinking, as opposed to nothing when there’s a blurred face.

Potential Improvements

  • It’s kinda slow right now, but I guess that’s because of how long it takes to classify the image. Could potentially only classify every nth frame instead of every frame.
  • Use the probabilities to map to different emojis that show the strength of the expression. Something like – 0.7 happy is a smiley face 🙂 where as anything greater that 0.9 probability is a very happy face :D. This could be done for all the different emotions to make it more accurate.
  • Right now, the recognition of expressions is not really that accurate. Maybe retraining the model in some way could help fix this.

All the code is available here

iML Week 2 Case Study: Baidu Translation AI

I ended up reading a whole lot about Machine Learning and AI applications in various fields – gaming, video/photo analysis, face recognition, gaming, especially gaming, agents that game better than humans, etc, but – I chose this option because of its relevance to me and how insanely useful it can be. 

We’ve all used Google translate at some point – where we supply an input and the “translator” generates an output. Most common use for me is when I copy past something in Chinese and hit translate, and I get the output in English. Then, there is the voice function – which I sometimes use to check (note, I said *check*) my Chinese oral homework. In there, you press the little mic button, the “translator” listens to your input and when you press the mic button again, it stops listening and generates an output.

Then there’s this –

The translation is in real time. Baidu claims to use Simultaneous Translation and Anticipation and Controllable Latency (STACL) or whatever that means. The result is that the “translator” is capable of staring translation second after a speaker has begun to speak and end translation momentarily after. To some extent, Baidu’s “translator” is able to anticipate the next word based on the current context and what is being said. In an example that I read about here, a translated word resulted in President Bush in Moscow (in English) and the AI was able to predict that the verb upcoming would be “meet” before the verb was even said (since it’s very likely that Bush will be meeting someone if he is in Moscow?).

There is also a latency feature which can be adjusted based on how closely the languages are related, but I don’t completely get how that works. There’s naturally some quality that’s lost, but it’s still able to produce simultaneous translation, which I think is pretty cool, especially when you read about how it works.  

I don’t have concrete sources like GitHub repos. I’m just going to link the articles I read. Also, here’s a research paper that I didn’t go through entirely(it looked very complex). 

Baidu’s official research blog

Article 1, Article 2