Final Project Step 4: Final Blog Post by Min Jee (Lisa) Moon

Bullying Simulator – Min Jee (Lisa) Moon – Marcela Godoy

Because my project was more of a statement piece, there wasn’t much interaction going on. 

  1. in order to give a first-hand experience of getting bullied by others, I made the project to be on the phone, just like how the victims of the bullied would always receive bullying messages on the phone. 
  2. To resemble the similar terror inside the user’s mind, I added the background sound and the ringtone. (Frankly, I got really sick and terrified of the ringtone of the project ringtone). 
  3. Collected the real text messages that I found on SNS to make the situation realistic. 
  4. Tried to make the project code heavy than the physical part, so that the user can somewhat interact with it, the way users do with their real phone.

For the fabrication,
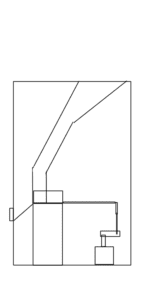
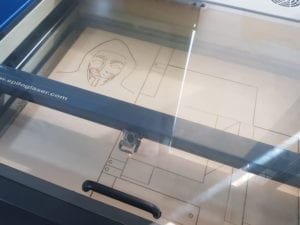
Initial physical outline for my project

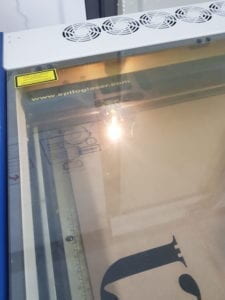
Rastering the laser cutting material

Finished laser cut material

Just like above, I intended the paper role to fall right in front of the hole, into the trash bin, because I thought the bullied are treated like an “emotional trash bin” since all the bad feelings of the bullies would be thrown into bullied as if the bullied are trash bin. 

However, during the user testing session, all the users would not get the “emotional trash bin” idea. Due to the outcome from the user testing session, I realized I would have to change my physical part.

What I moved onto (the idea that I got from the user testing session from the test users) the idea of the messages (trash) thrown to the user. As a result, I worked towards the paper roll shooting the trash towards the user. 

The first prototype was the one using the DC motor. 

As you can see from the video, the stepper would move the push bar to feed the trash messages to the dc motor wheel. 

However, as you can see from the above video, the DC motor would throw the trash message to the right front. In addition, the DC motor would get too loud to even make the entire table vibrate. As a result, I decided to change to prototype 2. 
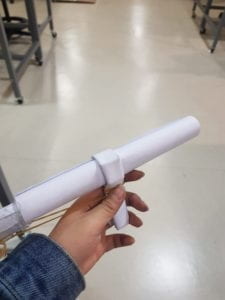
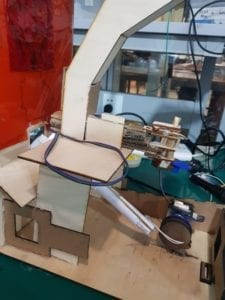
The shooter inside the device
Laser cutting the wheel to hold on to the strip/hook behind the paper shooter working like a trigger
The device without the feeder stepper (just for the better view inside the photo)

This is the shooter inside the prototype 2. The feeder from prototype 1 was kept the same. If the feeder feeds the trash messages inside the gun, the stepper inside the device would pull on the trigger behind the gun to shoot the trash message towards the user. However, because pulling on the material would be too hard. Therefore, I moved on to the last idea. 

For the last idea, I do not have an image or video, but the basic idea can be found here

Just like the video linked above, when the feeder feeds the trash message paper to the right place, the stepper wheel attached to the catapult would keep on pull on the material, and finally, the servo motor pushing down the catapult would release the catapult, making the trash message to be shot up at the user through the whole. 

However, the rubber pulling the catapult would be too weak, and the friction between the wooden boards between the catapult would be too strong to make the catapult shoot up the material effectively, failing the entire physical part’s intention. As a result, I, sadly, was forced to focus all my projects on my coded application part.  

HERE is the link to the code bit (The demo of this code bit can be seen from the video at the beginning of this post)

CONCLUSIONS:

This project was motivated by several videos about the suicide video of Amanda Todd and suicide notes of the 13 years old girl K (Korean) who decided to do suicide after continuous bullying. I collected a lot of the real bullying texts that the bullying victims got in their facebook messages, text messages, Kakaotalk (Korean WeChat), etc. to give a realistic experience. 

Because my initial and the main attempt was to give the user first-hand experience from the perspective of the bullied, I believe I was able to give a half-successful project. However, unlike my initial attempt of putting the users into the shoes of the bullied and the users tended to view the project in the perspective of the 3rd person’s point-of-view and since this program can only be run on my phone, I think it was still a project that has some space for improvement. 

In order to improve this project, I would love to get an approvement from our college and actually publish an actual application that actually sends the messages to the user’s actual phone, which would give more hands-on experience to the user. 

I believe this is a very meaningful project after-all because bullying is an ongoing issue all over the world. When I asked the NYU Shanghai students and instructors if they know who to contact if they encounter someone bullying others, nobody was able to answer the question. When I also asked if anybody knows how it feels to be bullied, nobody had a clear idea of how it would feel to be bullied by others. I believe this shows ignorance towards issues like this. Raising awareness to the NYU students and instructors (people whom I presented my project to) would satisfy my initial purpose. 

Recitation 9: Media Controller by Min Jee (Lisa) Moon

For recitation 9, we were able to extend our learning from the transitions between Arduino and processing. Because we were free to choose what we wanted to do with the media, I decided to build the camera function that would be needed for my project. 

In order to make a camera in the phone screen, I took a screenshot of the phone camera screen and covered up the non-camera showing part with the image.

Camera section

Whenever I was pressing the button connected to Arduino (it would have been cooler if the image could be taken with the actual camera button though- we needed Arduino bit), the processing would make a screenshot of the screen and save in the specific location. 

However, there was a shortcoming though.

example shot

As you can see from above, because the processing is taking the screenshot of the entire screen, the camera APP part is showing as well, which is different from the usual images inside the gallery. 

Below is the code.

Processing:

// IMA NYU Shanghai
// Interaction Lab
// This code receives one value from Arduino to Processing 
import processing.serial.*;
import processing.video.*; 

int photoNum = 0;

Serial myPort;
int valueFromArduino;

PImage camera;
Capture cam;

void setup() {
  size(335, 690);
  background(0);

  printArray(Serial.list());
  // this prints out the list of all available serial ports on your computer.

  myPort = new Serial(this, Serial.list()[5], 9600);
  // WARNING!
  // You will definitely get an error here.
  // Change the PORT_INDEX to 0 and try running it again.
  // And then, check the list of the ports,
  // find the port "/dev/cu.usbmodem----" or "/dev/tty.usbmodem----" 
  // and replace PORT_INDEX above with the index number of the port.
  camera = loadImage("images/camera.png");
  setCamera();
}


void draw() {
  // to read the value from the Arduino
  while ( myPort.available() > 0) {
    valueFromArduino = myPort.read();
  }
  showCamera();
  //println(valueFromArduino);
  if(valueFromArduino == 1){
    save("gallery/"+str(photoNum)+".png");
    photoNum++;
    //println("pressed");
  }
}

void setCamera() { 
  cam = new Capture(this, 640, 480);
  cam.start(); 
} 

void showCamera() { 
  if (cam.available()) { 
   cam.read(); 
  }   
  noStroke();
  for (int i=0; i<500; i++) {
    int size = int( random(10, 30) );
    int x = int( random(width) );
    int y = int( random(80, 480) );
    // get the pixel color
    color c = cam.get(x, y);
    // draw a circle with the color
    fill(c);
    ellipse(width-x, y+40, size, size);
 }
 image(camera, 0, 0);
}

Arduino:

// IMA NYU Shanghai
// Interaction Lab
// This code sends one value from Arduino to Processing

void setup() {
Serial.begin(9600);
}

void loop() {
int sensorValue = digitalRead(A0);
Serial.write(sensorValue);

// too fast communication might cause some latency in Processing
// this delay resolves the issue.
delay(10);
}

Below is the demo video.

While I was doing the recitation workshop and was proceeding with my final project, reading through Computer Vision for Artist and Designers inspired and motivated me to work. I grew up in a country which has very serious bullying that approximately 63% of the people have had experienced bullying (including cyber-bullying), and 19% of the people having tried suicidal attempt due to bullying. Reading through this week’s reading, I found two pieces really interesting. 

The first was Suicide Box by the Bureau of Inverse Technology. As previously mentioned, the country that I was born and raised is rated as a country with the most suicides amongst OECD countries. Though it is little sad to see this idea having to count people who are jumping off the bridge and is merely counting the numbers when the jumped off person is losing his or her life, I think by knowing the exact statistics, other people may be able to do something about the environment to lessen the number of people doing the suicidal attempt. 

The other was Stills from Cheese, an installation by Christian Möller. This was especially interesting because I was thinking to project the user’s face on the trash bin, giving the user the feeling that they were viewed as an (emotional) trash bin. Stills from Cheese, by analyzing the current photo showing up on the screen, is able to tell when the user is smiling or not. If I were to analyze a person’s face, I would be able to only portray the person’s face on the trash bin looking figure. Therefore this piece has gotten me a little sad and motivating at the same time. 

Final Project Step 3: Essay by Min Jee (Lisa) Moon

PROJECT TITLE

Are Bullied Emotional Trash bin?

 PROJECT STATEMENT OF PURPOSE

As can be seen from the project title, the purpose of this project is to make users feel like they are bullied. Through this project, I seek to shock people by giving them hands-on experience with the experience of viewing in first-person’s point-of-view of getting bullied. The feeling of scared, guilt, sadness, disgust. All of those emotions above would be intended for this project. 

PROJECT PLAN *

Explain in further detail what your project aims to do. Flesh out your project’s process through careful description, analysis, and with specifics.  What steps will you take to empathize with your intended audience and analyze their needs/requirements? Compose a detailed project plan that explains each of the steps you will take in the next few weeks to deliver your project. Be specific about when you need to finish which part of your project to finish it on time. 

Although we have grown up from the main bullied ages, we are still college “students” who are vulnerable to getting bullied. In fact, there are a lot of cyberbullying going on, which counts towards people of all ages. I hope through this project, people would walk away with a feeling of sadness and terror that they would be willing to stand up if they see the ones getting bullied. 

Because of the probable loudness within the room demonstrating this project, 1. Isolate the user in the small room (maybe we can use a black curtain to make up a small space where the user can go in?)

2. I am going to make the user use their earphone (Bluetooth earphone to ensure the user can move) listen to the audio. 

3. The room would in more or less in a dark hallway form so the user can walk straight. If there are mannequins standing in the sideways, it would be great. But if it is not available, I would try to film the video of walking in NYU hallway as if I am a transparent person where everybody is ignoring me (or looking at me but are spreading rumors about me). 

4. At the end of the hallway, there is a computer, which would work as a user’s computer. They would already feel strange by walking in the hallway. The distance of the user would be measured with the distance sensor. If the user walks up close to the computer, all of a sudden, there would be a notification on the side of the computer (through coding).

5. If the user clicks on the notification, there would be a short greeting message like “Yo you there?”.

6. The user will be able to click on the buttons to have a conversation with the fake person.

7. The computer starts receiving bullying messages.

8-1. If the user gets surprised and aims to walk away (also measured with the distance meter. if the user goes further than set amount of distance), there would be a message on the screen and the sound also through their bluetooth earphone saying “You might only feel it for these few minutes, the bullied have to go through this trauma all the time. A lot of people often still having difficulties from their childhood bullied experience.” and so on.

8-2. If the user successfully continues, the user will hear the voices through their earphone as he/she is receiving the messages as if they are speaking to them right next to the user.

9. After the user is finished with the messages, the user will be shown statistics about bullying. 

10. Outside the room would be an arduino-connected printer, a projector, and a 3D printed trash looking bin.

11. Through coding, the camera would take picture of the user (without them knowing as they go through the messages), the projector will screen the person’s face on the trash bin (because that is what the bullied are often used as – emotional trash bin where they can throw out their anger and negative emotions towards). As the user goes through messages, the printer will put papers (which has the bullied words that the user receives through the screen) in the trash bin.

CONTEXT AND SIGNIFICANCE *

Of course, there are three different types of people in the bullying scene: the bully, the bystander, and the bullied. The user is going to feel from the perspective of the bullied. I choose the bullied over anything else because the tragedy and the pain of bullying situation can only be felt through hand-on experience from the perspective of the bullied. The bully does not remember all the people he/she has bullied. If we were to make the hand-on experience for users with the first-person point-of-view of the bully, the purpose would be to make that user guilty for what the user has been doing. Although he/she may feel guilty, it would not be as effective as forcing the user to go on experience as if the user is bullied. 

This project is significant. Though there have been a lot of the people with the experience of getting bullied, there are still some people who have not got the experience of getting bullied just like my roommate. When I asked my roommate whether she knows how bad it is to be bullied, she would merely guess how bad would it be, but only has a vague idea about it. Through the first-person point-of-view in the perspective of the bullied, the user, hopefully, would walk away from my project with how bad it would be to be bullied by others. 

Although we have grown up from the main bullied ages, we are still college students who are vulnerable to getting bullied. In fact, there are a lot of cyberbullying going on, which counts towards people of all ages. I hope through this project, people would walk away with a feeling of sadness and terror that they would be willing to stand up if they see the ones getting bullied. 

This is related to our reading, Language of New Media by Manovich which describes the influence of computers on new media. We are currently living in a world where computers are everywhere. True, as I mentioned from the previous recitation blog posts, computers have had positive effect towards the human. Because we have the computers, we are able to communicate with people who are on the other side of the Earth, easily being able to find information and so forth. However, at the same time, they also had a negative impact towards human: it also has gotten easier for people to bully others. When people are online, they do not need to face the ones they are bullying. As a result, they would not feel guilty about saying mean things to other people online. 

Recitation 8: Serial Communication by Min Jee (Lisa) Moon

Exercise 1: Make a Processing Etch A Sketch

For exercise 1, we were asked to build an Etch A Sketch. 

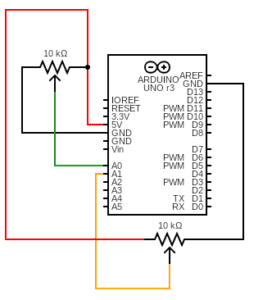
Circuit Diagram for Potentiometer

Using above design, I built circuit and adjusted the code according to the sample code from the class. The resulting code is below:

Arduino:

void setup() {
Serial.begin(9600);
}

void loop() {
int sensor1 = analogRead(A0);
int sensor2 = analogRead(A1);

float sensor1Map = map(sensor1, 0, 1023, 0, 450);
float sensor2Map = map(sensor2, 0, 1023, 0, 450);

// keep this format
Serial.print(sensor1Map);
Serial.print(“,”); // put comma between sensor values
Serial.print(sensor2Map);
Serial.println(); // add linefeed after sending the last sensor value

// too fast communication might cause some latency in Processing
// this delay resolves the issue.
delay(100);
}

Processing:

// IMA NYU Shanghai
// Interaction Lab
// For receiving multiple values from Arduino to Processing

/*
 * Based on the readStringUntil() example by Tom Igoe
 * https://processing.org/reference/libraries/serial/Serial_readStringUntil_.html
 */

import processing.serial.*;

String myString = null;
Serial myPort;


int NUM_OF_VALUES = 2;   /** YOU MUST CHANGE THIS ACCORDING TO YOUR PROJECT **/
int[] sensorValues;      /** this array stores values from Arduino **/

float pointerSize = 3;

int amtDigit = 0;
float[] xPos = new float[amtDigit];
float[] yPos = new float[amtDigit];

float curXPos;
float curYPos;

void setup() {
  size(500, 500);
  background(0);
  setupSerial();
  
  curXPos = 25 + sensorValues[0];
  curYPos = 25 + sensorValues[1];
  
  xPos = append(xPos, curXPos);
  yPos = append(yPos, curYPos);
}


void draw() {
  updateSerial();
  //printArray(sensorValues);
  printArray(curXPos);
  background(#C9C8C5);
  
  curXPos = 25 + sensorValues[0];
  curYPos = 25 + sensorValues[1];
  
  // pointer
  noStroke();
  fill(0);
  ellipse(curXPos, curYPos, pointerSize, pointerSize);

  checkAndAppend();
  
  if (amtDigit > 1){
    for(int i = 0; i < amtDigit; i++){
      stroke(0);
      strokeWeight(pointerSize-2);
      line(xPos[i], yPos[i], xPos[i+1], yPos[i+1]);
    }
  }
}

void setupSerial() {
  printArray(Serial.list());
  myPort = new Serial(this, Serial.list()[ 5 ], 9600);
  // WARNING!
  // You will definitely get an error here.
  // Change the PORT_INDEX to 0 and try running it again.
  // And then, check the list of the ports,
  // find the port "/dev/cu.usbmodem----" or "/dev/tty.usbmodem----" 
  // and replace PORT_INDEX above with the index number of the port.

  myPort.clear();
  // Throw out the first reading,
  // in case we started reading in the middle of a string from the sender.
  myString = myPort.readStringUntil( 10 );  // 10 = '\n'  Linefeed in ASCII
  myString = null;

  sensorValues = new int[NUM_OF_VALUES];
}

void updateSerial() {
  while (myPort.available() > 0) {
    myString = myPort.readStringUntil( 10 ); // 10 = '\n'  Linefeed in ASCII
    if (myString != null) {
      String[] serialInArray = split(trim(myString), ",");
      if (serialInArray.length == NUM_OF_VALUES) {
        for (int i=0; i<serialInArray.length; i++) {
          sensorValues[i] = int(serialInArray[i]);
        }
      }
    }
  }
}

void checkAndAppend(){
  if (xPos[amtDigit] != curXPos || yPos[amtDigit] != curYPos){
    xPos = append(xPos, curXPos);
    yPos = append(yPos, curYPos);
    amtDigit++;
  }
}

As a result of the above code:

Exercise 2: Make a musical instrument with Arduino

For exercise 2, we were asked to build an instrument with processing and Arduino.

Circuit Diagram for Buzzer

Using above design, I built circuit and adjusted the code according to the sample code from the class. The resulting code is below:

Arduino:

// IMA NYU Shanghai
// Interaction Lab
/*************************************************
* Public Constants
*************************************************/
/**
This example is to send multiple values from Processing to Arduino.
You can find the Processing example file in the same folder which works with this Arduino file.
Please note that the echo case (when char c is ‘e’ in the getSerialData function below)
checks if Arduino is receiving the correct bytes from the Processing sketch
by sending the values array back to the Processing sketch.
**/

#define NUM_OF_VALUES 2 /** YOU MUST CHANGE THIS ACCORDING TO YOUR PROJECT **/
//#include “pitches.h”

// notes in the melody:
int melody[] = {
262, 294, 330, 349, 392, 440, 494, 523
};
/*
#define NOTE_C4 262
#define NOTE_D4 294
#define NOTE_E4 330
#define NOTE_F4 349
#define NOTE_G4 392
#define NOTE_A4 440
#define NOTE_B4 494
#define NOTE_C5 523
*/

/** DO NOT REMOVE THESE **/
int tempValue = 0;
int valueIndex = 0;

/* This is the array of values storing the data from Processing. */
int values[NUM_OF_VALUES];

void setup() {
Serial.begin(9600);
for (int thisNote = 0; thisNote < 8; thisNote++) {

// to calculate the note duration, take one second divided by the note type.
//e.g. quarter note = 1000 / 4, eighth note = 1000/8, etc.
// stop the tone playing:
noTone(8);
}
}

void loop() {
getSerialData();

// add your code here
// use elements in the values array
// values[0] // values[1] int freq = melody[int(map(values[0], 0, 500, 0, 8))];

if(values[1]){
tone(8, freq);
} else {
noTone(8);
}
}

//recieve serial data from Processing
void getSerialData() {
if (Serial.available()) {
char c = Serial.read();
//switch – case checks the value of the variable in the switch function
//in this case, the char c, then runs one of the cases that fit the value of the variable
//for more information, visit the reference page: https://www.arduino.cc/en/Reference/SwitchCase
switch (c) {
//if the char c from Processing is a number between 0 and 9
case ‘0’…’9′:
//save the value of char c to tempValue
//but simultaneously rearrange the existing values saved in tempValue
//for the digits received through char c to remain coherent
//if this does not make sense and would like to know more, send an email to me!
tempValue = tempValue * 10 + c – ‘0’;
break;
//if the char c from Processing is a comma
//indicating that the following values of char c is for the next element in the values array
case ‘,’:
values[valueIndex] = tempValue;
//reset tempValue value
tempValue = 0;
//increment valuesIndex by 1
valueIndex++;
break;
//if the char c from Processing is character ‘n’
//which signals that it is the end of data
case ‘n’:
//save the tempValue
//this will b the last element in the values array
values[valueIndex] = tempValue;
//reset tempValue and valueIndex values
//to clear out the values array for the next round of readings from Processing
tempValue = 0;
valueIndex = 0;
break;
//if the char c from Processing is character ‘e’
//it is signalling for the Arduino to send Processing the elements saved in the values array
//this case is triggered and processed by the echoSerialData function in the Processing sketch
case ‘e’: // to echo
for (int i = 0; i < NUM_OF_VALUES; i++) {
Serial.print(values[i]);
if (i < NUM_OF_VALUES – 1) {
Serial.print(‘,’);
}
else {
Serial.println();
}
}
break;
}
}
}

Processing:

// IMA NYU Shanghai
// Interaction Lab


/**
 * This example is to send multiple values from Processing to Arduino.
 * You can find the arduino example file in the same folder which works with this Processing file.
 * Please note that the echoSerialData function asks Arduino to send the data saved in the values array
 * to check if it is receiving the correct bytes.
 **/


import processing.serial.*;

int NUM_OF_VALUES = 2;  /** YOU MUST CHANGE THIS ACCORDING TO YOUR PROJECT **/


Serial myPort;
String myString;

// This is the array of values you might want to send to Arduino.
int values[] = new int[NUM_OF_VALUES]; // [freq, duration]

int duration = 1;

void setup() {
  size(500, 500);
  background(0);

  printArray(Serial.list());
  myPort = new Serial(this, Serial.list()[ 5 ], 9600);
  // check the list of the ports,
  // find the port "/dev/cu.usbmodem----" or "/dev/tty.usbmodem----" 
  // and replace PORT_INDEX above with the index of the port

  myPort.clear();
  // Throw out the first reading,
  // in case we started reading in the middle of a string from the sender.
  myString = myPort.readStringUntil( 10 );  // 10 = '\n'  Linefeed in ASCII
  myString = null;
}


void draw() {
  background(0);
  
  //divider
  int x = 0;
  int space = width/8;
  stroke(255);
  strokeWeight(3);
  for(int i = 0; i < 8; i++){
    line(x, 0, x, height);
    x += space;
  }

  // changes the values
  values[0] = pmouseX;
  
  if(mousePressed){
    values[1] = 1;
  } else {
    values[1] = 0;
  }
  
  
  // sends the values to Arduino.
  sendSerialData();

  // This causess the communication to become slow and unstable.
  // You might want to comment this out when everything is ready.
  // The parameter 200 is the frequency of echoing. 
  // The higher this number, the slower the program will be
  // but the higher this number, the more stable it will be.
  echoSerialData(200);
  printArray(values);
}

void sendSerialData() {
  String data = "";
  for (int i=0; i<values.length; i++) {
    data += values[i];
    //if i is less than the index number of the last element in the values array
    if (i < values.length-1) {
      data += ","; // add splitter character "," between each values element
    } 
    //if it is the last element in the values array
    else {
      data += "n"; // add the end of data character "n"
    }
  }
  //write to Arduino
  myPort.write(data);
}


void echoSerialData(int frequency) {
  //write character 'e' at the given frequency
  //to request Arduino to send back the values array
  if (frameCount % frequency == 0) myPort.write('e');

  String incomingBytes = "";
  while (myPort.available() > 0) {
    //add on all the characters received from the Arduino to the incomingBytes string
    incomingBytes += char(myPort.read());
  }
  //print what Arduino sent back to Processing
  print( incomingBytes );
}

void keyPressed(){
  if (key == CODED){
    if (keyCode == UP){
      duration++;
    } else if (keyCode == DOWN){
      duration--;
    }
  }
}

As a result of the above code:

Recitation 7: Functions and Arrays by Min Jee (Lisa) Moon

Question 1: In your own words, please explain the difference between having your for loop from Step 2 in setup() as opposed to in draw().

Having for-loop inside the setup() and draw() is definitely making the big difference because setup() function only runs once, meaning the change will not occur even though you keep your serial open. However, if the for-loop is inside the draw() function, the for-loop will be running continuously, meaning the change will occur constantly. 

Question 2: What is the benefit of using arrays?  How might you use arrays in a potential project?

Arrays often add efficiency to the code. Like a database, you can add and delete values to and from the code whenever the situation is met (which the situation can be adjusted by the programmer. In addition, by grouping the similar types of values (like x-positions), it is easy to see what the values are for then having 100, for example, variables. 

If you use the array, you can go through the values using a loop, which definitely adds efficiency to the code. 

I can use arrays in a variety of ways in the potential project. For example, in the recitation 6 coding, I used array to make a snow falling effect. I can make the snow falling effect again or can use an array to simply save the position values.

Continue reading “Recitation 7: Functions and Arrays by Min Jee (Lisa) Moon”