Recitation 8: Serial Communication by Karen Zhang

Exercise 1: Make a Processing Etch A Sketch

In this recitation, we finally started to combine what we learned about Arduino and Processing together to make two small projects! Overall, there were two challenges I faced. First, sometimes I forgot how to connect the circuit since we did not practice for a really long time. Second, how to combine the code from Arduino and Processing together. Thanks to the sample code, it saved a lot of work for me to make it run.

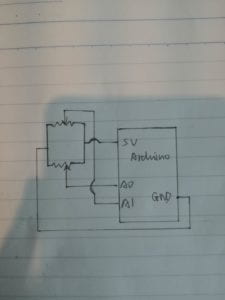
I built a circuit with two potentiometers, which were separated connected to pin A0 and A1. With the help of Katie, I corrected some of my mistakes in code. Nevertheless, the track of the ellipse was not so stable that I expected. I tried to switch the direction, it became a little better. 

Sketch: 
Video: 

Code: 

void setup() {

 Serial.begin(9600);

}

void loop() {

 int sensor1 = analogRead(A0);

 int sensor2 = analogRead(A1);

 // keep this format

 Serial.print(sensor1);

 Serial.print(“,”);  // put comma between sensor values

 Serial.print(sensor2);

 Serial.println();

 delay(100);

}

import processing.serial.*;

String myString = null;

Serial myPort;

int NUM_OF_VALUES = 2;   /** YOU MUST CHANGE THIS ACCORDING TO YOUR PROJECT **/

int[] sensorValues;      /** this array stores values from Arduino **/

float x;

float y;

void setup() {

 size(500, 500);

 background(0);

 setupSerial();

}

void draw() {

 updateSerial();

 printArray(sensorValues);

 x = map(sensorValues[0], 0, 1023, 0, width);

 y = map(sensorValues[1], 0, 1023, 0, height);

 noStroke();

 ellipse(x, y, 10, 10);

 // use the values like this!

 // sensorValues[0]

 // add your code

 //

}

void setupSerial() {

 printArray(Serial.list());

 myPort = new Serial(this, Serial.list()[4], 9600);

 myPort.clear();

 // Throw out the first reading,

 // in case we started reading in the middle of a string from the sender.

 myString = myPort.readStringUntil( 10 );  // 10 = ‘\n’ Linefeed in ASCII

 myString = null;

 sensorValues = new int[NUM_OF_VALUES];

}

void updateSerial() {

 while (myPort.available() > 0) {

   myString = myPort.readStringUntil( 10 ); // 10 = ‘\n’  Linefeed in ASCII

   if (myString != null) {

     String[] serialInArray = split(trim(myString), “,”);

     if (serialInArray.length == NUM_OF_VALUES) {

       for (int i=0; i<serialInArray.length; i++) {

         sensorValues[i] = int(serialInArray[i]);

       }

     }

   }

 }

}

Exercise 2: Make a musical instrument with Arduino

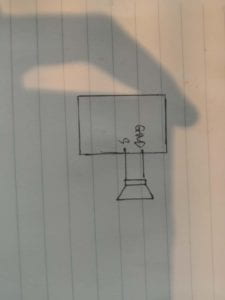
In this exercise, first I built a circuit with a buzzer connecting to pin 9 and the ground. I also designed to use the mouse to control the sound of the buzzer.  Thus, the frequency and duration should reflect the position of mouseX and mouseY. So when I moved the “paw” on my screen, the sound of the buzzer also changed. 

Moreover, Eric also reminded me that it is not possible to generate tones lower than 31Hz. So I had to map the frequency to make sure that it sounds right. 

Sketch: 
Video: 

Code: 

#define NUM_OF_VALUES 2    /** YOU MUST CHANGE THIS ACCORDING TO YOUR PROJECT **/

/** DO NOT REMOVE THESE **/

int tempValue = 0;

int valueIndex = 0;

/* This is the array of values storing the data from Processing. */

int values[NUM_OF_VALUES];

void setup() {

 Serial.begin(9600);

 pinMode(13, OUTPUT);

 pinMode(9, OUTPUT);

}

void loop() {

 getSerialData();

 int freq = map(values[0], 0, 500, 31, 500000);

 tone(9, freq, values[1]);

}

//recieve serial data from Processing

void getSerialData() {

 if (Serial.available()) {

   char c = Serial.read();

   //switch – case checks the value of the variable in the switch function

   //in this case, the char c, then runs one of the cases that fit the value of the variable

   //for more information, visit the reference page: https://www.arduino.cc/en/Reference/SwitchCase

   switch (c) {

     //if the char c from Processing is a number between 0 and 9

     case ‘0’…’9′:

       //save the value of char c to tempValue

       //but simultaneously rearrange the existing values saved in tempValue

       //for the digits received through char c to remain coherent

       //if this does not make sense and would like to know more, send an email to me!

       tempValue = tempValue * 10 + c – ‘0’;

       break;

     //if the char c from Processing is a comma

     //indicating that the following values of char c is for the next element in the values array

     case ‘,’:

       values[valueIndex] = tempValue;

       //reset tempValue value

       tempValue = 0;

       //increment valuesIndex by 1

       valueIndex++;

       break;

     //if the char c from Processing is character ‘n’

     //which signals that it is the end of data

     case ‘n’:

       //save the tempValue

       //this will b the last element in the values array

       values[valueIndex] = tempValue;

       //reset tempValue and valueIndex values

       //to clear out the values array for the next round of readings from Processing

       tempValue = 0;

       valueIndex = 0;

       break;

     //if the char c from Processing is character ‘e’

     //it is signalling for the Arduino to send Processing the elements saved in the values array

     //this case is triggered and processed by the echoSerialData function in the Processing sketch

     case ‘e’: // to echo

       for (int i = 0; i < NUM_OF_VALUES; i++) {

         Serial.print(values[i]);

         if (i < NUM_OF_VALUES – 1) {

           Serial.print(‘,’);

         }

         else {

           Serial.println();

         }

       }

       break;

   }

 }

}

import processing.serial.*;

int NUM_OF_VALUES = 2;  /** YOU MUST CHANGE THIS ACCORDING TO YOUR PROJECT **/

Serial myPort;

String myString;

// This is the array of values you might want to send to Arduino.

int values[] = new int[NUM_OF_VALUES];

void setup() {

 size(500, 500);

 background(0);

 printArray(Serial.list());

 myPort = new Serial(this, Serial.list()[ 4 ], 9600);

 myPort.clear();

 // Throw out the first reading,

 // in case we started reading in the middle of a string from the sender.

 myString = myPort.readStringUntil( 10 );  // 10 = ‘\n’ Linefeed in ASCII

 myString = null;

}

void draw() {

 background(255);

 paw(mouseX, mouseY);

 // changes the values

 for (int i=0; i<values.length; i++) {

   values[0] = mouseX;  /** Feel free to change this!! **/

   values[1] = mouseY;  

 }

 // sends the values to Arduino.

 sendSerialData();

 echoSerialData(200);

}

void paw(float x, float y) {

 pushMatrix();

 translate(x, y);

 noStroke();

 fill(30,100);

 ellipse(70, 90, 80, 55);

 ellipse(25, 60, 20, 30);

 ellipse(55, 40, 20, 30);

 ellipse(85, 40, 20, 30);

 ellipse(115, 60, 20, 30);

 popMatrix();

}

void sendSerialData() {

 String data = “”;

 for (int i=0; i<values.length; i++) {

   data += values[i];

   //if i is less than the index number of the last element in the values array

   if (i < values.length-1) {

     data += “,”; // add splitter character “,” between each values element

   }

   //if it is the last element in the values array

   else {

     data += “n”; // add the end of data character “n”

   }

 }

 //write to Arduino

 myPort.write(data);

}

void echoSerialData(int frequency) {

 //write character ‘e’ at the given frequency

 //to request Arduino to send back the values array

 if (frameCount % frequency == 0) myPort.write(‘e’);

 String incomingBytes = “”;

 while (myPort.available() > 0) {

   //add on all the characters received from the Arduino to the incomingBytes string

   incomingBytes += char(myPort.read());

 }

 //print what Arduino sent back to Processing

 print( incomingBytes );

}
Preparatory Research and Analysis by Karen Zhang

In the previous group research project and midterm project, I think that interaction must involve two actors in a cyclic process with thinking, processing, and responding. Besides, the interaction must have inputs and outputs, and interaction has to be able to process complex information instead of a simple one, which ultimately differs interaction from an instant reaction.

After the midterm project and learning processing, I pay more attention to the experience and result from the interaction. Many people commented on our midterm project was interactive but the users did not get a result or reward from that interaction. I think the word “reward” never occur to me during the time I was making my midterm project. Moreover, I also have experienced something different during learning Processing. I think everyone has his or her function to use. For me, I really like using “random.” Use random on color, size, and movement. Human beings love getting unexpected results. After all, interaction is a human-centered experience with reward and a process of exploration with multiple and unexpected alternatives.

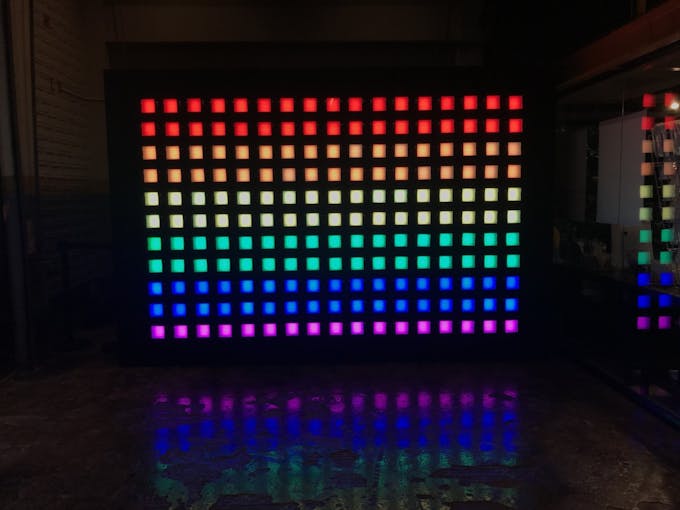
Here is a project I think aligns with my definition of interaction. The project Click Canvas is a highly interactive project made by Natthakit KIMBAB Kang, which provides multiple alternatives for users to explore. The users can turn on and turn off the LED boxes and change the color of the lights. They also have opportunities to choose the boxes they want to light on the wall. Some of the art pieces that the users create in the video are even beyond the imagination of the maker. And users even took photos with the LED box wall together. I think this is interaction with curiosity and surprise.

Rainbow for Pride Day by Phimpharb the Fatin

Click Canvas, an Interactive Wall

The next project I want to analyze is also a great project. However, it does not align with the new definition of interaction I provide. Creepy Cauldron made by Barton Listick is a great toy for children to play with especially in Halloween. His idea is to have the lighting and sound effects get increasingly intense as unsuspecting children approach the cauldron. It definitely scares children to some extent. The lighting and sound feedbacks are strong. However, like my midterm project, there is no reward for this interaction and the feedback is too monotonic, so it differs from my definition of interaction.

The curiosity aspect of interaction also reminds me of the story of Pandora’s box. Pandora opened a box containing sickness, death and many other unspecified evils which were then released into the world. Only the hope was left in the box. Pandora opened the box out of curiosity even Zeus told her not to. Even though it is a story about the curse, Pandora’s action of opening the box can intrigue a certain level of interaction from what is inside of the box.

In the end, the new definition of interaction is a cyclic and complicated process with inputs and outputs, which underlines human-centered experience with reward and a process of exploration with multiple and unexpected alternatives.

Reference 

https://en.wikipedia.org/wiki/Pandora%27s_box

https://create.arduino.cc/projecthub/barton-listick/you-can-t-creep-up-on-this-creepy-cauldron-7e6755?ref=search&ref_id=interactive&offset=22

https://create.arduino.cc/projecthub/natthakit-kim-kang/click-canvas-an-interactive-wall-04332c?ref=tag&ref_id=interactive&offset=0

Recitation 7: Processing Animation by Karen Zhang

Reflection: In-class Exercise

In this week’s recitation, we apply all the functions we have learned so far to make an animation that we want. I create an interactive game. When you press the key, the random and dirty paws are going to appear on the clear and white background. When you loosen the key, it will stop. Then, if you want to clean up the mess, you can use your mouse to click on the screen, then the paws will start to fade away. You can continue and repeat the process. In the end, you can create your own unique art piece!

Here is the code.

float x;
float y;

void setup() {
size(800, 800);
background(255);
}

void draw() {
}

void paw(float x, float y) {
pushMatrix();
translate(x, y);
noStroke();
fill(30,100);
ellipse(70, 90, 80, 55);
ellipse(25, 60, 20, 30);
ellipse(55, 40, 20, 30);
ellipse(85, 40, 20, 30);
ellipse(115, 60, 20, 30);
popMatrix();
}

void keyPressed () {
x = random(0, 800);
y = random(0, 800);
paw(x, y);
}

void mousePressed() {
float size =random(10, 500);
noStroke();
fill(255,70);
ellipse(mouseX, mouseY, size, size);
}

Reflection: Additional Homework 

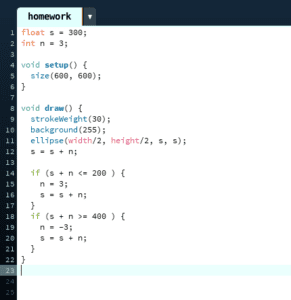
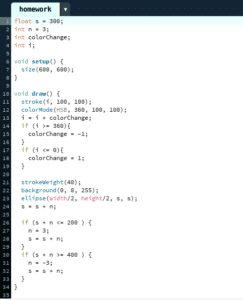
Overall, I think the most interesting functions are “keyPressed” and “mousePressed,” which are used by me in the animation that I made. I think these two functions invite people to interact with. And all kinds of use of “random” are also interesting since it provides more opportunities. For the homework, I think it is a little hard for me to figure out how to do this. I created a float variable of the size and an int variable of the speed (how much the size grows each time). Below are the codes and videos.

Step One

Step Two

HeartbE.T. – Karen Zhang – Eric

Partner: Anna Shi

  • CONTEXT AND SIGNIFICANCE:

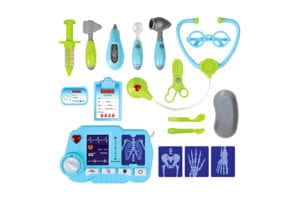
In our group research project, we define what interaction is and research the interactive projects online. The previous project I found online is the street art/public art in the streets of Detroit which make citizens engage with the city itself. I love street art but it is not interactive to some extent. In my opinion, interaction must involve two actors in a cyclic process with thinking, processing, and responding. Besides, I think interaction must have inputs and outputs, and interaction has to be able to process complex information instead of a simple one, which ultimately differs interaction from an instant reaction. Like Eye Writer, it is a highly interactive project and process complex information. When Anna and I started to think about this project, I initially came up with the idea of a doll which teaches children to learn our organs. Then we developed this idea to a role play game as a doctor since we all love to be doctors when we were small. We found that most doctor kits on the market are very simple and not interactive at all. So we want to improve this condition by adding feedback from the original toys to let the children experience the role of a doctor more real and also fun for adults to play with. The reason why we choose an alien is that we think an alien is more interesting, and it is beyond our common knowledge to find his heartbeat.

This is a common doctor kit you can find online. All the simple tools are not sufficient and interactive to play with.
  • CONCEPTION AND DESIGN:

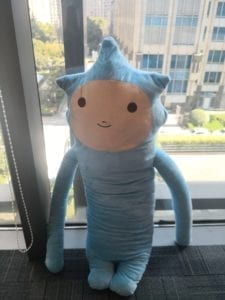
We think we should have something soft and cute for the users to interact, which was hard to be made by digital fabrication. So we decided to buy a doll and stethoscope on Taobao, and the stethoscope plays a significant role in the doctor game. Another reason we chose to perform on an alien doll instead of a human-looking doll is that we could not find an appropriate doll like a normal human that we expected. Moreover, we considered what kinds of feedback that our users could experience. We think light and sound are the most obvious and interactive ones to attract people’s attention. And Anna came up with the idea of two cute blushes with red shining light inside of them.

The picture of my alien son HeartbE.T. in the library, when he was still complete and we didn’t cut his body.

The video below we were just testing the blushes!

  • FABRICATION AND PRODUCTION:
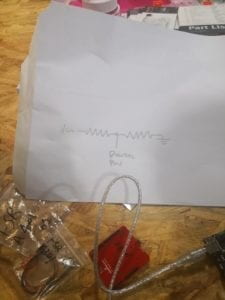
The sketch Nick drew for us

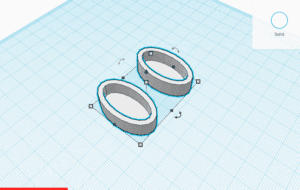
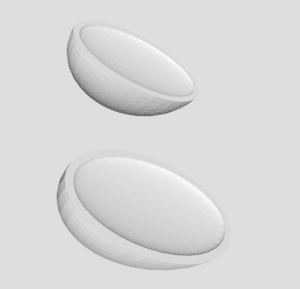
At first, we have some difficulties to use the new sensor — pressure sensor, but soon this problem was solved with the help of Nick. Since my project’s prototype is an alien, we should combine it with an actual doll and we did not spend a long time designing the digital fabrication part. We decided to create two translucent shells by 3D printing and put red LED lights into them in order to build two cute alien’s blushes. We thought it would be a very smooth process since they were small and we did not have to spend a long time to print them. Nevertheless, we failed four times and spent two days to print them. First, we built semiellipse shells. However, the 3D printer seemed to unable to print a thick shell that I expected. I changed the original files and adjusted the thickness for two times, the shells were not what I wanted. After three times of failures, we decided to change the shape of them. I changed them from two semiellipse shells to two semi-hollow cylinders, I might not use the right word to describe them. Here is the picture to better understand.

The new semi-hollow cylinders we created
The previous semiellipse shells we failed to print them out

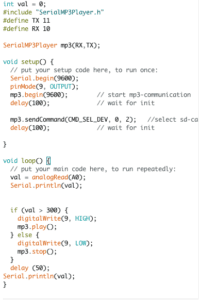
For the pressure sensors, we borrowed four or five types of sensors and eventually decided on using the biggest one. since our HearbE.T. is not small, if we put a smaller sensor into his body, the user will never find the heartbeat. For the sensor and LED part, it went very well, though we did spend some time to put them inside the body of our alien and make sure the circuits are tightly connected. Another obstacle we met is about the sound and music. We wanted to play the sound of the heartbeat, however, it was pretty hard for us to find the right device to play the sound. We mainly brought three kinds of things, including MP3 shield, buzzer/speaker, and MP3 player. The shield is kind of broken and we had to connect the wires by soldering, it was very unrealistic if we continue to use the shield. So we changed it to the speaker, we made the tune of Twinkle, Twinkle, Little Star, but we still wanted to play another kind of music, especially the sound of the heartbeat, which can help us the most to explain our project. With the help of Eric, the MP3 player finally works!! And the code is not very difficult, so we were able to learn quickly how to use it and finish the sound part. Here is our code.

After the user experience test, we found four improvements among all the feedback we had. First, the sensor. Some users had no idea to press it or press harder to trigger the light and sound; however, some users directly press it and find the heartbeat so easily. We thought about changing the sensor to magnetic sensor, however, it was too small which could not fit into our original plan. To adjust the situation, we low down the value from 600 to 300. So as long as the user presses a little bit, the sound and light could immediately be triggered. Second, we use the stethoscope, however, the sound of the heartbeat did not come from the stethoscope itself. We use the speaker to play the sound, and it did not reach our users’ expectation for it. So we changed it into a headphone and combined it with a part of the stethoscope. And I think it is the most successful change we made after the user experience test. Third, the heartbeat users heard sometimes is slow and sometimes is fast, which causes some confusions to the users. So we changed the code from mp3.pause(); to mp3.stop();. So every time the sound heartbeat play from the beginning rather than the middle. Fourth, create a new narrative of the project. We used the stickers to help the users to target where the hearts are. And we also created a poster and a document to better explain our story. Here are our poster and document.

Here is our user test video before our revision. The user has to press very hard to find the heartbeat. And the sound plays from the speakers outside.

Here is the final presentation for our project! Right now, you are unable to hear the sound outside, since the sound comes from the stethoscope. And we adjusted the value, so you don’t have to push very hard to get the feedback. We also add the red stickers part to help the users locate the hearts and find the shape (Thanks Anna for your wonderful performance! ) 


  • CONCLUSIONS:

Our goal is to create an interactive doctor game by examing the alien’s body and you can hear his heartbeat. It is a game designed for children and also fun for adults to play with. So all the equipment we use is not professional. We want to let the children experience the role of a doctor by interacting with this cute and friendly alien. In the beginning, users definitely have confusions to find the heartbeat since it is an alien. By interacting, they eventually can hear the sound of heartbeat from the specially designed stethoscope with headphone. And our users and audiences definitely interact with our project. One thing we will certainly improve if we have more time is the reward/outcome of finding the heartbeat. I think we focus too much on the experience of finding the heartbeat, such as changing speakers to a headphone. But until the presentation, we realize we didn’t focus on the reward part. Personally, I think if we can extend the project, the reward part is something we must improve by letting the heart light through the skin or playing music to indicate the users that they have successfully found the heart.

I am a social science student, so I strongly sense the differences between these two majors. Producing a paper is a smooth process for me as long as I have an outline, the rest of it is about the time to finish it. But for interaction lab, the process of producing a project is much harder than I imagined. Lots of failures and mistakes, and I did feel frustrated in the middle and somehow after a couple of days, things would work out. Patience and passion are definitely needed to complete a project!

  • Reference:

https://vault.fbi.gov/UFO/UFO%20Part%202%20of%2016/view

https://vimeo.com/9939042

https://www.vice.com/en_us/article/qvv3qp/massive-murals-detroit-library-street-collective

https://slate.com/human-interest/2018/09/best-doctor-kit-toys-toddlers-older-kids.html

Recitation 6: Processing Basics by Karen Zhang

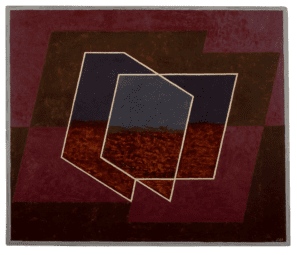
ARTIST: Josef Albers

TITLE: Penetrating (B)

DATE:1943

MEDIUM: Oil, casein, and tempera on Masonite

link: https://www.guggenheim.org/artwork/162

When I opened the website from Bauhaus School of Arts, this image immediately caught my sight. The two colors from the background seem to mix together in balance. In the center, the white or yellow lines are so strong and they are organized so well. Even though it is a piece of oil painting, the texture showed from the painting I could not mimic. However, I love this painting since the artist manages the color and lines so well. Inspired by this picture, I have created a picture based on it. Even though they look different, I use the purple and brown color from Albers’s painting. And based on the dominated color, I add blue and yellow to my sketch to make it more colorful. I also apply the white and yellow lines to my sketch. Moreover, I add different levels of transparency to the sketch. If you look carefully, you can see the differences.

However, so far I don’t think that drawing in Processing was a good means of realizing my design. If I could draw it in AI or any other programs, it would be much faster. I spend most of my time to calculate the right points and lines. Furthermore, I could not directly add color to my sketch. Choosing the color and type it into the code again made the painting process more complicated. Nevertheless, I get used to the traditional way of painting since that is the way I have been practicing for so long.

Here is my code:

size(600, 600);

background(147, 64, 50);

fill(229, 146, 37, 180);

stroke(247, 235, 185);

strokeWeight(6);

quad(-100, -50, -19, 400, 100, 400, 200, -50);

fill(85, 30, 47, 250);

stroke(247, 235, 185);

strokeWeight(6);

quad(100, 50, 0, 500, 100, 400, 200, -50);

fill(85, 30, 47, 200);

stroke(247, 235, 185);

strokeWeight(6);

quad(100, 50, 0, 500, 300, 500, 400, 50);

fill(27, 129, 139, 180);

stroke(247, 235, 185);

strokeWeight(6);

quad(200, 100, 100, 550, 300, 500, 400, 50);

fill(229, 146, 37, 180);

stroke(247, 235, 185);

strokeWeight(6);

quad(300, 150, 200, 600, 300, 500, 400, 50);

fill(229, 146, 37, 100);

stroke(247, 235, 185);

strokeWeight(6);

quad(300, 150, 200, 600, 500, 550, 600, 150);

fill(85, 30, 47, 150);

stroke(247, 235, 185);

strokeWeight(6);

quad(400, 200, 300, 650, 500, 550, 600, 150);

fill(27, 129, 139, 130);

stroke(247, 235, 185);

strokeWeight(6);

quad(500, 300, 400, 750, 500, 550, 600, 150);

fill(27, 129, 139, 100);

stroke(247, 235, 185);

strokeWeight(6);

quad(500, 300, 400, 750, 700, 700, 700, 300);