Recitation 8: Serial Communication by Like Yang

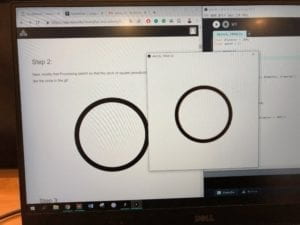
Exercise 1: Make a Processing Etch A Sketch

pic
Exercise 1: Schematic

Components:

1 * Arduino Uno

1 * USB-B to USB-A cable

2 * 10kΩ Potentiometer

Several jumper cables

Video:

Process:

In this week’s lecture, we have already learned how to transfer values between Arduino and Processing. Therefore, I didn’t encounter many problems when trying to understand and modify those codes in the template. However, during my first trial, it seems that Processing failed to receive the exact values from Arduino because the numbers in Arduino looks fine but all the readings were zero in Processing. After consulting Leon, he told me that I need to pay special attention to the format of values transferred from Arduino. What I should do is to use println instead of print so that Processing can read two numbers at each time. After correcting this, the entire project successfully began its operation.

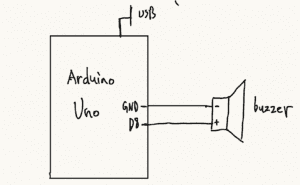
Exercise 2: Make a musical instrument with Arduino

pic
Exercise 2: Schematic

Components:

1 * Arduino Uno

1 * USB-B to USB-A cable

1* Buzzer

Several jumper cables

Video:

Process:

From my perspective, although the circuit of this project is easier, it is still a little bit harder in general than the previous one because the code is not very clear this time. The first thing to pay attention is that in the template, there is space for 10 values but during the exercise, we only need two. We have to remember to change the number in the array according to the specific needs of each program. Then, in Processing there was a for loop in void draw(), I could not think of why does this exercise requires us to use for loop so I deleted it and changed altogether. I simply let values[0] = mouseX and values[1] = mouseY. Thankfully, this action did not cause errors. Finally, I made the buzzer to give out sound but the tone was so low and we really could not make any pleasant rhythm within such a setting. As a result, I raised the frequency by twice and this problem was partially solved. I hope in the future, I can replicate the effect of showing the path of my mouse’s movement, just as what the person did in the original version of the video. Maybe I should refine the settings of frequency as well to bring truly pleasant sounds and make the instrument more practical.

Preparatory Research and Analysis by Like Yang

Definition for ‘Interaction’ Revisited

In my blog post for our Group Project, I defined Interaction as  the following: 

  1. 1. Involves two or more actors.
  2. 2. Includes reciprocal processes of receiving information, processing information, and giving out feedbacks, despite the form of information (verbal, physical, visual, analog, digital etc.)
  3. 3. Could be carried out without prior interpretations.

This definition was largely based on Tom Igoe’s “Making Interactive Art: Set the Stage, Then Shut Up and Listen” and Tom Igoe & Dan O’Sullivan’s “Physical Computing – Introduction“. However, the experience of designing and making our midterm project Duet Beat made me wonder whether it is possible to always give individualized inputs and outputs throughout the course of interaction. It may be too demanding to require every single interactive process to have some ‘uniqueness’ but I believe in the context of physical computing, this is not a difficult goal to achieve. In fact, the customized inputs and outputs, I believe, reveals the centrality of our users and shows the designers’ respect towards those who appreciate their work. After I have learned about processing, I would like to add another universal criterion for my definition of interaction, which is the accessibility. Every human being or even animal (There was an example that someone made a device to feed his pet earlier in the class) should be able to carry out the so-called activity of ‘interaction’, regardless of nationality, race, or other differences we have. If there is no such a thing that can initiate the process, then the entire project design would be meaningless. In my group project, the one I mentioned against – F3 – is the best example to explain this because people need to have considerable programming experience in order to use that software. In other words, its interaction with users has a high threshold.

Two Interactive Products

pic
User Interface of Cellular Automata and the Edge of Chaos

The program I find in line with my definition this time is called Cellular Automata and the Edge of Chaos by David Eck from Brandeis University. As you can see, in this project, users give different settings to the computer and the computer will generate a customized painting featuring pixels of different colors and positions. The two actors involved are the computer and the user. The input in this project are settings in numbers and the output is the painting. It is quite user-friendly since we do not need to understand the meaning of each setting. Of course, it would be even better if we know how to adjust the painting but even if we just play around, we can still come up with fantastic artwork. In our final project, I really want to make something that can combine elements of visual art with physical computing because that is largely what Processing was designed for, as stated in the article written by Casey Reas and Ben Fry. Below are some samples I got:

pic
Forest of Christmas trees?
pic
A bear in the middle?

The project that I think is less relevant to my definition of interaction is called KNBC by Casey Reas. It is “an audio and visual distortion of television signals”. In fact, I find many of the work Casey Reas finished are more related to the art itself instead of interaction with people. 

pic
KNBC by Casey Reas

There are only viewers instead of users in this project. People can only stop by and watch how the changing TV signals give them different outlays of pixels on this screen. They cannot input any message into this project by themselves and generate an outcome. And of course, people will need instructions in order to understand what this project is doing. However, the lack of interactivity does not harm this project’s value as an artwork because encoding and decoding the TV signals to bring new visual and audio experiences to people is a spectacular idea that will refresh our knowledge about media or even the contemporary society in the media age. Based on that, I would say this project is still inspiring for our final project because it is somehow educational and carries deep meanings that people should learn about the environment around. I would be so happy if we can come up with a final project with educational value in the end because we attempted and failed for making the creepy dog head. In some other senses, we can say that the two actors involved in interaction for this project are the computer/ screen and the TV signals. But I don’t quite agree because such a process is unconsciously initiated. 

New Definition for Interaction

My final version of Interaction’s definition would be:

A conscious process with another object that every individual can conduct without prior instructions, which initiated some kind of input to derive an output. 

This latter part of this definition is still based on what you have read in the first paragraph because I think input, processing, and output are indeed three key factors within interaction that we cannot miss, even though we have various ways for the description of such a process. Chris Crawford, Tom Igoe, and Dan O’Sullivan all included such a three-step model when they talk about interaction. The main evolution of my definition is in the first half, which is that now I would like to stress more on the role user plays. From lectures and the experience of making our midterm projects, I really believe it is users that attached meaning to the project we have come up with. So, it is reasonable to mention them in the first place of my definition of interaction. Even for something as ingenious as Rube Goldberg Machine, we still need someone to tricker the initial movement, right?

Recitation 7: Processing Animation by Like Yang

Recitation Exercise:

For this week’s project, I simply built on the painting I created last week. Now, the object originally on the right will be able to move around the canvas following my mouse. What the user needs to do is to fit it back into the original position. When they successfully complete this task, the color of the entire painting will change to its contrast (which I find even better than the original colors). Meanwhile, users would be able to see the message of “Perfect Match!” in the console. There is another detail, which is that the other object with the same shape of the object the user is controlling, will not display on the screen at the very beginning. By adjusting the alpha value, I made it more evident when the user is getting closer to the original position.  The functions I have used include pushMatrix, translate, popMatrix, mouseX, mouseY etc. You can find the code below.

void setup(){
  
size (600, 600);
colorMode(RGB);
noStroke();

}

void draw(){

  background (133, 97, 50, 150);
  
  pushMatrix();
  translate(mouseX, mouseY);
  
  fill (0, 0, 0);
  quad (-275, -125, -225, -25, 225, -25, 175, -125);
  
  fill (248, 231, 14, 125);
  quad (-45, -205, 50, 45, 100, 45, 5, -205);
  
  fill (215, 215, 215, 150);
  quad (-105, -85, -255, 105, -35, 105, 115, -85);
  
  fill (255, 0, 0, 100);
  ellipse (65, -125, 100, 100);
  popMatrix();
  
  
  fill (100, 100, 100, mouseX-200);
  quad (45, 350, 65, 385, 250, 385, 225, 350);

  fill (248, 231, 14, mouseY-200);
  quad (125, 320, 165, 420, 190, 420, 150, 320);

  fill (30, 30, 30, mouseX-125);
  quad (135, 360, 60, 460, 135, 460, 210, 360);

  fill (255, 0, 0, mouseY-195);
  ellipse (168, 347, 42, 42);


if ((mouseX > 315) && (mouseY > 315) && (mouseX < 335) && (mouseY < 335)){
  
  background (122, 158, 205, 150);
    
  fill (255, 255, 255);
  quad (50, 200, 100, 300, 550, 300, 500, 200);
  
  fill (7, 24, 241, 125);
  quad (280, 120, 375, 370, 425, 370, 330, 120);
  
  fill (40, 40, 40, 150);
  quad (220, 240, 70, 430, 290, 430, 440, 240);
  
  fill (0, 255, 255, 100);
  ellipse (380, 200, 100, 100);
  
  fill (155, 155, 155, 125);
  quad (45, 350, 65, 385, 250, 385, 225, 350);

  fill (7, 24, 241, 125);
  quad (125, 320, 165, 420, 190, 420, 150, 320);

  fill (225, 225, 225, 100);
  quad (135, 360, 60, 460, 135, 460, 210, 360);

  fill (0, 255, 255, 130);
  ellipse (168, 347, 42, 42);

println(mouseX, mouseY);
println("Perfect Match!");
}

}

Additional Recitation Homework:

pic
Step 1

In this homework, it is very important to remember using the HSB volor mode instead of RGB.

The code for homework is here:

float diameter = 100;
float speed = 2;
int count = 0;
int x,y;

void setup(){
size (600, 600);
frameRate(110);
colorMode(HSB);
x = width/2;
y = height/2;
}

void keyPressed(){

if (key == CODED){
if (keyCode == UP){ 
y = y - 10;
} 
if (keyCode == DOWN){
y = y + 10;
}
if (keyCode == LEFT){
x = x - 10;
}
if (keyCode == RIGHT){ 
x = x + 10;
}
}
}

void draw(){
background (255);
ellipse (x, y, diameter, diameter);
strokeWeight (20);
stroke(count, 255, 255);
count = count + 1;
if (count > 255){
count = count - 255;
}
circleMove();
circleBounce();
}

void circleMove(){
diameter = diameter + speed;
}

void circleBounce(){
if ((diameter > 350) || (diameter < 100)){
speed = -speed;
}
}

Overall Comments:

The most useful functions I have used in this recitation is pushMatrix/translate/popMatrix. As you can see in my project, I need to move around the parallelograms and circles a whole. This goal is much easier to achieve if I put them in a Matrix and change the center. Also, the HSB color mode is also a very interesting feature because this is the only way to make an object flow in so many different colors. The drawback for HSB is that we cannot tell the components of the color very directly. For a  specific color, we should still use the RGB mode. In the future, I would like to try frameRate  and frameCount function. I think they will be interesting to use, too.

Recitation 6: Processing Basics by Like Yang

pic
A II by László Moholy-Nagy

This painting is called A II, created by László Moholy-Nagy, one of the faculty from Bauhaus School of Art and Design. I chose this painting because not only its name but also its outlay is futuristic. This painting was finished in 1924 but the name reminded me of artificial intelligence (AI), which is somehow related to creating art with computers. So does its simple design. After nearly a century of the creation of this painting, the primary way for people to interact with the rest of world is through those abstract tiles on the screen, just like the ones we can see in this painting. Meanwhile, A II is different than AI since II also refers to ‘2’ in roman numbers. Does this mean that the two similar objects on the canvas, composed by parallelograms and circles, signifies our humans’ of company, even in the digital age? These endless interpretations of the artwork fascinate me about the image I chose.

pic
A III by Like Yang

What I want to create in Processing is simply a replication of the Moholy-Nagy painting, making it a step closer towards the contemporary AI technology. As you can see, the components within this image are not complicated at all. The challenging part is the relative positions of each shape so as to maintain its original artistic expression of two objects attached together. During the recitation, I spent most of my time adjusting the position of each shape. In fact, I find it quite interesting that drawing parallel lines in Processing require some mathematical computation. Artists are seldom that rational when they paint, right? The other thing to notice is that, as you can see, the circles and parallelograms in the original painting are semi-transparent. I tried to adjust the alpha value but still cannot reach the feeling of texture in the original one. Generally speaking, I think my painting seems more digital than the original creation since the colors and shapes are all clearly defined. It really resembles the original image in content but is too flat so as to lack the sense of layering. Hopefully, I will be able to add more elements to this painting after I get more familiar with Processing.

From my perspective, the purpose of using Processing to draw is not to replicate the existing artwork but to help artists explore the possibilities they are unable to reach on the ordinary canvas. Computers are able to accurately copy the color, shape, and positions of the original painting but they can definitely do more. For example, in my work, if the two objects, big and small, can follow my mouse to move a little bit on the canvas to show that they are actually separate, it may help the audience better understand “Ah, there are two parts in this painting and it is trying to express their attachment.” In this way, the threshold of appreciation of artwork can be lower. We would be able to create the aesthetic appreciation “for the rest of us”. 

Please find below the original codes for my work:

size (600, 600);
background (133, 97, 50, 150);
noStroke();

fill (0, 0, 0);
quad (50, 200, 100, 300, 550, 300, 500, 200);

fill (248, 231, 14, 125);
quad (280, 120, 375, 370, 425, 370, 330, 120);

fill (215, 215, 215, 150);
quad (220, 240, 70, 430, 290, 430, 440, 240);

fill (255, 0, 0, 100);
ellipse (380, 200, 100, 100);

fill (100, 100, 100, 125);
quad (45, 350, 65, 385, 250, 385, 225, 350);

fill (248, 231, 14, 125);
quad (125, 320, 165, 420, 190, 420, 150, 320);

fill (30, 30, 30, 100);
quad (135, 360, 60, 460, 135, 460, 210, 360);

fill (255, 0, 0, 130);
ellipse (168, 347, 42, 42);

Duet Beat – Like Yang – Rudi

pic
Duet Beat

You can also find a short film clip about Duet Beat here.

Context and Significance:

As mentioned in my blog post for our group research project, I define interaction as an activity between at least two actors that includes reciprocal processes of receiving information, processing information, and giving out feedbacks.  However, I find this definition difficult to cover the essence of interaction in the context of physical computing after I have encountered ‘Ethical Things‘ because the development of technology enables us to unlock so many possibilities. What truly fascinates our contemporary users, I think, should be that the variety of sensors could transmit individualized inputs and, of course, give customized outputs depending on time, space and users’ conditions. This characteristic is also in line with the belief of ‘human-centered design’ as we have mentioned in one of our lectures. When designing our group research project, ‘Sfeeder‘, we integrated this user-centered idea by adding health detecting functions and this belief is no different from our midterm project ‘Duet Beat’. The unique thing about our project is that the rhythm our users will get is totally based on their own mental state and creativity. Before attaching the sensors to his or her body, the user would not know what are they going to get with the machine. Also, it is very easy for everyone to use. Taking advantage of the built-in melody, the difficulty of composing one’s own song has been significantly reduced. By building ‘Duet Beat’, I believe we are getting closer to the ideal of building the computer for ‘the rest of us’, as is stated in Igoe and O’Suvillian’s article. We hope that everyone, no matter amateur or professional, can create their own music immediately when they are inspired. Without the complicated user interface, music creation is closer to us than ever. 

Conception and Design:

What we would like to create was a machine that is easy to use so we tried to make our design as simple as possible. We managed to fit two Arduinos, two breadboards, two battery cases, and all the jumper cables into a small box so the entire equipment won’t seem clumsy. Except for the main body, users can only directly see the heart rate sensor and the keyboard for them to create music so it is unlikely to cause their misunderstandings to the usage of Duet Beat. Although in many aspects we minimized our design, we tried to use as more LED lights as possible to clearly indicate the status of the machine. As for the material, we used wood because it is one of the few materials that were provided for laser cutting but we find it very suitable for our project. In fact, most of the musical instruments, especially those western ones, are made of wood so using wood is one of the few characteristics that Duet Beat inherited from our tradition. Unlike other materials such as plastic or cardboard, wood can better transfer the sound from our buzzers. The other part of design I would like to mention is our keyboard. In the final form of Duet Beat, the keyboard is divided by lines and we find this design not intuitive. People tend to press on the board instead of using their hand as a blade to let the distance sensor capture their movements, despite that the width of each key is already small. Perhaps, we should add some guidance or reminder on the box to illustrate its correct usage. Professor Godoy said that we can simply design the box using the shape of a heart and the keyboard using the shape of a blade, which I also think is a good idea to implement.

Fabrication and Production:

We began with the design of circuits. I was mainly in charge of the keyboard part and at the very beginning, I found that the readings from the IR distance sensor were inaccurate. It was often the case that the tones would change even my hands haven’t moved. To settle this problem, I made adjustments to both the hardware and software. By seeking information on the Internet, I found that the readings can be easily affected by the currency that went through the sensor. The online instructions advised us to add a low pass filter to make sure that the currency is stable. After trying capacitors of 10 μF and 100 μF as well as 1kΩ and 10kΩ resistors, the readings’ stability had been improved but still can’t meet the standard to make a keyboard. In the end, I separated the sensor from the main circuit and offered it separated power supply. I also cleaned the pins to make sure that the current can go through smoothly. After hours of trial, I found that installing the sensor higher from the table and change the detecting interval from 500 to 380 would make the situation better. In the last day, I finally settled the problem of unstable readings. The other crucial step in the making of the main body. We tried to make the body as small as possible and this posed a problem to us as for how to arrange the inner layout. In the end, we have to put the battery cases vertically and overlay the breadboard on the Arduino. We understand that doing so is at the risk of poor contact so we are more than careful when putting all the components in. Luckily, we did not have to compensate on the compact design in the end. Due to sudden design changes, Duet Beat did not participate in Friday’s user test session but we still collected some feedback from our friends and peers working at the lab. Just as I mentioned before, the most confusing part was the design of the keyboard. However, there were also users think that the usage of the keyboard is interesting because creating music without having to touch anything brings a futuristic feeling. Also, to allow users better understand Duet Beat’s working status, we put an LED on each of the keyboards so they would know which tone they were playing. One user said that we should switch the location of the LEDs and keyboard indication but unfortunately, we were unable to do so due to the position of holes preserved for cables. This is what we should consider in future developments.

Conclusions:

The goal of our project is to create a customized music maker that is accessible to everyone and unlock people’s creation potentials. We achieved the goal of having individualized input and giving customized outputs but definitely, we can do better. The rhythms generated from the heart rate sensor were pre-determined so it is still not customized enough. I hear that nowadays artificial intelligence is already capable of composing their own music and I look forward to adopting that technology into Duet Beat. The interaction between Duet Beat and our audience includes two parts, one is the basic rhythm generated from the readings of heart rate and the other is the tones of the keyboard by capturing their physical movements. If we have more time, the first thing to do is to add a switch. The current design of our project does not allow users to turn it off without breaking into its main body, which is not energy-efficient and also potentially dangerous. The other thing we can improve is to redesign the keyboard part, not only to make its usage more intuitive but also to cover the cables that were exposed in the air. From my perspective, the lessons I have learned from my failures and setbacks are the most valuable part of the midterm project. I finally found out how difficult it is to put the blueprint into reality. First, we may not be able to find a practical way to realize our ideal design. Even if we have come up with the solution, the results we get may be far from our expectations and this is the primary reason for us to abandon our first prototype. When making our project, I always think that ensuring the stability of core functions is our priority but my partner Guangbo often came up with ideas to add new features. Without him, I don’t think we can develop Duet Beat to that far. Even if sometimes, adding new features resulted our code does not work anymore, he did not choose to give up. I see the courage of stepping out of the comfort zone on him, which is something that I need to develop in my future.

Meanwhile, I learned the valuable lesson of how to gain back confidence after experiencing failure. When I was trying to insert numerous pins into the breadboard, I almost lost my patience because there were simply too many capacitors crowding together for those LEDs. However, Candy Bi, who was working on her project next to me on that day, kept encouraging me and told me not to be in a hurry. I was indeed moved by her encouragement because, you know, sometimes that kind of word is exactly you need when you want to give up. I am so glad to meet all these peers that supported me to go this far on the course of making Duet Beat. I still remember that day when Professor Cossovich told us that by taking interaction lab, some people learn more about coding, some people learn more about design, some people learn more about interaction, etc. and he thought that we could come up with better projects.  Now, after finishing making my midterm project, I would like to say that in the future, I may forget about Arduino, forget about Processing, forget the definition of interaction. But the courage and perseverance I gained from the experience of making Duet Beat, I believe, would carry on with me to face bigger challenges. The life lesson I have had when doing the midterm project is totally beyond my expectation and I appreciate having that chance to reflect on my drawbacks.