A. Go back to your definition of interaction as you defined it during the group project. Based on the initial definition and your experience developing and executing your midterm project, how has your definition of interaction evolved?
In the group project, I once defined interaction as a course that involves two actors to deliver information, process and give feedback to each other, which is based on “The Art of Interactive Design” by Crawford, and “Introduction to Physical Computing” by Igoe and O’sullivan. However, after experiencing making the midterm project and getting commentary from participants, I would like to add a touch to the “feedback” part. Now I think the feedback has two dimensions: immediate feedback during the interaction process, and final result at the end of that process. If the participants do not feel the process is complete or get any rewards from the process, they are very unlikely to have the sense of interacting with the project.
B. Research at least two other interactive projects to serve as inspiration for your Final Project. Find projects that align with what you think interaction is and at least one that differs from it.
This project aligns with my thoughts on interaction. It includes clear input of voice and language information and output in multiple forms including but not limited to voice messages, controlling lights, searching online, etc. The voice feedback acts as the direct, immediate feedback part in my definition, while the functioning of orders placed by the user is the final result.
This project, though may align with my former opinion of interaction, does not fit my definition of interaction anymore. The robot in this project does have some action and reaction with the user, but the whole process of using results in nothing more than an experience.
Notes: I would like to apply a connection between physical objects and presentations in processing in my project. For now, I and my partner have been considering using a physical mirror as a component of the physical part and make a visual mirror on computer with processing to give the information output.
C. Finally, propose a “new” definition of interaction in your own words. Draw from your account above and try to evolve your definition beyond the current convention.
I define interaction as a course that provides a final result by multiple particpants delivering complex information, processing and giving instant feedback to each other.
strokeWeight(10);
stroke(c,255,255);
if(c < 255){
c ++;
} else if (c >= 255) {
c = 0;
}//random color
ellipse(x, y, r, r);
r += i;
if(r >= 300){
i = -i;
r += i;
} //shrink
if(r <= 60){
i = 1;
r += i;
} //expand
}
void keyPressed(){
if(key == CODED){
if(keyCode == UP && y > 0){
y -= 20;
}
if(keyCode == DOWN && y < height){
y += 20;
}
if(keyCode == LEFT && x > 0){
x -= 20;
}
if(keyCode == RIGHT && x < width){
x += 20;
}
}
}
Notes
I have got familiar with basic interactive functions (mouse and keyboard interation) in processing, and started to try using transform functions (but with no good outcome yet).
This week we chosed a piece of art work as an inspiration to make new images with processing. Below is the image I picked, Blue Gold Totem designed by Victor Vasarely. I picked this on because I thought it practical to make a composition of basic shapes like this work of Vasarely, considering that I was not very familiar with the processing yet.
Since it was my first try on making something with processing, I did not intend to do complex recreations but would like to simply imitate the original image. However, my attempt was not a very successful one. On the one hand, I found locating the position of shapes very troublesome; On the otherhand, I faced difficulty in finding the right colors. These two problems made the processing very time-consuming, and I was not able to finish in the time limit.
My piece
Code
Code
I do not really think processing is the most suitable method for this design. Since the design is mostly repetition and composition of almost same shapes, it could have been much more convenient to create same shapes with different colors that are free to move. Before starting processing, I did not make a wise choice on image and design choosing because I knew little about the advantages and limitation of drawing with processing. But after this failed try, I think I have grown a little more familiar with it.
Our Midterm Project started from our discussion of the definition of interaction based on our experience in previous Group Project “Speaking Gloves”, and spread out as we moved forward to look for inspirations online.
I am particularly inspired by the artistic form of immersive theatre, represented by Sleep No More, where the audience are able to explore the space and settings to find material clues for the play. This provides me a subtle solution for a problem I met in my previous experience of designing interactive projects. I found the theatrical settings, if set cleverly, may give the audience more sense of participation on account of people’s natural absorption and processing of background stories and other information. This process is essential to our definition of interaction, which is a process composed of input, process and output of information of some complexity between two actors. Taking immersive theatre into my starting stage, I decided to do something involves theatrical elements.
However, our project had restriction in time and our technique, so we had to keep it practical. The most basic and primitive form of theatre that came to our mind was play house of children. Karen came up with the idea of role playing doctors, a typical profession that gets obvious input and output of information from medical tools. We found mant existing toys for children imitating medical activities mechanic and dull, so we decided to make a project that is interesting enough for children to have fun experience, and thus be encouraged to continue future exploration in medical field.
CONCEPTION AND DESIGN:
Considering that our project targets mainly at children, we wanted to keep the input and output stage of interaction easy to practice and capture. Therefore, we chose one of the most directly reflective part in a medical check: taking the heartbeat with a stethescope. The input can be achieved with touching, a simple body engagement, while the output takes form in sound. To make the output of information more explicit and complex, I came up with the idea that we can also give visual output with blush on the face of the “patient”. For these “blushes”, we thought the conbination of 3D printing products and LEDs would be the most convenient way for us to produce.
We also wanted to create fun elements, even games, in our project to keep our audience interested. So we made up a background story: An alien whose spacecraft crashed on earth needs an urgent body check, but we human beings know nothing about his body and need to search for the location of his heart(s). We planned to introduce this plot to our audience in performance.
In addition, we wanted the subject of our project cute, welcoming and “toucher-friendly” enough to the audience. Considering all factors above, we purchased a plush toy online to be our subject because of its softness and cuteness. Of course, we also got a real stethoscope vital to the role play.
This is the original look of the doll.
FABRICATION AND PRODUCTION:
We started with the sensors. After testing several kinds of sensors, we decided that a pressure sensor in the style of a belt suits our project best. It was large enough in scale for participants to find. We planned to connect it with arduino that controlled two red LEDs and a speaker, and then plant them into the body of the alien doll, so that the lights in the “blushes” and speaker will work when the doll is stroked. When building the circuit, we got help from Nick.
The sample diagram drew by Nick.
We encountered several failures in 3D printing the LED shells. We originally intended to construct two translucent shells, but the products failed to meet our expectation for three times, because this shape is difficult for the 3D printer to accomplish. So we redesigned the shells into semi-hollow cylinders, which is easier to make.
Our original design that failed.
Our final design.
We assembled the shells and the LEDs before cutting the doll open to plant them in.
Assembling the “blushes”. Imitation of blushes with lighted red LEDs
Inserted into the doll
For the sound output, we first intended to use an MP3 arduino shield o play a sound clip of heartbeat according to the suggestion of Eric. But we found the shield not usable unless we soldier the wires, which was too time- and energy-consuming. So we switched to use a buzzer and composed a simple tune in vcc file. This worked, but we were not satisfied with the situation that we cannot play soundclip of heartbeat.
The sound of heartbeat is so vital to the clarity of our project, so we again made another adaption. We tried using an MP3 player, and finally succeeded in playing the soundclip with help of Erik.
The final code for our arduino
So far, our project had completed the first stage of construction. When the doll is stroked in certain areas with enough pressure, the pressure sensor underneath its skin will send the data to the arduino, which controls the LEDs and the MP3 player to work. The sound was amplified through two loudspeaker boxes placed outside. Then we attended the user experience test with this project, and named it HeartbE.T.
During the test, we received many useful thoughts and suggestions. The one that influenced our project most was that it was too confusing for the participant not to hear the heartbeat through the stethoscope. Also, some participants pressed less hard than enough so they did not activate the sensor at all.
The users found it difficult to locate the correct position, or even got confused at what to do.
To fix these problems, we connected the MP3 player to a headphone instead of the speaker boxes, and sticked the headphone wire with the stethoscope. Therefore, the participants would be able to get more convincing feedback from the headphone. We also slightly adapted our code to make the sensor more sensitive. We once thought of replacing the pressure sensor with a magnetic one, but we gave up that because magnetic sensors were too small to find in such a large doll.
For our last performance, we improved our story, adding more details and background information to it. We made files for the crashed spacecraft in the story, and designed a poster for our project. These actions turned out to be quite successful in the ultimate presentation: Though our audience at the presentation were all adults, they thought the story interesting and the theatrical performance important to the interactive experience. To add the degree of interaction, we provided stickers for the participants to mark out the location of the heartbeat they capture.
My demonstration of the project
CONCLUSIONS:
The participants smoothly figured out how to interact with our alien HeartbE.T. in a short time with the tailor-made “stethoscope” and our introduction of the story, though one of them met a little difficulty in finding the locations because of the problem of lacking pressing power, which we intended to fix after the user test.
I managed to include theatre and performance elements in our project to increase the participants’ sense of engagement, which was successful. The participants commented the project as interesting, engaging and inviting (in the sense of loveliness). However, according to the feedback we received at the final presentation, the “final goal”, or the “reason” for the project itself does not seem very clear to the audience. They were invited to participate in the story, but they had no understanding why they should do it. As a result, they did not get a sense of “final reward” after finishing their experience. In other words, while I focused on the instant output/feedback, I actually neglected the sense of overall accomplishment which a complete interactive project should have. The theatrical element played a role, but it can still be improved on the level of completeness.
If I have more time on the project, I would like to find out a way to make up for the shortness of pressure sensors. I think adding a final reward at the end of the interaction process would also help a lot, for example, a signal showing the alien coming back to life. This relates again to the completeness of the story which I would like to polish to cater to the improved project. Besides, since our original target audience are children, I would like to invite some children to play with the project and provide feedbacks. If possible, I will be able to adapt it into a version that considers more about children’s ability of learning and understanding.
The interactivity in our project relates closely to our goal: to encourage learning through fun activities. In interactive process, participants experience fun through thinking/processing information and getting right feedback. It is this reasoning of positive learning that the most precious part I have taken from the project.
References
Sleep No More: http://mckittrichotel.com
Doctor play house: https://slate.com/human-interest/2018/09/best-doctor-kit-toys-toddlers-older-kids.html
source of document making: https://vault.fbi.gov/UFO/UFO%20Part%202%20of%2016/view
This week we made drawing machines, composed of two stepper motors controlled by H-bridges and mechanical arms attached to them. The arms hold and move a pen to draw on a sheet of paper. The circuit is quite complicated at the first eye, but it is actually very reader-friendly because of the carefully chosen colors of wires.
After I finished connecting wires according to the diagram, I tested whether the stepper motor functioned well, only to find it vibrating but not spinning. I double checked the wires but found no problem. However, with the help of a fellow I figured out that the H-bridge was loosen. The motor worked perfectly after fixing the connection problem.
Then I added a potentiometer into the circuit. I realized that I was not really familiar to how to connect a potentiometer, and spent some time browsing class notes. When I finished the circuit, I was able to control the stepper motor with the potentiometer:
Then me and my partner connected the mechanical arms and attached them to our two stepper motors. Though the holes on the arms were a little to big to hold the pen tight, which resulted in shaky lines when actually drawing, the machines worked well.
Questions
Question 1:
What kind of machines would you be interested in building?Add a reflection about the use of actuators, the digital manipulation of art, and the creative process to your blog post.
I would be interested in building machines that do repetitive works but also reveal something new in that repetitive pattern just like this drawing machine we made this week. I have not imagined before that these lines and curves can create beautiful images through replication.
Question 2:
Choose an art installation mentioned in the reading ART + Science NOW, Stephen Wilson (Kinetics chapter). Post your thoughts about it and make a comparison with the work you did during this recitation. How do you think that the artist selected those specific actuators for his project?
Waves made by Daniel Palacios Jimenez has caught my eyes. It is composed of elastic ropes waved by motors into visual shapes. I link the design opinion of Waves to our drawing machine, because they both use replication of single curve/line to create patterns. However, Waves is more emotionally infectious to me because it transform two-dimensioned lines into three-dimensioned shapes.
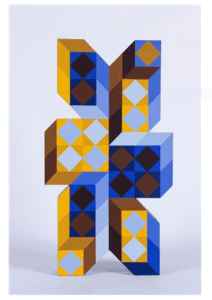 Original piece designed by Vasarely
 My piece
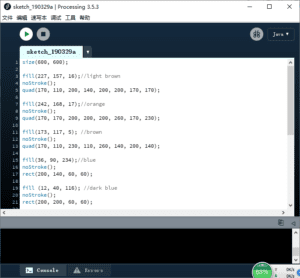 Code
Code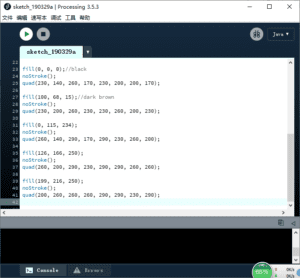 Code
Code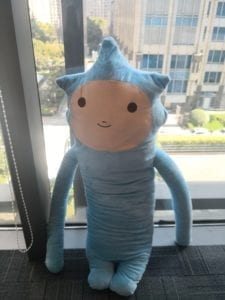
 The sample diagram drew by Nick.
 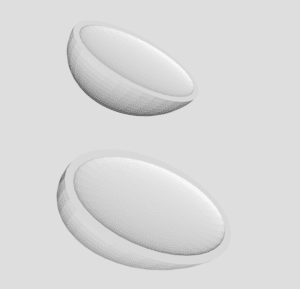 Our original design that failed.
 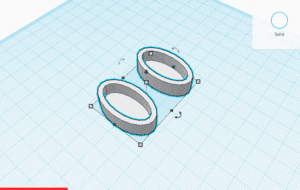 Our final design.
 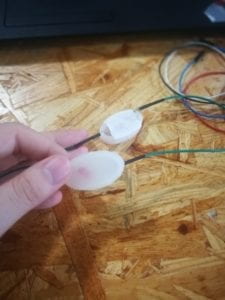 Assembling the “blushes”.
 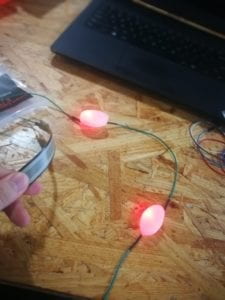 Imitation of blushes with lighted red LEDs
 Inserted into the doll


