Touch the Stars: Final Interaction Lab Project
Conception and Design
When my partner (Caren Yim) and I initially began thinking about our final project, we had the idea of creating a game called Ready, Set, Guess!, in which two players would compete to see who could identify a blurring image on the screen first. However, after the recitation and lecture session in which we received other people’s feedback, we decided to change our idea. During recitation, we were told that our game didn’t seem ‘innovative’ enough, at that the interaction we had planned (of hitting buttons which corresponded to colors next to answer choices appearing on the screen) was not interactive enough. We were advised by one of the teachers that creating a new, effective game would be very hard to achieve, and that it might make more sense for us to create something which involved more interactive elements. In lecture, we were further advised against making games, and noticed that everyone else in our class also wanted to create a game. The feedback we received was all accurate- hitting a button, for a sort of ‘game show’ like game was not interactive enough. After this lecture, my partner and I met after class to discuss our project further.
We wanted to differentiate our project from the other ones in our class, and thought about switching to something more creative and artistic. Caren and I remembered the “Eyewriter”, a project we had read and heard about in class, which combined tracking technology with art. Earlier this year, I went to the Yayoi Kusama art exhibit in Shanghai, and was very inspired by the experience I got from being there. Thus, Caren and I decided that we wanted to create an art project that could be displayed in a museum for users to interact with. We were further inspired by the saying, “reach for the starts”, and wanted to create an art exhibit in which people could get a relaxing, interactive experience of brushing their hands through a galaxy of stars and planets. We thought the name Touch the Stars was fitting, and got to work. After asking a teaching fellow about suggestions for which type of motion-tracking technology to use, we decided on LeapMotion. Though we knew it would be a challenge to work with, as we had never used it in class (versus a webcam tracking feature we had previously learned about and worked with), we knew it would be most effective for helping us achieve our project, as we wanted just someone’s hand to be tracked and not have to make them wear gloves or a light (as, if this were in an art museum, people would not want to go through the trouble of putting something on in order to interact with the exhibit). We wanted the motion tracker to just track the movements of someone’s hand and be able to give them a calming and fun virtual experience.
Fabrication and Production
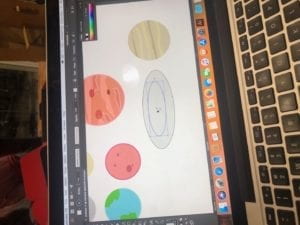
We began our production process by playing around with code to see how we could best utilize LeapMotion in our project. We looked at example codes on openprocessing.org, and found this code by Konstantin Makhmutov: https://www.openprocessing.org/sketch/529835, and asked a fellow if we were allowed to use example codes to change and work off of. We really like the fluidity of the movement of the dots in this code, and so we got to work on trying to incorporate the particles from this code into ours. As this code was in a different language than we learned, we had to go through a lot of trial and error to incorporate the particles into our code. Our most challenging task was working with LeapMotion, as we had never used it before and the instructions on the LeapMotion website on how to set up the program and code were a bit confusing to us. It took us a few days of many hours at the lab and assistance from the fellows to finally figure out how to use hand tracking to move the stars in our code. We also wanted to create some ‘shooting stars’ in the background of the moving stars, as well as planets, to give a more galaxy-like feel to our project. Creating the appearance of slowly-moving stars in the background was a challenge, as the code kept ‘spazzing’ when we ran the program and the stars moved very quickly or not at all. In order to incorporate planets into our background, we drew the planets by hand on Adobe Illustrator, and converted them into our code afterwards. We initially thought we would want the planets to move with the rest of the stars, but after coding this saw that the interaction was more fluid and made more sense with the planets static in the background. The planets we made were much bigger than the stars, and so it just made more sense for us to put them in the background (also because planets are much bigger and thus would not move as quickly as the shooting or other stars).
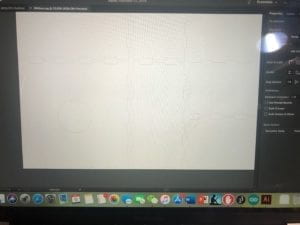
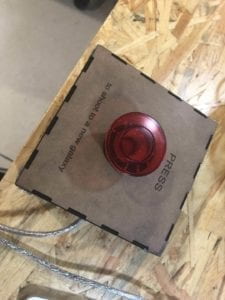
We decided to add a button which said “PRESS to shoot to a new galaxy” in order to: 1. allow for the stars to be ‘reset’ into the original positions, so that, if this were in an art exhibit for example, each user could reset their galaxy, and 2. to change the color and position of stars and planets, to create a slightly different experience for each user. Changing the code so that the planets changed positions but remained static was difficult for us, but we finally created a boolean statement in order to solve this problem. Considering that we imagined this project in an art exhibit, we wanted to create a simple box with a big, glowing button. During our presentation (and if this were in an exhibit), we would want the lights to be off in order to create a better ‘space’ experience, and so a glowing button which was big and bright enough for people to see and that made sense scale-wise with the projection of our galaxy made sense. Sam, in our lecture class, was kind enough to let us borrow a button she had used for her Midterm project. We wanted to laser cut the box so we could create a solid, simple shape to hold all our wires and place the button in. Below is a picture of the box sketch on Illustrator, as well as a sketch of our planets while we were making them:
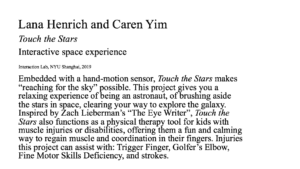
In order to further create the experience of our project being an exhibit in an art museum, we create a ‘name plate’, like those which hang next to paintings in museums, to display on one of the screens next to our project during our presentation. A picture of it is below:
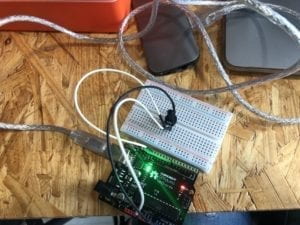
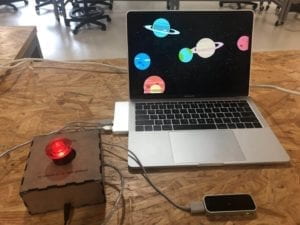
Because we envisioned our project as part of an art exhibit, we got to thinking about how our project could remain meaningful, even after the exhibit would be closed and enough people had interacted with our project. We thought about how we could make our project more than just something artistic, but actually something useful for people besides the entertainment, relaxation, and experience it provided. We started researching physical hand-therapy treatments and the issues which they created, and saw a lot of sources online which intended to provide more ‘fun’ and engaging ways for people to do their hand therapy workouts. We realized that the movements which one did to interact with out project were similar to those recommend by physical therapists for people with hand injuries or impairments. After further researching information on these injuries and their treatments, we found out that our project could work perfectly as a tool to keep kids with hand injuries (or other reasons for hand exercises) engaged, incentivized, and motivated about their hand exercises. The injuries we found for which physical therapy involved some of the motions incorporated into our project are: Trigger Finger, Golfer’s Elbow, fine motor skills deficiencies, and strokes. Because LeapMotion is a small and portable motion tracker, we thought that our program could be a great way for people to interact with our project from the comfort of their own home. Below are images and a video of our project in action:
Conclusion
My main goal with this project was to make a project which created a personal and interactive experience, something which could go into an art exhibit. My definition of interaction is the interplay between technology and humans, giving them a chance to virtually experience something which would otherwise not be possible. Thus, I think Touch the Stars has aligned with this definition. Though my project doesn’t have an end ‘achievement’ which it rewards the user with after interacting with it, I have furthered my definition of interaction to not always have to fulfill a useful purpose, but simply be a tool for expanding creativity and art. My audience agreed with me (both during user testing and afterward) that the project provides an interactive, relaxing, and new artistic experience. If I had had more time, I would love to have create more ‘galaxies’ which could be played with; meaning that each time the button is pressed a complete new experience could emerge. From completing this project, I have learned a lot of about coding and interaction- it is difficult, and often the things you believe will be most easy will pose the greatest challenges. However, with a lot of time and the willingness to try new things and experiment, as well as allowing yourself to be versatile and open to new ideas, there is not limit to what kind of projects can be created. Furthermore, I believe that my project is a good blend of creativity (an interactive art exhibit in a museum) and purpose (something which people can use in their own homes for their own therapeutical and relaxation purposes).
Touch the Stars in Action
Below is the code from our project.
import processing.sound.*;
SoundFile file;
import processing.serial.*;
PImage photo;
PImage bg;
Serial myPort;
int valueFromArduino;
int particlesQuantity = 9000;
float fingerX, fingerY;
boolean drawHands = false;
float [] positionX = new float [particlesQuantity];
float [] positionY = new float [particlesQuantity];
float [] speedX = new float [particlesQuantity];
float [] speedY = new float[particlesQuantity];
ArrayList<Planet> planetlist = new ArrayList<Planet>();
int NUM_OF_IMAGES = 8;
Planet mars;
PImage [] images = new PImage[NUM_OF_IMAGES];
Star[] stars = new Star[800];
float speed;
boolean state = false;
void setup() {
size(1440, 900);
bg = loadImage(“sky.jpeg”);
frameRate (60);
file = new SoundFile(this, “IMA.mp3”);
file.loop();
printArray(Serial.list());
myPort = new Serial(this, Serial.list()[ 1 ], 9600);
for(int i = 0; i< NUM_OF_IMAGES ; i++){
images[i] = loadImage(“planet”+i+”.png”);
planetlist.add(new Planet(0,0,images[i]));
}
stroke(random(100, 225), random(100), random(100, 225));
for (int particle = 1; particle < particlesQuantity; particle++) {
positionX[particle] = random(0, width);
positionY[particle] = random(0, height);
}
for (int i = 0; i < stars.length; i++) {
stars[i] = new Star();
}
positionX[0] = 0;
positionY[0] = 0;
setupLeapMotion();
}
void draw() {
speed = (3);
background(bg);
for(int i = 0;i< planetlist.size();i++){
if (state == false) {
planetlist.get(i).rand();
}
}
for(int i = 0;i< planetlist.size();i++){
state = true;
if (state == true) {
planetlist.get(i).show();
}
}
updateLeapMotion();
speedX[0] = speedX[0] * 0.5 + (fingerX – positionX[0]) * 0.1; // allows to move particles with hand through LeapMotion
speedY[0] = speedY[0] * 0.5 + (fingerY – positionY[0]) * 0.1;
positionX[0] += speedX[0];
positionY[0] += speedY[0];
for (int particle = 1; particle < particlesQuantity; particle++) {
float whatever = 1024 / (sq(positionX[0] – positionX[particle]) + sq(positionY[0] – positionY[particle]));
speedX[particle] = speedX[particle] * 0.95 + (speedX[0] – speedX[particle]) * whatever;
speedY[particle] = speedY[particle] * 0.95 + (speedY[0] – speedY[particle]) * whatever;
positionX[particle] += speedX[particle];
positionY[particle] += speedY[particle];
if ((positionX[particle] < 0 && speedX[particle] < 0) || (positionX[particle] > width && speedX[particle] > 0)) {
speedX[particle] = -speedX[particle];
}
if ((positionY[particle] < 0 && speedY[particle] < 0) || (positionY[particle] > height && speedY[particle] > 0)) {
speedY[particle] = -speedY[particle];
}
point(positionX[particle], positionY[particle]);
}
pushMatrix();
translate(width/2, height/2);
for (int i = 0; i < stars.length; i++) {
stars[i].update();
stars[i].show();
}
popMatrix();
//for (int i = 0; i < NUM_OF_IMAGES ; i++){
// image(images[i],random(0,1440), random(0,900));
//}
//for (int i=0; i < NUM_OF_IMAGES; i++) {
// Planet p = images.get(i);
// //Planet(x,y, “planet.jpg”);
// image(p.img, p.x, p.y);
//}
while ( myPort.available() > 0) {
valueFromArduino = myPort.read();
}
println(valueFromArduino);//This prints out the values from Arduino
//if (valueFromArduino >=10){
// for (int i = 0; i < planetlist.size() ; i++){
// planetlist.get(i).rand();
// }
//}
if (valueFromArduino == 0) {
state = false;
for (int particle = 1; particle < particlesQuantity; particle++) {
stroke(random(100, 225), random(500), random(100, 225));
positionX[particle] = random(0, width);
positionY[particle] = random(0, height);
}
//for (int i = 0; i < planetlist.size() ; i++){
//}
}
}
import de.voidplus.leapmotion.*;
LeapMotion leap;
void setupLeapMotion() {
leap = new LeapMotion(this);
}
void updateLeapMotion() {
// …
int fps = leap.getFrameRate();
// ========= HANDS =========
for (Hand hand : leap.getHands ()) {
// —– BASICS —–
int hand_id = hand.getId();
PVector hand_position = hand.getPosition();
PVector hand_stabilized = hand.getStabilizedPosition();
PVector hand_direction = hand.getDirection();
PVector hand_dynamics = hand.getDynamics();
float hand_roll = hand.getRoll();
float hand_pitch = hand.getPitch();
float hand_yaw = hand.getYaw();
boolean hand_is_left = hand.isLeft();
boolean hand_is_right = hand.isRight();
float hand_grab = hand.getGrabStrength();
float hand_pinch = hand.getPinchStrength();
float hand_time = hand.getTimeVisible();
PVector sphere_position = hand.getSpherePosition();
float sphere_radius = hand.getSphereRadius();
// —– SPECIFIC FINGER —–
Finger finger_thumb = hand.getThumb();
// or hand.getFinger(“thumb”);
// or hand.getFinger(0);
Finger finger_index = hand.getIndexFinger();
// or hand.getFinger(“index”);
// or hand.getFinger(1);
Finger finger_middle = hand.getMiddleFinger();
// or hand.getFinger(“middle”);
// or hand.getFinger(2);
Finger finger_ring = hand.getRingFinger();
// or hand.getFinger(“ring”);
// or hand.getFinger(3);
Finger finger_pink = hand.getPinkyFinger();
// or hand.getFinger(“pinky”);
// or hand.getFinger(4);
// —– DRAWING —–
if (drawHands) hand.draw();
// hand.drawSphere();
// save the position in the global variables
fingerX = finger_index.getPosition().x;
fingerY = finger_index.getPosition().y;
// ========= ARM =========
if (hand.hasArm()) {
Arm arm = hand.getArm();
float arm_width = arm.getWidth();
PVector arm_wrist_pos = arm.getWristPosition();
PVector arm_elbow_pos = arm.getElbowPosition();
}
// ========= FINGERS =========
for (Finger finger : hand.getFingers()) {
// Alternatives:
// hand.getOutstrechtedFingers();
// hand.getOutstrechtedFingersByAngle();
// —– BASICS —–
int finger_id = finger.getId();
PVector finger_position = finger.getPosition();
PVector finger_stabilized = finger.getStabilizedPosition();
PVector finger_velocity = finger.getVelocity();
PVector finger_direction = finger.getDirection();
float finger_time = finger.getTimeVisible();
// Let’s test this first!
// fill(255, 0, 0);
// ellipse(finger_position.x, finger_position.y, 10, 10);
// —– SPECIFIC FINGER —–
switch(finger.getType()) {
case 0:
// System.out.println(“thumb”);
break;
case 1:
// System.out.println(“index”);
break;
case 2:
// System.out.println(“middle”);
break;
case 3:
// System.out.println(“ring”);
break;
case 4:
// System.out.println(“pinky”);
break;
}
// —– SPECIFIC BONE —–
Bone bone_distal = finger.getDistalBone();
// or finger.get(“distal”);
// or finger.getBone(0);
Bone bone_intermediate = finger.getIntermediateBone();
// or finger.get(“intermediate”);
// or finger.getBone(1);
Bone bone_proximal = finger.getProximalBone();
// or finger.get(“proximal”);
// or finger.getBone(2);
Bone bone_metacarpal = finger.getMetacarpalBone();
// or finger.get(“metacarpal”);
// or finger.getBone(3);
// —– DRAWING —–
// finger.draw(); // = drawLines()+drawJoints()
// finger.drawLines();
// finger.drawJoints();
// —– TOUCH EMULATION —–
int touch_zone = finger.getTouchZone();
float touch_distance = finger.getTouchDistance();
switch(touch_zone) {
case -1: // None
break;
case 0: // Hovering
// println(“Hovering (#”+finger_id+”): “+touch_distance);
break;
case 1: // Touching
// println(“Touching (#”+finger_id+”)”);
break;
}
}
// ========= TOOLS =========
for (Tool tool : hand.getTools ()) {
// —– BASICS —–
int tool_id = tool.getId();
PVector tool_position = tool.getPosition();
PVector tool_stabilized = tool.getStabilizedPosition();
PVector tool_velocity = tool.getVelocity();
PVector tool_direction = tool.getDirection();
float tool_time = tool.getTimeVisible();
// —– DRAWING —–
// tool.draw();
// —– TOUCH EMULATION —–
int touch_zone = tool.getTouchZone();
float touch_distance = tool.getTouchDistance();
switch(touch_zone) {
case -1: // None
break;
case 0: // Hovering
// println(“Hovering (#”+tool_id+”): “+touch_distance);
break;
case 1: // Touching
// println(“Touching (#”+tool_id+”)”);
break;
}
}
}
// ========= DEVICES =========
for (Device device : leap.getDevices ()) {
float device_horizontal_view_angle = device.getHorizontalViewAngle();
float device_verical_view_angle = device.getVerticalViewAngle();
float device_range = device.getRange();
}
}
// ========= CALLBACKS =========
void leapOnInit() {
// println(“Leap Motion Init”);
}
void leapOnConnect() {
// println(“Leap Motion Connect”);
}
void leapOnFrame() {
// println(“Leap Motion Frame”);
}
void leapOnDisconnect() {
// println(“Leap Motion Disconnect”);
}
void leapOnExit() {
// println(“Leap Motion Exit”);
}
class Planet {
PImage photo;
float xpos;
float ypos;
//PImage [] images = new PImage[NUM_OF_IMAGES];
Planet(float _x, float _y, PImage img) {
xpos = _x;
ypos= _y;
photo = img;
//photo = loadImage(planetName);
}
void update(float x, float y) {
xpos = x;
ypos = y;
}
void show() {
image(photo, xpos, ypos);
}
void rand(){
xpos = random(0,width);
ypos= random(0,height);
}
}
class Star {
float x;
float y;
float position;
float Pvalue;
Star() {
x = random(-width/2, width/2);
y = random(-height/2, height/2);
position = random(width/2);
}
void update() {
position = position – speed;
if (position < 1) {
position = width/2;
x = random(-width/2, width/2);
y = random(-height/2, height/2);
}
}
void show() {
pushStyle();
fill(255);
noStroke();
float newX = map(x / position, 0, 1, 0, width/2);
float newY = map(y / position, 0, 1, 0, height/2);
ellipse(newX, newY, 2, 2);
popStyle();
}
}
The song we used as background music for our project (bensound.com):