Recitation 6 – Processing Animation – Kevin Nader

Introduction:

For this recitation, we were tasked with creating animations in processing. This was a skill I particularly struggled with so my animation is not too entertaining to look at.

My Animation:

This animation is simply a ball bouncing around the canvas. 

Ball

Code:

int rad = 60;        
float xpos, ypos;       

float xspeed = 2.8;  
float yspeed = 2.2;  

int xdirection = 1;  
int ydirection = 1;  


void setup() 
{
  size(500, 500);
  noStroke();
  frameRate(60);
  ellipseMode(RADIUS);
  xpos = width/2;
  ypos = height/2;
}

void draw() 
{
  background(0);
  
  xpos = xpos + ( xspeed * xdirection );
  ypos = ypos + ( yspeed * ydirection );
  
  if (xpos > width-rad || xpos < rad) {
    xdirection *= -1;
  }
  if (ypos > height-rad || ypos < rad) {
    ydirection *= -1;
  }

  ellipse(xpos, ypos, rad, rad);
}

Homework:

I struggled with the homework but I was able to make something along the lines of what it was supposed to look like with the help of a fellow.

Pulsing Circle

Code:

int high;
int low;

float c;

void setup() {
  fullScreen();
  colorMode(HSB);
  strokeWeight(20);
  high = height/3;
  low = 50;
}

void draw() {
  background(255);

  if (c >= 255) c=0;
  else c++;
  fill(c, 255, 255);
  high = max(high, mouseY);

  translate(width/2, height/2);

  int mid = (high+low)/2;
  float p =  sin( PI*millis() / (1000-high) );
  int dia = mid + int( p*(high-mid) );
  ellipse(0, 0, dia, dia);
}


Recitation 5 – Processing Basics – Kevin Nader

Introduction:

The image I chose is titled Bent Dark Gray and I chose it simply because this piece stuck out to me when browsing pictures in the links provided. What specifically grabbed my attention was the way in which the simple geometry created a three dimensional shape that could be interpreted in differently depending on the viewer. Some may view the black shape in the middle to be a “wall” casting a shadow to its left while others may interpret the shape to be a thin cube shooting out at you. 

Link:

Bent Dark Gray

Code:

size(600,600);

background(255);

fill(0);
triangle(0, 0, 129, 0, 0, 129);

line(43, 86, 43, 301);

line(0, 301, 43, 301);

fill(127);
rect(129, 172, 215, 129);  

beginShape();
vertex(387,172);
vertex(344,172);
vertex(344,301);
vertex(387,344);
endShape(CLOSE);

fill(127);

beginShape();
vertex(129,301);
vertex(129,387);
vertex(258,516);
vertex(559, 516);
vertex(344, 301);
endShape(CLOSE);

fill(177);

quad(387, 43, 387, 301, 559, 516, 559, 215);

My Picture:

I am not an artist, so trying to create something similar was rather challenging. In order to help create this sketch, I used the graph paper provided to plot the coordinates for my shape. Though difficult at first, this proved instrumental in the long run. In order to keep the motif of “multiple interpretations” I tried to create a gray shape that the viewer could either see as pushing further into  or popping out of the sketch. I tried to maintain the color scheme of the original photo, however I tried to take concept of the original (multiple perspectives) and blow it out of proportion. Though not perfect, I am satisfied with my first attempt at using processing. I’m almost certain that more practice with drawing on processing will aid me in realizing future designs. 

See Your Feelings – Kevin Nader – Marcela Godoy

Introduction: Concept and Design

This blog post is going to discuss  my Interaction Lab final project dubbed See Your Feelings. Albeit the name is a bit lackluster, the project itself is an interesting one.

See Your Feelings is a project that aims take a user’s story and give it a unique physical image. The inspiration behind See Your Feelings derived from a guest speaker hosted by the IMA department; this speaker talked about his interest in exploring the unorthodox concept of “seeing sound and hearing light”. Upon hearing his presentation, I was inspired to incorporate an idea similar to his in my own project. See Your Feelings, as the name suggests, is about seeing your feelings. I wanted to take a user’s feelings, as abstract as they may be, and provide them a way to see what their feelings as well as other users’ feelings looked like. In order to do this, a user must first choose their color. They create their desired color by twisting three potentiometers; each one correlating to red, green, and blue respectively. There is an RGB LED that provides the user with visual aid as to the color they are making. Once the user is satisfied with the color they have created, they press a button labeled “Done” and speak into a microphone. The user is encouraged to say whatever they want into the microphone. I’ve seen users sing songs, talk about their day, or even just scream into the microphone. Once the user is finished speaking, they then press a button labeled “Finish”. Upon pressing “Finish”, the user’s “feelings” will appear on a digital canvas in the form of what can best be described as a radiating circle. The circle’s size is dictated by the volume at which the user speaks; the louder the user talks, the louder their circle will be. One of my favorite aspects of See Your Feelings is how it compiles every user’s unique input into a vibrant picture that displays the diversity in our feelings. 

Process:

This was the first stage of See Your Feelings. As you can see it was nothing but a single potentiometer and a button. This was to ensure the serial communication ran smoothly. Prior to user testing, the potentiometer would be replaced with a sound sensor and two more buttons would be added.

User Testing: Prior to user testing the project was extremely primitive. It consisted of three buttons that if pressed would display either a green, red, or blue pattern consisting of randomly generated shapes on a canvas with eight tiles. Once all eight tiles were full, the program would have to be restarted. Though the project presented at user testing was a poor representation of what the project aimed to be, I still received amazing feedback. (Unfortunately there are no videos)

Feedback:

  1. Allow the user to choose the color of their pattern. Emotions should not have associated colors.
  2. Forget the eight tiles, instead have the patterns occur in random places on the canvas.
  3. Alter the project so that it can run continuously. It is hard to display a project if you constantly have to restart the program. 
  4. Make the pattern less ugly. 

All of this feedback would eventually be implemented one way or another. 

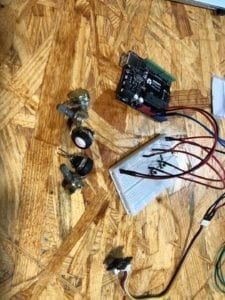
This was the first stage to constructing the project. As you can see, the only thing wired into the arduino was two buttons and a sound sensor.

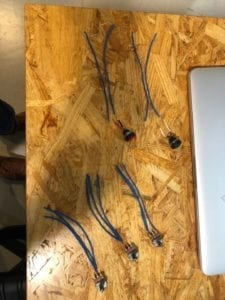
Here you can see that improved buttons as well as potentiometers have had wires soldered to them. These will go on to be the potentiometers responsible for the user choosing their desired color. The improved buttons will serve as the aforementioned “Finish” and “Done” buttons.

This is an image of the hardware fitting into the newly fabricated case for the first time. The casing was made of a thin wooden material.

This video shows the potentiometers, sound sensor, buttons, and newly added RGB light all fitting into their allocated housing on what would soon become the lid of the casing.

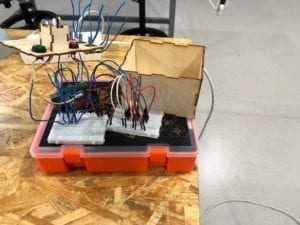
This video displays how the wiring did not comfortably fit into the casing. Moreover, it was at this point that I realized all three of the potentiometers were not functioning.

This was the temporary rig I came up with in order to test the code. I resorted to using potentiometers from our Arduino kits in order to accomplish this.

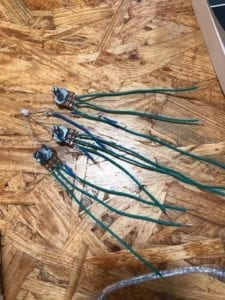
These are the newly soldered potentiometers.  Not only did they function, however the wires on these potentiometers were shorter compared to their predecessors which helped get around the issue of the hardware not fitting into its casing.

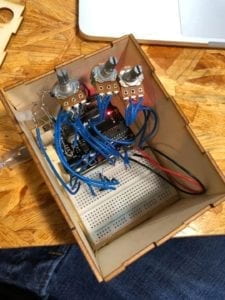
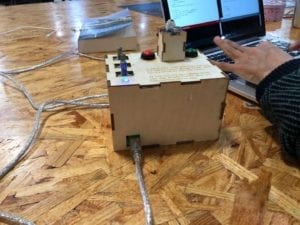
This image shows all of the hardware comfortable fitting into the casing. You can also see that a bulk of the M/M wires on the breadboard have been replaced with flat wiring in order to conserve more space.

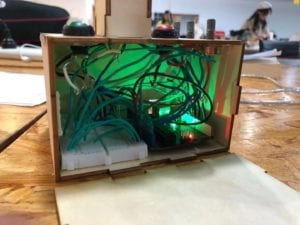
This is an additional image of the hardware in its casing, as you can see the LED is working beautifully. 

This video displays the final product!

Processing code:

// IMA NYU Shanghai
// Interaction Lab
// For receiving multiple values from Arduino to Processing

/*
 * Based on the readStringUntil() example by Tom Igoe
 * https://processing.org/reference/libraries/serial/Serial_readStringUntil_.html
 */

  
import processing.sound.*;
SoundFile file;

import processing.serial.*;
ArrayList<Ring> rings = new ArrayList<Ring>();
ArrayList<Float> message = new ArrayList<Float>();


int nextSpot = 0;
//int speakerLow [] = new int [8];
////int speakerMid [] = new int [8];
//int speakerHigh [] = new int [8];
color colors[] = new color[8];


String myString = null;
Serial myPort;


int NUM_OF_VALUES = 6;   /** YOU MUST CHANGE THIS ACCORDING TO YOUR PROJECT **/
int[] sensorValues;      /** this array stores values from Arduino **/
int[] prevValues;

float startx;
float starty;
float speakerLow;
float speakerHigh;
color colorRing;

boolean startMessage = false;

//float min = Float.MAX_VALUE;
//float max = Float.MIN_VALUE;
float min;
float max;
void setup() {
  fullScreen();
  //size(1000, 500);
  background(0);

file = new SoundFile(this, "1.mp3");
  file.play();

  setupSerial();
  for (int i=0; i<colors.length; i++) {
    colors[i] = color(0, 0, 0);
  }
}


void draw() {
  updateSerial();
  //printArray(sensorValues);
  noStroke();
  fill(0, 0, 0, 10);
  rect(0, 0, width, height);
  //background(0);
  for (int u=0; u<rings.size(); u++) {
    Ring r = rings.get(u);
    r.drawShape();
  }

  if (sensorValues[1]==1 && prevValues[1]==0) {
    colorRing = color(sensorValues[3], sensorValues[4], sensorValues[5]);
    startMessage=true;
  }

  if (sensorValues[2]==0 && prevValues[2]==0 && startMessage==true) {
    message.add(map(float(sensorValues[0]), 0, 1023, 0, height*0.8));
  }

  if (sensorValues[2]==1 && prevValues[2]==0) {
    updateSpeaker();
    speakerLow = min;
    speakerHigh = max;
    rings.add(new Ring(random(width), random(height), width/4, height/2, colorRing, speakerLow, speakerHigh));
  }
  if (sensorValues[1]==1 && sensorValues[2]==1) {
    background(0);
    rings.clear();
  }
  if (sensorValues[2]==1 && prevValues[2]==0) {
    file.play();
  }
  

  arrayCopy(sensorValues, prevValues);
}

//void startMessage() {
//    message.add(float(sensorValues[0]));
//}

void updateSpeaker() {
  startMessage=false;
  min = height*0.8;
  max = 0;
  println(message.size());
  for (int i = 0; i < message.size(); i++) {
    //Find the minimum value of the arraylist
    if (message.get(i) < min) {
      min = message.get(i);
    }
    //Find the maximum value of the arraylist
    if (message.get(i) > max) {
      max = message.get(i);
    }
    println("min " + min);
    println("max " + max);
  }

  message.clear();
  //int newValue = int(map(sensorValues[0], 0, 1023, 0, height/2.5));
  //speakerLow = min(height*0.1, newValue);
  ////speakerMid[7] = __;
  //speakerHigh = max(height*0.2, newValue);
}


void setupSerial() {
  printArray(Serial.list());
  myPort = new Serial(this, Serial.list()[25], 115200);
  // WARNING!
  // You will definitely get an error here.
  // Change the PORT_INDEX to 0 and try running it again.
  // And then, check the list of the ports,
  // find the port "/dev/cu.usbmodem----" or "/dev/tty.usbmodem----" 
  // and replace PORT_INDEX above with the index number of the port.

  myPort.clear();
  // Throw out the first reading,
  // in case we started reading in the middle of a string from the sender.
  myString = myPort.readStringUntil( 10 );  // 10 = '\n'  Linefeed in ASCII
  myString = null;

  sensorValues = new int[NUM_OF_VALUES];
  prevValues = new int[NUM_OF_VALUES];
}


void updateSerial() {
  while (myPort.available() > 0) {
    myString = myPort.readStringUntil( 10 ); // 10 = '\n'  Linefeed in ASCII
    if (myString != null) {
      String[] serialInArray = split(trim(myString), ",");
      if (serialInArray.length == NUM_OF_VALUES) {
        for (int i=0; i<serialInArray.length; i++) {
          sensorValues[i] = int(serialInArray[i]);
        }
      }
    }
  }
}
class Ring {
  float startx; 
  float starty; 
  float wid; 
  float hei; 
  color clr; 
  float low; 
  float high;

  Ring(float tempstartx, float tempstarty, float tempwid, float temphei, color tempclr, float templow, float temphigh ) {
    startx = tempstartx;
    starty = tempstarty;
    wid= tempwid;
    hei= temphei; 
    clr = tempclr; 
    low = templow; 
    high = temphigh;
  }

  void drawShape () {
    float mid = (low+high)/2;
    stroke(clr);
    float p = sin( PI*millis() / (1000-high) );
    float dia = mid + int ( p*(high-mid) );
    ellipse(startx, starty, dia, dia);
  }
}

Arduino code:

// IMA NYU Shanghai
// Interaction Lab
// For sending multiple values from Arduino to Processing

int red_light_pin = 11;
int green_light_pin = 10;
int blue_light_pin = 3;

void setup() {
  Serial.begin(115200);
  pinMode(red_light_pin, OUTPUT);
  pinMode(green_light_pin, OUTPUT);
  pinMode(blue_light_pin, OUTPUT);
}

void loop() {
  int soundSensor = analogRead(A1);
  int doneButton = digitalRead(8);
  int finishButton = digitalRead(7);
  int RedPot = analogRead(A5);
  int GreenPot = analogRead(A4);
  int BluePot = analogRead (A3);

  analogWrite(red_light_pin, RedPot/4);
  analogWrite(green_light_pin, GreenPot/4);
  analogWrite(blue_light_pin, BluePot/4);


  // keep this format
  Serial.print(soundSensor);
  Serial.print(",");  // put comma between sensor values
  Serial.print(doneButton);
  Serial.print(",");
  Serial.print(finishButton);
  Serial.print(",");
  Serial.print(RedPot);
  Serial.print(",");
  Serial.print(GreenPot);
  Serial.print(",");
  Serial.print(BluePot);
  Serial.println(); // add linefeed after sending the last sensor value


  // too fast communication might cause some latency in Processing
  // this delay resolves the issue.
  delay(100);
}

Reflection: 

Overall, I just wanted See Your Feelings to take the user’s feelings/story/whatever and provide them the opportunity to see whatever they said into that microphone with their own eyes. The project appeared to resonate with audiences of all ages. Though admittedly a little hard to use, See Your Feelings constantly put the user’s face once they were able to find their contribution to the intricate picture laid before them. I was glad that every step of the interaction appeared to be enjoyable; there were some users whose favorite aspect of the project was simply getting to create their own colors. I’m satisfied with the project’s level of interactivity as both using the project and witnessing the results appeared to be equally entertaining.  I would improve my project by making the radiating circles produced by the user’s voice more unique. I would accomplish this by taking more aspects of the users voice into account when generating the radiating circles. For example, what if the user’s pitch influenced how fast their individual circle pulsed? I feel like additiones similar to this would greatly add to the symbolism of each user’s input; something that, in my eyes, would greatly improve the project. This leaves us with one final point to cover: why should anyone care about my project? To be quite honest, I don’t know the answer to that question. Would the world keep spinning had See Your Feelings never been created? Yes. With that being said, even if just a single user was able to see what they said and reflect on it in any capacity, then I consider the project a success. It’s been an extremely fun semester thanks in large part to Interaction Lab, and I’m glad I got to end it project I care so deeply about. Thanks for everything Marcela, see you around!

Recitation 8: Serial Communication – Kevin Nader

Introduction:

In this recitation we were tasked with making both an Etch A Sketch and a musical instrument. The reason we were tasked with making these devices was in order to familiarize us with serial communication. We accomplished this by simultaneously utilizing processing and arduino. 

Process:

Etch-A-Sketch in action:

Etch A Sketch

Etch-A-Sketch Code:

Writing the code for this was rather easy because it was very similar to what we did in class the day before recitation. The only modifications required were changing the ellipses to lines.

// IMA NYU Shanghai
// Interaction Lab
// For receiving multiple values from Arduino to Processing

/*
 * Based on the readStringUntil() example by Tom Igoe
 * https://processing.org/reference/libraries/serial/Serial_readStringUntil_.html
 */

import processing.serial.*;

String myString = null;
Serial myPort;

int posx2;
int posy2;


int NUM_OF_VALUES = 2;   /** YOU MUST CHANGE THIS ACCORDING TO YOUR PROJECT **/
int[] sensorValues;      /** this array stores values from Arduino **/


void setup() {
  size(500, 500);
  background(0);
  setupSerial();
}


void draw() {
  updateSerial();
  printArray(sensorValues);

  stroke(255);
  line(sensorValues[0], sensorValues[1], posx2, posy2);
  
  posx2 = sensorValues[0] ;
  posy2 = sensorValues[1] ;

}


void setupSerial() {
  printArray(Serial.list());
  myPort = new Serial(this, Serial.list()[19], 9600);
  // WARNING!
  // You will definitely get an error here.
  // Change the PORT_INDEX to 0 and try running it again.
  // And then, check the list of the ports,
  // find the port "/dev/cu.usbmodem----" or "/dev/tty.usbmodem----" 
  // and replace PORT_INDEX above with the index number of the port.

  myPort.clear();
  // Throw out the first reading,
  // in case we started reading in the middle of a string from the sender.
  myString = myPort.readStringUntil( 10 );  // 10 = '\n'  Linefeed in ASCII
  myString = null;

  sensorValues = new int[NUM_OF_VALUES];
}


void updateSerial() {
  while (myPort.available() > 0) {
    myString = myPort.readStringUntil( 10 ); // 10 = '\n'  Linefeed in ASCII
    if (myString != null) {
      String[] serialInArray = split(trim(myString), ",");
      if (serialInArray.length == NUM_OF_VALUES) {
        for (int i=0; i<serialInArray.length; i++) {
          sensorValues[i] = int(serialInArray[i]);
        }
      }
    }
  }
}

/*
  AnalogReadSerial

  Reads an analog input on pin 0, prints the result to the Serial Monitor.
  Graphical representation is available using Serial Plotter (Tools > Serial Plotter menu).
  Attach the center pin of a potentiometer to pin A0, and the outside pins to +5V and ground.

  This example code is in the public domain.

  http://www.arduino.cc/en/Tutorial/AnalogReadSerial
*/

// the setup routine runs once when you press reset:
void setup() {
  // initialize serial communication at 9600 bits per second:
  Serial.begin(9600);
}

// the loop routine runs over and over again forever:
void loop() {
  // read the input on analog pin 0:
  int sensorValue1 = analogRead(A0);
  int sensorValue2 = analogRead(A1);
  // print out the value you read:
  Serial.print(sensorValue1);
  Serial.print(",");
  Serial.print(sensorValue2);
  Serial.println();
  delay(1);        // delay in between reads for stability
}

Musical Instrument in action:

IMG_4879

Musical Instrument Code:

Coding this was an absolute nightmare. Not because I didn’t know what I was doing, but because I mismanaged my variables. It took help from Professor Marcela Godoy to smooth things out.

// IMA NYU Shanghai
// Interaction Lab
// This code sends one value from Processing to Arduino 

import processing.serial.*;

Serial myPort;
int valueFromArduino;

int High;
int Med;
int Low;

void setup() {
  size(500, 500);
  background(0);

  printArray(Serial.list());
  // this prints out the list of all available serial ports on your computer.

  myPort = new Serial(this, Serial.list()[19], 9600);
  // WARNING!
  // You will definitely get an error here.
  // Change the PORT_INDEX to 0 and try running it again.
  // And then, check the list of the ports,
  // find the port "/dev/cu.usbmodem----" or "/dev/tty.usbmodem----" 
  // and replace PORT_INDEX above with the index number of the port.
}


void draw() {
  // to send a value to the Arduino
  High = height;
  Med = 2*height/3;
  Low = height/3;
  if (mousePressed && mouseY > 0 && mouseY < Low) {
    myPort.write('L');
  } else if (mousePressed && mouseY > Low && mouseY < Med) {
    myPort.write('M');
  } else if (mousePressed && mouseY > Med && mouseY < High) {
    myPort.write('H');
  } else {
    myPort.write('N');
  }
  //if (mouseX > width/2) {
  //  myPort.write('H');
  //} else {
  //  myPort.write('L');
  //}
}

// IMA NYU Shanghai
// Interaction Lab
// This code receives one value from Processing to Arduino
int valueFromProcessing;

void setup() {
  Serial.begin(9600);
  pinMode(8, OUTPUT);

}
//
//void draw() {
//  if (mouseX > width / 2) {
//    myPort.write('H');
//  } else {
//    myPort.write('L');
//  }
//}

void loop() {
  // to receive a value from Processing
  while (Serial.available()) {
    valueFromProcessing = Serial.read();
  }
  analogWrite(8, valueFromProcessing);

  if (valueFromProcessing == 'H') {
    //digitalWrite(8, HIGH);
    tone(8, 3000);
  } else if (valueFromProcessing == 'N') {
    //    digitalWrite(8, LOW);
    noTone(8);
  }
  else if (valueFromProcessing == 'M') {
    //digitalWrite(8, HIGH);
    tone(8, 2000);
  }
  else if (valueFromProcessing == 'L') {
    //digitalWrite(8, HIGH);
    tone(8, 1000);
  } 
  // something esle


  // too fast communication might cause some latency in Processing
  // this delay resolves the issue.
  delay(100);
}

Reflection:

I found this recitation to be a lot of fun. Being able to recreate such a staple of my childhood was great. The lesson I learned from this recitation was that I need to stay organized when coding. Things got a little bit out of hand, and I suspect because I was working with two programing softwares simultaneously. Learning to stay organized while wiring hardware was important, but I argue that remaining organized while coding is even more important. 

Project Proposals

Kevin Nader
Interaction Lab
Professor Marcela Godoy
11/14/19

Project Proposals

Project Title 1:
• The Artist’s Test

Project Statement of Purpose:
• This is just a game that I thought of that I wanted to implement it (or at least consider it). I want to make a game where one person is given an item that they must draw using a setup similar to the etch-a-sketch. The other players would then have to guess what the drawer is creating. Whoever guesses the item correctly will be given 2 points while the drawer gets 1. The drawer will then be switched out. Whether the points will be kept in game vs. manually is up for question still. The idea just seems fun and it emulates a childhood game my friends and I used to play.

Project Title 2:
• Turf Wars

Project Statement of Purpose:
• This project aims to pit two contenders against each other in order to claim the most “turf”. This project is inspired by the spirit of competition. Being able to channel friendly competitiveness into art helps said art leave an impact on its users. Moreover, it extends the interaction of the art past the user and the art and instead the art becomes a method in which two people can interact. The art becomes a tool, not a showpiece. The way this game would work would be a button pressing competition. Once the game begins players will have to tap their allotted buttons. Depending on how much they press, they will claim more turf which can be visualized through a processing sketch which would look almost like a game of tug of war.

Project Title 3:
• Vocal Art

Project Statement of Purpose:
• This project aims to take someone’s voice and transform it into art. Depending on how loud someone’s voice is, the more “intense” the colors will be. This project is inspired by the concept of collaboration between the spectators of art. What this idea would look like would be a microphone that takes someone’s voice and translates it into colors and shapes. Their mark on the art would remain and someone new would come and add their mark. This project would essentially just show a large number of emotions and feelings shoved into one piece of art.