Documentation 4: Group Project

Documentation 4: Group Project 

The text Introduction to Physical Computing, defined interaction as the “cyclic process in which two actors alternately listen, think, and speak” (Introduction to Physical Computing).  After reading the required readings from week 1 to week 3, my personal definition of interaction would be the an action involving two or more objects or people that have an effect upon one another, usually creating an exchange that will stimulate an increased sensory factory.

The first project that I chose that aligned with my definition of interaction would be the project on Expressive Tactile Controls. I strongly believe that this project full of buttons, sliders, switches demonstrates my definition of interaction. Created by Hayeon Hwang, he interactive design process involved buttons or sensors that would react with personality traits. The sensor that is “timid” would  hide from any approaching user once it senses an incoming touch and the button that is impatient would force itself upon the user to be pushed some more as it is “impatient” (Creative Applications Network).

This project specifically aligns with my definition of interaction because both are independent of one another, yet they are able to react to each other and increase the sensation of touch. The project that did not align with my definition of interaction was the “Fashion Photos Reveal the Intimate Beauty of Laundry Day” (Vice News).  The stylist Dominick Barcelona and Photographer Danny Lim teamed up to explore self care routines through a visual representation. The photos depicted the people interacting with the laundry baskets and cleaning products but I did not feel that it was a properly represented interaction as the laundry products did not interact back with the people. It was an interesting form of expression but the project did not accurately represent interaction. This projected showed me that my definition of interaction would have to involve a bounce back reaction on both objects for there to truly be a reaction.

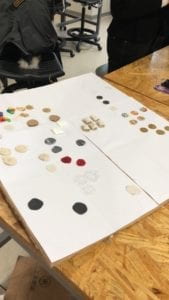
My group focused on was an interactive display that would be projected from an ipad or device in the year of 2119. Blindness is an issue that will continue throughout generations and into the future, however, we wanted to create a device that would allow blind children to interact with braille letters with different textures. Growing up, I would only see braille letters in the form of metal on elevator buttons or the outsides of metro stations. I wanted to create a device that would not only teach the Braille language to young children, but also allowing them to interact with the words that have different textures written in Braille. The child would speak to the device, telling it the phrases that he or she would like to learn.  If the child would like to learn how to read “water”, the device would respond by projecting the word “water” in braille with the texture of water. This would be a completely different experience for the child to learn how to read, write, and feel different words and textures. This relates to my definition of interaction because that two objects react to each other. The device reacts to the child’s voice and the child reacts to the device through touch. There is a bounce back of sensations between both of them. In our project, we used various materials including cardboard, silk fabric, cotton, tissues, paper, sandpaper, to depict the phrase, “a new dimension of interaction”. We wanted to create an educational device for future generations. Technology is expanding at an exponential rate and in the future that we created, we did not want to create any devices that would would involve social media or devices that would complete tasks for you because that would be a form of bad interaction. We wanted the response to have positive effects for society itself. It was a bit hard to fully understand what our project did through the presentation because it was a bit hard to depict but our intentions were to create an educational device.
Recitation 3: Sensors

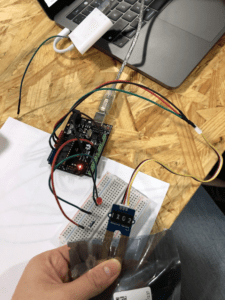
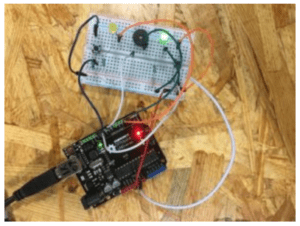
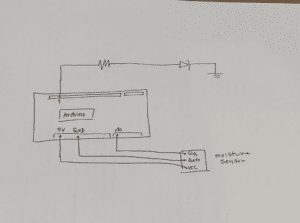
In today’s recitation, my partner and I incorporated sensors into our Arduino circuit. We were working with a moisture sensor and connected it to one side of the Arduino. The other side of the Arduino was connected to the LED circuit which turned on when the moisture sensor measured a moistness level of over 200. The circuit worked fine although the code needed to be changed a bit. We forgot to declare one of the variables which we fixed later on.

Attached below are photos of the circuit. 


What did you intend to assemble in the recitation exercise? If your sensor/actuator combination were to be used for pragmatic purposes, who would use it, why would they use it, and how could it be used?

In today’s recitation exercise, we attempted to create a circuit in which the LED would light up it the moisture level was too high. If our sensor combination were to be used for pragmatic purposes, it could be used in a reptile tank. If the moisture levels are too high in the tank, then the LED would go off and the pet owner would be able to adjust the moisture or dryness levels to for a healthier reptile ecosystem.

Code is often compared to following a recipe or tutorial.  Why do you think that is?

Code is often compared to a recipe or a tutorial because in a recipe, you cannot skip a step and jump to the end, expecting some kind of brilliant result. Likewise in coding, you cannot skip the vital “ingredients” and expect the code to work. If you do not define your variables or write the loop correctly, then the code will not run later on.

In Language of New Media, Manovich describes the influence of computers on new media. In what ways do you believe the computer influences our human behaviors?Humans are completely dependent on computers and technology nowadays. While riding the Shanghai metro, seldom do I see someone who is not attached to their cell phone. Humans have become more lazy, compared to our ancestors. We expect a machine to do all the cleaning and is one of the greatest platforms for entertainment. We have also learned how to multitask because of computers, while at the same time, decreasing our attention span.

Recitation 2: Arduino Basics

Introduction:

In today’s recitation, we incorporated micro controllers into each of the circuits creating a fading LED light, a melody, and a speed game. By doing so, we increased the complexity of the circuits and were able to do more with the Arduino compared to the previous recitation.

Circuit 1: Fade

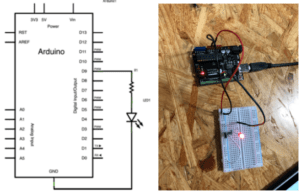
In the first circuit, we hooked the the LED to the breadboard and used a 220 ohm resistor. We uploaded the prewritten code on to the Arduino and the LED lit up and began dimming.The circuit worked the first time we built it, however, we forgot to include the voltage regulator. We were also unsure about the orientation of the switch. After a couple of rotations, we realized that it best bit between the gaps of the breadboard

Attached is the video of fade.

Circuit 2: toneMelody

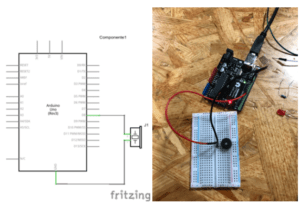
In this circuit we plugged in the wires for power and ground into the breadboard as well as the small speaker. We then uploaded the prewritten code to the Arduino and the speaker played a small melody. It was a very simple circuit and was not hard to create. Attached is the video of toneMelody (buzzer)

Circuit 3: Speed Game

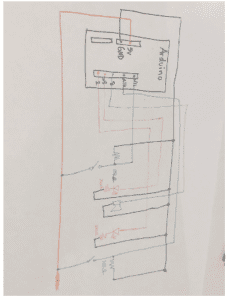
The speed game was an extremely complicated to build but we ended up making it work.We attach two LEDs, two switches, two 220 ohm resistors and a speaker to the breadboard and connected it to the Arduino. Our circuit worked perfectly the first time, the most challenging part of creating this circuit was trying to figure out where to put the wires as it was a tedious process. 

After uploading the code to the Arduino, the serial monitor would give a countdown and my partner and I would press the switches to see who would win. The inner would have their LED light up. We tried to connect two games together but it did not work.  Attached is the video of the game that worked.


Question 1
: Reflect how you use technology in your daily life and on the circuits you just built. Use the text Physical Computing and your own observations to define interaction.

In modern society, it is impossible to escape the technology. From the LED screens on the windows of stores to our phone and computers, we are always surrounded by technology. To be honest, I find it quite suffocating because while it has made modern life so much more convenient, it’s rapid development gives society new types of anxieties. We are so dependent on it that one day, without them we would be completely lost and confused on basic fundamental tasks. I do not think that technology should be used to make life more convenient. Technology that cleans the floor and makes your coffee will take away the satisfaction of doing things ourselves and appreciating our resources; and it makes humans lazy. However, I do believe that technology that can enhance somebody’s life is so important, such as the Eyewriter. I was curious about how computers could make so much out of random letters and numbers, so I took interest digital electronics in high school. My experience with coding and Arduino has taught me so much about electronics and their logic. Every time I interact with computers or come in contact with technology, I think about how smart the people who wrote the code were, to think and create something so sophisticated. I was surprised when the text Physical Computing asked the question, how does  the computer see us? It gives a whole new perspective to interaction because most people have never thought of the computers interaction with us. Only our interaction with computers themselves. Interaction is the “cyclic process in which two actors alternately listen, think, and speak” and it is not just between two human beings.

Question 2: If you have 100,000 LEDs of any brightness and color at your disposal, what would you make and where would you put it?

If I had 100,000 LEDs of any brightness at my disposal, I would attach them to every ceiling in my house and make the LEDs the only source of light in my house. The LEDs would only power on if they sense me movement so the light would follow me wherever I go. This way I don’t have to turn off the lights in every room and I can have light whenever I need.

Documentation 1 – Kathy

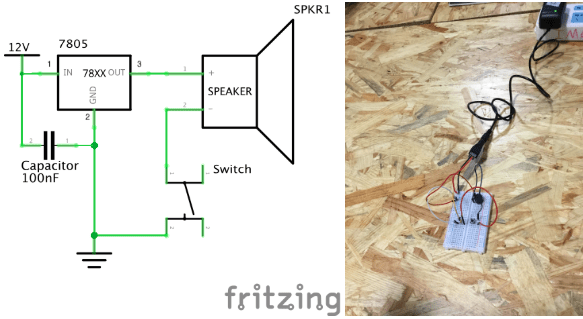
Circuit 1: Doorbell

List of Components:  Wires, Power cord (12V), Breadboard, Capacitor (100nF), Voltage Regulator 78XX, Switch, Speaker,

  • The wires are used to connect the components together.
  • The power cord gives the breadboard power by connecting to electricity.
  • The breadboard allowed us to make the electrical circuit.
  • The capacitor holds excess electricity and stores it for future use. It does not dissipate energy and provides a consistent voltage which improves the performance of the circuit.
  • The 78XX is a voltage regulator, it is included to produce a voltage that is positive relative to a common ground
  • The switch turns the doorbell on.
  • The speaker is included because it acts as a doorbell; it is the output.

The circuit worked the first time we built it, however, we forgot to include the voltage regulator. We were also unsure about the orientation of the switch. After a couple of rotations, we realized that it best bit between the gaps of the breadboard.

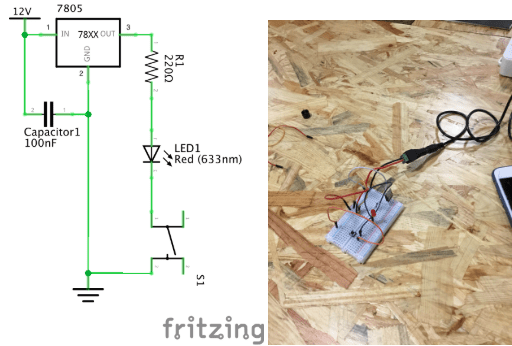
Circuit 2: Lamp

List of Components: Wires, Power cord (12V), Breadboard, Capacitor (100nF), Voltage Regulator 78XX, Switch, Resistor (22 Ohms), LED (633 nm)

  • The wires are used to connect the components together.
  • The power cord gives the breadboard power by connecting to electricity.
  • The breadboard allowed us to make the electrical circuit.
  • The capacitor holds excess electricity and stores it for future use. It does not dissipate energy and provides a consistent voltage which improves the performance of the circuit.
  • The 78XX is a voltage regulator, it is included to produce a voltage that is positive relative to a common ground.
  • The Switch turns the LED light on.
  • The resistor is used to limit the amount of current going through the circuit. If a resistor is not included the LED can be destroyed
  • The LED light lights up.

The LED light did not work the first time we set it up. This is because we did not know how to include the voltage regulator into the breadboard along with the resistor. We found it kind of confusing to put them together. We figured out that we had to use the resistor as the connector between the voltage regulator and the LED light as there would be not enough space on the board if we used wires.

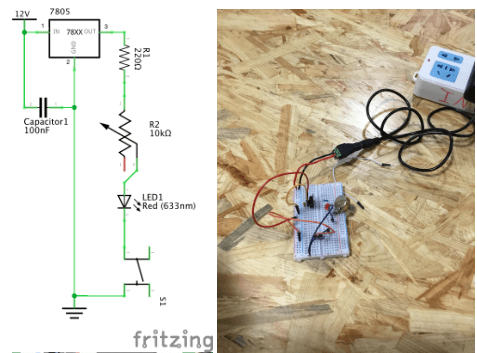
Circuit 3: Dimmable Lamp

List of Components: Wires, Power cord (12V), Breadboard, Capacitor (100nF), Voltage Regulator 78XX, Switch, Resistor (22 Ohms), LED (633 nm), Potentiometer (10k Ohms)

  • The wires are used to connect the components together.
  • The power cord gives the breadboard power by connecting to electricity.
  • The breadboard allowed us to make the electrical circuit.
  • The capacitor holdsexcess electricity and stores it for future use. It does not dissipate energy and provides a consistent voltage which improves the performance of the circuit.
  • The 78XX is a voltage regulator, it is included to produce a voltage that is positive relative to a common ground.
  • The Switch turns the LED light on.
  • The resistor is used to limit the amount of current going through the circuit. If a resistor is not included the LED can be destroyed
  • The LED light lights up.
  • The Potentiometer is a multi-terminal resistor or a “voltage divider”. It is included to dim the light in the LED.

While building the dimmable lamp, we had trouble attaching the potentiometer to the breadboard. Since there were three pins attached to the potentiometer, we had trouble understanding what each pin was used for. The first time we built the dimmable lamp it did not work, only the LED turned on. After changing around the orientation of the wires and correcting connecting the LED and the resistor to the potentiometer, the LED successfully dimmed.

Reflection

Question 1: After reading The Art of Interactive Design, do you think that the circuits you build today include interactivity?

After reading The Art of Interactive Design, I believe that the circuits I built today included interactivity. Together, my partner Serene and I thought about how to connect the objects together to create a circuit. Whenever there was a problem, we examined the circuit, and listened to one another’s ideas about what could have went wrong. We also interacted with the objects that we had and created the output of sound and light out of small electrical components which is pretty fascinating.

Question 2: How can Interaction Design and Physical Computing be used to create Interactive Art? You can reference Zack Lieberman’s video or any other artist that you know.

Interaction design and physical computing could be used to create interactive art through the use of coding, technology, and physical art. In Zack Lieberman’s video, he created a Eyewriter which ultimately lead to an type of interactive art. The idea behind the Eyewriter was interactive between the patient and the world outside of the hospital creating a magical performance for the patient and the people outside. With interactive design and physical computing, the power of coding, technology and a purpose for the creation, the art, design, and technology together merge into interactive art.