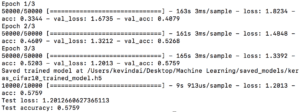
In order to train the CIFAR-10 CNN, I played around with the batch size and epoch, starting off with a batch size of 32, and 3 epochs. The result was a test accuracy of 0.58, and a loss of 1.2.
Because I am still relatively new to machine learning, the effects of epoch and batch size are quite unfamiliar to me, so I wanted to see what would happen if I changed the two drastically. I increased the epoch size to 10, and kept the batch size the same.
I ended up with a test accuracy of 0.68, and a loss of 0.9. Therefore, it seems that more than doubling the epoch size while keeping the batch size the same has little effect on accuracy.
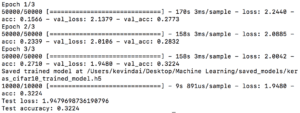
Next, I changed the epoch size back to 3, and increased the batch size to 2048.
As you can see, the test loss approached 1.95, while the accuracy decreased down to 0.32. Judging from this run, having a low epoch size, while running a high batch size did not necessarily increase accuracy. I think this might be because an epoch is one iteration over the entire dataset, and the batch size is number of training examples within the set, so passing a very large batch size through a small epoch size may degrade the quality of the model.
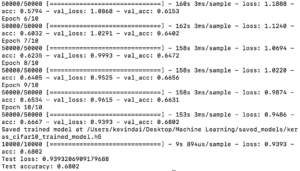
Lastly, I ran it with an epoch of 20, and a batch size of 32.
This was probably the most stable run out of the tests, as the accuracy rate seemed to peak at around 0.75, while the loss went down to 0.74. In this case, the batch size was relatively similar to the epoch size, so I think in this case, the epoch and batch size setup that follows this range would work best for the data set given.
I was especially intrigued by the various emotions displayed by the Braitenberg Vehicles, despite being constructed from a few basic sensors. Vehicles like “Fear” and “Love” were the starting point for my inspiration; I enjoyed how they utilized simple processes such as straying away from a source to depict fearfulness, or orienting themselves towards a source that they find attractive. Because of this, I wanted to utilize the bot’s ultrasound sensor, as I thought that this would be the most versatile sensor in terms of detecting the surrounding environment.
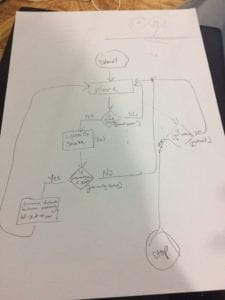
In terms of emotions, I wanted to imbue my robot with characteristics of curiosity and cautiousness. These two emotions complement each other quite well, and are distinct markers of an active, ‘intelligent’ organism. Curiosity will drive the bot to approach certain objects, while cautiousness will inhibit curiosity, making sure the bot keeps a certain distance from said object. To begin, I quickly created some pseudocode for these behaviors:
#while True:

  #variable = ultrasound sensor distance

  #display the distance value
 #if variable >= desired dist:

    #display happy face

    #move motor 1 forward

    #move motor 2 forward

    #delay
 #if variable <= desired dist:

    #display sad face

    #move motor 1 backward

    #move motor 2 backward

    #delay
Despite having a simple code makeup, I feel that it captures ‘curiosity’ and ‘cautiousness’ quite well. Both behaviors are stored within the while loop, and the ultrasound detected distance will be stored within a variable. If the robot is far enough from an object, it will display a happy face, to show that it is content, and move forward towards the object, hence the ‘curiosity’ characteristics. However, once it nears the object, and passes the distance threshold, it will display a sad face, and move backwards, enacting the ‘cautious’ approach. Therefore, if it approaches a human, it will continue to move backwards if the human keeps moving closer, and forward if the human backs away from the robot. This way, there will always be a certain distance between the bot and the human, regardless of whether it is moving toward or away from the user. If faced with an immoveable object, the bot will be stuck in a loop of moving forward and backwards in the same axis.
The actual code:
from microbit import *

import robotbit

import time
while True:

  dist = robotbit.sonar(pin0)

  #display.scroll(dist)
  if dist <= 25:

     display.show(Image.SAD)

     robotbit.motor(1,140,0)

     robotbit.motor(3,-180,0)

     #sleep(2)
I first wanted to test whether or not the ultrasound sensor was working. It was a struggle to find the perfect distance threshold, but finally, I managed to get it working, and display the LED facial expressions accordingly.
Then, the next step was to have the motors move either forward or backwards according to the distance:
After completing the LED display and motor steps, I tested it on an immovable object to see if it reacted the way I expected it to:
As you can see, when faced with objects that do not move, the bot will be stuck in a perpetual loop of moving back and forth, which is exactly what I had expected. Finally, I tested it myself by moving my foot closer or away from the bot:
From the video, you can see the bot stutter when I quickly move my foot in front of the sensor, which I initially wanted to get rid of, but after further interaction, I actually really liked it, as I thought this quirk made the bot’s behavior more ‘realistic’, like it was indecisive about whether or not to approach me. Testing it with my hand was even more fun; as I reached out to it from far away, it happily approach me like a puppy, but once it neared me, it backed away hesitantly, as if unsure about the situation.
I am quite happy with the results.
PART B:
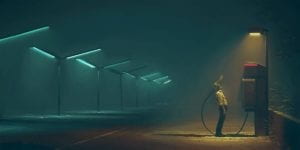
One of my absolute favorite artists, Simon Stalenhag, happens to create work based off of human-technology interaction. Simon utilizes ‘digital painting’ to create his pieces, and he draws inspiration from the Swedish countryside, where he is originally from.
Some select pieces:
What I really enjoy about Simon’s work is that he is able to capture the biological, almost human-like qualities of machines. The way the technology is set against the natural backdrop of the countryside is very intriguing; on one hand it seems a bit unnatural and unnerving to see giant machines wander across the mountains, but on the other hand, there is something truly captivating about humans (flesh) integrating technology (artificial) into their own bodies and lives. In a way, Simon pushes the viewers to question whether or not sentient machines are truly ‘alive’, or if technology will always require human life to exist.
With that in mind, I thought about instances where the emotions I chose for my bot appear in real life. In a way, I feel that most complex creatures are ‘pre-programmed’ to be both curious and cautious, as these traits were necessary for organisms to grow and evolve over time. Animals need to be cautious in order to avoid potential dangers and keep themselves alive in order to pass on their genes to the next generation. However, these organisms also need to have a sense of curiosity, which enables them to act upon their surrounding environment and discover new survival techniques that allow for adaption and accommodation, ways of thinking that can benefit the entire species.
From this video, we can see that the raccoon exhibits both cautiousness (wary of the stranger) and curiosity (desire to grasp the ration and move closer to the stranger). There are countless instances of various types of animals engaging in this behavior, such as squirrels darting away from a passerby who wanders too close, or monkeys who gather around onlookers to see if fruit is available.
In terms of changing my code, I initially had the kitten head servo move side to side continuously, as I wanted to add more interactive behavior. However, I realized that since the head was essentially the ultrasound sensor, this would add unnecessary complications to how the bot reacted to incoming stimuli. For example, if an object were to appear in front of the bot, it would detect its presence, and move back. However, if the head were turned to the side, it would not see the object in front of it, and continue moving forward, colliding with it. As a result, I cut out the servo movement and left the ultrasound in a default position of facing forward. Therefore, the bot would continuously be reacting to whatever it was facing. In the future however, I would like to add multiple ultrasound sensors to the perimeter of the body, so that the head can move freely to express different emotions/states, while still being able to detect the surrounding environment accurately.
Ultimately, I felt that this lab went better than the previous ones, partially because using the Python editor was much faster than the ‘block code’ technique we had to use previously. I really enjoyed using the ultrasound sensor, and I hope to be able to experiment with more sensors (photocell, sound, etc). One interesting aspect I hope to expand upon would be imbuing the bot with more behaviors, such as moving the servo head while still being able to detect oncoming stimuli, and utilizing the light sensor to create different interactions in varying light levels.
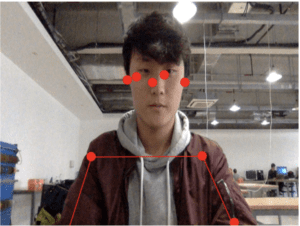
I was very interested in utilizing poseNet to create a simple, interactive project that would show me just how well the model worked, and how accurate it was in detecting parts of the body.
Initially, I imported the model into my sketch, where it drew out ellipses for key points on the body, creating a ‘skeleton’. There were some small issues with video noise, as the points kept jumping from one spot to another, but it was probably due to the lighting.
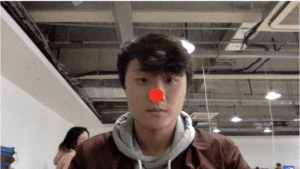
Then, I had it detect the nose, as I assumed it was probably the most stable feature.
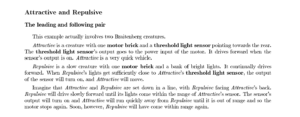
For my project, I was inspired in part by the Braitenberg Vehicles, which are a set of robots created by MIT’s Media Lab. The robots themselves utilize very simple sensors, but the interaction between them seems quite complex. Specifically, I really liked the relationship between ‘Attractive’ and ‘Repulsive’ , which are two robots that act a bit like magnets. ‘Repulsive’ moves in a straight line towards ‘Attractive’, but when it enters a certain distance threshold, ‘Attractive’ moves away from ‘Repulsive’ until there is enough distance between the two robots.
Braitenberg Vehicles:
‘Attractive and Repulsive’ from the MIT Media Lab Braitenberg Vehicle Abstract:
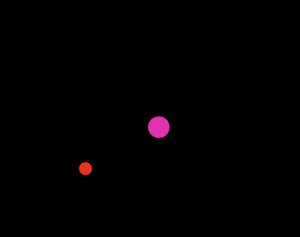
The setup I envisioned was pretty simple; the two robots would be represented by ellipses, with one ellipse acting as ‘Repulsive’, which will be controlled by the user, and one ellipse acting as ‘Attractive’, which will shy away from the user controlled ellipse.
To begin, I imported the original poseNet with webcam code, and modified it to detect the left wrist (since the video will be inverted, it will actually be the user’s right arm), so that the ellipse can be controlled through arm movement. I drew a black background over the footage, and drew another ellipse in the center of the canvas. To have the ellipse act ‘repulsed’ by the user controlled ellipse, I measured the distance between the two shapes, and instructed the ‘attractive’ ellipse to move away accordingly. Finally, I added some small details like the ‘jitter’ effect and color/sound to make it more interactive.
Demo:
Screenshots:
Ultimately, I really liked how it turned out, although the detection is a bit all over the place. I found that having your arm over a white background works the best in terms of stability, although the nose is still the most stable feature.
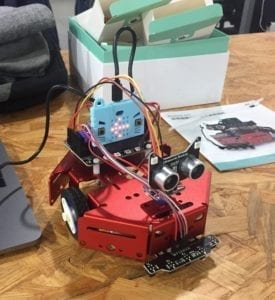
The kittenBot was quite fun to work with; the instructions were very clear and the setup wasn’t too cumbersome or confusing. The only problem I ran into when I was putting the bot together was the placement of the screws, but that was a minor detail. The end product turned out fine:
First off, I wanted to start off by playing around with the LED setup, just to see if I connected everything correctly. I displayed a few random icons initially, then utilized a simple code to switch between LED icons using the buttons:
if (input.buttonIsPressed(Button.A)) {
basic.showIcon(IconNames.Happy)
} else if (input.buttonIsPressed(Button.B)) {
basic.showIcon(IconNames.Sad)
}
LED Test:
Then, I programmed a simple motor script to test the motors and make the bot move within a constrained space. If button A is pressed, the bot will move clockwise in a continuous circle, and if button B is pressed, the bot will move counterclockwise.
if (input.buttonIsPressed(Button.A)) {
basic.showIcon(IconNames.Happy)
pins.servoWritePin(AnalogPin.P0, 0)
pins.servoWritePin(AnalogPin.P1, 180)
} else if (input.buttonIsPressed(Button.B)) {
basic.showIcon(IconNames.Sad)
pins.servoWritePin(AnalogPin.P0, 180)
pins.servoWritePin(AnalogPin.P1, 0)
}
Motor Test:
After testing the LEDs, DC motors, and Neopixels, I wanted to utilize the ultrasound sensor to make the bot detect nearby objects, and display reactions according to the distance of the object. The bot would move forward initially, but as it comes within a certain distance to an object, it will display an icon and turn 180 degrees and move forward. Of course, if it is stuck between two objects, it will forever move back and forth between them:
let distance = 0
distance = robotbit.Ultrasonic(DigitalPin.P3)
if (distance > 50) {
pins.servoWritePin(AnalogPin.P0, 0)
pins.servoWritePin(AnalogPin.P1, 0)
basic.showIcon(IconNames.Happy)
} else if (distance < 50) {
basic.showIcon(IconNames.Sad)
for (let i = 0; i < 1; i++) {
pins.servoWritePin(AnalogPin.P0, 180)
pins.servoWritePin(AnalogPin.P1, 0)
}
pins.servoWritePin(AnalogPin.P0, 0)
pins.servoWritePin(AnalogPin.P1, 0)
}
if (input.buttonIsPressed(Button.A)) {
basic.showIcon(IconNames.Yes)
pins.servoWritePin(AnalogPin.P0, 0)
pins.servoWritePin(AnalogPin.P1, 180)
} else if (input.buttonIsPressed(Button.B)) {
basic.showIcon(IconNames.No)
pins.servoWritePin(AnalogPin.P0, 180)
pins.servoWritePin(AnalogPin.P1, 0)
}
Ultimately, the kittenBot was a fun and simple lab; I really liked how all the pieces came together and I thought it was really well designed. I hope to utilize more sensors in the future with the microbit.
My partner and I wanted to take inspiration from nocturnal animals, playing with the sensitivity to light and sound. We originally decided that the robot should react accordingly to a sudden increase in light or noise.
Our Sketch:
The plan was to have the robot start off moving in random directions, but stop in the presence of bright light. In response to loud noises, we wanted it to display a certain pattern of lights, and shake. If an object comes too close to the robot, it will increase the distance between the object and itself, through the use of the proximity sensor.
Because we did not have the proximity sensor or a buzzer (for the shaking effect), we wanted to represent the behavior using lights. We utilized the built in photocell in the microbit to measure the light level.
Our Code:
let light = 0

basic.showNumber(input.lightLevel())

light = input.lightLevel()

if (light < 20) {

   basic.showIcon(IconNames.Heart)

}

if (light > 20) {

   basic.showNumber(IconNames.Sad)

}
The microbit displayed a heart icon during low light conditions, and a sad face during increased light conditions. However, there were some issues with the photocell detecting light levels, so in the code below, we edited the sad face function to display the number for the light intensity.
Our Edited Code:
basic.showNumber(input.lightLevel())

let light = input.lightLevel()

if (light < 20) {

   basic.showIcon(IconNames.Heart)

}

if (light > 20) {

   basic.showNumber(input.lightLevel())

}