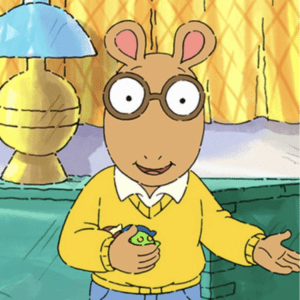
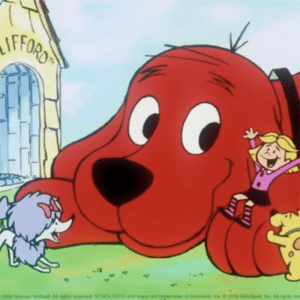
For this week’s cycleGAN project, I ended up utilizing a pre-trained model due to several issues I ran into during training, as well as time constraints. I wanted to incorporate a few photos of Picasso’s cubism paintings and stylize images of childhood cartoons, as I thought the result would be quite interesting. My expectation would be that the characters would still retain some form of similarity to the original photo (whether it be through color, form, etc), but show some obvious changes in structure, caused by the sharp edges of Picasso’s cubism style.
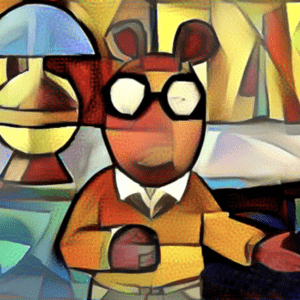
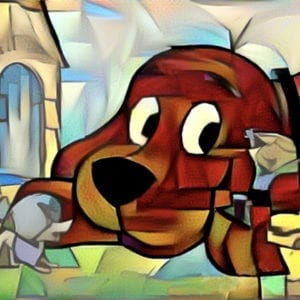
Here are the results:
I think the photos turned out extremely clean cut, due to the fact that the input images contained very defined edges, as they are cartoons. The Picasso cubism style is quite noticeable, although I do think that the results will be a bit worse with photos of real life scenes.
The main subject of this lab revolved around observing the circadian cycle present in fruit flies. The so-called “cycle”, or better known as the “circadian rhythm”, is a biological phenomenon where living organisms are governed by an internal, physiological clock that runs 24-hours, allowing the creature to wake up and fall asleep at regular intervals. The process itself is usually endogenously generated (internally generated), but can be influenced by external cues such as sunlight or temperature.
Setup
To prep for the lab, we first had to separate the male fruit flies from the females, in order to remove the possible situation of the female flies reproducing during the testing stage. Then, we created two sets of flies, one set composed of regular Drosophila flies, and other made up of Drosophila flies with a genetic mutation. We utilized C02 in order to incapacitate the insects and move them into vials. In the end, we had 8 vials of normal functioning files, and 8 vials of mutated flies. The samples were placed in the dark, and monitored every hour. This way, we would be able to make the distinction that the flies were indeed able to follow an internal clock without the use of external cues such as lighting. Our expectation is that the presence of a circadian rhythm will be observed in the normal Drosophila flies, and not in the mutated sample set.
Results
Here are a few snippets of the results from the lab. As you can see from the data, it seems that the regular Drosophila flies do indeed follow some sort of circadian rhythm, as they look to be active for around 5-6 hours (the specific hours of the day vary a bit between the flies), and inactivate for the remaining portion of the 24 hours. In contrast, the mutated flies exhibit little to no circadian patterns, fluctuating between being awake and asleep at seemingly random hours of the day. The rest of the flies that display no movement at all are most likely dead.
Reflection
I thought this experience was especially interesting because I have never worked with live organisms under a microscope before. Analyzing the sleep patterns of the flies and discovering the presence of a circadian rhythm was a bit eye opening in that I was reminded that even living organisms may possess some ‘robotic qualities’ similar to machines. In a way, this lab pushed me to seek out other behaviors that animals may possess that are seemingly ‘machinelike’ to incorporate into my final project.
Our group actually cycled through various animals during the inspiration stage. Our first brainstorm revolved around the jellyfish, and how it navigates in the water through the use of pulsating movements. From our understanding, if we wanted to achieve this locomotion in the air, we needed to have a mechanism that allowed it to float. Of course, that’s when we realized we needed helium balloons to do so, and set out prototyping a solid base to hold the balloon and motor.
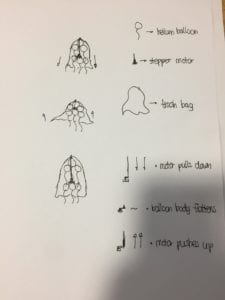
Our initial sketch:
As you can see from this photo, we came to the consensus that the ‘robot’ would have to be a collection of small balloons that held up a small stepper motor. The motor’s purpose would be to pull a thin pole (attached to the top of the jellyfish) back and forth, creating a pulsating motion that would allow the robot to push itself in the air. Strangely, the most difficult aspect of putting this plan into motion was that helium was quite hard to find, and since we didn’t want to order a huge tank of it through TaoBao, we were left with little options. That’s when we came across this video describing the creation of a self-stabilizing flying robot:
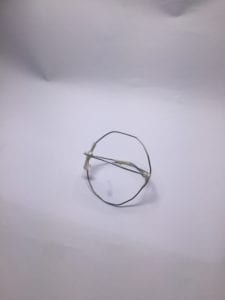
It turns out that the robot was created by a group of mathematicians at NYU, and that it is actually the first flying bot that possesses the ability to stabilize itself in the air without the use of sensors. To put it simply, the contraption is constructed from thin carbon fiber wire, and fitted with four wings. The robot is essentially ‘hollow’ in that the body is purely made up of the wires, and it is able to fly because the wings move at slightly different times relative to each other. The entire device also weighs 2.1 grams, and is not much larger than a dime. Our group was very enthralled by this project, and we thought that maybe we could recreate this, but at a larger scale.
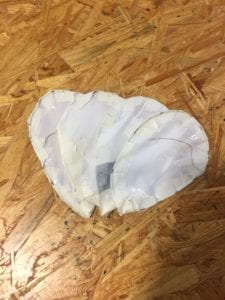
However, as with any prototyping idea, it fell flat. Our main problem was that our body was just too heavy to fly:
Despite having made some quality wings, we all agreed to scrap this idea as well.
With the deadline coming up, we began to search for an animal movement that we could replicate using simple mechanisms such as pulleys and gears. Diana proposed that we replicate a frog’s jumping behavior, and we found several videos that described in detail how frogs managed to leap into the air. However, we were hesitant to fully commit to this idea, as frogs jump extremely high, and we weren’t sure if we could generate enough power to lift the robot into the air in that fashion. Therefore, we began looking at a toad (which moves more clumsily), and finally, our breakthrough was discovering this fish called the Mudskipper:
I thought this was especially fascinating, in that the fish was able to use its fins as propellers to navigate out of water. Although at first glance, this doesn’t seem like the most efficient way of moving on ground, a closer look will reveal that the fish can actually nudge itself along the sand quite quickly. Given the fact that it is still indeed a fish, I was really inspired by the versatility of how it uses its fins. According to our research, the mudskipper’s pectoral fins are located at the frontal area of its body, and its unusual shape is what allows it to ‘skip’ across land. The radial bones within the fins are elongated, and stretch out from the body, creating two ‘segments’ or joints that are quite similar to small arms. Here is a close up demonstration of the fish moving on land:
As you can see from the video, the fish moves by placing its elongated fins onto the ground, and then pushing away, generating enough force to propel itself forward. In some cases, the mudskippers have been recorded to be able to leap up to distances of 2 feet.
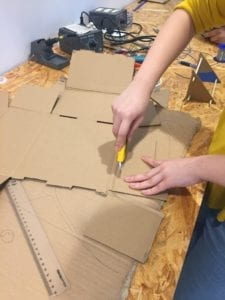
Our group thought this was the perfect organism to base our locomotion on, so we set out to create a prototype using cardboard.
Creation Stage
Before creating our frog-themed mudskipper organism, we wanted to set some guidelines to follow:
The fins of the organism needed to be strong enough to support the entire base (including motor and battery), while at the same time, light enough to be lifted by the motor
The pulley system is the most ideal for tackling two-fin rotation motion, as we only need one motor to move multiple fins
The fins will most likely have to be equilateral triangles, as this allows us to focus the force of the pulley system to one point, as well as stabilize the entire structure (the triangle shape technique was heavily influenced by youtube videos we watched describing how to create stable structures out of soft material such as paper and cardboard)
Lastly, our first priority should be getting the robot to nudge itself along the ground; if we end up with extra time or resources, we could make the robot jump like a frog
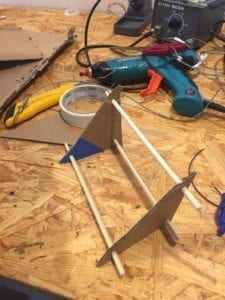
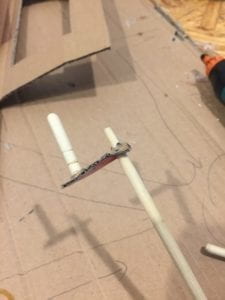
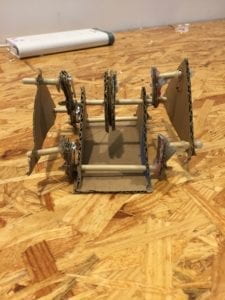
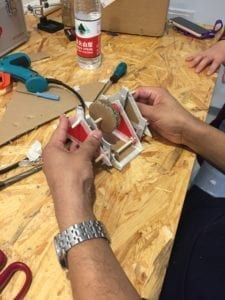
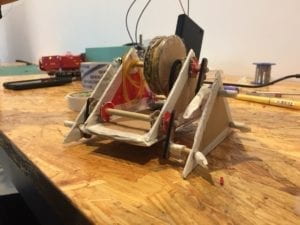
With these guidelines in mind, we ended up with a solid prototype structure:
As you can see from these photos, our entire organism is made up of four triangles, connected in parallel by wooden sticks. The base is one rectangular piece of cardboard. Here is a demonstration of the rotation movement we managed to create:
To be quite honest, despite the prototype looking a bit rough, we were really happy with achieving the rotation we wanted from the pulley system. The main problem however, was that the hinges of the sticks were too soft to support the full rotation of the fin. As a result, the fin would rotate halfway, then either stop or break off. We knew that to remedy this, we would have to laser cut wooden pieces to act as the rectangular hinges. The rest of the cardboard body however, worked fine, so we decided to just use more reinforced cardboard for the final prototype.
Final Product Stage
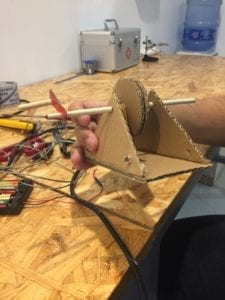
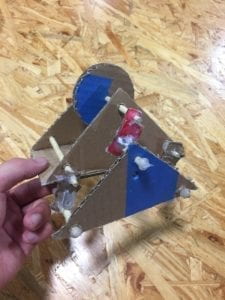
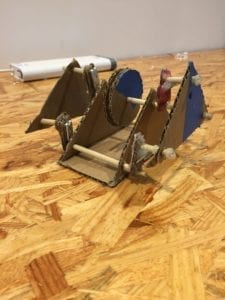
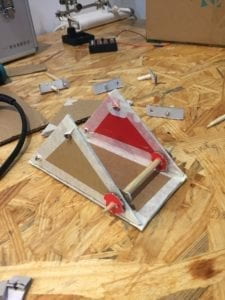
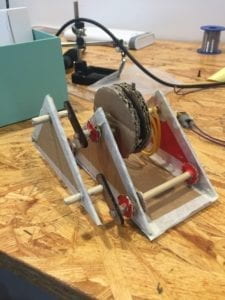
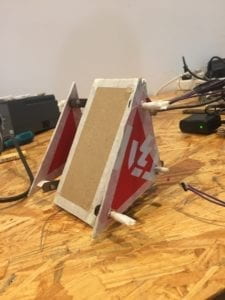
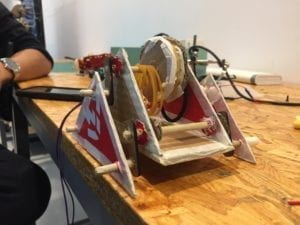
The Final Product:
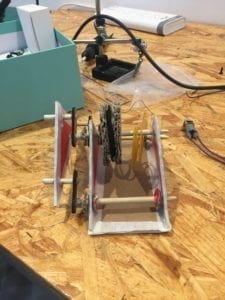
The final product in motion:
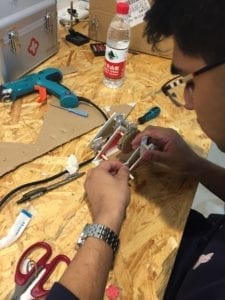
Our final product was definitely more polished than our prototype, due to several refinements to the sticks and triangle pieces. We sharpened the ends of the sticks in order to provide better penetration abilities, and Anand reinforced the edges of the cardboard through the use of masking tape, which was a good touch. We did run into a major problem however, in that the pulley system was too weak to rotate the newly structured fins. We were stumped on this problem for a while, until Rudi saved the day by proposing we use more than one rubber band for the pulley system. By making the rubber band thicker, we ended up creating faster rotation, resulting in the the organism being able to propel itself across the floor.
Demo:
Reflection Stage
I think our whole group can agree that this lab provided valuable experience in terms of prototyping and ideation. We had to run through multiple inspiration and prototyping stages, as well as tackle problem after problem regarding our robot. I think one of the reasons why we were able to efficiently address these issues and produce a working robot was that our group dynamic was very fluid and well structured. We were all very receptive of each other’s ideas, and often bounced inspirations off of each other’s suggestions, resulting in a more polished, refined goal. We were also in sync with the guidelines each of us proposed, and quick to come up with solutions that we all agreed upon to address problems that we faced during the creation and prototyping stages. As for our end product, I personally am very satisfied with the mudskipper robot, both in the movement we managed to achieve, and the overall design. I think that our group was actually a bit awed when the robot propelled itself across the floor during the first test run, because we honestly didn’t expect it to move, after going through countless trials and reiterations. In terms of improvements, I think that if we had more time, we would figure out a way to increase the power of the pulley system and reduce the weight of the fins to make the robot jump like a frog, rather than crawl across the sand. However, ultimately, I am quite happy with the lab results, and hope to incorporate what I learned in this process into my final project.
For my final project, I want to expand upon the chatbot I created for the midterm. If you recall, the bot I introduced during the midterm was programmed to simulate a patient with speech impediment; this time however, I want to create a model that allows for the chatbot to talk naturally. To take this a step further, I will create two chatbots with differing speech styles, and have them converse with each other. In essence, my final project will be a conversation between two basic AI’s that have been trained on different data sets.
Inspiration
As I have mentioned in previous posts, AI language processing is quite fascinating to me, and I really enjoy interacting with chatbots or watching chatbots interact with each other. I think the uncertainty of what the chatbot will produce is what draws me in the most, because although generative language programs are made to simulate human speech as accurately as possible, the models will often deviate from ‘normal’ human conversation conventions because language is such a complex concept for machines to learn.
Here is a video that really inspired me to go down this chatbot conversation path:
I thought that this interaction between the two bots was absolutely fascinating and entertaining to watch. In a way, their conversation reminds me of how toddlers talk with each other, with some existential questions thrown in for good measure. This is what I hope to achieve with my project.
Idea
To put this into simple terms, my final project idea is to create and train two chatbots with differing ‘personalities’ or speech styles, and have them converse with each other. Right now, I aim to have them interact in a purely text-based interface, but I may incorporate sound into this (depends on time and resources).
Tools
I will be incorporating RASA NLU and RASA Core into my project to aid in natural language processing and grammar/syntax usage. Of course, I will need to delve deeper into RASA, but from my current understanding, it is a powerful, open source tool for structuring speech in machine learning. Both RASA NLU and Core are frameworks that can be used to create bots such as those in online customer service positions, where the user inputs a simple question or request, and the bot attempts to satisfy the customer’s needs. The most important thing about RASA for me however, is that the framework will allow me to imbue the chatbot with natural, fluid speech patterns similar to a human. This is a tremendous step up from my midterm project, because fixing grammar/syntax was one of the large hurdles I had to overcome.
Dataset
My choice of datasets is probably the most important aspect of my project (besides the structure of the model), because this is what will give my bots a ‘personality’. I plan on training each bot with one long novel that will be transferred into a word list, and eventually a dictionary that will act as the chatbot’s vocabulary pool. Each bot will be trained on a different novel, so that the end result will be that they will have contrasting speech styles. I have already picked out the novels (although this is also subject to change).
Bot 1 Dataset:
I really liked how my midterm chatbot turned out (trained on War and Peace); I found that it possessed a very old-fashioned, refined style of talking, which I want for my final as well. This is because the novel itself contains rather ‘outdated’ language due to the setting and time of publication.
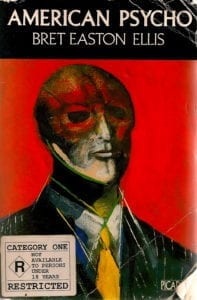
Bot 2 Dataset:
I think that this will be especially interesting, because American Psycho is written in a first-person perspective of a psychopath. In a sense, I will be making Bot 1 into a more ‘posh’ or refined speaker, while Bot 2 will hopefully possess some qualities akin to that of a psycho killer. I feel it would be quite interesting to see these two personalities interact with each other.
Goal
The ultimate goal for this project to have a working, comprehensible conversation between the two chatbots. Currently, I foresee this happening within terminal, but if everything goes according to plan, I also hope to add a few more extra tweaks, such as a refined interface or different language options.
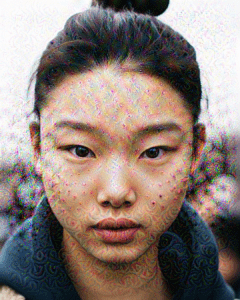
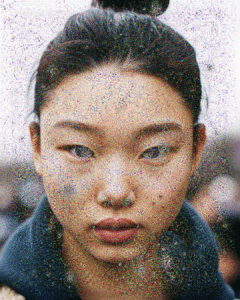
As a photographer, I found myself very interested in the applications of deep dream. Although I’ve seen various artists use deep dream generators to create ‘trippy’ scenes and illusory patterns, I’ve never actually experimented with it myself. Going off of the steps we performed in class, I continued to play around the parameters, using a portrait shot I found online. Initially, I wanted to use the human face as a template, because I’ve seen images of people being warped before, and I thought the effect was quite unusual. However, the images didn’t turn out the way I expected:
step = 0.01 # Gradient ascent step size num_octave = 3 # Number of scales at which to run gradient ascent octave_scale = 1.5 # Size ratio between scales iterations = 20 # Number of ascent steps per scale max_loss = 10.
step = 0.09 # Gradient ascent step size num_octave = 15 # Number of scales at which to run gradient ascent octave_scale = 10 # Size ratio between scales iterations = 50 # Number of ascent steps per scale max_loss = 15.
step = 0.05 # Gradient ascent step size num_octave = 15 # Number of scales at which to run gradient ascent octave_scale = 6 # Size ratio between scales iterations = 30 # Number of ascent steps per scale max_loss = 20.
From these test sets, I gained a general idea of how the parameters affect the final image. It seems that increasing octave numbers results in a more warped color field, while increasing step size leads to more fine grained shapes. A greater number of iterations will also lead to more refined structures, but this will take a longer time.
After running these test images, I wanted to find a good balance between rigid structure and color warping, and ended up with these parameters:
step = 0.01 # Gradient ascent step size num_octave = 3 # Number of scales at which to run gradient ascent octave_scale = 3.5 # Size ratio between scales iterations = 50 # Number of ascent steps per scale max_loss = 10.
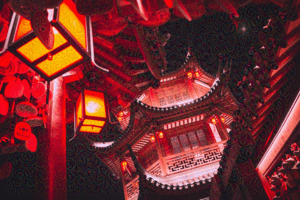
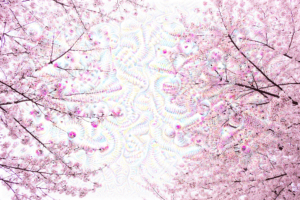
With this setup, I applied it to my own photos:
Judging from these results, I feel that my night time shots didn’t mesh too well with deep dream, as the structures and colors didn’t stick out enough. However, if you look very closely, you can still see the intricate patterns. I think my shot of the Sakura trees during the day worked the best, as the colors are extremely noticeable, and the patterns complement the flowers very well. Even the color scheme turned out quite well, and I hope to apply this deep dream pattern to my other daytime photos as well, since I think those types of photos work best with this.