Spacetime Symphony – Kyle Brueggemann – Godoy

Spacetime Symphony

Concept and Design

Once my partner Robin and I thought of our main concept of creating an interactive audiovisual experience, we wanted to first find the most effective design that would enhance the interactive experience. We knew that we had wanted to use some kind of sensor values to put into the Arduino and then send to the processing sketch, but we did not know exactly which sensor to use. We debated using buttons, tilt sensors, light sensors and much more to control the movement of the animation. We decided that we didn’t want the interaction to be too obvious, which would occur if we had used a very basic sensor such as a button, so we decided to use a distance sensor.
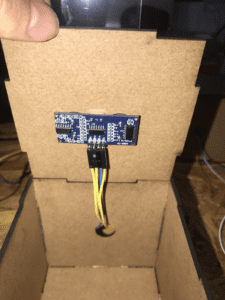
This was intuitive enough to allow our audience to think more about the interaction, but also not complicated enough to isolate our audience from the possibilities of interaction.

In the making of both our physical and digital elements, we decided to have three main components to our project. The physical setup which included the Arduino and the sensors, the projected animation, and the soundscape. While the soundscape and animation were implemented in Processing, we used the laser cutting fabrication process in order to construct boxes.
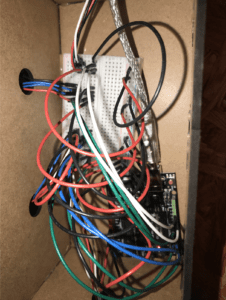
These boxes contained the Arduino, circuit board, and the wiring in order to create a clean aesthetic and inviting setup to bring in users who wish to interact. This simplicity of the laser cut boxes allowed for no distractions for the users other than the sensors that we wanted them to interact with.

We both believed that using the laser cut boxes were the most effective materials to contain the Arduino and circuit board. We had other options for the construction of our physical elements such as 3d printing, however, the laser cutting process was a more efficient method of fabrication for our purposes intended.

Fabrication and Production

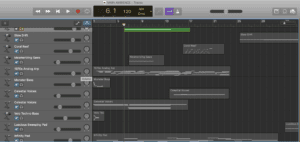
Our production process consisted of a couple of main steps. The first step was the sampling and cutting of the soundscape audio files. I worked in Garage Band and sampled every sound the system offered and grouped them into separate categories based on their sound style. These categories included base, twinkly sounds, ambient, and drum beats. Then, I grouped together a bunch of audios into the main song file and tested how they fit all together. Then, once I made sure all the intended sounds fit together well, I isolated them so that they could be added and subtracted from the song in the final product. Then once I isolated all the extra sounds, I was left with the main ambient background track

.
The next step was testing different sensors in order to find out which one could most accurately communicate our desired values. We tested both the infrared sensor and ultrasonic ranger, however, the ultrasonic ranger provided the most consistent values. Although we had wanted to work with the infrared sensor because we were afraid the ultrasonic sensors would interfere with each other, we were proved wrong when the ultrasonic sensors provided a greater consistency. Another step of the process was the coding of the processing animation.  Robin did the coding for this step and we had cycled through a number of designs for the layout of the animation but settled on the 3d cube and sphere. Another step was the coding of the serial animation in order to take the values from Arduino to Processing.
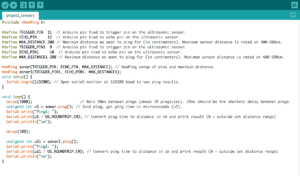
Both Robin and I worked on this aspect of the coding, and it didn’t take long to figure out how to transfer the values. However, one aspect of this step that took a while was figuring out which range of values from the distance sensor we wanted to apply to each sound. The final step was the creation of the physical model. First I had laser cut four boxes. Each one had its own ultrasonic ranger which had three different ranges in order to play three different sounds.

We had also laser etched different shapes into each box in order to indicate which aspect of the animation would be altered once each specific sound was added. We also at first forgot to laser cut a box to house the Arduino and main circuit board. However, we were able to laser cut it at the last second in order to finish the main construction.
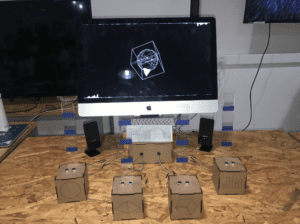
One more design element we added at the very end were four long acrylic sticks, which we attached vertically onto each box. We marked each acrylic stick with three different lengths of tape. Each length of tape indicated where the user would place their hand in order to play a different sound.

Our user testing session went entirely well. Communication between everyone was very clear so we were able to take a lot of the feedback and implement it directly into our design. We had not yet fabricated any physical components because we wanted to have feedback before deciding on a final design. During user testing, we were able to come to many conclusions about specific design questions we had. One thing that we were unsure of in relation to the physical setup was whether to have the ultrasonic rangers positioned horizontally or vertically. However, based on the majority of the feedback, placing the ultrasonic rangers so they face vertically provided the most comfortable experience for the users to interact. This also answered another main design question that we had pondered. Robin and I could not decide whether or not to encourage the users to use their body to interact with the distance sensors, or whether to encourage them to use their hands. However, when they are oriented vertically, users only have the options to use their hands. Another thing we noticed during the user testing is that many users did not realize that each ultrasonic ranger could accompany the production of multiple sounds. We found a way to make this more obvious by laser cutting the acrylic sticks marked with tape at the location where they should hold their hand in order to trigger each specific sound. Another thing noticed during user testing is that we should make the feedback more obvious as to when the users have triggered certain sounds. In order to accomplish this, Robin adjusted the coding for the animation to make it more obvious when certain sounds had been triggered. I also added etchings of certain parts of the animation to the design of the laser cut boxes in order to signify which part of the animation would be altered.
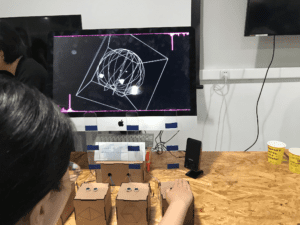
All of these adaptations were very effective in the presentation of our project, and its appearance at the IMA show. Users not only enjoyed the vertically placed sensors, but they were also able to make the connection of how each sound was linked to certain parts of the animation. In addition, the placing of the acrylic sticks and tape was very helpful in alerting the users of the location in which they should place their hands to play certain sounds. I believe all of these production choices were very wise and I’m so grateful for the amount of honest feedback we received because it allowed for our project to thrive in the best way possible.

Conclusion

In the end, our goal for this project was to create an interactive soundscape that itself interacts with a Processing animation. This artwork would allow user interaction and also find a crossroads between music and art. This project aligns with my definition of interaction, a two-way street of communication between two or more machines/beings. I believe it aligns with such because the user is able to use sensors that send values to the animation to create both sound and art. The user will then see their interaction flourish in the sound and art, and once they respond to the artistic output, they will be inclined to interact with the sensors even more. While I believe our project was very in line with my definition of interaction, I believe that we could even greater improve it by possibly adding more elements that signal when a user plays with the sensors. This would strengthen the two-way street of communication. Compared with my expectations, a real-world audience interacted very well with the project. They would first look at the animation, and then look at the physical setup. They would then wave their hands around and notice a change in the audio or a change in the animation. Then they would possibly connect the audio and the visuals.

The most invested of audiences would also notice that the etchings on the boxes match the parts of the animation that would change. While not all audiences would become that invested, in general, I was very delighted with the way people would react. One of the main goals of our project was to create an environment in which many people would be encouraged to interact with the sensors at once. This would allow the artwork to also become a medium for bonding between multiple people. After our final presentation, and based on Marcela’s feedback, I decided to lengthen the wires that connect the boxes in order that the sensors could be placed further apart. When they were placed further apart, this encouraged the different audiences to feel comfortable with interacting with the project simultaneously, because they had more space to do so.

Given that we had more time to work on the project, I think I would like to really invest time in producing the most immersive soundscapes. A lot of the sounds and musical combinations I produced were due to simple experimentation and luck, however, I think by using a more professional musical process of working with keys, time signatures, and maybe even a more professional audio editing software, I could create a better soundscape. Other than what I could improve given more time, during my actual project there was one main setback that occurred. Right before the final presentation, as I was taking the project off of the shelf, one of the boxes became disconnected from the circuit board, fell on the ground, and broke into separate parts. With no time to spare, I had to run to the IMA lab and glue the parts back together, reconnect the wires, and retest the code. This setback meant that before our presentation started, we had not fully set it up. We had to spend a small amount of time at the beginning of our presentation uploading the load and connecting to the TV. Due to this occurrence, we had constructive feedback regarding how we should have been fully prepared for the presentation. At first, the feedback was difficult to accept as it was a very unlucky situation, but after this learning experience, I feel encouraged to be extremely prepared for all of my future projects. To be prepared for situations like this will prevent any unlucky situations from affecting my performance as a student. In contrast, I believe Robin and I accomplished something amazing, which was the ability to make people feel. At the IMA show, seeing people have fun with another while interacting with the project, and seeing their faces light up when they were able to connect with the project’s meaning is enough accomplishment for me. All of the hard work spent in the IMA lab felt entirely worth it.

This connection felt between people and also between the art and ourselves is exactly why one should care about my project. Most of us go to the art museum and learn certain things. However, when the audience is given the task of making themselves a part of the art, their empathetic capability is enhanced as they can see their own personality uniquely impact the audio and visual expressions.
Recitation 11: Workshop on Media Manipulation by Kyle Brueggemann

For this recitation, I decided to join the workshop on media manipulation as my project involves a lot of visuals that my partner and I plan to manipulate with various inputs. A lot of the instruction provided was an extremely useful refresher on how to incorporate audio, visuals, and movies in my Processing code. 

For my media manipulation exercise, I decided to loop a video of an animated cherry blossom. I first did this by importing the processing video and then playing it in the setup function. I wanted to manipulate the video by adding a tint so I first created a time stamp. With the time stamp, I decided to add and if, else function for if the timestamp was greater than a certain value, the tint would be a certain color and if it was below that certain value, the tint would be another color. With this code, I created a dark tint, that turned into a light tint once the cherry blossoms bloomed.

I also wanted to add a little distortion to the video so with the values that determine the positioning of the video, I randomized them and applied them to the integer “x”.

Finally, I added an overlay of very chill harp music to bring the vibe of the video together. Overall this project was a very solid exercise to reaffirm my knowledge of media manipulation and embedding both video and audio into Processing simultaneously. I’m excited to take this knowledge into the creation of my final project, which definitely includes the intersection of visuals and audio.

Media

Code

import processing.video.*;
Movie myMovie;
import processing.sound.*;
SoundFile myMusic;

int x;

void setup() {
size(780, 420);
myMovie = new Movie(this, “blossom.mp4”);
myMovie.loop();
myMusic = new SoundFile(this, “wave.wav”);
myMusic.loop();
}
void draw() {
if (myMovie.available()) {
myMovie.read();
}
float timestamp = myMovie.time();
println(timestamp);

if(timestamp>11){
tint(200,150,180);

}
else {
tint(50,30,80);
}
x = int (random(0,10));
image(myMovie, x, x);
}

Recitation 10: Media Controller by Kyle Brueggemann

Overview

In this recitation, I used an image I found on the Internet and then used values from a potentiometer to create an interactive image. I first took the values from the potentiometer, sent them through Arduino, and then to Processing. In Processing I used code to select random pixel colors from the photo and to then draw different circles based on the pixel’s color with random x and y values. I set the size of each of these pixels to the value of the potentiometer in order to let the user use the potentiometer to make these color-picked circles increase and decrease as they desire.

The coding work with Arduino was extremely easy. All I had to do was create an integer for the sensor value coming from the analog zero pin. Then, once having written it as a sensor Value, and sent to Processing is where the more difficult coding comes around.

In Processing, I first had to load the photo, and make sure the serial.list was the correct port number in order that the values coming from the Arduino are sent correctly. Once the value being sent in was correct and the image loaded, then all I had to do was take the value and apply them to the image somehow. I then decided to take the class example of getting the colors from the pixels and instead of using a random value for the height and width of the circles for each loop through the draw function, I changed it to allow the value from the potentiometer control the height and width of the circles.

My end product is an interactive image that you can pixelate and clarify with the turn of the potentiometer.

Code

Arduino

void setup() {
Serial.begin(9600);
}

void loop() {
int sensorValue = analogRead(A0) / 4;
Serial.write(sensorValue);

// too fast communication might cause some latency in Processing
// this delay resolves the issue.
delay(10);
}

Processing

PImage myPhoto;

import processing.serial.*;

Serial myPort;
int valueFromArduino;

void setup() {
size(500, 500);
myPhoto = loadImage(“moonlight.jpg”);

printArray(Serial.list());

myPort = new Serial(this, Serial.list()[ 1 ], 9600);

}

void draw() {
image(myPhoto,0,0,width,height);
for (int i=0; i<255; i++) {
int size = valueFromArduino;
int x = int( random(myPhoto.width) );
int y = int( random(myPhoto.height) );
color c = myPhoto.get(x, y);
fill(c);
ellipse(x, y, size, size);
while ( myPort.available() > 0) {
valueFromArduino = myPort.read();
}
println(valueFromArduino);
}
}

Media

Reflection about the ways technology was used in my project.

After reading, Computer Vision for Artist and Designers, I genuinely feel more educated on the upbringings of various computer programming systems and how their evolution from strict utilitarian purposes to more widespread use has allowed students and artists to invest in their application on a more creative spectrum. Seeing all of the example projects coming from such early years when I thought none of this would have been possible has shown me a lot about the progress of technology. Progress is not only inventing something more complex and intricate, but it is also allowing what is available to the few become available to the many. And this latter form of progress has allowed me to create what I created today. Using such program as Processing as well as physical components, to create such a unique distortion of the image that every participant can leave their mark on is an accomplishment one doesn’t realize when they’re in the midst of coding. By realizing the history of what we do, can we only understand the reality of the present. And I think it is amazing that even through my eyes, what is seemingly such a simple technology has such a complex history and I am able to take what is present and create something entirely new, by combining Processing, Arduino, and my own creative capacities.

Recitation 9: Final Project Process by Kyle Brueggemann

Step 1

Guess the Picture

This two-player game idea by Lana involves multiple rounds of gaming where there is a blurred image displayed on the screen. Each player will have 3 different buttons, each with a different answer choice, that they can press in order to guess what the picture is showing. The coding will allow new categories and images to appear to always keep the game interesting and ensure a unique gameplay experience for people of all ages.

I believe this game involves a healthy amount of interaction between the two players, as they are encouraged to compete against each other and gain the best score between them both. My suggestion for this project to ensure there is enough interaction between human and machine is to make sure that there is adequate response coming from the computer showing the different players scores and what they have gotten wrong/right. This will allow the players to respond and put in more effort based on the values of their scores. I also believe this project could benefit if it had a deeper meaning for its users.

Bottlecap Recycling Game

This game designed by Santi is about recycling plastic bottle lids as well as promoting the importance of recycling in the sustenance of our earth. A 3d model of the earth with various sized holes will rotate along the axis of a motor. The players will attempt to throw plastic bottle caps through the holes in the earth as it rotates. The players will then gain a certain amount of points based on the hole that they threw the bottle cap through, and for every point gained, a visual model of the earth will rotate such degrees. Once the earth has rotated a full 360 degrees, then the players would have won the game.

One of our suggestions was to make a marking on the rotating globe as well as a scoreboard so the players can gauge how many points they have scored as well as how far they need to continue. Another suggestion is to make the game timed so there is a sense of challenge and urgency for the players. A final suggestion is to make sure the point values given for each bottlecap thrown are high enough so that the players aren’t throwing hundreds of bottlecaps before reaching the desired score. Overall, this game shows a very good level of interactivity as it evokes serious topics through engaging games.

Simple instrument

This interactive musical instrument by Daniel is an easy-to-learn electronic musical device that changes volume and pitch based on the interaction with different sensors. The volume of the air blown will trigger a pressure sensor whose values will control the volume of the instrument. One’s hand movement will control motion sensors that can control the pitch of the instrument. This design of an interactive instrument will allow anyone who has had an interest in music but has never had the opportunity to express their interest to take advantage of the easy interface and create music. This will allow interaction with this instrument to create the sound that the user wants. And with greater skill level, they can use it to express the exact musical melody they desire to. The interaction is prevalent as the user will play with the instrument, and the instrument will then output a sound, and then based on that sound the user will play with the instrument some more. This involved interaction between human and machine but also human and human as the user can create music for others to enjoy.

A unanimous piece of advice given for this project is to make sure that there is a consistency in the tone of the musical device. It is important that there are caps put on the ranges so extremely loud and high pitches, as well as volumes, are excluded from expression. This is beneficial not only to boost the overall appeal of the instrument but to also give leeway for those who are just learning to use a musical instrument for the first time.

Step 2

Spacetime Symphony

A piece of valuable advice given by my peers is to make sure that there is a consistent theme with the visual and audio components. I totally agree with this as I believe a consistent theme will glue the entire project together and allow for the users to best experience the interaction between music and art.

Another piece of advice given is to make sure that the interactions done by the user are noteworthy enough that they will trigger readable responses in the media elements. This is extremely important because, in order for a user to fully interact with something, they must be aware of the effects of their participation in order to be encouraged to fully immerse themselves in the project.

The final suggestion for my project is to find a way to conduct the project in a closed room. I will definitely do this if there are the means possible to treat it like such installation.

All of this feedback is greatly appreciated and I will definitely take them into consideration so this project is as interactive as possible

Final Project Essay by Kyle Brueggemann

Spacetime Symphony

During my research, I concluded that the most effective interactive projects are those that stimulate as many senses as possible. I was very much inspired by teamLab’s installations around the world. teamLab’s exhibits are multimedia interactive installations that bring many people together to experience a unique work of art. I was specifically inspired by their exhibition in Shanghai, Universe of Water Particles in the Tank.

It is a giant projection consisting of animated waterfalls and flowers that change position based on your movement. It utilizes interaction between the self and visual elements, as well as background audio. I would love to build off of their idea and create interaction in which one can interact with physical as well audial elements. To trigger as many senses as possible and also give the experiencer the chance to control what their senses are receiving is an experience of definite interaction. With this discovery, for our project, my partner, Robin, and I want to create an abstract work of visual art accompanied by a corresponding soundscape that allows one to experience the intersection of space and time. This intersection challenges society’s common separation of music and visual art, encourages the exploration of artistic genres, and facilitates the communication of the moment through creative expression. We plan to make both the audio and visual aspects of our project interactive in order to allow multiple people to use teamwork to create a transient work of art. The interactivity and randomization of our project ensures that each viewer will never experience the same thing twice. This encourages intimacy and connection between those who seek to come together and design their own unique memory.

Our project aims to create a connection between one’s self and creative ability. By closing the gap between visual arts and music, one who may be acquainted with one calling but not the other will be encouraged to widen their interest. One who is acquainted with neither will be encouraged to explore their untapped artistic side. We also want to create a connection between the disciplines themselves. This intersection of art and music is rarely approached, except in music videos. However, we want to take this rare approach and add interactivity in order to encourage enthusiasm for its existence. We also want to simply create a connection between such people who come together to interact with this project. The creation of art is something usually done alone, but by giving the opportunity for people to come together and create art as a team will not only produce something entirely unique, but it will also create a beautiful moment for them to remember.

In order to establish this interaction, we plan to create background videos, individual animations, background music, and individual sounds. For the stylization of these effects, we have decided on a futuristic, yet natural theme that incorporates a clean aesthetic and possibly even pixel art. Our color scheme will consist of gem tones and our final product should end up somewhere between abstract and surreal. We plan on incorporating pressure sensors to turn on sounds, tilt sensors to spawn animations, distance sensors to control the pitch of the music, and much more. Our first steps are to mix the audio and create the visuals, as well as start on coding the communication between Arduino and Processing. Then we will establish our background visuals and sync it up with our background music. Once the background effects are established, we will work on incorporating the individual sounds and visuals and also work on linking them up to the various sensors described earlier. For our final project, we plan to use speakers and a projector in order to fully immerse our audience in our creation.

I believe this proposal entirely aligns with my definition of interaction. It encourages not only a two-way street of communication between those who are interacting with our project but also a two-way street of communication between the interactors and the audiovisual effects. Not only will the effects be influenced by a person’s participation in the sensors, but the person will also be influenced by their own creative ability being expressed both visually and musically. This project is intended for absolutely anyone who has an appreciation for the arts, especially those who have not yet found their artistic side but want to test it out. It is also meant for anyone to come together with their friends, or even a stranger, to design a work of art together. I hope that under the circumstances our project is successful, future creators will be inspired by the challenge of creating interaction not only within art but also music. The artistic world is always growing and with the influence of technology, we have even more incentive to create, so I hope not only to bridge the gap between visual art and music, but also technology and the arts.