A Transcendent Journey
Project Description
For our final project, my partner, Celine Yu, and I desired to create a work that allows the viewer to transcend their current physical condition and evoke spiritual thoughts and transformations. We created our work as a medium of expressing deep spiritual concepts and expressing them in a way that is conceivable to a live audience. Our work is revolutionary in the way that it uses audio and visuals to express a concept once previously only expressed through words and ideas.
The spiritual experience we are portraying is one of ego-death and loss, followed by a finding of oneself and the rebuilding of one’s identity from the very bottom-up. It is depicting the confrontation of one’s shadow followed by the subsequent creation of a new identity that further matches one’s identity and a true sense of self.
Within our initial research, we were mainly inspired by Sigmund Freud’s concept of the human psyche and its personality. We wanted to show the battle between the super-ego and the id and how when consistently battling with each other, the ego must intervene. Our performance is meant to show the tense confliction between these parts of our identity, and how when they become destroyed, the true ego or self is revealed and this part of ourselves must then choose to build its identity without any implication.
We used the medium of a realtime audiovisual performance to show how the ego would disappear and adapt to its death and eventual resurrection. With our imaginative concepts, we were able to incorporate this with our hallucinogenic imagery and audiovisual storytelling.
Perspective and Context
Our audiovisual performance finds its inspiration in spiritual concepts, however, in order to fully attain its purpose as a work that moves its audience, the concepts must be attainable but not too secret. With such an abstract genre, our meaning definitely will shift based on the viewer’s own personal interpretation, however, one development throughout our project was to make sure that our audio and visuals show the effort of that spiritual transformation.
James Whitney, who drew his inspiration for his audiovisual works from many eastern-philosophical concepts, also went through similar creative processes. As described by William Moritz, “The abstract language of his art became ‘non-objective’ in the special sense of its refusal to view ‘things’ coldly as objects” (2). So in the same essence, I can relate our creative process to Whitney’s, one that must use objects to confirm certain realities, but one that must also use abstract ideas to reveal abstract concepts. The same worries that I had in the creation process also seem to link to Whitney’s refusal to view objects just as objects. His perspective totally reflects our same approach to expressing deep concepts in an abstract sense. Similarly, “As he studied Eastern philosophies, James realized that certain cosmic principles did not yield easily to verbal explanations, but could be seen and ‘discussed’ through the abstract shapes in his films” (Moritz 2). In this same way, I believe our process of evoking ideas through this medium is a modern extension of his beliefs.
In relation to previous problems within the audiovisual field that we have solved with our project, I believe we have attained an amazing level of connection between our audio and our visuals. When describing the mathematics of music, “Many pieces of music may share exactly the same mathematics quantities, but the qualities that make one of them a memorable classic and another rather ordinary or forgettable involves other non-mathematical factors, such as orchestral tone color, nuance of mood and interpretation” (Moritz). A previous artist who struggled with this is Mary Ellen Bute, as in her past works she was “using gaudily-colored, percussive images of fireworks explosions during a soft, sensuous passage–perfectly timed mathematically, but unsuited to mood and tone color” (Moritz). However, I believe that we have evolved upon this problem by separating our audio into many parts, this allows our visuals to be affected by each individual audio, rather than the mathematical output of the entire soundtrack. This adds a layer of complexity to our performance, but it allows us to evolve beyond these problems in the audiovisual field. Another way we work beyond this is by working as a duo, which allows us to personally manipulate the visuals as the performance moves on.
Whether our connection to the rest of the audiovisual world is a shared inspiration and form of expression, or whether it is a way that we have advanced the field, I believe that our work definitely finds connection with other artists in this field.
Development and Technical Implementation
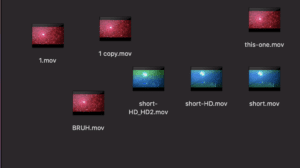
Celine and I split up the workload as I completed the audio, while she found the videos, and then we both worked together with the completion of the patch.
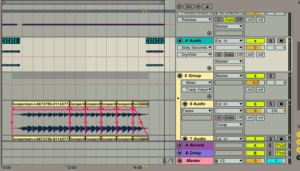
Audio:
For the audio process, I used the system Logic Pro X and experimented with all of the different sounds. I had wanted to split up our project into 5 distinct parts that represent the process of the ego deterioration and then rebirth as follows: excitement, confusion, nightmare, acceptance & peace. For each section, I found certain audios in the music program that matched the vibe of each section of our performance. I then stitched together all of these audios and experimented with how they affect the work’s transformation as a whole. For each section, I made sure to include dramatic transitions to ensure that the audio evokes the story that we were trying to tell.
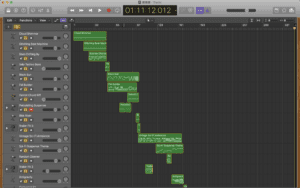
Following, I took out 12 different audio tracks from the main piece that would be individually played by me throughout the performance. This separation of the audio from the main track allowed for the playing of the audio to individually trigger changes in our visuals. The main track plus the 12 separate audios allowed for 13 separate tracks to be played at certain intervals throughout the entire performance. Each track was titled with the exact minute and second counter at which it had to be queued to match up with the main track’s beat.
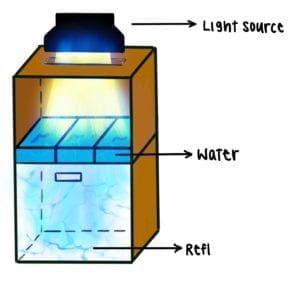
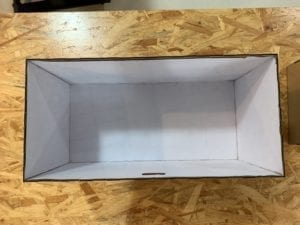
Filming:
For the visual part, instead of starting with a generator effect within our patch, we decided to have a base video that we could then manipulate within our patch. Celine took the role of going around to Shanghai and finding different colorful scenes to film that would be useful for the manipulation within our patch. She ventured to various spots around Shanghai such as the Light Museum, the Bund, and Space Plus.
For our film, we came to the conclusion that we wanted something with a bokeh effect because it would not only give us a colorful movie, but also something that could be easily manipulated into an abstract design for our specific scenes. We wanted something simple enough that it could take on many forms. At the end of the day, we ended up with many different videos, but we decided to incorporate just one due to the fact that our patch was already running quite slow after we incorporated it in.
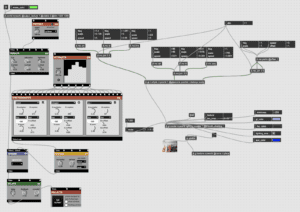
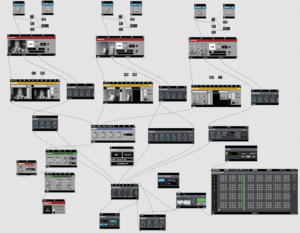
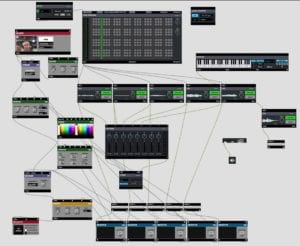
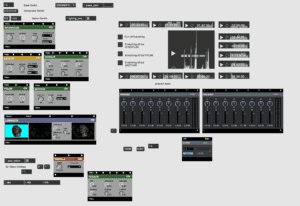
The Patch:
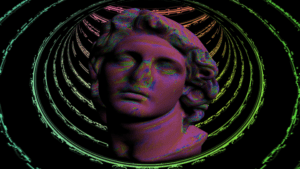
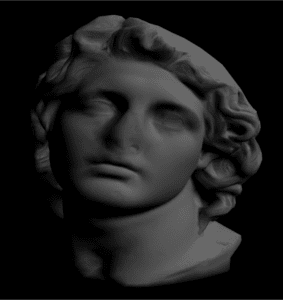
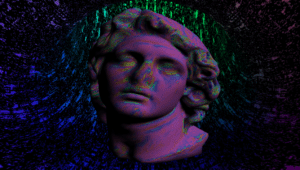
The head:
When working on the patch, the first thing I did was incorporate a background visual, as well as a 3d model that could be placed on top of it. Using a model found online, https://sketchfab.com/3d-models/helios-vaporwave-bust-f7a0fdfc6bef44b497e33257658764c8, I was able to upload it into the patch using the jit.glmodel that was named myworld. We decided upon this head because we figured we could move it in many ways throughout the experience to replicate the emotional process that one would go through should they experience ego death. I then set the model in the very middle of the patch and was able to connect different loadmess objects to its placement values so that when we load the patch in it will be correct every time. We had some issues with uploading the head at first because we could not implement the texture correctly, but after finding out the issue that we need to name the texture correctly and source it from the right file folder, it worked amazingly.

In order to spice up our 3d model even more, I came up with the idea to animate its texture as a forever changing rainbow. In order to do this, I connected the head texture file to a husalir, which had a twiddlr connected to it, then the output of the husalir would be sent to the jit.gl.texture object. The input of this effect allowed us to turn off and on the head’s color-changing effect.
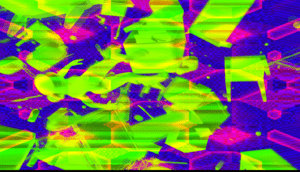
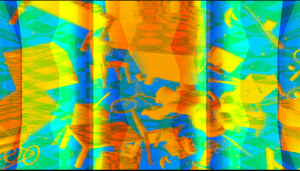
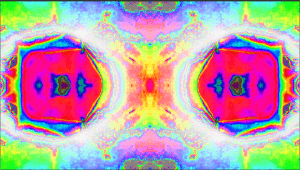
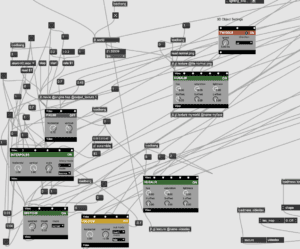
The background:
Using the video that Celine filmed, we figured out how to convert it into the HAP file after many sessions of trial and error with the AVF Batch Converter. Once the video was able to be uploaded without slowing down our FPS too much, Celine then took on the role of experimenting with different Vizzie modules in order to find the most desired effects for manipulating the video. After her experimentation and consulting with me, we decided to use the pixl8r, interpol8r, sketchr, kaleidr, and husalir. Once experimenting with these for a long time, we found the best combinations of each Vizzie module that gave us the effects we desire most. Another thing that occurred during our manipulation of the video is that we felt that it was too fast, so we manipulated the speed of the original video. This was accomplished by adding a rate $1 message to our jit.movie object and then attaching different messages to the rate $1 that would allow us to slow down the movie as well as speed it up if needed.
The Tunnel:
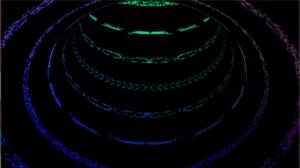
I brought up with Celine that we had a beautiful background, but the patch could use a bit more going on, especially if we are going to have multiple scenes. I came up with the idea of creating a generated animation within the patch in addition to the background video and the head 3d model. After playing around with the jitter program, I came up with the idea of using a torus, but rather placing the perspective of the audience as being inside the torus, and then having it rotate on its axis as if the audience was traveling through a never-ending tunnel.
It was quite difficult to get the perfect positioning of the torus animations in order to achieve this tunnel effect, but once we achieved it, we were quite satisfied. In order to even further enhance the experience of the tunnel, we connected our original background output to a jit.gl.texture object which would be named the texture of our tunnel. This allowed us to add amazing visuals to the tunnel as well as have a lot of ability to manipulate its visual effect throughout the performance.
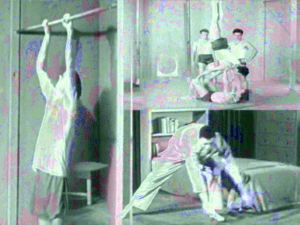
Combining the background, head, and tunnel:
Using a lumakeyr module, we then combined the 3d head model as well as the manipulated video, the lumakeyr allowed for us to fade the head in and out of the main background video. However, we then wanted to be able to switch between the main background video and the tunnel animation. We originally had an xfade Vizzie module with both the background video and tunnel animation connected to it, but for some reason, this made our patch crash quite frequently. Our professor then helped us out by replacing our xfade module with a “prepend param xfade” object. This allowed for us to create the effect of the xfadr module without actually incorporating the entire module into our patch. For some reason, this change allowed for our patch to run much smoother.
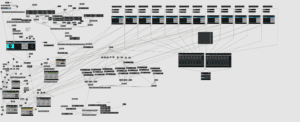
Audio in Patch:
In order to add all the audio into the patch, I added the 12 different audio tracks as well as the main audio track, all connected to 2 different pan mixers, and then sent to a stereo output. I also added an audio2vizzie object as well as a smoothr object for every single individual audio file that we had. This is important for the implementation of our audio files allowing our visuals to move.
Audio to Visual:
As I had made a lot of the creative decisions in the design of the visuals, Celine took on the responsibility of deciding which audio would affect which visual throughout the patch. The process was one of trial-and-error, connecting a lot of the audios to individual Vizzue modules and taking note of their effect.
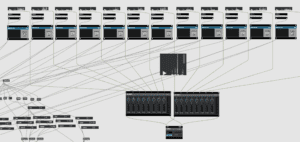
During this process, our patch became quite messy and complicated because we had many wires going all the way from our audio tracks to the Vizzie components on the whole other side of the patch. One main difficulty was noting how each visual component would be turned on and off by the trigger of the sound values. We had to make sure that the certain transformation of visuals that occurs from the sounds being triggered is, in fact, going to genuinely affect our overall output. This is due to the fact that many Vizzie modules would be turned on and off throughout the performance, as they would be affected by other sounds that were played. In order to fix this, Celine came up with a genius solution to create 1 and 0 messages which would be triggered by the various audios. This allowed for us to make the audios trigger the turning on and off of certain Vizzie effects as needed throughout the performance.
Once this process was completed, our patch was quite complicated, but thankfully presentation mode came to our rescue and allowed us to create a screen with only the essentials of our performance.
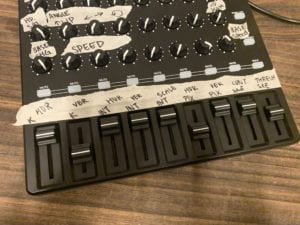
MIDI Board:
As I would be controlling the audio and certain visual effects from the computer and Celine would be controlling the MIDI board throughout the performance, she set up the MIDI board to certain effects that she wanted to alter throughout the performance. She had the MIDI board connected to the lumakeyr module so she could fade it in as well as the different movement values connected to the head. She also had it connected to the xfadr which switched between the tunnel visual and the background video.
Performance
Due to us being not able to find a MIDI board that we could practice with until very late, the amount of time we had to practice our performance all the way through was definitely not as long as I had hoped, but we managed to pull off our performance very well. During our practice sessions, we made many decisions about when to fade in the head, when to add color to the head, as well as when to switch between the tunnel visual and the background visual. During our practice, we helped create a checklist of the things that we wanted to alter throughout our 10-minute piece in order to follow the storyline of the audio.
For our performance, I had my phone open in order to play the stopwatch so we would know when to cue certain effects, while Celine had her phone open in order to display the cues that would be needed. During the performance, we both took big roles as Celine would fade and play with a lot of the visuals as well as control the movement of the head, while I played all the sounds as well as controlled the speed of the video and controlled the heads movement.
Everything went amazingly during our performance. We had a few moments where we were not entirely synchronized, but none of these small mistakes were obvious enough to affect the overall outcome of our performance. Everything worked perfectly and all of our visuals reacted in the way we desired, it was just at times we could have been a bit more punctual. I believe with more practice throughout our entire performance, we would have been more familiarized with the different transitions more and more able to play them at the exact right time.
Overall, I think Celine and I worked very well during our performance, I felt really in touch creatively with how we were expressing ourselves through our audiovisual performance and I believe she felt the same way. We were quite nervous at first buy my confidence definitely built up as the performance went on.
Conclusion
I believe that this truly was the best outcome for our project. Ever since our planning stage, we have made a few changes to our final output, however, the essence of our project has stayed the same. From our initial proposal as well as our trial performance, we were advised to make certain changes such as minimalize the number of scenes we had as well as do more with the head as to not reveal everything to the audience right away. We took all opinions into great consideration by not including too different elements, but rather taking a smaller number of elements and making them more interactive during the performance. Also with the appearance of the head, we had originally planned to have it in sight during the entire performance, but after our professor’s suggestion to not reveal it right away, we came together and found the best transitions to fade our head in or out, include color, and to have it move around, that best fit what our original story intended to portray.
The way we divided the work in our project worked perfectly was I am more versed with audio creation, and Celine is more versed with filming. Once we created our individual parts, we were able to come together and create a beautifully intricate, however extremely messy max patch that accomplished basically every effect we learned in the class. I was extremely satisfied with how we were both dedicated to producing the most beautiful and thought-provoking outcome of a project as it allowed us to put on a performance that I’m very happy with. Regardless of a few timing issues, we were able to do everything we wanted with the patch seamlessly, even if we were a bit on edge during our performance.
Our ability to work together is amazing and I knew we’d work together based on our past success working on the Communications Lab final project together. Both of our strengths and weaknesses really balanced each other out throughout the entire creative process.
Regarding the emotional meaning behind the work, I believe we were truly able to portray the meaningful spiritual transformation that comes with ego death and the building of identity that follows one’s loss of ego. Through all of the visual effects and transitions, accompanied by the story told through the audio, I hope our audience was also able to feel the story of our work.
Regardless of a few stressful moments and some minor flaws in our performance, I’m entirely happy with what happened at Elevator. I enjoy the nightlife dynamic and to be able to be a part of that was really enjoyable. I believe a few small alterations such as practicing more with the MIDI board and tidying up our presentation mode would have streamlined our process even more, but there never is a perfect project. The overall process from planning, to creating, and then manipulating that was really enjoyable to me and I think this is my favorite IMA project I have done so far.
I am grateful to have taken this IMA class and completed such an intensive project because it has really allowed me to realize an art form that I didn’t even know existed. This art form is now my favorite form of expression and the completion of this final project has given me a big insight into what I would like to pursue in the future. Being able to convey such beautiful concepts through imagery and visuals is extremely rewarding for me and I’m glad I was able to share what Celine and I had created with such a special audience. I had a great time with this project and I know that the effect it had on my aspirations will not die anytime soon.
Works Cited
Moritz, William. Mary Ellen Bute: Seeing Sound, The Museum of Modern Art/Film Stills Archive.
Moritz, William. “Who’s Who in Filmmaking: James Whitney.” Sightlines, Vol. 19, no.2, 1986.