Week 13: What If U Re Beauty(Final Documentation) – Jinzhong

Name

What If U Re Beauty (BeautyMirror)

GitHub

https://github.com/NHibiki-NYU/AIArts/tree/master/Final

Source

Proposal | PaperPretrained ModelPresentation

Tech Specs

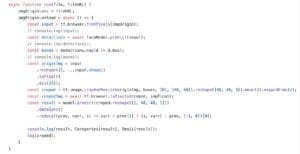
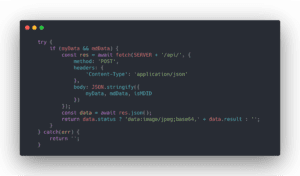
In this final project, I mainly separate the work into two parts:

  • backend: to be in charge of computational jobs and static servers.
  • frontend: to interact with the user, take the picture, send it back to the server, and display the result of the GAN network.

So, the pipeline of the whole steps are:

  1. The frontend takes a photo by webCam
  2. The frontend process and compress the image at frontend and post it back to backend
  3. The python server receives the image and transfers it to numpy matrix
  4. The python server passes the matrix as input to TensorFlow backend and gets the result
  5. Again, the backend server transfers the output matrix to image and encode it to base64 string as a result for frontend request
  6. The frontend gets the base64 image and displays it on canvas

Development process

Firstly, I used a method navigator.mediaDevices.getUserMedia to create a context to activate WebCam. Then, I create a <video /> element and set its source to the context. The realtime camera should be displayed on the screen.

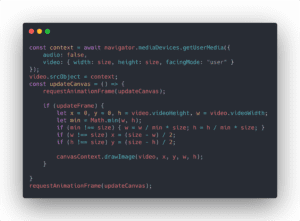
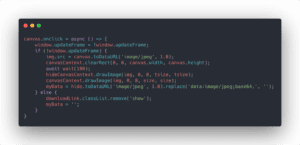
After that, by using canvasContext.drawImage(video, x, y, w, h);, the video frame could be extracted to the canvas. When the user clicks, we only need to pause the update of the canvas and send the image on canvas to the backend server.

Obstacles

There are many problems when I want to publish the demo to the world-wide-web.

Unable to connect to HPC

Since HPC in NYU Shanghai does not have a static public IP address, it is not possible to access the machine directly from the outside part of the NYU network. So, I need to find a way to break this NAT environment. There is an open-sourced software called ngrok, which allows users to run client mode on their NAT server and run server mode on their host server which has a public IP bind on it. When the user requests the IP address via the host server, the host server will connect the NAT server through the tunnel. The users, therefore, have access to content on the NAT server without a public IP.

Link To: ngrok

WebCam only be allowed on https

Another obstacle is the WebCam can only be launched on https (Http over TLS). So, I use letsencrypt to issue a certificate for a domain. (I used my own domain in this scenario, but we can also use those public domain services like nip.io or xip.io)

When got certificates and keys from letsencrypt, we need the file privkey.pem for the private key and fullchain.pem for the certificate. The flask server can be start like this

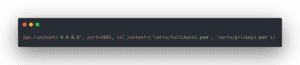
Now the server should be started at :3003 with https encrypted.
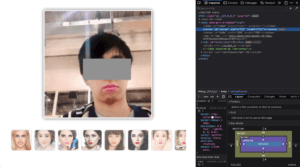
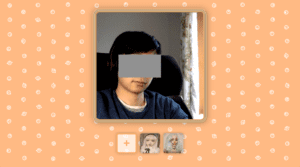
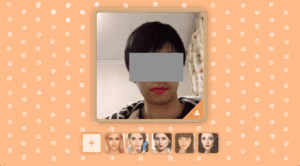
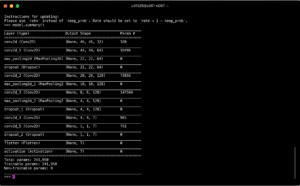
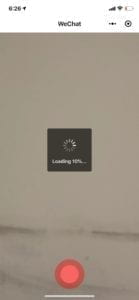
Screenshots

Week 12: Final Proposal – Jinzhong

Name

BeautyMirror

Source

Paper: http://liusi-group.com/pdf/BeautyGAN-camera-ready_2.pdf

Pretrained Module: https://drive.google.com/drive/folders/1pgVqnF2-rnOxcUQ3SO4JwHUFTdiSe5t9

Presentation: https://docs.google.com/presentation/d/1DKCaDpAfye6AF4DmrT1d3hjaJCn3PrIQfMcUBAmh2-A/edit?usp=sharing

Inspirations

Nowadays, there are lots of beauty cams in the market that can beautify user’s portraits (transfer the style of makeups) and outputs a better-looking photo than the original one. However, users can either have limited options to select preset models or manually set some abstract configurations described by jargon. These configs indeed guarantee the quality of outcomes, and yet they limit the creativity. The face can be a very personal thing and should be customized based on users’ will.

So, here comes the BeautyMirror, a GAN network by Tsinghua University that extracts makeup features from a face in one image as a model and transfer the makeup style of the input image. The network will detect some feature points of faces, for example, the style of the nose, lip, eye shadow, etc.

The advantage of the project is that by utilizing the power of GAN, the users can change their face style to any portraits they upload which gives the users more freedom when experiencing the project. The challenges are also lying on the ground that I need to be cautious when selecting preset models(images) that have an impressive impact on users.

Demo

Week 11: Training Deepdream – Jinzhong

The assignment for this week is to play around DeepDream, a GAN network to transfer the style (or pattern) of an image, for example, this one:

WORK

There are 5 parameters that are customizable in the step of generation in total. These are:


octave_n = 2
octave_scale = 1.4
iter_n = 15
strength = 688
layer = "mixed4a"
 
And today I am going to talk about my research and understanding of these parameters, as well as my tests and experiments.
 

octave_n

– Test Range: [1, 2, 3, 4, 5, 6]

– Test Outcome:

Form the test we can see the parameter determines the depth of deep dream. The larger octave_n becomes, the deeper the render/transfer process will be. When it is set to 1, the picture is only slightly changed, the color of the sheep remains almost the same as its original source. However, when the parameter becomes larger, the contrast colors become heavier and the picture loses more features.

octave_scale

– Test Range: [0.5, 1, 1.5, 2, 2.5, 3]

– Test Outcome:

This parameter controls the scale of the deep dream. Although the contrast colors are not as heavier as the first parameter octave_n, the size of each transfer point scales and affect a larger area. So, we can see from the last picture, the intersections of several transfers are highlighted.

iter_n

– Test Range: [10, 15, 20, 25, 30, 35]

– Test Outcome:

This parameter controls the number of iteration of the deep dream. In other words, it determines the times of image processing. When the number is smaller, the output woulld be more similar to its original input. When the number becomes larger, the output would be more ‘deepdreamed’.

strength

– Test Range: [300, 400, 500, 600, 700, 800]

– Test Outcome:

The strength determines the scalar condition of each deep dream process. As we may see from the pictures above, the 6 transforms of the original picture are almost the same while only differ in the strength of colors (patterns). The higher strength outputs the sharper result.

layer

– Test Range: [“mixed3a”, “mixed3b”, “mixed4a”, “mixed4c”, “mixed5a”]

– Test Outcome:

The layer gives different patterns of the deep dream. It is also the pattern GAN used to train. So, each pattern would render different shape of DeepDream.

Week 10: Training StyleTransfer – Jinzhong

TRAINING

In this week’s assignment, I am going to train a styleTransfer model for ml5 on devCloud. I select an image from the Insider. Using Skittles to draw the portraits of people. This work of art binds people’s mentality with materials and soul, which creates huge visual and social impact.

In this training assignment, I am going to train a style transfer network using one of the portraits to let it transfer camera rolls to the art expression. So I follow the instructions in the slides and set up the environment on the devCloud:


$ # Create SSH connection with devCloud
$ ssh devCloud

$ # Clone the training code from GitHub
$ git clone https://github.com/aaaven/train_style_transfer_devCloud.git
$ cd train_style_transfer_devCloud

$ # Set up virtual environment and training image
$ conda env create -f environment.yml
$ sed -i 's/u24235/u31325/g' train.sh
$ sed -i 's/styletransferml5/styleTransfer/g' train.sh
$ sed -i 's/zaha_hadid.jpg/train.jpeg/g' train.sh
$ curl -L https://image.insider.com/5cb7888866ae8f04915dccc8?width=2500&format=jpeg&auto=webp -o images/train.jpeg

$ # Start training
$ qsub -l walltime=24:00:00 -k oe train.sh

The instructions above are the essential ones that extracted from the original slides to simplify the set-up process. After submitting the job, we can run qstat to check out the training process. It usually shows like that:


Job ID Name User Time Use S Queue
------------------------- ---------------- --------------- -------- - -----
410873.v-qsvr-1 train.sh u31325 07:16:30 R batch

Indicating the training is still on the go. If the result of the command shows nothing after hours of wait, the training process is done, and the model can be extracted from devCloud:


$ # On my own laptop
$ scp -r devcloud:/home/u31325/train_style_transfer_devCloud/models myModels

And the model is saved to the local path under myModels folder.

TESTING

The next step is to load the model in ml5js and let if transfer the style of images. I followed the instruction here

Indicating the training is still on the go. If the result of the command shows nothing after hours of wait, the training process is done, and the model can be extracted from devCloud:


const style = ml5.styleTransfer("myModels/", modelLoaded);
function modelLoaded() {
  style.transfer(document.getElementById("img"), function(err, resultImg) {
    img.src = resultImg.src;
  });
}

The JavaScript code will load models from the previously copied folder and run styleTransfer after the model is completely loaded.

RESULTS

I transferred some pictures and get the following results:

Week 07: Mojisaic (Midterm Progress) – Jinzhong

GITHUB: https://github.com/NHibiki-NYU/AIArts-Mojisaic

INTRO

The project Mojisaic is a WeChat mini-app that can be launched directly in WeChat by a QRCode or link. The nature of WeChat mini-app is a hybrid app that displays a webpage but has better performance and higher permissions. With the help of WeChat mini-app, the ‘web’ could be started in a flash and act like a normal app. By using TensorFlowJS, Keras model can be converted and loaded on the web client. So, we can keep the power of HTML/CSS/JS as well as the magic of machine learning.

PROCEDURES

1. Train the model

Firstly, I used a VGG like structure to build the model that detects emotion on one’s face.

Then, I find a dataset on kaggle, a data collecting and sharing website.

https://www.kaggle.com/c/challenges-in-representation-learning-facial-expression-recognition-challenge/data

The dataset contains 28,709 samples in its training set and 3,589 in its validation set and testing set. Each sample consists a 48x48x1 dimensional face image and its classified emotion. There are totally 7 emotions that are labelled – Angry, Disgust, Fear, Happy, Sad, Surprise, and Neutral. With the help of this dataset, I started the training on Intel devCloud.

I run the training for 100 epochs and reaches 60% accuracy of emotion classification. According to the author of the previous model, the accuracy of training result lies between 53%-58%, so 0.6 is not a bad outcome.

2. Convert the model

Since I want my model to be run by JavaScript, I cannot use the model trained by Python/Keras directly. There is a tutorial on TensorFlow website about how to convert Keras model to TensorFlowJS format:

https://www.tensorflow.org/js/tutorials/conversion/import_keras

After I converted the Keras model to the TensorFlowJS model, I created a webpage and try to run the model on the web first before I step forward to WeChat mini-app.

I wrote a script to detect the emotion of people in the image that the user chooses to upload from the web interface, printing out the emoji of the emotion.

3. Journey to WeChat MiniApp

As I mentioned previously, WeChat mini-app is built with JavaScript so ideally TensorFlowJS can be used in the app. However, the JavaScript engine is specially customized by WeChat developers so that the library cannot perform fetch and createOffScreenCanvas in WeChat mini-app. Fortunately, a third-party library on GitHub helped in this case.

https://github.com/tensorflow/tfjs-wechat

It is a plugin for mini-app that overrides some interfaces in TensorFlowJS to make it act normally (although not good enough). In the WeChat mini-app, I use WebCam to detect the user’s face in real-time and place emoji directly on the face. By hitting the shot button, the user can save the image or send it to his/her friends.

OBSTACLES

There are mainly 2 obstacles when I made this project. 

First, old model conversion problem. When I want to extract faces from a large image, I use a library called faceapi to run its built-in model to locate faces. However, the WeChat TensorFlowJS plugin cannot support faceapi. So, I should either convert its model to normal TensorFlowJS model or modify the code directly to make it support WeChat API. After countless failures of converting old TensorFlow layer models, I surrendered and chose to modify faceapi source code. (Although it took me nearly 3 days to do that…)

Secondly, the plugin in WeChat mini-app is not perfect enough – it does not support worker in its context. So the whole computational process needs to be done in the main thread. (that’s so exciting and scaring…) Although WeChat mini-app is integrated with 2 threads – one for rendering and the other for logic. The rendering part does not do anything in fact – there are no data binding updates during the predicting process. So all the computational tasks (30 fps, about 30 face detections, and emotion classifications) make WeChat crashes (plus the shot button not responding). The temporary way to solve it is to reduce the number of predictions in one second. I only do a face detection every 3 frame and emotion classification every 15 frames to make the app appears responding.