Recitation 7: Functions and Arrays (November 6, 2019) by Jackson McQueeney

In step 1 of this recitation, I drew a single object.
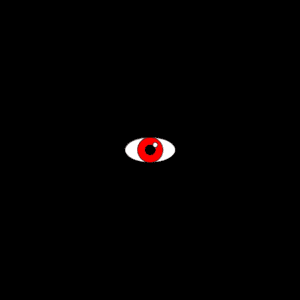
In step 2, I wrote a for loop to draw the same object 100 times. When that for loop was in the setup(), it did this:
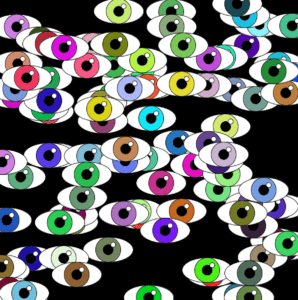
When the same for loop was in the draw(), it did this:

In step 3, I stored the data for the locations of the objects and their color in arrays. I did not store the data for the size of the objects as arrays, because I wanted the objects to all be of the same size. 

In step 4, I made each object able to move independently of one another, and they “bounced” when they hit any side of the canvas. The following video shows the final product of the code:

And the final code: 

int NOI = 100;

float x = 100;
float y = 50;

color[] c = new color[NOI];

float xspeed[] = new float [NOI];
float yspeed[] = new float [NOI];
float[] xloc = new float[NOI];
float[] yloc = new float[NOI];

void setup(){
size(600, 600);
background(0);
for(int index = 0; index < NOI; index++) {
  xloc[index]=random(width);
  yloc[index]=random(height);
  c[index]=color(random(255), random(255), random(255));
  xspeed[index]=random(-3, 3);
  yspeed[index]=random(-3, 3);
 }
}

void draw() {
  fill (0);
  rect (0, 0, height, width);
  for(int index = 0; index < NOI; index++) { 
  display(100, 50, xloc[index], yloc[index], c[index]);
  xloc[index]=xloc[index]+xspeed[index];
  yloc[index]=yloc[index]+yspeed[index];
  if (xloc[index]>width || xloc[index]<0){
    xspeed[index]=-xspeed[index];
  }
   if (yloc[index]>width || yloc[index]<0){
    yspeed[index]=-yspeed[index];
  }
  } 
 }

void display(float x, float y, float xloc, float yloc, color c) {
  fill (255);
  ellipse (xloc, yloc, x, y);
  fill (c);
  ellipse (xloc, yloc, x-50, y);
  fill (0);
  ellipse (xloc, yloc, x-80, y-30);
  fill (255);
  ellipse (xloc+10, yloc-10, x-90, y-40);
}

Question 1:
Having the for loop in setup() made each object draw just once. Having the for loop in draw() made each object redraw constantly over previous objects, resulting in the attached video under step 2.

Question 2:
Arrays allow you to create and store a large number of objects in a code. A project that required a random selection among and the storage of many objects would benefit from the use of arrays, as in this project, where arrays were used to store color data as well as x and y location data.
Final Project: Proposals (November 14, 2019) – Jackson McQueeney

1:  Digital SCUBA Mask Interface
Traditional SCUBA gear includes a series of gauges and sensors to measure things like depth, water pressure (in atmospheres), and remaining air in the cylinder. These gauges are attached to hoses that connect to the user’s buoyancy control device (BCD), and are sometimes cumbersome, especially in extreme diving conditions. This project would streamline the equipment by displaying all of this important data directly on the mask in a non-obstructive way. It goes without saying that the target audience for this product would be divers, ideally making it easier for the user to focus on the experience of diving rather than constantly checking all of their measurements. 

2: WorldBook
This project would be an interactive world map containing data about every country from the CIA World Factbook. This data could include things like political systems, religions, languages, population, and other metrics. The target audience of this project could be made as an early learning experience for children. Ideally, the map would consist of physical components, that, when activated, would display the data on a digital interface. One challenge with this idea is facilitating continued interaction between the user and the machine, or in other words, making the jump from reactivity to interactivity.

3: Pianote (Continued)
This project would be a continuation of my midterm project, which was a piano that teaches the user to play “Twinkle, Twinkle” (and ideally other songs, too). Again, the project would include two buttons, one indicating a free play mode and the other for a learning mode. Free play mode is self explanatory, and learning mode would prompt the user with a sequence of notes, giving positive feedback for correctly-played notes and reprimands for incorrectly-played notes. One of the major critiques of the midterm version of this project was that too much of the instruction was in through the medium of the serial monitor. To mitigate this, the updated version would indicate correct notes using LEDs. Also, in order to have more authentic-sounding notes, this project would utilize .WAV files stored in Processing, rather than the buzzer notes used in Arduino. 

Recitation 6: Processing Animation (October 29, 2019) by Jackson McQueeney

My first animation was a face that bounced around the canvas. Upon clicking the mouse, the face would change to a random color and assume a random speed and direction. 

Code for the above animation:

float x = 0;
float y = 0;
float Xspeed = 5;
float Yspeed = 5;

float red = 255;
float green = 255;
float blue = 255;

void setup(){
size(600, 600);
background(0);
}

void draw(){
  noStroke();
  fill(0, 0, 0, 100);
  rect(0,0, width, height);
  noStroke();
  fill(red, green, blue);
  ellipse(x, y, 150, 150);
    if(x > width || x < 0){
      Xspeed = -Xspeed;
    }
    if(y > height || y < 0){
    Yspeed = -Yspeed;
    }
  x = x+Xspeed;
  y = y+Yspeed;
  fill (0);
  ellipse (x-20, y-5, 10, 10);
  ellipse (x+20, y-5, 10, 10);
  rect (x-10, y+5, 20, 5);
  noStroke();
}

void mousePressed(){
    red = random(255);
    green = random(255);
    blue = random(255);
    Xspeed = random(20);
    Yspeed = random (20);
}


The next part of this recitation was to create a circle that periodically shrinks and grows, that smoothly transitioned between colors, and moved according to arrow key input:

(Using arrow keys during the screen recording caused the recording window to move around rather than the circle, but the arrow keys work without the screen recording)

The code for the above animation:

float chud= 100;
float chudspeed = 5;
float xloc = 300;
float yloc = 300;

float c;

void setup() {
  size(600, 600);
  smooth();
  colorMode(HSB);
}
 
void draw() {
  background(255);
  
  noStroke();
  if (c >= 255) c=0;
  else c++;
  fill(c, 255, 255);
  ellipse(xloc, yloc, chud, chud);
  noStroke();
  fill(255);
  ellipse(xloc, yloc, chud-75, chud-75);
  chud = chud + chudspeed;
  chud = chud + chudspeed;
  
  if (chud > 600){
   chudspeed = -chudspeed;
  }
  if (chud < 75){
   chudspeed = -chudspeed;
  }
}

void keyPressed() {
  if (key == CODED) {
    if (keyCode == UP) {
      yloc = yloc - 5;
    } 
    else if (keyCode == DOWN) {
      yloc = yloc + 5;
    } 
    else if (keyCode == LEFT) {
      xloc = xloc - 5;
    } 
    else if (keyCode == RIGHT) {
      xloc = xloc + 5;
    } 
  } 
}

During this recitation, I learned how to make an object continually function according to its constantly updated locations. I also learned how to change an object’s color based on user input, and how to use keyCode in general. Some of the most interesting functions I used were colorMode and keyCode.

Final Project: Preparatory Research and Analysis (Nov. 7, 2019) – Jackson McQueeney

  1. Fito Segrera’s The Form of Becoming is a project at the Chronus Exhibition consisting of a string on top of 50 arms controlled by motors. The project runs on a code that continuously attempts to straighten the string by moving each motor, raising or lowering its corresponding arm. It seems that the machine somehow detected tension on the strings, and adjusted accordingly. From my point of view, I don’t think this project was interactive at all, or even reactive for that matter, since it executed its function regardless of the inputs of a human actor. In this regard, this project was not very different from an art piece in a traditional exhibit, like a sculpture or a painting, in that it was purely visual.
  2. The first piece I researched is called TAMI, which stands for “Tangible Mathematics Interface”. This project aims to teach the user basic trigonometric principles using the user’s inputs. The device’s intended audience is students who struggle with math, since it visualizes mathematical concepts in a more tangible way than a traditional classroom. A teacher facilitates the communication between the student and the machine by teaching the student some basic concepts, with which the student translates into visual representation using TAMI. The device is interactive, by my definition, since the student gives mathematical inputs, which the device translates into visual outputs. Additionally, there is another layer of interactivity in the teacher, who provides the student with more potential inputs. The student optimally learns from TAMI’s outputs. 

    Next, the bomb is what the creators describe as “an immersive film, music, and art installation that puts viewers at the center of the story of nuclear weapons”. The project is designed to put the viewer in the center of nuclear history, particularly the Cold War era, using intense visual and aural experiences. Like The Form of Becoming, I don’t see this project as interactive or reactive, since the only communications are screens and speakers communicating an especially immersive film to a passive viewer.
  3. In my previous definitions of interaction, I described it as the communication of two or more actors through the medium of inputs and outputs. My first definition that I developed during the research stage of the group project was not very nuanced, only describing interaction as “two actors who respond to and influence each other”. By the time I had progressed to the midterm project, this definition evolved into “communication between two or more actors, including machines and humans, in the form of inputs and outputs”. At this point, I would update this definition to “the communication between two or more organic or machine actors, facilitated by an interchange of inputs and outputs between the actors”. An interactive project is one that facilitates communication between (perhaps more than one) human actor and a machine, which relies on the mutual exchange of input and output between these actors. 

    As I said before, I believe the first project from part B is a good example of interactivity between a human actor and a machine actor (or in this case two humans and a machine). TAMI accounts for the inputs of the student and uses these inputs to generate visual outputs. Additionally, there is interaction between the teacher and the student in the form of basic mathematical instruction. However, both the project from part A and the second project from part B are not, by my definition, interactive, nor are they reactive. The project from part A conducts a series of programmed actions until it achieves a desired result, and then it resets. The second project from part B is really just a film, though it is playing on a panoramic screen with more immersive sound effects. For these reasons, neither of these projects are interactive at all, though they do have artistic value. 

Recitation 5: Processing Basics (October 22, 2019) by Jackson McQueeney


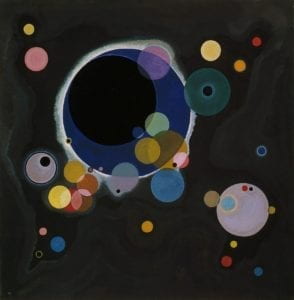
Several Circles (Einige Kreise) 
by Vasily Kandinsky


Kandinsky painted this picture to synthesize “the greatest oppositions. It combines the concentric and the eccentric in a single form and in equilibrium. Of the three primary forms, it points most clearly to the fourth dimension.” I chose the image because while it is made up of only circles, they arranged in a convoluted and confusing way. 

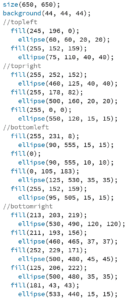
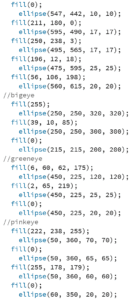
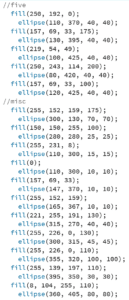
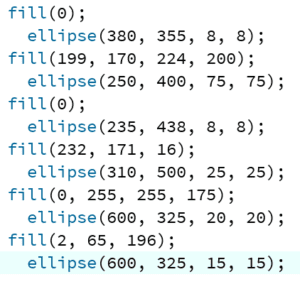
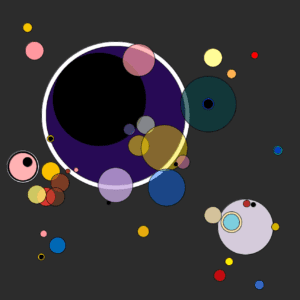
In processing, I wanted to recreate this image as accurately as I could. I started by creating a dark grey background. After that, I just drew whichever circle I felt like drawing. However, after drawing about ten circles, I realized that there were too many circles to keep up with, so I organized the canvas in sections and drew circles in each section. The sections included the top left, top right, bottom left, bottom right, the large blue circle, the medium-sized pink circle, the medium-sized green circle, the five warm-colored circles, and a section of the miscellaneous small circles scattered throughout the canvas. After that, finishing this project was just a matter of generating accurately-sized and colored circles in positions that were accurate relative to the other circles. Originally, I set the canvas to be 600×600, but I later resized to 650×650 because I realized that I had positioned the circles too far apart.

I do think that I was able to mimic the painting pretty well, but I know that the original painting required more technical skill. There were two elements of the original painting that I could not recreate in my sketch, namely the gradient glow around some of the circles and the irregularly colored overlapping sections of the transparent circles. For example, in the original, the overlapping section between a yellow circle and a salmon-colored circle created a pastel pink color, but with my ability in Processing, this section was of a light orange color. One more thing I would have done differently is to include the “noStroke” function on most of the circles. I realized while writing this documentation that I could have avoided the outline on some of the circles, but it was too late to go back and change it. The following image is my version of the painting:

And my code: