On the Way – Serene – Rudi

CONCEPTION AND DESIGN

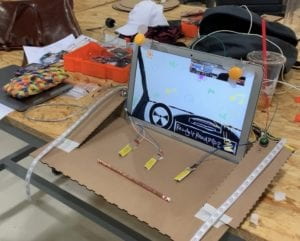
For my project, I intend to focus on creating a driving scene, which originates from the daily driving experience but is different. It is like an interactive driving experience and offer the users imaginative scenes. I hope that the users are able to interact with my project through multiple methods of controlling a car instead of only using the steering wheel. Therefore, I try to apply controllers that are both easy to handle and as creative as possible to my project. For instance, I have used the conductive tape in order to give the users the physical feeling of making a choice by putting the stick under the match (which represents the possible ending plot of this experience). I could use buttons for the users to make choices, but I consider that users might be so familiar with button-controlling games that they will generate the sense that they are playing the game instead of getting immersed in the scene. I also could use keyboards as the controllers. However, as my professor Rudi has suggested, using keyboards keeps reminding the users that they are sitting in front of a computer instead of a car. Thus, we quit using keyboards and built a wooden board to accommodate other controllers while hiding the keyboards.

FABRICATION AND PRODUCTION

The original idea of my project is actually very different from what the project has turned out to be. The first significant step my partner and I have made was about getting rid of unnecessary plots. We first tried to use the story-telling method in our project so that the users would not feel confused when the scenes start to deviate from their experience in real life. However, as we were writing the plots, we found they were kind of endless and led the users to nowhere because we were focusing more on the creation of scenes instead of telling a story. Therefore, we decided to only keep those plots that are necessary for understanding or changing scenes.

Another change we have made to our project was that we abandoned our initial idea of using a real steering wheel as a controller. As our Professor Rudi has suggested, it was hard to stabilize the steering wheel. Also, presenting the steering wheel to the users might falsely lead them to consider our project as a driving game. As a result, we cancelled this idea and turned to other controllers.

During the user testing, we had received lots of advice. I have also learned how to modify the project according to the users’ reactions instead of just listening to them passively. One thing I noticed was that the users tended to press keys and use other controllers even without any instructions showing up. However, our project at that time was still not mature enough for this kind of free exploration and pressing some keys in advance of the instructions might cause the false switch between different scenes. I changed the code so all the controllers will not work unless the users reach certain progress in the driving experience. However, we were still afraid that the users might get disappointed when they found the controllers did not react when they tried to use them. Hence, my partner and I then decided to replace the keyboards with conductive tapes and buttons. Through this, we hope that the users would feel less familiar with the controllers and thus be less likely to use them before they reach certain plots in the interactive experience. Another approach we have made was to add more functions to the physical step. Originally, the step was just for starting the game. However, I found that the users really love the step and would step on it constantly to see the outcome. To adapt our project to the users’ habits, we added more functions to the step and let it become a vital controller of changing scenes on the screen.

What’s more, in the user testing session, I was surprised by the gap between my partner and I as the designers and the users as the audience. Specifically, the users did not like to read long texts. The result was that they seldom noticed the instructions and felt confused about what was happening on the screen. Our according solution was to make the texts larger in size and more concise in the meaning so that the users would easily pay attention to the instructions and take little time understanding them.

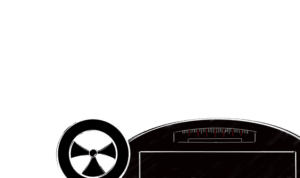
All the changes we have made were based on our ultimate goal of making this project, which was to create an interactive driving experience for the users. That was how we decided what was important to our project and what was relatively not that important and could be abandoned. As it turned out in the presentation and the IMA show, the changes we made did improve the project in the users’ perspectives.
CONCLUSIONS

the goal of our project is to create an interactive driving experience that is different from the daily driving routine both in the part of physical controlling and in the part of driving views. As I define interaction as an illuminator of the continuous exchanging of thoughts among people, our project intends to inspire and encourage people to imagine creatively based on the daily elements. I, as the designer, offering different experiences for the users. The right of choosing what kind of experience they are going to have is in the users’ hands. After seeing what kind of choices the users would like to make, I then get to know how others’ thinking modes are similar to or different from mine. This process of deeper interaction is generated by the interaction offered by our project. However, I still feel that the potential interaction scale we might be able to achieve is limited. For instance, the ways of controlling we have now do not go beyond focusing on certain part of human’s bodies. Pressing buttons is for the fingers and stepping is for the feet. I think these controllers should be more synthesized so that they lead to a comprehensive interaction between the project and the user as whole.

I have learned a lot during the process of making this project. Firstly, the designer should be clear about his/her aim so that all the modifications of the designing has a common theme, which is to better suit the original aim instead of deviating from it. Secondly, it is important to consider the users’ positions. It is important to let the users understand the project and take their feelings into consideration.

The supposed significance of our project is to promote imagination in people’s normal life and encourage them to apply creativeness to their daily routine. Through this, we might be able to find joy, inspirations and a positive life attitude.

Recitation 10: Media Controller by Serene Fan

In this recitation, I have explored how to use controller to manipulate images by combining processing and Arduino. Here is the video.

Here is the code.

import processing.serial.*;
PImage img1, img2;
PShader blur;
import processing.serial.*;

Serial myPort;
int valueFromArduino;

void setup() {
size(1200, 750);
img1 = loadImage(“recitation10.jpg”);
img2 = loadImage(“recitation10.jpg”);
blur = loadShader(“blur.glsl”);

printArray(Serial.list());
myPort = new Serial(this, Serial.list()[7], 9600);

}

void draw() {
image(img1, 0, 0);
image(img2, width/2, 0);
background(0);
while ( myPort.available() > 0) {
valueFromArduino = myPort.read();
}
println(valueFromArduino);
if (valueFromArduino>100) {
img1.filter(INVERT);
delay(1000);
} else {
img2.filter(INVERT);
delay(1000);
}

image(img1, 0, 0);
image(img2, width/2, 0);
}

At first, I did not add the last two lines of the code and every time I ran it the screen went black. Then I figured out that it was because the image will not restore to what they were like. After I added those two lines, if I spin the potentiometer, the image would then started to blink because of the loop. I like this effect but the rate of blinking seemed to be too fast, so I added “delay” to the code.

I found “Computer Vision for Artists and Designers: Pedagogic Tools and Techniques for Novice Programmers” inspiring. Like what is mentioned, the computer vision is gradually getting more accessible to folk programmers, allowing more explorations of interactive media arts using computer vision. People are less restricted by the domination of the keyboard and the mouse when interacting with computers.

I feel that even though what this article is talking about is way more technological than what we have done in our recitation, there is still resonation. For instance, we are also trying to use different physical controllers other than the keyboard and the mouse. Approaching more ways of depicting interaction, are adding more possibilities to their relation with technology. “Techniques exist which can create real-time reports about people’s identities, locations, gestural movements, facial expression, gait characteristics, gaze directions and other characteristics.” Techniques are more and more likely to be an amplification of human expression instead of just a neutral tool.

This is the image I used.

Final Project Essay: Driving into Imagination by Serene Fan

Driving into imagination

Our project focuses on adding joy to people’s daily experience. We intend to focus on those who are too used to the normal driving experience and find it boring. We found many people have experienced a transition of feeling from being excited at driving when they first got license to being bored at it after some time of driving. Therefore, we hope that we might start from imitating a normal driving process to offering an extraordinarily fascinating “driving” experience. I seek to address the challenge of developing a daily routine into an imaginative and story-telling series of scenes, just like what happens in Alice’s Adventures in Wonderland. We suppose the impact of our project could be inspiring people to seek for fun even when they seem to be stuck in repetitive daily life.

Generally, our project aims to design a game that deviates from people’s daily experience and inspires imagination. To be more specific, we plan to put a physical steering wheel in front of the computer screen, as one of the inputs. On the screen, it is basically a road (we plan to draw that and use the “image” function to insert all the drawings) with all the common elements like lights, trees and so on. As the character in the game, who is on the wheel, drives along the road, there will be options for him/her to choose. According to his/her choice, the scene of the road will change, gradually and more and more away from reality. For instance, at first the scene is just a rainy day with a gray sky, but as the audience explore the game further, it might rain diamonds from the pink sky. What’s more, we will use key function to allow the audience to control the basic equipment on the car such as the windscreen wiper or the radio. Similarly, as the game goes further and more choices are made, these keys start to generate unexpected effects like turning on the lights alongside the road. We will draw most of the effects and upload it to processing. For the car radio part, we are thinking about using speakers.

To analyze the needs of my intended audience, I plan to keep asking and inviting people to view my project before I finish it. Through this, they may ask questions, make advice and require different functions. That is how I plan to conduct a small-scale user test constantly.

In the next few weeks, we decide to construct an outline for the whole game in the first week, find the proper steering wheel and figure out how to connect all these circuits. Also, we need to have some idea about how to code it, or at least the structure of the coding. For the next week, we are going to draw all the scenes in details, transform different pieces of music to code and add them to our coding. Meanwhile, we need to perfect the physical design of our project. In the remaining time, we need to keep testing our project and modify it according to others’ advice.

Based on my preparatory research, I first thought about making an interactive platform that can record people’s typing process, which may deliver more information than what they eventually send as message. However, when I try to dig into the planning part, my partner and I found there were some technique problems, as well as practical problems. What if in most cases, people just made typing mistakes randomly instead of modifying or cancelling unsaid messages? And if so, recording will then be less meaningful. That was how the interactive printer I found as an inspiring object connected to my original idea. Meanwhile, I started to reflect on another interactive object I found. Before, I thought Bandersnatch was not innovative at making interactive films. However, I thought it over, I realized that the reason I thought it was not interactive was that Bandersnatch was limited by its form, a film. As I read in the reading about physical programming, the way people interact with computers is limited within the keyboard and the screen. There is really not much Bandersnatch can do in this aspect. This thought helped me generate my second idea about my project. I attempted to add more methods of interacting with the computer, which was why Ning and I considered connecting a real steering wheel in order to create a driving scene. We first thought about using the wheel to control the music channel, but as Rudi has suggested, this connection might be a little confusing to the audience because it did not align with people’s common sense and there was no explicit explanation. Therefore, we changed our idea a little. By producing a story-telling game in which the first perspective is from the driver’s view, we intend to achieve interaction by allowing the audience to control the wheel and changing the scene accordingly with a timeline. We stepped a little further than Bandersnatch by trying to add physical elements to our project (of course, the quality of the content of Bandersnatch should be way better). Also, as I was searching online, I found virtual biking very inspiring. The audience gained a pleasant biking experience without changing his/her position and most of the experience was achieved by the screen. That aligned with my definition of interaction because the product of virtual biking served as s tool for the audience to create an excellent experience themselves. It was also similar to what we wanted to do, but we would like to make our project a less intensive game by adding the story-telling part. By analyzing different choices made by the audience, we present different styles of drawing, different scenes and different kinds of imaginations. Our project, at least as I think, is unique both in the aspect of designing and the purpose behind. By making such a game, combining the virtual experience and physical feeling of driving, we intend to offer inspiration to those who are tired of following daily routines. I am willing to share my imagination by developing the daily scenes into grotesque but fascinating fictions. Also, through this, I intend to let the audience think about how imaginations can lead people to create joy from daily life and get encouragement from it.

After the completion of my project, there must be lots of space to improve. At the point of the very beginning of this project, I could only say that there must be more ways to make the physical feeling of driving more real, maybe by adding more equipment. If this project can be perfected further, perhaps we can put it on the street for passers-by to have a try. It is less possible to make it into a commercial product both because it requires too many physical equipment and it deviate from our original purpose of just offering an extraordinary experience as possible inspiration to other people.

Recitation 8: Serial Communication by Serene Fan

Serial Communication

For this recitation, I practiced how to transfer values from processing to Arduino or from Arduino to processing. I feel it is of vital importance to achieve interaction because interactive designing involves both physical outcome and programming.

Exercise 1: Make a Processing Etch A Sketch

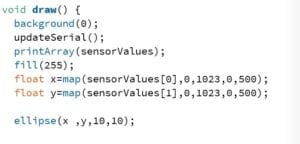
I used the file I downloaded to transfer multiple values from Arduino to processing and made some changes to the code in processing. One thing I paid attention to was that since the screen size is 500*500 while the maximum number a potentiometer can reach was 1023, “map()” function was needed. Another thing was that if I ran the code in Arduino directly, the two values from different potentiometers were not separated. To distinguish the two values, instead of a comma, I set “Serial.println();” just as shown below.

Exercise 2: Make a musical instrument with Arduino

By modifying the code for transferring values from processing to Arduino, I managed to connect processing and Arduino. I used “tone()” function in Arduino to control the buzzer and two parameters of “mouseX” and “mouseY” to adjust the tone of the buzzer. However, to be honest, the sound of the buzzer was still a little ear-piercing. 

Still, I found what I could achieve through transferring values would be really helpful for my project. I might need to find a better way to generate music.

Rec 7: Processing Animation by Serene Fan

The interactive animation I have made👇

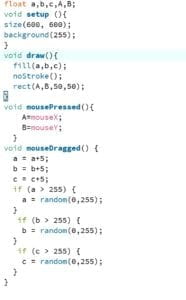
Here is the code:


THE PROCESS:

I wanted to explore more functions of processing, so I started to look for functions that were related to the mouse controlling. I found this interesting function called “mouseDragged”. Basically, every time I drag my mouse, the code then operates. 

Yes, it did seem too simple. Actually, I attempted to achieve the effect that once I created a new rectangle, it would start to bounce around the canvas. However, I was only able to make the latest made rectangle move and the rest of all the rectangles I had created failed to bounce together. 

At first, I thought perhaps I was not using the right function for the effect. I searched in the references on the processing website but found no alternative function. Therefore, I turned to Tristan for help. He told me that I had to use “array” for this kind of effect, which I had not learned yet. The good news is that I am going to learn it next class, so I am looking forward to being able to use this new function.

All the interesting functions I have come across:

random(); a really useful and interesting function to help decide the size, position and color;

ellipseMode(); it helps to position the ellipse ore precisely;

mouseDragged(); the code runs when you drag the mouse, a way to approach interaction;

mouseReleased(); I have considered to combine this with mouseClicked(); to make animation before I found mouseDragged();

Besides, I have tried the recitation homework and here is what I have achieved. 

At first I wrote the code like what is shown below. However, it failed to be what I want. The outside black circle just refused to move without any apparent reason.

At last, I changed the code and it turned out to be like what is shown below.

int a=400;
int b=350;
int speed=5;
int w=300;
int h=300;
int s=5;
int i,j,k;
void setup(){
size(600,600);
}

void draw(){
a=a+speed;
b=b+speed;
background(255);

noStroke();
colorMode(HSB,360);
for (int i = 0; i < 100; i++) {
fill(i,200,100);
}
ellipse(h,w,a,a);

fill(255);
ellipse(h,w,b,b);

if (a>400){
speed *=-1;
}
if (a<100){
speed *=-1;
}
}
void keyPressed() {
if (key == CODED) {
if (keyCode == UP) {
w = w – s;
} if (keyCode == DOWN) {
w = w + s;
}
} if (keyCode == LEFT){
h = h -s;
}
else if (keyCode == RIGHT){
h = h +s;
}
}

Still, the color did not change accordingly. After reading through the instructions on the reference page of the processing website, I found perhaps it was because only one parameter of the “fill()” was changing and thus the change of the color was less than obvious. Therefore, I changed the range of the color and all the three parameters of the “fill()”. As I expected, It worked at last. 

Here is the code:

int a=400;
int b=350;
int speed=5;
int w=300;
int h=300;
int s=5;
int i,j,k;
void setup(){
size(600,600);
}

void draw(){
a=a+speed;
b=b+speed;
background(255);

noStroke();
colorMode(HSB, 300,500,a);
fill(a/2,a*2,a);
ellipse(h,w,a,a);
fill(255);
ellipse(h,w,b,b);

if (a>400){
speed *=-1;
}
if (a<100){
speed *=-1;
}
}
void keyPressed() {
if (key == CODED) {
if (keyCode == UP) {
w = w – s;
} if (keyCode == DOWN) {
w = w + s;
}
} if (keyCode == LEFT){
h = h -s;
}
else if (keyCode == RIGHT){
h = h +s;
}
}