Floating Keys Documentation – James Bai

Floating Keys Documentation

Our project, Floating Keys, aimed to create a combined experience of Guitar Hero and Piano Tiles. Both games use instruments to create a fast pace, high-score aiming game experience. And we wanted to incorporate that same idea in a more physically interactive way.

This documentation will be split into three parts: Assembling the sensors on the Arduino, Designing the physical model of the project, and coding it.

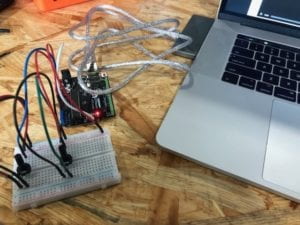
Before you read the documentation here is how the project worked:

Assembling the Sensors

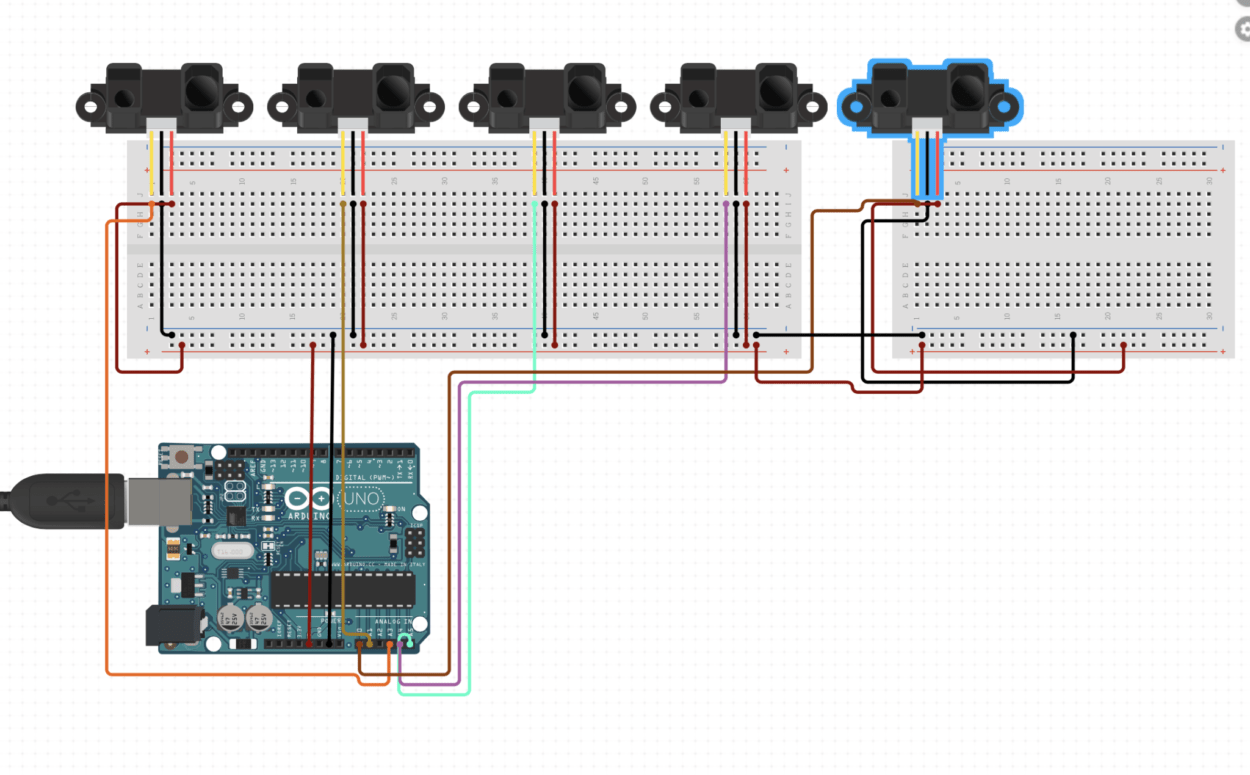
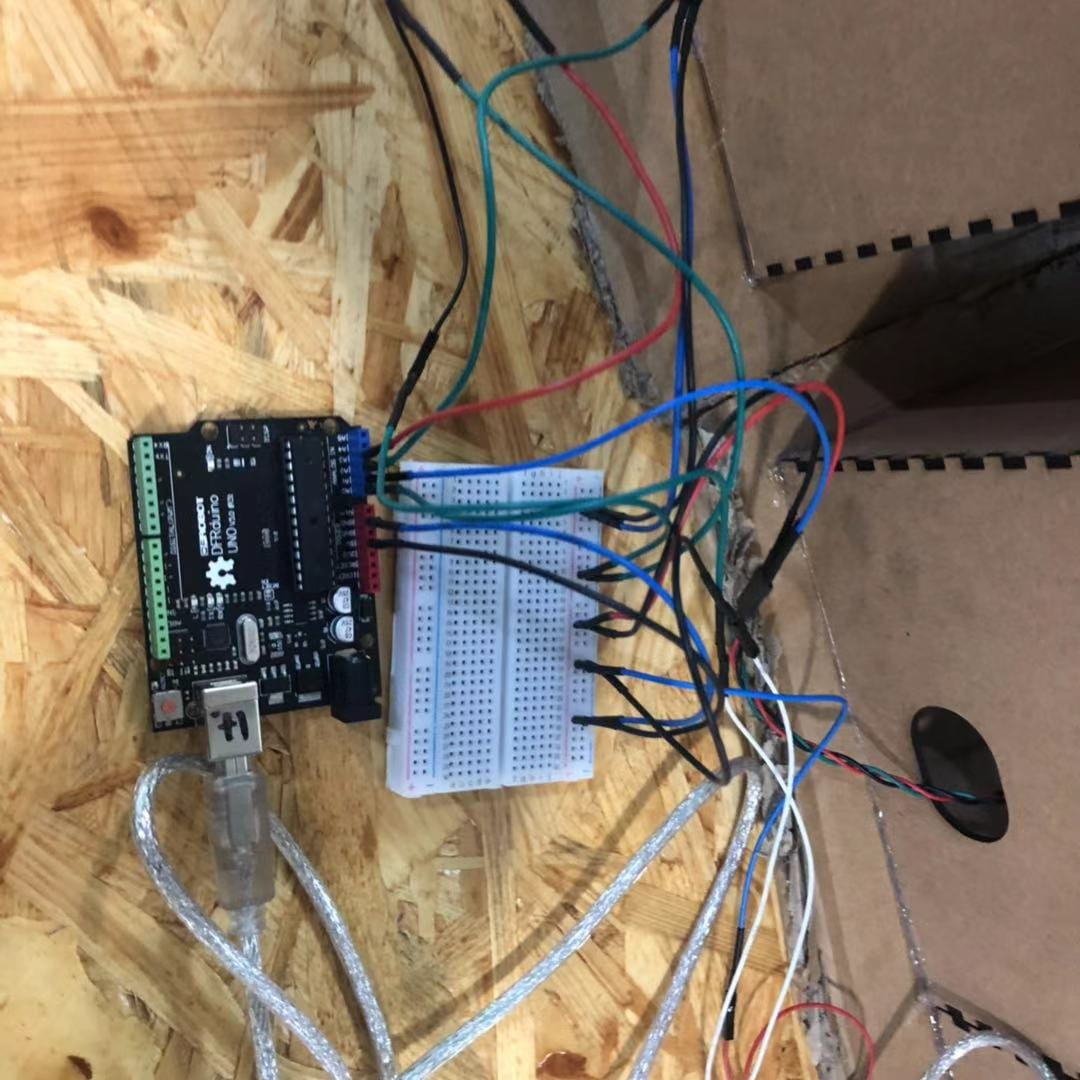
This part was the simplest and supposed to be the quickest since it was just performing skills we learned earlier in the semester. We had four infrared distance sensors, so we connected each’s power and ground to the corresponding places on the breadboard, and each analog line into A0, A1, A2, and A3. It looked like:

Assembling this was supposed to be the quickest part, but it was not as we spent around an hour asking teaching assistants and other professors on what was wrong. The problem was that the Arduino, when connected to the computer, did not show up in the “ports” list, and the green light would turn off after 20 seconds. Also, the Arduino was really hot. Turns out for one of the sensors, the ground and power cables were swapped. This was a very small, easy-to-fix mistake that ended up costing us an hour.

Furthermore, on our final presentation day (Thursday, December 12) the Arduino was not connecting to the computer for the same reason: the ground and power lines were swapped for one sensor. It was working on Tuesday, but suddenly not on Thursday and I got really worried questioning if the Arduino broke or the computer had issues. Turns out, it was just a simple mistake.

The coding part for the Arduino was fairly simple, as we just added “int sensor (1-4) = analogRead (each’s analog input). Next, we mapped each sensor value from 0-1023 to 0-60. This was because we wanted a smaller range of numbers to fit in the processing conditionals (to correspond in the game).

This was our code for Arduino:

// IMA NYU Shanghai
// Interaction Lab
// For sending multiple values from Arduino to Processing


void setup() {
  Serial.begin(9600);
}

void loop() {
  int sensor1 = analogRead(A0);
  int sensor2 = analogRead(A1);
  int sensor3 = analogRead(A2);
  int sensor4 = analogRead(A3);

  sensor1 = map(sensor1, 0, 1023, 0, 60);
  sensor2 = map(sensor2, 0, 1023, 0, 60);
  sensor3 = map(sensor3, 0, 1023, 0, 60);
  sensor4 = map(sensor4, 0, 1023, 0, 60);

  // keep this format
  Serial.print(sensor1);
  Serial.print(",");
  Serial.print(sensor2);
  Serial.print(",");
  Serial.print(sensor3);
  Serial.print(",");
  Serial.print(sensor4);
//  Serial.print(",");  // put comma between sensor values
//  Serial.print(sensor2);
  Serial.println(); // add linefeed after sending the last sensor value

  // too fast communication might cause some latency in Processing
  // this delay resolves the issue.
  delay(100);
}

Physical Design

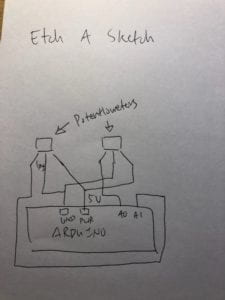
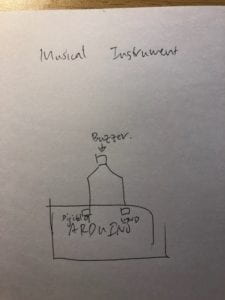
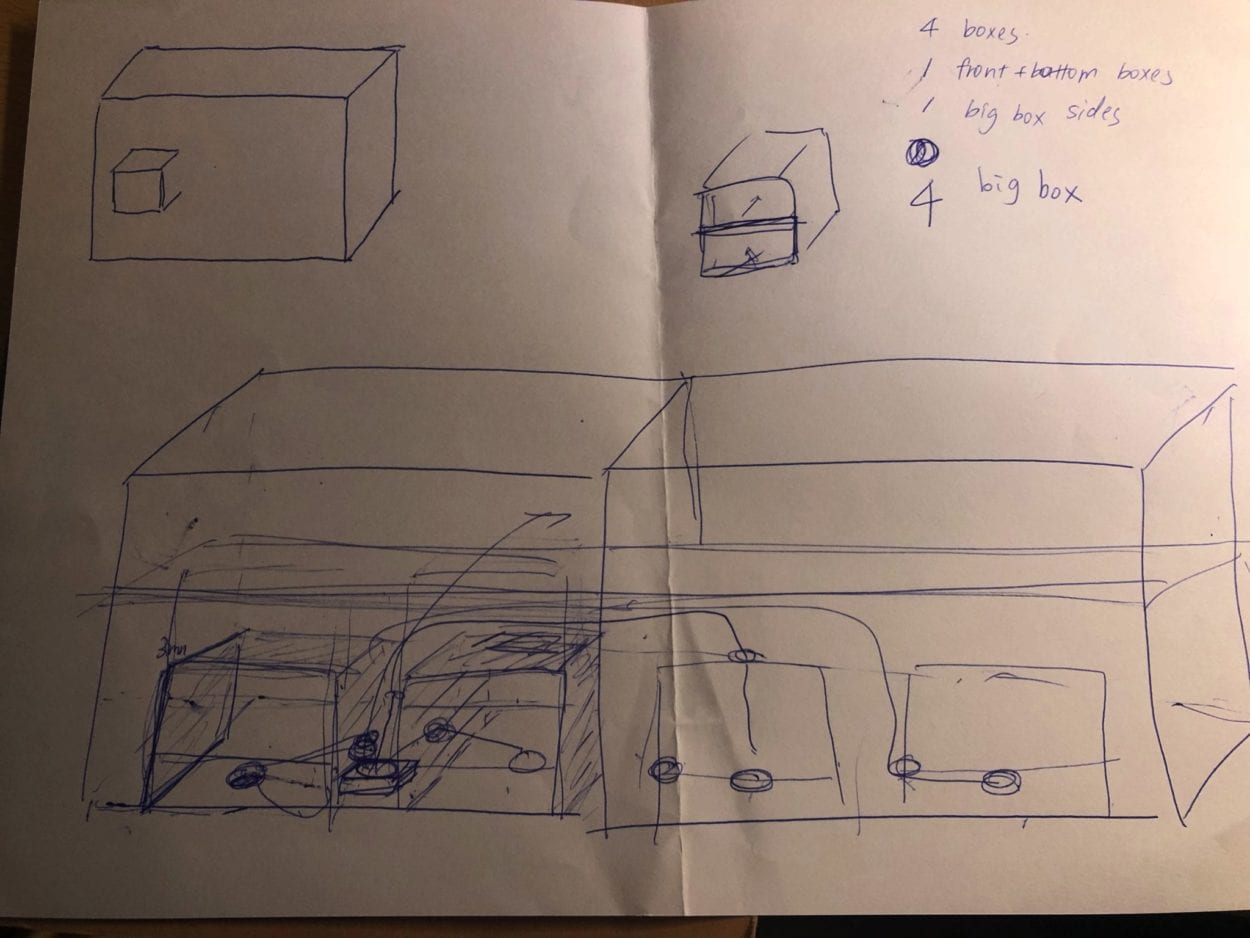
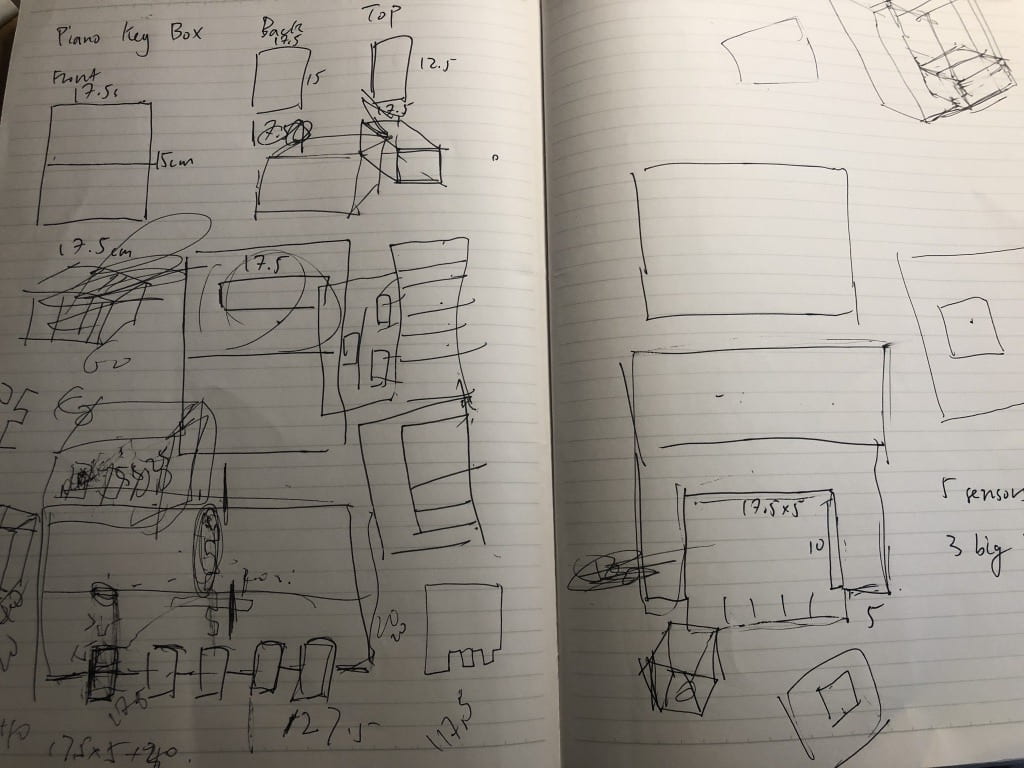
This was what we discussed first since we thought the fabrication lab would be filled throughout the week after Thanksgiving break. We started out with different ideas and spend around half an hour debating how the project should look. Our first idea was to have a really large box (which was around 125×60 cm). However, this project would use 10 pieces of wood, which we and the TA thought were too much. We later both agreed on similar ideas for how to revise the project design, which was to have four individual boxes on a platform. Each box was separated with a wall, which was what Eric suggested in class. We drew the dimensions of how it should look like on a piece of paper:

Our original idea and sketches:


And this is our design of each box on makercase.com:

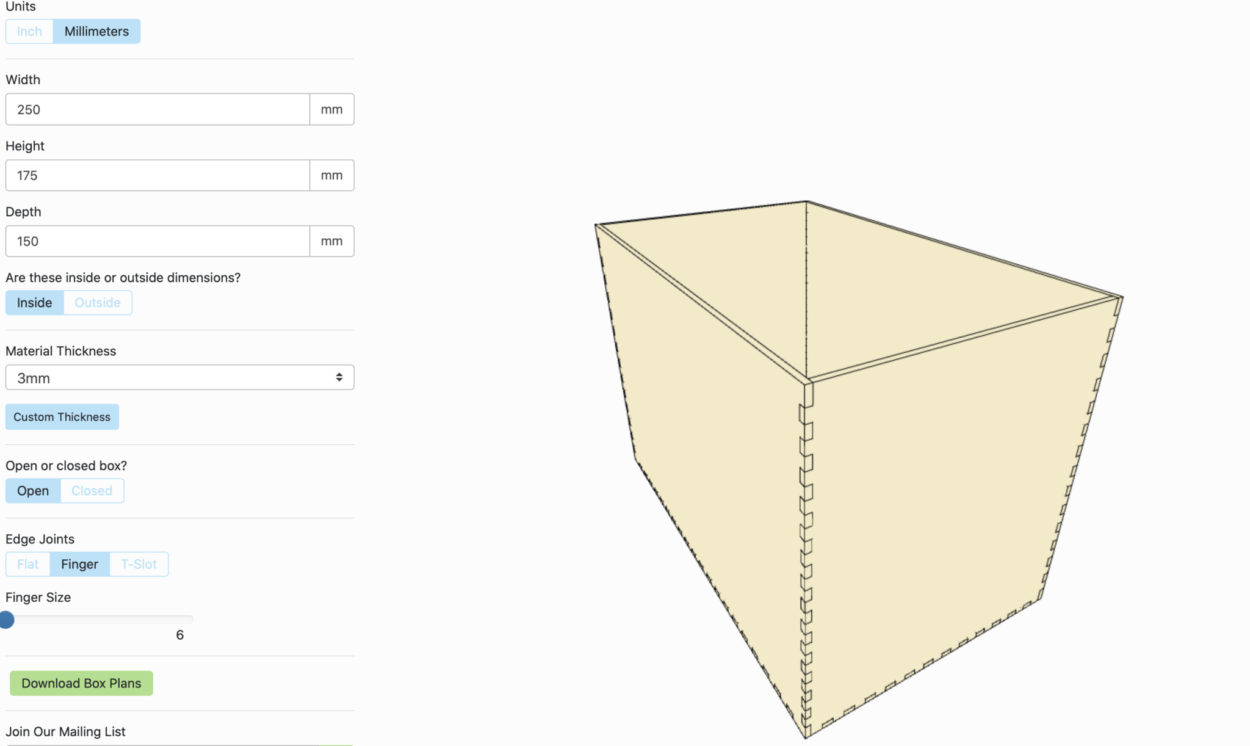
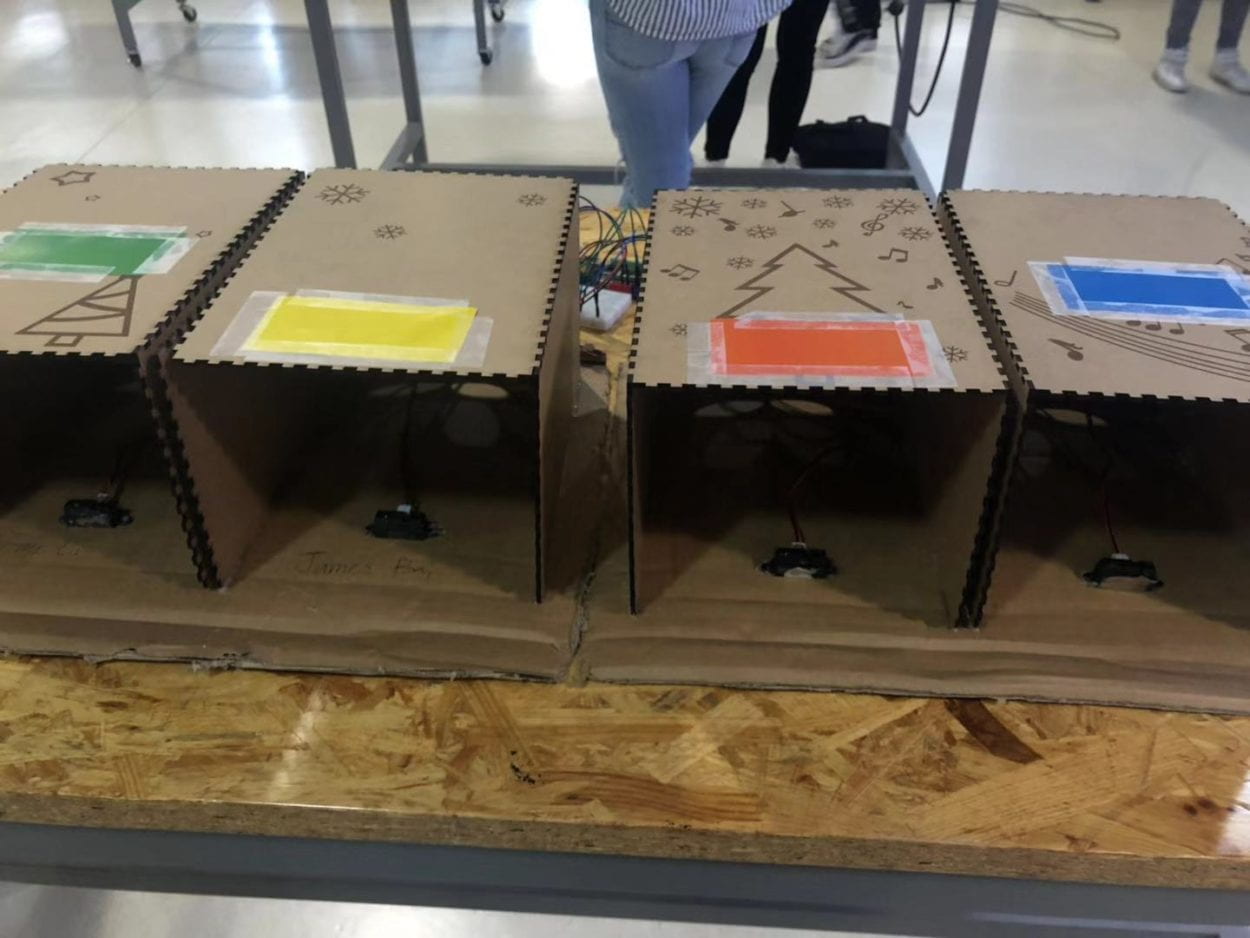
We had holes on the back of each box to allow the sensor’s wires in, and it was an open-top box because we wanted to glue the top of the box (without finger joints) to the platform. The bottom of the box became the top of the box since it had finger joints and a lid. 

Fay later added the Chrismas and holiday decorations onto the top of the box, since Christmas is coming.

Our main challenge here was that the assistant told us we were using too much material. The first time we went, which was the Monday after Thanksgiving, we needed 10 pieces of wood, which even we thought was a lot. So the TA gave us ideas to save space and told us to come back after we finished our blueprints on Adobe Illustrator.

So we redesigned everything to only use six pieces of material, including the platform which took two. And that was still too much, so we had to use our back-up plan of just not laser-cutting the platform, and only cut the boxes. We tried to portray what our idea looked like and how important the platform was to our project, but six pieces still seemed like a lot so we had no other choice. So instead of the wood platform, we found a box in the cardboard room. The length of the box was more than half of our projects, which was perfect since we could use both sides of the box to cover the whole length. Using the boxes, we glued the top side of them to the cardboard, and glued the rest of the finger joints, other than the lid, to make the box stable. After that, we just put the Christmas designed bottom (or now the top) of the boxes on, and the sensors through the hole in the back. Our physical design looked like:


Coding

This was by far the most time-consuming and complicated part of the project. We were helped by lots of people, including professors, TAs, and multiple friends (some which I woke up late at night). In my first attempt at the code, I created a grid using a for loop, and I tried to have the grid move down one every-time a key was pressed. 

ArrayList<Integer> blocks = new ArrayList<Integer>();
int a=0;
int t=0;
int y;

void setup(){
      
      for( int i =0; i<100; i++){
    blocks.add(int(random(0,4)));
      }
   System.out.println(blocks);
    size(400,400);


}

void draw(){
  for(int m = 0; m<8; m++){
    for(int n = 0; n<4; n++){
      noFill();
      rect(n*30+150,m*30,30,30);
    }
    
        for(int j = 0; j<100; j++){
     a = blocks.get(j);
     //println(a);
      fill(255,0,0);
      y = 240-j*30;
      
      if(key =='1'){
       y= y+30;
      }
      rect(a*30+150,y,30,30);
    }
    
  }
}

That is the code and this was what happened every time I pressed the key 1.

We couldn’t get the tiles to move down continuously after changing it for around 2 hours. I asked two TAs in the lab, but they were busy with other students. So I thought it would be better if I asked a friend to help me code the concept. I didn’t like the feeling of only using someone else’s code for the main part of my project, so I changed and added a lot to the code.

We added a title screen so the players would not be immediately immersed in the game, a time bar that decreased to the left (with Eric’s help), and modified the score code adding in a high score feature. The high score feature would be there until the game was closed. For the title screen, we added snow that fell down continuously, which was used by the class we created. And to combine the title screen and the game, we changed the whole void draw into a conditional, using frameCount to change from the title screen into the game. I will copy and paste the code at the very end of the documentation.

Our biggest challenge was connecting the sensors to the piano tiles on the game. Before the connection, the game was using a modified version of the keyPressed function. And the main problem with sensors was, that it did not work when using for example sensorValues[0] > 15, inside the keyPressed conditionals. Eric helped us by changing the keyPressed function into sensorPressed, and calling out sensorPressed in the void draw. That allowed the sensor to press the tiles. However, ever time the sensor sensed something within its distance, the tiles would keep getting pressed nonstop. So we added if conditionals to the sensorPressed function saying that if the sensorValues are less than 15 (if they were greater than 15 the tile would be pressed) basically don’t trigger the tile. This can be seen in the code later on under void sensorPressed.

Our second challenge, which kind of ended up hurting our presentation was the inclusion of the jingle bells melody. On Tuesday, we thought we would be picked, but we weren’t. And we just had each tile play a music note, so the most left tile would play the C note, and the next one playing D, etc. We wanted a melody to match our theme of the project, which was Christmas time. So we added in the notes C, D, E, F, G and incorporated them using the Sound library. We created an array and an if function that played the next note in the array. However, when it came to the end of the array the game would crash. It was a very simple fix, but I thought it would be overly complicated and I ran out of time to fix it on Thursday, which was presentation day (I also was really busy with presentations in other classes on Wednesday). Eric helped us fix it after our presentations by adding a conditional, so that when the array list ended start back at spot 0 in the array.

Although our project was not perfected on the presentation day, I think in conclusion the whole process was very creative and fun working as a team. We created our vision of the project, with the help of Eric and many of our other friends. I think the project had many challenges and our way of finding how to surpass them or go around them was very creative, now that I think of it.

———————————PROCESSING CODE————————————

Snow Class:

class Snow {
  float x, y;
  int c;
  float spdX, spdY;
  float r;
  boolean isDone;
  
  Snow() {
    r = random(5,8);
    spdX = random(-2,2);
    spdY = 5;
    c = int(random(30,255));
    x = random(width);
    y = 0;
    isDone = false;
  }
  
  void checkEdges(){
    if(x<0 || y>height){
      isDone = true;
    }
    
  }
  void move() {
    x += spdX;
    y += spdY;
    
  }
  void display() {

    fill(255,c);
    ellipse(x,y,r,r);
  }
}

Piano Sketch

Snow theboi;
int hi=0;
ArrayList<Snow> snowList = new ArrayList<Snow>();
PImage img;
import processing.sound.*;
SoundFile sound1;
SoundFile sound2;
SoundFile sound3;
SoundFile sound4;
SoundFile sound5;
SoundFile soundlist[] = {sound1, sound2, sound3, sound4, sound5};
ArrayList<SoundFile> soundList = new ArrayList<SoundFile>();
import processing.serial.*;
String myString = null;
Serial myPort;
int NUM_OF_VALUES = 4;
int[] sensorValues;
int blockSize = 125;
boolean[][] pTiles;
int score = 0;
int highScore = 0;
boolean record = false;
float time = 40;
float startTime = 0;
int gameMode = 0;//0=not start 1=start 2=over
boolean keyCTrigger = false;
boolean keyDTrigger = false;
boolean keyETrigger = false;
boolean keyFTrigger = false;
int songList[] = {3,3,3,3,3,3,3,5,1,2,3,4,4,4,4,3,3,5,5,3,2,1,3,3,3,3,3,3,3,5,1,2,3,4,4,4,4,3,3,5,5,3,2,1,3,3,3,3,3,3,3,5,1,2,3,4,4,4,4,3,3,5,5,3,2,1};
int a = 0;


void setup() {
  fullScreen();
  img = loadImage("floatingKeys.jpg");
  sound1 = new SoundFile(this, "Cnote.mp3");
  sound2 = new SoundFile(this, "Dnote.mp3");
  sound3 = new SoundFile(this, "Enote.mp3");
  sound4 = new SoundFile(this, "Fnote.mp3");
  sound5 = new SoundFile(this, "Gnote.mp3");
  
  soundList.add(sound1);
  soundList.add(sound2); 
  soundList.add(sound3);
  soundList.add(sound4); 
  soundList.add(sound5);
  
  
  setupSerial();
  pTiles = new boolean[4][ height - 50 / blockSize + 1];
  for (int i = 0; i < height - 50 / blockSize + 1; i++) {
    int t = int(random(0, 4));
    for (int j = 0; j < 4; j++) {
      if (j == t) {
        pTiles[j][i] = true;
      } else {
        pTiles[j][i] = false;
      }
    }
  }
}


void draw() {
  snowList.add(new Snow());
  
  if(frameCount<200){
    background(0);
    textSize(35);
    fill(255);
    text("Floating Keys Loading!",width/2 - 155,height/2,400,400);
    for(int i = 0; i<snowList.size(); i++) {
    Snow temp = snowList.get(i);
    temp.display();
    temp.checkEdges();
    temp.move();

  }
  
  for(int j = snowList.size()-1; j>=0 ; j--){
    Snow p = snowList.get(j);
    if(p.isDone){
      snowList.remove(j);
    }
    
  }
  
  }
  else {
  
  background(255);
  fill(255);
  fill(50, 205, 50);
  sensorPressed();
  design();
  for (int i = 0; i < 4; i++) {
    for (int j = 0; j < height - 50/blockSize+1; j++) {
      if (pTiles[i][j]) {
        fill(177,18,38);
      } else {
        noFill();
      }
      rect(i *100 + width/3.275, height - 50 - blockSize - j*blockSize, 100, blockSize);
    }
  }

  fill(0);

  textSize(18);
  text(score, width - 250, height/2);
  text("Current Score:", width - 375, height/2);
  if(record){
    fill(255,0,0);
  }else{
    fill(128);
  }
  text("High Score:", width - 350, height/2 + 50);
  text(highScore,width - 250,height/2 + 50);

    //text("-10", 50, 750);
  fill(0);
  if(gameMode == 0){
    textSize(35);
    text("Quick! \n Put your hand \n in the box!", width/4 - 250, height/2 - 100);
  }else if(gameMode == 1){
    text((startTime + time * 1000 -millis())/1000,50,750);
    rect(300,150 + 675 - 675 * ((startTime + time * 1000 -millis())/1000) / time,40,675 * ((startTime + time * 1000 -millis())/1000) / time);
    if(startTime + time * 1000 -millis() <= 0){
      gameMode = 2;
      if(highScore < score){
        record = true;
        highScore = score;
      }
    }
  }else if(gameMode == 2){
    text("Game Over",50,750);
    text("Please Press R To Start Over",width / 2 + 280, height - 145);
  }
  }
}

void playSound() {
  soundList.get( songList[a]-1 ).play();
  a++;
  
}

void sensorPressed() {
  fill(0, 50);
  updateSerial();
 // printArray(sensorValues);
  if (gameMode != 2) {
    if (sensorValues [0] >= 15 && keyCTrigger) {
      keyCTrigger = false;
      rect(100, height - 50, 100, 25);
      pushTile(0);
      playSound();
    }
    if (sensorValues [1] >= 15 && keyDTrigger) {
      keyDTrigger = false;
      rect(200, height - 50, 100, 25);
      pushTile(1);
      playSound();
    }
    if (sensorValues [2] >= 15 && keyETrigger) {
      keyETrigger = false;
      rect(300, height - 50, 100, 25);
      pushTile(2);
      playSound();
    }
    if (sensorValues [3] >= 15 && keyFTrigger) {
      keyFTrigger = false;
      rect(400, height - 50, 100, 25);
      pushTile(3);
      playSound();
    }
    
    if(sensorValues [0] < 15 && keyCTrigger==false){
      keyCTrigger=true;
    }
    if(sensorValues [1] < 15 && keyDTrigger==false){
      keyDTrigger=true;
    }
    if(sensorValues [2] < 15 && keyETrigger==false){
      keyETrigger=true;
    }
    if(sensorValues [3] < 15 && keyFTrigger==false){
      keyFTrigger=true;
    }
  }
  }


void pushTile(int n) {
  if (gameMode == 0) {
    gameMode = 1;
    startTime = millis();
  }
  if (pTiles[n][0]) {
    step();
    score++;
  } else {
    background(255, 0, 0);
    score -= 1;
  }
}

void keyPressed() {
  if (key == 'r'){
    reset();
  }
}

void design() {
  image(img,width/1.5,height/4);
  img.resize(400,250);
  
  fill(0,255,0);
  rect(width/2 - 250, height - 50, 100, 25);
  fill(255);
  rect(width/2 - 230, height - 50, 60, 15);
  fill(255, 255, 0);
  rect(width/2 - 150, height - 50, 100, 25);
  fill(255);
  rect(width/2 - 130, height - 50, 60, 15);
  fill(255, 140, 0);
  rect(width/2 - 50, height - 50, 100, 25);
  fill(255);
  rect(width/2 - 30, height - 50, 60, 15);
  fill(50, 82, 123);
  rect(width/2 + 50, height - 50, 100, 25);
  fill(255);
  rect(width/2 + 70, height - 50, 60, 15);

  line(width/2 - 250, 0, width/2 - 250, height-50);
  line(width/2 - 150, 0, width/2 - 150, height-50);
  line(width/2 - 50, 0, width/2 - 50, height-50);
  line(width/2 + 50, 0, width/2 + 50, height-50);
  line(width/2 + 150, 0, width/2 + 150, height-50);
}

void step() {
  for (int i = 1; i < height - 50 / blockSize + 1; i++) {
    for (int j = 0; j < 4; j++) {
      pTiles[j][i-1] = pTiles[j][i];
    }
  }
  int t = int(random(0, 4));
  for (int j = 0; j < 4; j++) {
    if (j == t) {
      pTiles[j][height - 50 / blockSize] = true;
    } else {
      pTiles[j][height - 50 / blockSize] = false;
    }
  }
}

void reset() {
  score = 0;
  gameMode = 0;
  record = false;
  for (int i = 0; i < height - 50 / blockSize + 1; i++) {
    int t = int(random(0, 4));
    for (int j = 0; j < 4; j++) {
      if (j == t) {
        pTiles[j][i] = true;
      } else {
        pTiles[j][i] = false;
      }
    }
  }
}


void setupSerial() {
 // printArray(Serial.list());
  myPort = new Serial(this, Serial.list()[3], 9600);
  myPort.clear();
  // Throw out the first reading,
  // in case we started reading in the middle of a string from the sender.
  myString = myPort.readStringUntil( 10 );  // 10 = '\n'  Linefeed in ASCII
  myString = null;

  sensorValues = new int[NUM_OF_VALUES];
}


void updateSerial() {
  while (myPort.available() > 0) {
    myString = myPort.readStringUntil( 10 ); // 10 = '\n'  Linefeed in ASCII
    if (myString != null) {
      String[] serialInArray = split(trim(myString), ",");
      if (serialInArray.length == NUM_OF_VALUES) {
        for (int i=0; i<serialInArray.length; i++) {
          sensorValues[i] = int(serialInArray[i]);
        }
      }
    }
  }
}

Recitation 10 – James Bai

In this recitation, I participated in the Object-Oriented Programming workshop with Tristan. We focused on adding classes to code in order to make the code more clean and simple to bring back up. Classes (the function in processing) were split into three parts, the variables, the constructor, and the functions of each class.

Here is the example code we created (with my small edit of interaction by adding a mousePressed function:

The Ball Class:

class Ball {
  float x, y;
  color c;
  float spdX, spdY;
  float r;
  
  Ball(float newSpdX, float newSpdY, color newColor) {
   r = 50;
   spdX = newSpdX;
   spdY = newSpdY;
   c = newColor;
   x = width/2;
   y = height/2;
  }  
  void move() {
    if (mousePressed){
    x += spdX;
    y += spdY; 
    }
  }  
  void display() {
    fill(c);
    ellipse(x, y, r, r);
  }
}

And the Main Code calling the class:

Ball james;
Ball jame;

ArrayList<Ball> ballList = new ArrayList<Ball>();

void setup() {
  size(1600,900);
  
  for(int i=0; i<100; i++) {
    ballList.add(new Ball(random(-10,10),random(-10,10),color(random(255)) ));
  }
  //james = new Ball(random(-10,10),random(-10,10),color(random(255)) );
  //jame = new Ball(5, 0, color(0,0,255));
  
}

void draw() {
  background(255,255,150);
  //james.display();
  //jame.display();
  //james.move();
  //jame.move();
  for(int i = 0; i<ballList.size(); i++) {
    Ball temp = ballList.get(i);
    temp.display();
    temp.move();
  }
  
}

For my version, I wanted to change the balls to squares first, and then make them fall from the top of the screen using (mousePressed).

I also wanted to change the Squares to rain down in a funnel-like shape, instead of spreading from the middle. So here is what it looked like:

And here is the new code:

For the class:

class Square {
  float x, y;
  color c;
  float spdX, spdY;
  float size;
  
  Square(float newSpdX, float newSpdY, color newColor) {
   size = 50;
   spdX = newSpdX;
   spdY = newSpdY;
   c = newColor;
   x = width/2;
   y = 0;
  }  
  void move() {
    if (mousePressed) {
    x += spdX;
    y += spdY; 
    }

  }  
  void display() {
    fill(c);
    rect(x, y, size, size);
  }
}

For the main code:

Square james;

ArrayList<Square> ballList = new ArrayList<Square>();

void setup() {
  size(1600,900);
  
  for(int i=0; i<100; i++) {
    ballList.add(new Square(random(-10,10),random(0,10),color(random(255)) ));
  }
  //james = new Ball(random(-10,10),random(-10,10),color(random(255)) );
  //jame = new Ball(5, 0, color(0,0,255));
  
}

void draw() {
  background(255,255,150);
  //james.display();
  //jame.display();
  //james.move();
  //jame.move();
  for(int i = 0; i<ballList.size(); i++) {
    Square temp = ballList.get(i);
    temp.display();
    temp.move();
  }
  
}

Final Project Essay – James Bai

Floating Keys

Floating Keys is an interactive, musical project that uses infrared sensors as piano keys and the Processing as the interface for the game. Our main focus was to create a fun twist to playing piano, so that everyone can learn the keys and melodies to famous songs in the format of a game. The insight for this game was to use sensors and processing to create a game, and then my I sudden thought of Guitar Hero. I want the interface to have the style of Guitar Hero, and the player would follow along by correspondingly putting their hands in the range of the sensor. We want this game to be played by everyone.  Playing a famous pop song on the piano takes weeks or months to master, and the duration is further affected by your skill on the piano. Most people don’t even try to play it on the piano due to their skill and unfamiliarity with that instrument. However, with the Floating Keys players, no matter of their skill level, can learn melodies within minutes, while enjoying the whole process as a game.

Furthermore, our project is intended for the players to put their hands inside a closed area, or a box, where the sensor is located. Imagine this area to be a rectangle with a side open for the hand to go in. We will use an if statement so that the sensor detects the hand, but not the top of the rectangular area. Say, the distance from the sensor to the top of the rectangular box is 15 cm, we will limit the sensors range to around 14.5 cm, so whenever a hand comes in it detects it, but not the top of the box. Each box will be closed fully on all sides except the hand entrance so users do not just move their hands horizontally and hit all the keys. We intend to have the 5 keys C, D, E, F, and G. I am still not sure of this idea because I want the users to not have an impossible task by moving their two hands to seven keys. We will design these boxes to look like a piano, but add our twist to it which we will decide soon. The game on processing will be similar to guitar hero, where a key comes down the screen to a line, where you must try to press it exactly at the line. We intend to have a points system where if pressed directly on the line, the player will maximize their points. If the player puts his/her hand inside the box before the key hits the line, points will be rewarded, just less than hitting the note perfectly. And the same idea for if the note is not hit. Lastly, we will include a sound system, so that each button pressed creates its actual sound – so the player can actually hear the melody he/she is playing. We want the design of the project to attract audiences, and have the interface and game simple enough that the players can understand how to play and start the game. This is done by adding a tutorial, where the player can test out the keys and the response time on the game to get used to it. The point system is the result of each player’s interaction with the game, as we intend to have a leaderboard at the end to create competition. We want users to have fun, simply learn the melodies of songs, and compete with one another.

First, we want to create a prototype for our design, and have it done before the start of next week. This is to have an idea of what our final product will look like and the get the dimensions of each box in mind. Second, we want to test out the prototype with a sensor, say key C, and connect it with an MP3 player to play the corresponding sound(which we can borrow in the equipment room). Once we get key C done, we will move on to the other four keys, create a box, and use a sensor for each. We should complete this by the weekend of November 30th. After we have all this finished, we will move onto the processing part of things. The interface will definitely take a while to create, so we intend do work on this on the same weekend of November 30th. If we don’t finish on the weekend we still have one more week to do this task, because we plan on combining and testing the whole project on December 6-9. During this whole process we will keep refining the design, and create a smoother experience for the players.

The other projects we proposed were interesting, but not as appealing as this one. This was the first project we thought of and the ideas for how to do this just fell into place when we were writing the proposal. Our second proposal, the game platform, influenced the gaming interface of this project. We were looking up games to add to that proposal and I suddenly thought of playing Guitar Hero on my old Xbox. It all added up with our idea of a piano with sensors. Furthermore, I believe our project aligns with interaction in that it allows the players to learn new melodies by moving their hands inside sensors. Each player’s hand movement and reaction speed are their interactions with the project, which is aimed at a higher score each time. The uniqueness of our project is that we add a twist to a typical piano by using technology and previous experiences. We want the player’s experience to be unique by being excited to learn new melodies due to the simplicity of the game, which is also its difference from an orthodox piano. We intend our project to be played by everyone, no matter their skill level in piano or their knowledge of music notes.  We want those with the least experience to have as much fun as those with more experience in music. I feel like our project could become an actual game, on Xbox or Playstation as a twist to Guitar Hero. Since there have not been any new ground shaking music games since Guitar Hero and Rock Band, Floating Keys could possibly be the next. Of course this is a result of our project becoming more complicated by having numerous songs and more keys. However, this final product could be an interesting game for everyone, of different musical skill levels to enjoy.

Recitation 9 – James Bai

For this recitation we had to connect sensor Values (using potentiometers) to Processing in order to control some aspect of an image or webcam. The example code for this is the multipleValues Arduino to Processing. I decided to have a 500×500 Panda image and have each potentiometer control something different. The first potentiometer would control the Opacity, the second would control the color:

To do this I added to the setup:

colorMode(HSB);

This made it less complicated to use the tint command later.

So, to add the panda image, I found this special panda on google:

Tian Tian

So, I downloaded the image, then added it to the Processing data by dragging it onto the interface.

To pull up the image, I added PImage photo; at the very top before void setup, photo = loadImage(“panda.jpg”); inside void setup, and image(photo, 0 ,0); inside void draw.

After that, I added the tint command:

tint(sensorValues [0], 255, sensorValues [1], sensorValues [1]);

It took a while to test it with HSB, since it was different but it would be a lot less complicated than RGB for sensors, since I wanted one sensor to control the color and the other to control the opacity.

Here is the video of it:

Here is a picture of the circuit:

Here is the code for Arduino:

// IMA NYU Shanghai
// Interaction Lab
// For sending multiple values from Arduino to Processing


void setup() {
  Serial.begin(9600);
}

void loop() {
  int sensor1 = analogRead(A0);
  int sensor2 = analogRead(A1);

  sensor1 = map(sensor1, 0, 1023, 0, 255);
  sensor2 = map(sensor2, 0, 1023, 0, 255);

  // keep this format
  Serial.print(sensor1);
  Serial.print(",");  // put comma between sensor values
  Serial.print(sensor2);
  Serial.println(); // add linefeed after sending the last sensor value

  // too fast communication might cause some latency in Processing
  // this delay resolves the issue.
  delay(100);
}

Here is the code for Processing:

// IMA NYU Shanghai
// Interaction Lab
// For receiving multiple values from Arduino to Processing

/*
 * Based on the readStringUntil() example by Tom Igoe
 * https://processing.org/reference/libraries/serial/Serial_readStringUntil_.html
 */
PImage photo;
import processing.serial.*;

String myString = null;
Serial myPort;


int NUM_OF_VALUES = 2;   /** YOU MUST CHANGE THIS ACCORDING TO YOUR PROJECT **/
int[] sensorValues;      /** this array stores values from Arduino **/


void setup() {
  size(500, 500);
  background(0);
  setupSerial();
  photo = loadImage("panda.jpg");
  colorMode(HSB);
}


void draw() {
  updateSerial();
  printArray(sensorValues);

  // use the values like this!
  // sensorValues[0] 
  tint(sensorValues [0], 255, sensorValues [1], sensorValues [1]);
  image(photo,0,0);
  // add your code

  //
}


void setupSerial() {
  printArray(Serial.list());
  myPort = new Serial(this, Serial.list()[ 4 ], 9600);
  // WARNING!
  // You will definitely get an error here.
  // Change the PORT_INDEX to 0 and try running it again.
  // And then, check the list of the ports,
  // find the port "/dev/cu.usbmodem----" or "/dev/tty.usbmodem----" 
  // and replace PORT_INDEX above with the index number of the port.

  myPort.clear();
  // Throw out the first reading,
  // in case we started reading in the middle of a string from the sender.
  myString = myPort.readStringUntil( 10 );  // 10 = '\n'  Linefeed in ASCII
  myString = null;

  sensorValues = new int[NUM_OF_VALUES];
}


void updateSerial() {
  while (myPort.available() > 0) {
    myString = myPort.readStringUntil( 10 ); // 10 = '\n'  Linefeed in ASCII
    if (myString != null) {
      String[] serialInArray = split(trim(myString), ",");
      if (serialInArray.length == NUM_OF_VALUES) {
        for (int i=0; i<serialInArray.length; i++) {
          sensorValues[i] = int(serialInArray[i]);
        }
      }
    }
  }
}

Recitation 8 – James Bai

Etch A Sketch

For this, I started off adding two potentiometers to my breadboard, which connected to my Arduino to change the ellipses x and y values. On the computer, the Arduino’s code would connect to Processing to draw the ellipses there.

The circuit looked like this:

The code for the Arduino was:

void setup() {
Serial.begin(9600);
}

void loop() {
int sensor1 = analogRead(A0);
int sensor2 = analogRead(A1);

sensor1 = map(sensor1, 0 ,1023, 0, 500);
sensor2 = map(sensor2, 0, 1023, 0, 500);

// keep this format
Serial.print(sensor1);
Serial.print(","); // put comma between sensor values
Serial.print(sensor2);
Serial.println();
// add linefeed after sending the last sensor value

// too fast communication might cause some latency in Processing
// this delay resolves the issue.
delay(100);
}

And the code for Processing (first part because the second part is all the same in example): 

import processing.serial.*;

String myString = null;
Serial myPort;

int NUM_OF_VALUES = 2; 
int[] sensorValues; 

void setup() {
size(500, 500);
background(0);
rectMode(CENTER);
setupSerial();
}

void draw() {
updateSerial();
printArray(sensorValues);

// use the values like this!
// sensorValues[0]

// add your code
fill(255,255,255);
ellipse(width/2,height/2,sensorValues [0], sensorValues [1]);
//
}

Here is a video of the it working on Processing:

After completing this, I went to create an Etch A Sketch by changing the ellipse code on Processing to:

// IMA NYU Shanghai
// Interaction Lab
// For receiving multiple values from Arduino to Processing

/*
 * Based on the readStringUntil() example by Tom Igoe
 * https://processing.org/reference/libraries/serial/Serial_readStringUntil_.html
 */

import processing.serial.*;

String myString = null;
Serial myPort;


int NUM_OF_VALUES = 2;   /** YOU MUST CHANGE THIS ACCORDING TO YOUR PROJECT **/
int[] sensorValues;      /** this array stores values from Arduino **/
float prevX; 
float prevY; 

void setup() {
  size(500, 500);
  background(0);
  setupSerial();
 
}


void draw() {
  updateSerial();
  printArray(sensorValues);

  // use the values like this!
  // sensorValues[0] 

  // add your code

float posX = sensorValues[0];
float posY = sensorValues[1];
stroke(255); 
line(prevX, prevY, posX, posY); 
prevX = posX; 
prevY = posY; 
}


void setupSerial() {
  printArray(Serial.list());
  myPort = new Serial(this, Serial.list()[ 4 ], 9600);
  // WARNING!
  // You will definitely get an error here.
  // Change the PORT_INDEX to 0 and try running it again.
  // And then, check the list of the ports,
  // find the port "/dev/cu.usbmodem----" or "/dev/tty.usbmodem----" 
  // and replace PORT_INDEX above with the index number of the port.

  myPort.clear();
  // Throw out the first reading,
  // in case we started reading in the middle of a string from the sender.
  myString = myPort.readStringUntil( 10 );  // 10 = '\n'  Linefeed in ASCII
  myString = null;

  sensorValues = new int[NUM_OF_VALUES];
}


void updateSerial() {
  while (myPort.available() > 0) {
    myString = myPort.readStringUntil( 10 ); // 10 = '\n'  Linefeed in ASCII
    if (myString != null) {
      String[] serialInArray = split(trim(myString), ",");
      if (serialInArray.length == NUM_OF_VALUES) {
        for (int i=0; i<serialInArray.length; i++) {
          sensorValues[i] = int(serialInArray[i]);
        }
      }
    }
  }
}

Here is a video of it:

Musical Instrument

For this code, the multiple values Processing to Arduino example was used and then modified, since in the example it said to send Serial Values from Processing to Arduino.

I tried to create a musical instrument that would create a different sound when the mouse was pressed, and when it was at a different spot in terms of width and length.

The circuit looked like this:

The code for Arduino was: 

#define NUM_OF_VALUES 2 

int tempValue = 0;
int valueIndex = 0;

int values[NUM_OF_VALUES];

void setup() {
Serial.begin(9600);
pinMode(7, OUTPUT);
}

void loop() {
getSerialData();
tone(7, values[1], values[0]);

// add your code here
// use elements in the values array
// values[0]
// values[1]
}

//recieve serial data from Processing
void getSerialData() {
if (Serial.available()) {
char c = Serial.read();
//switch - case checks the value of the variable in the switch function
//in this case, the char c, then runs one of the cases that fit the value of the variable
//for more information, visit the reference page: https://www.arduino.cc/en/Reference/SwitchCase
switch (c) {
//if the char c from Processing is a number between 0 and 9
case '0'...'9':
//save the value of char c to tempValue
//but simultaneously rearrange the existing values saved in tempValue
//for the digits received through char c to remain coherent
//if this does not make sense and would like to know more, send an email to me!
tempValue = tempValue * 10 + c - '0';
break;
//if the char c from Processing is a comma
//indicating that the following values of char c is for the next element in the values array
case ',':
values[valueIndex] = tempValue;
//reset tempValue value
tempValue = 0;
//increment valuesIndex by 1
valueIndex++;
break;
//if the char c from Processing is character 'n'
//which signals that it is the end of data
case 'n':
//save the tempValue
//this will b the last element in the values array
values[valueIndex] = tempValue;
//reset tempValue and valueIndex values
//to clear out the values array for the next round of readings from Processing
tempValue = 0;
valueIndex = 0;
break;
//if the char c from Processing is character 'e'
//it is signalling for the Arduino to send Processing the elements saved in the values array
//this case is triggered and processed by the echoSerialData function in the Processing sketch
case 'e': // to echo
for (int i = 0; i < NUM_OF_VALUES; i++) {
Serial.print(values[i]);
if (i < NUM_OF_VALUES - 1) {
Serial.print(',');
}
else {
Serial.println();
}
}
break;
}
}
}

The code for Processing was:

import processing.serial.*;

int NUM_OF_VALUES = 2;

Serial myPort;
String myString;

int values[] = new int[NUM_OF_VALUES];

void setup() {
size(500, 500);
background(0);

printArray(Serial.list());
myPort = new Serial(this, Serial.list()[ 4 ], 9600);
// check the list of the ports,
// find the port "/dev/cu.usbmodem----" or "/dev/tty.usbmodem----"
// and replace PORT_INDEX above with the index of the port

myPort.clear();
// Throw out the first reading,
// in case we started reading in the middle of a string from the sender.
myString = myPort.readStringUntil( 10 ); // 10 = '\n' Linefeed in ASCII
myString = null;
}

void draw() {
background(0);
if(mousePressed)
{
values[0] = mouseX;
values[1] = mouseY;
}

// sends the values to Arduino.
sendSerialData();

// This causess the communication to become slow and unstable.
// You might want to comment this out when everything is ready.
// The parameter 200 is the frequency of echoing.
// The higher this number, the slower the program will be
// but the higher this number, the more stable it will be.
echoSerialData(200);
}

void sendSerialData() {
String data = "";
for (int i=0; i<values.length; i++) {
data += values[i];
//if i is less than the index number of the last element in the values array
if (i < values.length-1) {
data += ","; // add splitter character "," between each values element
}
//if it is the last element in the values array
else {
data += "n"; // add the end of data character "n"
}
}
//write to Arduino
myPort.write(data);
}

void echoSerialData(int frequency) {
//write character 'e' at the given frequency
//to request Arduino to send back the values array
if (frameCount % frequency == 0) myPort.write('e');

String incomingBytes = "";
while (myPort.available() > 0) {
//add on all the characters received from the Arduino to the incomingBytes string
incomingBytes += char(myPort.read());
}
//print what Arduino sent back to Processing
print( incomingBytes );
}

Musical Instrument Video

My Arduino had issues connecting to the computer so I borrowed an Arduino yesterday and it did not work. It could upload, but any code I tried got stuck at “Uploading…”. I am pretty sure it is not my computer’s problem.

Edit 2019-11-22 14:02:38: Tristan is looking at that borrowed Arduino that had issues, I borrowed another one and it is working. Uploading video for Musical Instrument and changing code for all examples to look better.