“When the Mind Meets the Eye”- Isaac Schlager- Professor Eric Parren

Title: When The Mind Meets The Eye

Professor: Eric Parren

Producer: Isaac Schlager

In the very beginning stages of our final project, despite knowing very little about which direction to go in, my partner and I knew that we wanted to create some form of interaction centered around art. As we each conducted further research, we discovered one common problem that persisted in art museums worldwide: a lack of connection or interaction between attendees and the art pieces, particularly popular ones. One specific article I remember approaching referenced the Mona Lisa and how many people who went to the Louvre to visit her left disappointed. I referenced this specifically in my project proposal documentation and how our goal is to mitigate this problem through a new form of interaction we create using Arduino and Processing. Both of us can attest that we never realized just how far this project has come since its planning stages and are so grateful for all the knowledge we acquired while working on it.

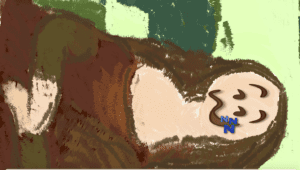
The foundation for our interaction again centered around what we deemed as an “elevated” experience between the user and art. Of course we needed to extrapolate on what “elevated” means, so we decided to take some time to brainstorm ideas before our next meeting. The inspiration for the direction we decided to go in actually centers around the common trend of taking selfies in front of works of art in the museum, particularly the Mona Lisa. We thought a lot about why one takes a picture with a work of art and determined that one of the reasons was to create a personal connection and a personalized image of you with the piece. Therefore, we wanted our project to have the user interact with a piece of recognizable art and insert themselves into the piece by creating their own version. In order to do this, we wanted to go beyond just a user creating what they wanted. We intended to add a surprise factor and have the user influence and create their own personalized version without knowing what the turnout would be. To ensure this process, decided to use questions in which users would be able to have a slew of answers to choose from and based off of their answers, an image would be drawn. Instead of drawing something completely unique for our design process, we decided to stick with something relevant and keep the template of the Mona Lisa itself because of how widely known the painting is. One thing we learned from this decision was just how impactful, hand drawing or painting things can be if imported into your project. Originally, we were contemplating merely creating a collage of images from the internet but then became aware of the copyright issues as well as the lack of creativity that this would take. Therefore, we decided to draw the Mona Lisa in Illustrator as well as all of her different changes. The changes we decided to create, otherwise known as the edits the user could make to the Mona Lisa, were branched into three categories: the eyes, the mouth, and accessories. Our reasoning for omitting a nose is that many emojis do not have a nose feature and therefore, the nose is not critical for expressing or reflecting different emotions or personalities.

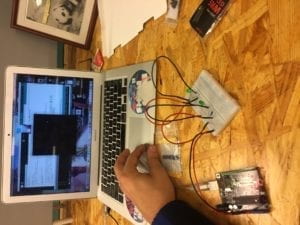
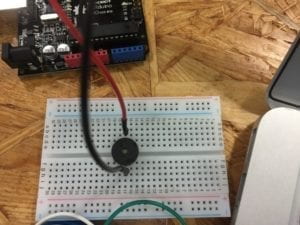
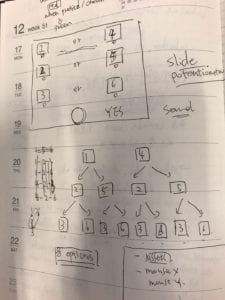
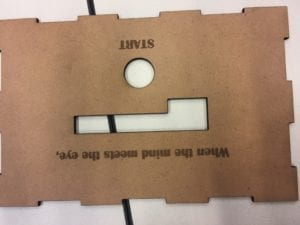
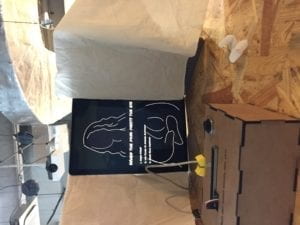
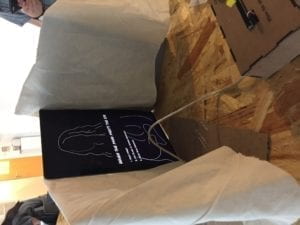
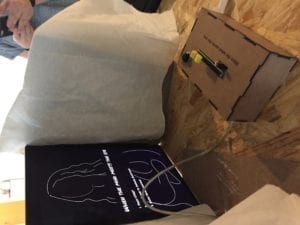
Below are some pictures of our planning process.

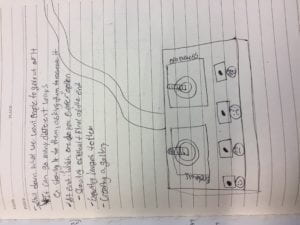
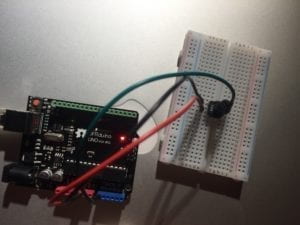
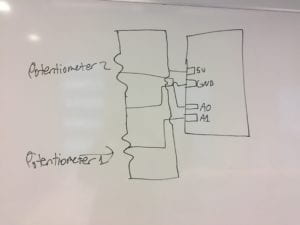
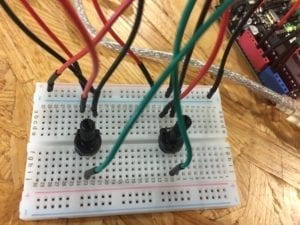
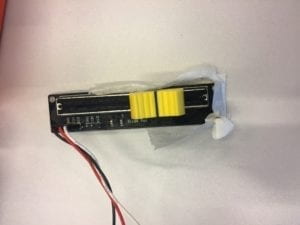
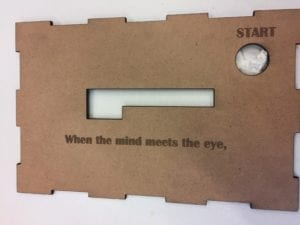
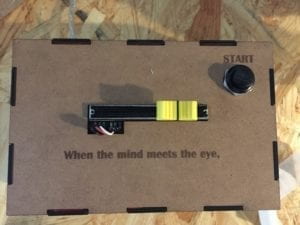
The idea to provide the users with options as well as have their responses to questions reflect the emotions of the Mona Lisa lead us to make the decision to use potentiometers that the user would interact with in order to record their answers. We decided to specifically use a slider potentiometer because of the visual effect and scale that we were trying to reflect in the question answer options. We also decided to create a console where we would have one potentiometer and a start button. Creating the console taught us that sometimes simplicity is better than flashiness, or that quality is better than quantity. We originally planned to have a potentiometer to answer each of the questions, but we realized that having more than one potentiometer could confuse the user, so we decided to keep our design simple. We digitally fabricated the console we wanted to create out of wood because wood was light, yet sturdy and hard, yet malleable. We determined that creating a console that used the mold of a box would be much easier to work with and make edits to and test than 3D printing one.

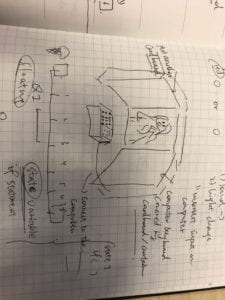
Below are images of the resources we decided to use as well as the different parts of the console. We had two different designs made but decided to go with the one where the start button was in the top right corner.

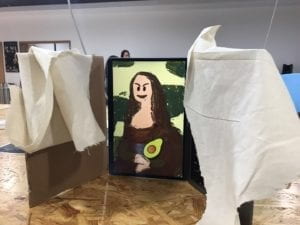
Another aspect of our project that was emphasized more than my midterm project was theming. Because we wanted to provide an artsy aesthetic, we found a tan fabric that we ended up draping over parts of the laptop that we were using as well as a piece of cardboard, which provided a renaissance vibe.

By the time user testing came around, we accomplished many significant steps in our production process. First and foremost, we had the console constructed and ready to use. We also had all of the different versions or “moods” of the Mona Lisa drawn as well as any accessories. Our code was created to the point where three questions would appear on the screen as well as each of the possible answers. A user could log in each of their answers to each question and it would be read in an array and the corresponding features would then be drawn on the Mona. In total, we had six different pairs of eyes, six different types of mouths, and 4 different features to choose from. The mouths and the emotions they portrayed ranged from happy to sad to scared and other emotions. The same thing was the case with the eyes. The accessories on the other hand referenced emotions as well as other things that current pop culture or art included. For example, we had an avocado, party hat, orb, and sweat mark that were all options that the user could choose. We had each question relating to a specific type of feature and decided that it would be best that way because then things were loosely related to one other. We wanted the user to eventually figure out how they could change the features but without giving them any hints and still making things seem random or unknown. Below are two pictures of our current setup at the time.

I believe that the feedback we received during user testing was imperative to any success we had during the final presentation as well. There were key aspects of interaction that were neglected which surfaced during user tested and we definitely learned a great deal from the experience. The first large issue that we encountered was that the users were having difficulty reading the questions and answers in time to figure things out and answer the beginning question. They knew how to use the start button, but when it came to the potentiometer, things were much more difficult. To remedy this issue, my partner and I created another separate colored ellipse that would float over the corresponding answer as the user moved the potentiometer from left to right. We also printed clear directions on the title screen in addition to the start button, which made things much more clearer for the user. Here, we learned that users are not always as smart as we think they are. I do not mean that in a disrespectful manner, but I mean to say that things are not always as intuitive as they seem. The user testing really exposed just our own biases towards the project and showed that even though things may seem obvious to us, they are not always obvious to others. Another significant change we made as a result of the user testing session was the content of the questions being asked. Even though people may have enjoyed our initial project, they voiced their concerns around its purpose and would consistently show their confusion with its message. One aspect that was particularly confusion were the questions being asked. Initially, my partner and I intended to have our questions be finally and relatable to the NYU Shanghai user, while still measuring some aspect of the user’s personally. Yet, in making these questions comical or relatable, they had very little to do with the art aesthetic and content we were working with. Therefore, we decided to change all three questions and make them centered around art, which was a change made for the better. Another key feature of our project that we decided to add after user testing was a black screen with a white outline of the Mona. With these, the user had more of a visual message that something was going to happen to her after they answered their series of questions. It also was more visually appealing at the end for the user once everything was drawn and presented in color. The last major source of feedback we received was to program a “select button”. The reasoning behind this was that some users thought that the start button also qualified as a select button and that they could record their answer before the timer ran out. This obviously was not the case and it confused the users. In order to program this, there were two directions that we could have gone it. The first would be to physically add and code in another button, but that would entail us having to fabricate another cover for the console and in the interest of time, it was not feasible. Thus, we decided to go the other route and try and code our start button to perform both operations. On the Arduino side of the changes we needed to make, this was relatively easy. All we had to do was create another conditional and boolean variable that would allow for the button’s value to be read only once while pressed in order for questions not to be skipped. Yet, for reasons we still have not figured out, the serial communication with processing was not working. In fact, we encountered a number of other issues once we incorporated this function into our code. Questions were not being read, the button was only working part of the time, and for some reason a fourth value was being read from processing that was making things more difficult. Every time we solved one issue, another three or four would arise. Therefore we ended up making the difficult decision not to include a select button. That being said things ended up working in our favor during the final presentation, for our directions were clear enough in that the users were not trying to double the function of the start button.

Below is a visual from what took place during our first user testing session as well as our initial presentation of our project.

In conclusion, the goals of our project were to create an increased connection between the user and a piece of art, have their personality reflected within the Mona Lisa Painting they create, all while maintaining an entertainment factor strong enough for the user to want to test it multiple times. I believe these goals, as well as the our outcome which satisfied all of them to one extent or another, also reflected my definition of interaction which is, “a continued conversation between two or more persons or things that convert different forms of energy into the physical and virtual worlds”. My reasoning behind this is threefold, first and foremost the serial communication factor ensured constant communication between Arduino and Processing. In addition, the user was had a consistent time limit where they had to respond to questions and did so accordingly, reacting to each of the options presented to them as well as the final product they created. The user was also able to physically move the potentiometer and press the start button in order to create a virtual image of the Mona Lisa. If I were to look back previous definition of interaction, which centered around the “open mouth effect”, it may not have satisfied it, but I believe that interaction goes beyond this phenomenon. In the end, our final project presentation was very successful. The users knew how to interact with things based off of the directions that were provided, they enjoyed the question and answer content, and they were left wanting to try the project again and see the different possible combinations they could create. That being said, there were still some things we would change about the project if we were allotted more time. The major change we would have made would be increasing the options that one could choose and expand to other paintings besides just the Mona Lisa. If we were to include other famous paintings and features, the users could have a much longer, more entertaining testing session. That being said I would say our biggest failure was that the overall message that we were trying to convey in regards to art was not necessary received by the users. Some users did not identify with the possible responses presented to them for each question and when finished testing the project, they had to ask us more questions about our intended message behind the project and the features that were being presented to them. Though frustrated with this result, I believed that we learned something critical from this experience, which is that we need to use more sufficient methods behind conveying our project’s purpose and think more about the general user who may not have the knowledge and understand to be able to even comprehend some of the basic aspects of our project that we were trying to convey. That being said, my partner and I accomplished above and beyond what we originally thought possible with this project and I am extremely happy to have worked with her. Producing this not only expanded my knowledge of coding, but it also provided me with many important lessons. The first lesson is that no matter how much work you put into something, it can and sometimes will always fail to complete its purpose during user testing. During this time period, despite the pain it may inflict, it is important for successful creators to truly listen and be open to the feedback and constructive criticism provided to them. I understand why interaction lab is more than its title. I truly believe that the hardest aspect of interaction lab is not creating something on a screen or building a circuit, but having a person successfully interact with what is on that screen or in that circuit. This final project taught me a lot about the human mind, what we find entertaining, and how we act with our surrounding environment. I truly believe that, despite not majoring in Interactive Media Arts, that the tools I learned about in this class will help me in the future and I do not regret for one moment taking this class and putting in all of the hard work and effort that I did on each of the projects I created for it. To conclude this documentation, I would like to explain the overall significance of my final project. Our project’s significance lies within the interaction it creates and the lesson it provides. Our project connects the user to pieces of art that they otherwise may not have paid as much attention to (ex. The Mona Lisa). It not only creates a fun, engaging experience with art, but it also provides a critique our relationship with art by exposing a form of interaction that has not been widely implemented. I believe that our project could be the foundation for much greater projects to come and I hope that one day, someone will expand upon this aspect of interactive art in the future.

Below are pictures and videos of our final product as well as the code that we created from scratch.
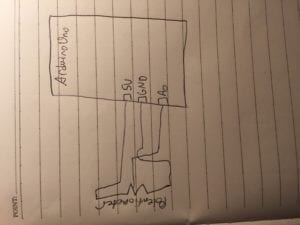
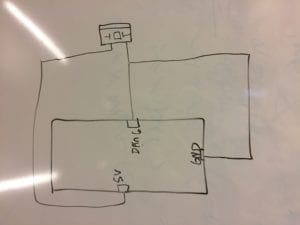
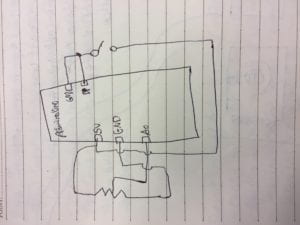
Circuit Schematic

Processing Code

//File Titles
//Mouths: 1 “mouth-1.png”, 2 “mouth-2.png”, 3 “mouth-3.png”, 4 “mouth-4.png”, 5 “mouth-5.png”, 6 “mouth-6.png”
//Eyes: 1. “eyes-1.png” 2. “eyes-2.png”, 3. “eyes-3.png”, 4. “eyes-4.png”, 5. “eyes-5.png”, 6. “eyes-6.png”
//Accessories: 1. “feature-2.png”, 2. “feature-3.png”, 3. “feature-4.png”, 4. “f5.png”,

//SERIAL COMMUNICATION
import processing.serial.*;
Serial myPort;

String Mouths[] = {“mouth-1.png”, “mouth-2.png”, “mouth-3.png”, “mouth-4.png”, “mouth-5.png”, “mouth-6.png”};
String Eyes[] ={“eyes-1.png”, “eyes-2.png”, “eyes-3.png”, “eyes-4.png”, “eyes-5.png”, “eyes-6.png”};
String Features[] ={“feature-2.png”, “feature-3.png”, “feature-4.png”, “f5.png”, };
//QUESTIONS
String[] questions = {“How do you feel when you see the Mona Lisa?”, “What was your last experience at a museum?”, “How often do you see yourself as an artist?”};
int questionIndex = 0;
boolean intro = true;
boolean oneTime = false;
//boolean reset

//ANSWERS
int[] answers = new int[questions.length];
int answer = 0;
String wholemessage;
int startbutton;

//TIMER VARIABLE
int startTime = 0;
int timerLength = 12;

//QUESTIONAIRE SWITCH
boolean askingQuestions = false;
boolean creatingPicture = false;
//mona lisa background (defining variable)
PImage mona_start;
PImage mona_question;
PImage mona_final;
PImage mouth[] = new PImage[6];
PImage eyes[]= new PImage[6];
PImage features[]= new PImage [5];

//Font
PFont font;
//PShape mona;
//PShape eyes1;
int[] values = new int[2];
String[] list = new String[2];

float alpha1 = 0;
float alpha2 = 0;
float alpha3 = 0;

void setup() {
fullScreen();
//size(1440, 900);
//size(600, 600);
mona_start=loadImage(“mona_q.png”);
mona_question=loadImage(“mona_qq.png”);
mona_final=loadImage(“mona.png”);
//mona=loadShape(“artboard1.svg”);
myPort = new Serial(this, Serial.list()[1], 9600);
//[0]= ellipse (100,200,20,30);
//background(0);
//ellipse (100,200,20,30);
for (int i =0; i < Mouths.length; i++) {
mouth[i]=loadImage(Mouths[i]);
}
for (int i =0; i< Eyes.length; i++) {
eyes[i]=loadImage(Eyes[i]);
}
for (int i=0; i<Features.length; i++) {
features[i]=loadImage(Features[i]);
}
printArray(Serial.list());
/*font = createFont(“Nobile-Bold.ttf”,60);
textFont(font);*/
String[] fontList = PFont.list();
printArray(fontList);
font = createFont(“PermanentMarker-Regular.ttf”, 40);
textFont(font);
}

void draw() {

if (intro==true) {
background(0, 0, 0);
imageMode(CENTER);
image(mona_question, width/2, height/2, width, height);
pushMatrix();
translate(640,130);
rotate(HALF_PI);
textSize(60);
text(“When the mind meets the eye”, -90, -50);
textSize(50);
//text(“Press Start to Begin”, 30, 70);
textSize(30);
text(“1. Press START”, -70, 70);
text(“2. Use Slider to Answer Questions”, -70, 130);
text(“3. Enjoy Your Creation!”, -70, 190);
popMatrix();
}
//shape(mona, 50, 50, 50, 50);
//my laptop’s screen size
//text(“positioning placeholder”, 900,200);
//image(mona, 0, 0, 1560, 2600);
//image(name,x,y,width,height)
//shape(pshape name, x, y, width, height);
//println(mouseX, mouseY);
//testing location and size

//Uncomment these lines to test features (SAM)
//image(mouth[0-5], 980, 425, 200, 200);
//image(eyes[0-5],1145, 400, 200,200);
//image(features[0-5],50,50,50,50);

updateSerial();
//println(answer);
//}

if (startbutton == 0 && !askingQuestions && creatingPicture == false) {
startTimer(); //put this wherever it is you start asking questions
askingQuestions = true;
intro = false;

// start image here
imageMode(CENTER);
image(mona_start, width/2, height/2, width, height);
}

if (askingQuestions == true) {

// questions image here

/*for loop checking that all the questions in an array
titled questions is being iterated through. e.g array will look like:
[“whats your favorite number out of 6? XD”, “another question”, “anotha”] so when we iterate through each question, we will start with the first question at index 0, then
start the timer and check if the timers complete. once its complete, we can then store the answer
in an array of equal length to the array titled questions. after that, the loop will move onto the
next question and the process will repeat. what you do with the array of answers is up to you afterwards*/

//Show questions[questionIndex]

// start image here
imageMode(CENTER);
image(mona_question, width/2, height/2, width, height);

pushMatrix();
translate(width/2, height/2);
rotate(HALF_PI);
textSize(36);
fill(255);
text(questions[questionIndex], 0, 0);
textAlign(CENTER);

printArray(answers);
popMatrix();
//if the timer is up
if (millis()/1000 – startTime > timerLength) {
//record answer:
answers[questionIndex] = answer;
//move to next question: questionIndex += 1
questionIndex += 1;
//restart the timer
startTimer();
}

drawTime();
ellipse(650, height * 1/7, 30, 30);
ellipse(650, height * 2/7, 30, 30);
ellipse(650, height * 3/7, 30, 30);
ellipse(650, height * 4/7, 30, 30);
ellipse(650, height * 5/7, 30, 30);
ellipse(650, height * 6/7, 30, 30);
textAlign(CENTER);
textSize(30);
if (values[0] == 0 ) {
fill(255,249,121);
ellipse(650, height * 1/7, 28, 28);
pushMatrix();
//ellipse(600, height * 1/7, 30, 30);
translate(580, height * 1/7);
rotate(HALF_PI);
//his codes
if(questionIndex == 0) {
fill(255);
text(“Irrelevant”, 0, 0);
} else if(questionIndex == 1) {
fill(255);
text(“Boring”, 0, 0);
} else {
fill(255);
text(“Never”, 0, 0);
}
popMatrix();
}
if (values[0] == 1) {
fill(255,249,121);
ellipse(650, height * 2/7, 28, 28);
pushMatrix();
translate(580, height * 2/7);
rotate(HALF_PI);
if(questionIndex == 0) {
fill(255);
text(“Overrated”, 0, 0);
} else if(questionIndex == 1) {
fill(255);
text(“Perplexed”, 0, 0);
} else {
fill(255);
text(“I’m No Picasso”, 0, 0);
}

popMatrix();
}
if (values[0] == 2) {
fill(255,249,121);
ellipse(650, height * 3/7, 28, 28);
pushMatrix();
translate(580, height * 3/7);
rotate (HALF_PI);
if(questionIndex == 0) {
fill(255);
text(“Ambiguous”, 0, 0);
} else if(questionIndex == 1) {
fill(255);
text(“Touchy Feely”, 0, 0);
} else {
fill(255);
text(“Sometimes Warhol”, 0, 0);
}
popMatrix();
}
if (values[0] == 3) {
fill(255,249,121);
ellipse(650, height * 4/7, 28, 28);
pushMatrix();
translate(580, height * 4/7);
rotate (HALF_PI);
if(questionIndex == 0) {
fill(255);
text(“Intrigued”, 0, 0);
} else if(questionIndex == 1) {
fill(255);
text(“Selfie Time!”, 0, 0);
} else {
fill(255);
text(“Weekend Van Gogh”, 0, 0);
}
popMatrix();
}
if (values[0] == 4) {
fill(255,249,121);
ellipse(650, height * 5/7, 28, 28);
pushMatrix();
translate(580, height * 5/7);
rotate (HALF_PI);
if(questionIndex == 0) {
fill(255);
text(“Fascinated”, 0, 0);
} else if(questionIndex == 1) {
fill(255);
text(“Mesmerizing”, 0, 0);
} else {
fill(255);
text(“Daily Monet”, 0, 0);
}
popMatrix();
}
if (values[0] == 5) {
fill(255,249,121);
ellipse(650, height * 6/7, 28, 28);
pushMatrix();
translate(580, height * 6/7);
rotate (HALF_PI);
if(questionIndex == 0) {
fill(255);
text(“Pure Ecstasy!”, 0, 0);
} else if(questionIndex == 1) {
fill(255);
text(“In Love”, 0, 0);
} else {
fill(255);
text(“I AM ART”, 0, 0);
}
popMatrix();
}

//SHOW TIMER / TRACK INPUT

//check that you’ve reached the end
if (questionIndex == questions.length) {
askingQuestions = false;
creatingPicture = true;
questionIndex = 0;
}
}
//PART AFTER ASKING QUESTIONS
//each question as an “if” statement, else if…. and then within each have a switch
//ex. case 1…… break;
if (creatingPicture==true) {

// final image
imageMode(CENTER);
image(mona_final, width/2, height/2, width, height);

pushMatrix();
float yOffset1 = sin(alpha1) * 5;
alpha1 += 1.6;
translate(0, yOffset1);

switch (answers[0]) {
case 0:
image(mouth[0], 1010, 375, 67, 130);
break;
case 1:
image(mouth[1], 1010, 375, 67, 130);
break;
case 2:
image(mouth[2], 1000, 375, 67, 130);
break;
case 3:
image(mouth[3], 1020, 405, 67, 130);
break;
case 4:
image(mouth[4], 1000, 375, 66, 150);
break;
case 5:
image(mouth[5], 1000, 375, 90, 150);
break;
default:
//image(mouth[0], 1010,375, 67,130);
break;
}

popMatrix();

pushMatrix();
float yOffset2 = sin(alpha2) * 7;
alpha2 += 1.2;
translate(0, yOffset2);

switch(answers[1]) {
case 0:
image(eyes[0], 1130, 370, 85, 200);
break;
case 1:
image(eyes[1], 1130, 370, 100, 250);
break;
case 2:
image(eyes[2], 1130, 370, 108, 230);
break;
case 3:
image(eyes[3], 1135, 370, 161, 230);
break;
case 4:
image (eyes[4], 1135, 370, 97, 230);
break;
case 5:
image (eyes[5], 1130, 370, 113, 200);
break;
default:
//image(eyes[0], 1130,370, 85,200);
break;
}

popMatrix();

pushMatrix();
float yOffset3 = sin(alpha3) * 6;
alpha3 += 1;
translate(0, yOffset3);

// image(mouth[answers[0]], 980, 425, 200, 200);
//image(eyes[answers[1]], 1100, 400, 200, 200);
switch(answers[2]) {
case 0:
image(features[0], 1197, 217, 119, 85);
break;
case 1:
image(features[1], 321, 500, 280, 280);
break;
case 2:
image(features[1], 321, 500, 280, 280);
break;
case 3:
image(features[2], 345, 518, 310, 281);
break;
case 4:
image(features[2], 345, 518, 310, 281);
break;
case 5:
image(features[3], 1282, 287, 216, 280);
break;
default:
//image(features[0], 1197,217,119,85);
break;
}

popMatrix();
}
if (startbutton == 0) {
startTimer(); //reset
intro = true;
creatingPicture=false;
}
}

void updateSerial() {
//sending start message to Arduino
while (myPort.available() > 0) {
wholemessage = myPort.readStringUntil(10); //10 is the ASCII code for ‘new-line’
if (wholemessage != null) {
//println(wholemessage);
values = int(split(trim(wholemessage), ‘,’));

for (int i = 0; i < values.length; i ++) {
//values[i] = int(list[i]);
}
}
}
startbutton= values[1];
answer= values[0];
printArray(values);
}

void drawTime() {
fill(255, 255, 255);
noStroke();
rect(width/6, 0, width/30, height * ((startTime + timerLength)- millis()/1000) / timerLength);
fill(255);
rectMode(CENTER);
//text((startTime + 10) – millis()/1000, width/2, 5*height/6);
rectMode(CORNER);
}

void startTimer() {
startTime = millis()/1000;
}

Arduino Code

int sensor1 = A0;
int button = 9;
//int sensor2 = 9;

int startbuttonvalue = 0;

void setup() {
// put your setup code here, to run once:
Serial.begin(9600);
pinMode(button, INPUT_PULLUP);
//using this in order to not use a breadboard
//starts at 1 instead of 0
}

void loop() {
//while (Serial.available()) {
//Serial.read();
int sensor1Value = map(analogRead(sensor1), 0, 1023, 0, 5);
startbuttonvalue = digitalRead(button);
Serial.print(sensor1Value);
Serial.print(“,”);
Serial.print(startbuttonvalue);
Serial.println();
delay(20);
//}
}

Recitation 11 Documentation (Isaac Schlager)

PART 1:

For the first part of this recitation, we were asked to create an arduino-to-processing serial communication circuit that used two analogues and controlled drawing something on the screen. This exercise was relatively simple in that we already did something creating an etch-a-sketch in recitation 8. I used two potentiometers for this in A0, A1. Once i defined the serial arrays in arduino, all I had to do was create an x and y variable in processing, map the two arrays with these variables, and float an ellipse with these coordinates.

Arduino

// IMA NYU Shanghai
// Interaction Lab
// This code receives one value from Processing to Arduino

char valueFromProcessing;
int ledPin = 9;

void setup() {
Serial.begin(9600);
pinMode(ledPin, OUTPUT);
}

void loop() {
getSerialData();

intbrightness1=map(values[0], 0, 500, 0, 255);
intbrightness2=map(values[1], 0, 500, 0, 255
analogWrite (9, values[0]);
analogWrite(11, values[1]);

// to receive a value from Processing
while (Serial.available()) {
valueFromProcessing = Serial.read();
}

if (valueFromProcessing == ‘H’) {
digitalWrite(ledPin, HIGH);
} else if (valueFromProcessing == ‘L’) {
digitalWrite(ledPin, LOW);
} else {
// something esle
}

// too fast communication might cause some latency in Processing
// this delay resolves the issue.
delay(10);
}

Processing

// IMA NYU Shanghai
// Interaction Lab
// This code receives one value from Processing to Arduino

char valueFromProcessing;
int ledPin = 9;

void setup() {
Serial.begin(9600);
pinMode(ledPin, OUTPUT);
}

void loop() {
getSerialData();

intbrightness1=map(values[0], 0, 500, 0, 255);
intbrightness2=map(values[1], 0, 500, 0, 255
analogWrite (9, values[0]);
analogWrite(11, values[1]);

// to receive a value from Processing
while (Serial.available()) {
valueFromProcessing = Serial.read();
}

if (valueFromProcessing == ‘H’) {
digitalWrite(ledPin, HIGH);
} else if (valueFromProcessing == ‘L’) {
digitalWrite(ledPin, LOW);
} else {
// something else
}

// too fast communication might cause some latency in Processing
// this delay resolves the issue.
delay(10);
}

PART 2:

For the second part of the recitation, we had to use processing-to-arduino serial communication. We were asked to use the mouse to light up two separate LED’s. For this, in processing I used mousex and mousey functions and set things so that the x and y values that processing was sending through in arrays would be received as lighting each LED separately. I was able to complete this circuit, yet one of my LED’s was barely lighting up, and I was having trouble with its resistor for some reason. This is shown in the video below.

Arduino Code:

// IMA NYU Shanghai
// Interaction Lab

/**
This example is to send multiple values from Processing to Arduino.
You can find the Processing example file in the same folder which works with this Arduino file.
Please note that the echo case (when char c is ‘e’ in the getSerialData function below)
checks if Arduino is receiving the correct bytes from the Processing sketch
by sending the values array back to the Processing sketch.
**/

#define NUM_OF_VALUES 2 /** YOU MUST CHANGE THIS ACCORDING TO YOUR PROJECT **/

/** DO NOT REMOVE THESE **/
int tempValue = 0;
int valueIndex = 0;

/* This is the array of values storing the data from Processing. */
int values[NUM_OF_VALUES];

void setup() {
Serial.begin(9600);
}

void loop() {
getSerialData();

// add your code here
// use elements in the values array
// values[0];
// values[1];
int brightness1 = map(values[0], 0, 500, 0, 255);
int brightness2 = map(values[1], 0, 500, 0, 255);
analogWrite(9, brightness1);
analogWrite(11, brightness2);
}

//recieve serial data from Processing
void getSerialData() {
if (Serial.available()) {
char c = Serial.read();
//switch – case checks the value of the variable in the switch function
//in this case, the char c, then runs one of the cases that fit the value of the variable
//for more information, visit the reference page: https://www.arduino.cc/en/Reference/SwitchCase
switch (c) {
//if the char c from Processing is a number between 0 and 9
case ‘0’…’9′:
//save the value of char c to tempValue
//but simultaneously rearrange the existing values saved in tempValue
//for the digits received through char c to remain coherent
//if this does not make sense and would like to know more, send an email to me!
tempValue = tempValue * 10 + c – ‘0’;
break;
//if the char c from Processing is a comma
//indicating that the following values of char c is for the next element in the values array
case ‘,’:
values[valueIndex] = tempValue;
//reset tempValue value
tempValue = 0;
//increment valuesIndex by 1
valueIndex++;
break;
//if the char c from Processing is character ‘n’
//which signals that it is the end of data
case ‘n’:
//save the tempValue
//this will b the last element in the values array
values[valueIndex] = tempValue;
//reset tempValue and valueIndex values
//to clear out the values array for the next round of readings from Processing
tempValue = 0;
valueIndex = 0;
break;
//if the char c from Processing is character ‘e’
//it is signaling for the Arduino to send Processing the elements saved in the values array
//this case is triggered and processed by the echoSerialData function in the Processing sketch
case ‘e’: // to echo
for (int i = 0; i < NUM_OF_VALUES; i++) {
Serial.print(values[i]);
if (i < NUM_OF_VALUES – 1) {
Serial.print(‘,’);
}
else {
Serial.println();
}
}
break;
}
}
}

Processing Code

// IMA NYU Shanghai

// Interaction Lab

/**

* This example is to send multiple values from Processing to Arduino.

* You can find the arduino example file in the same folder which works with this Processing file.

* Please note that the echoSerialData function asks Arduino to send the data saved in the values array

* to check if it is receiving the correct bytes.

**/

import processing.serial.*;

int NUM_OF_VALUES = 2;  /** YOU MUST CHANGE THIS ACCORDING TO YOUR PROJECT **/

Serial myPort;

String myString;

// This is the array of values you might want to send to Arduino.

int values[] = new int[NUM_OF_VALUES];

void setup() {

  size(500, 500);

  background(0);

  printArray(Serial.list());

  myPort = new Serial(this, Serial.list()[ 15 ], 9600);

  // check the list of the ports,

  // find the port “/dev/cu.usbmodem—-” or “/dev/tty.usbmodem—-“

  // and replace PORT_INDEX above with the index of the port

  myPort.clear();

  // Throw out the first reading,

  // in case we started reading in the middle of a string from the sender.

  myString = myPort.readStringUntil( 10 );  // 10 = ‘\n’  Linefeed in ASCII

  myString = null;

}

void draw() {

  background(0);

  values[0] = mouseX;


  values[1] = mouseY;

  // changes the values

  /*for (int i=0; i<values.length; i++) {

    values[i] = i;  /** Feel free to change this!! **/

  //}

  // sends the values to Arduino.

  sendSerialData();

  // This causess the communication to become slow and unstable.

  // You might want to comment this out when everything is ready.

  // The parameter 200 is the frequency of echoing.

  // The higher this number, the slower the program will be

  // but the higher this number, the more stable it will be.

  echoSerialData(200);

}

void sendSerialData() {

  String data = “”;

  for (int i=0; i<values.length; i++) {

    data += values[i];

    //if i is less than the index number of the last element in the values array

    if (i < values.length-1) {

      data += “,”; // add splitter character “,” between each values element

    }

    //if it is the last element in the values array

    else {

      data += “n”; // add the end of data character “n”

    }

  }

  //write to Arduino

  myPort.write(data);

}

void echoSerialData(int frequency) {

  //write character ‘e’ at the given frequency

  //to request Arduino to send back the values array

  if (frameCount % frequency == 0) myPort.write(‘e’);

  String incomingBytes = “”;

  while (myPort.available() > 0) {

    //add on all the characters received from the Arduino to the incomingBytes string

    incomingBytes += char(myPort.read());

  }

  //print what Arduino sent back to Processing

  print( incomingBytes );

}

Overall, I feel like this was a good recitation for me to attend. I felt that I needed much more practicing with serial communication and this definitely helped with my final project which is based off of serial communication as well.

Recitation 10 (Isaac Schlager)

For this week’s recitation, we were tasked with selecting an image or video and altering it using processing and arduino. I decided to select this picture of a roller coaster on the beach as my canvas. I decided that I was going to set up a circuit where I would have a potentiometer that would adjust the brightness of the photo with a turn of the knob. In order to code this  interaction, I had to use an arduino-to-processing template. I used one matrix with one set of values, which resembled the potentiometer and began from there. I then had to input the code I wanted in void draw. Originally, I was going to use a “For” loop that would change a set of RGB values, but then I was made aware that since I am changing the brightness, I should use HSB values. Once I finished with this, I uploaded the image into my processing code and ran it… but nothing came up. I checked my circuit and arduino code and everything was working fine, but for some reason the photo wouldn’t show. I was able to get help from the recitation helpers and professors, but whenever the code ran, a grey screen would pop up. In order to try and solve this, I changed the color values in my code back to RGB and worked on just changing each individual pixel’s color to a darker or lighter shade with each turn of the potentiometer. I ran the code again but to no avail. For some reason, things were not processing in processing.

Picture of circuit


Circuit schematic

Before I relate this reading to my project, I want to emphasize the importance of open source code and opportunities of learning how to code and use new technology that are open to the public. I think it’s a great idea that computer vision is reaching out to novice programmers and I think more initiatives should do the same. I think today, computer vision has become extremely popular and I think many of our interaction lab projects will contain some aspect of it. My project for this recitation uses a very basic aspect of computer vision by changing the brightness of an image with the turn of a knob. I enjoy how the article goes through a list of elementary techniques that one can use with computer vision. I believe the fact that my circuit allows for the user to manually change the how an image looks makes it a “computer visioned” technique or process, but I hope that as I become more comfortable with processing, I can do more with computer vision by creating more visual effects.

Processing Code

// IMA NYU Shanghai
// Interaction Lab
// For receiving multiple values from Arduino to Processing

/*
* Based on the readStringUntil() example by Tom Igoe
* https://processing.org/reference/libraries/serial/Serial_readStringUntil_.html
*/

import processing.serial.*;
PImage photo;
String myString;
Serial myPort;
float c;
int NUM_OF_VALUES = 1; /** YOU MUST CHANGE THIS ACCORDING TO YOUR PROJECT **/
int[] sensorValues; /** this array stores values from Arduino **/

void setup() {
size(600, 600);
//background(0);
photo = loadImage(“RCP.jpg”);
setupSerial();
colorMode(HSB);
}

void draw() {
updateSerial();
printArray(sensorValues);
//set(x,y,color(random(255), random(255), random(255))));
// use the values like this!

//c=map(sensorValues[0], 0, 1023, 0, 255);
//image(photo, 0, 0, width/2, height/2);
for (int x=0; x<photo.width; x++) {
for (int y=0; y<photo.height; y++) {
color col = photo.get(x, y);
color newCol = color(col, col, map(c,0,1023,0,255));
photo.set(x, y, newCol);
}

}

// add your code

//
}

void setupSerial() {
printArray(Serial.list());
myPort = new Serial(this, Serial.list()[13], 9600);
// WARNING!
// You will definitely get an error here.
// Change the PORT_INDEX to 0 and try running it again.
// And then, check the list of the ports,
// find the port “/dev/cu.usbmodem—-” or “/dev/tty.usbmodem—-”
// and replace PORT_INDEX above with the index number of the port.

myPort.clear();
// Throw out the first reading,
// in case we started reading in the middle of a string from the sender.
myString = myPort.readStringUntil( 10 ); // 10 = ‘\n’ Linefeed in ASCII
myString = null;

sensorValues = new int[NUM_OF_VALUES];
}

void updateSerial() {
while (myPort.available() > 0) {
myString = myPort.readStringUntil( 10 ); // 10 = ‘\n’ Linefeed in ASCII
if (myString != null) {
String[] serialInArray = split(trim(myString), “,”);
if (serialInArray.length == NUM_OF_VALUES) {
for (int i=0; i<serialInArray.length; i++) {
sensorValues[i] = int(serialInArray[i]);
}
}
}
}
}

Arduino Code

void setup() {
// put your setup code here, to run once:
Serial.begin(9600);
}

void loop() {
int sensor1= analogRead(A0);
Serial.println(sensor1);

delay(100);

}

Recitation 9 Documentation (Isaac Schlager)

The three projects that I critiqued were by Nate, Eva, and Dominick. Each of my classmates and their proposal ideas were drastically different from one another.

“The Journey”:

Nate’s project is centered around a “Game of Thrones” narrative. I did not ask him too much about the plot, for that would spoil the show for me, but he did provide me with a basic  format of the story he wants to tell. This project is similar to black mirror’s “Bandersnatch” episode (minus the existential themes), or the “Telltale Games” series. A player has a couple choices provided to them on each slide where they make a selection that determines the progression of their character. Nate will have a specified amount of slides that will show the progression of the story and then depending on the decisions each player makes, they will survive or achieve glory. He is planning on using Arduino and button coding as well as audio feedback for his interactive methods. I believe Nate’s original idea is fairly interesting because decision-making games or simulations are popular at the moment, but I think Nate’s biggest challenge will be making his project more interesting/ significant than previous ones, while using Processing. This could be done using more advanced graphics and images (either hand drawn or from elsewhere). Much of our feedback for Nate was asking him to provide further interactive methods or theming that would engage the user more than what he already had planned. Of course, we do not know the full plot of Nate’s story, but we could tell that a simple crudely drawn slides with stories and choice options will not set his project out from others. If he wants his project to create a significant interaction with its users, I believe he will most likely need to focus on the plot and visual/audio effects of his project. Nate’s definition of interaction was different than mine in that it allowed for it included more digital aspects by referring to Arduino and Processing.

“Space Invaders”:

Dominick’s project is intended to be a similar replica of a game where a ship has to doge and shoot its way through meteorites and ships to complete a level. He wants to make things more unique by using a distance sensor to allow users to control their ships movement with their own body movements. I think this idea is intriguing, but it could also be too ambitious for this short amount of time. Being able to calibrate a motion sensor to pick up your movements in a split second may not be feasible for the given programs and materials were are provided with. That being said, I think he should rethink the sensor he would like to use and provide another method of users interacting with the game. I believe that if Dominick wants to create a meaningful project that interact with its users, he should consider an alternative form of interaction than a distance or motion sensor. Dominick’s definition of interaction was similar to mine in that it focused on the “conversation” between two or more entities.

Eva’s Final Project Project:

I found Eva’s project to be the most abstract of our group’s members’ projects and I find that to be a good thing. Eva wants to create an audio/visual experience that will activate the camera feature and show the user’s facial reactions to the audio and visuals being displayed. She wants to focus on the question of whether and to to what extent we lose touch with ourselves. We often do not get to see ourselves, unless we are standing in front of the mirror, so this project provides an open space for self-reflection. Eva’s goal is for the users to have an intimate experience with themselves without any distractions. During our feedback for Eva’s project, we talked a lot about what specific audio she will use. We suggested that the audio be calming or “white noise” in order for the user to be able to tone out what is around them. We also mentioned maybe installing mirrors around the project to allow the user to be in a more secluded environment. I believe that if Eva wants her project to create a significant interaction, she really needs to decide what audio and visuals she will use on the people interacting with her project, for that determines the direction she wants to go in. Eva’s definition of interaction was more simple than mine. It did not need to include a physical interaction, which set it a part from any other definitions that I have heard.

“When the Mind Meets the Eye” (My group’s project)

Most of the feedback I received concerning my final project is centered around what I think the user will get out of it. Examples people gave me involved changing how the user acted with the Mona Lisa itself, for example, when will she be displayed and how will she be displayed. People mentioned displaying the original painting in the beginning and then the personalized version the user creates at the end to compare and contrast. We have decided to run with this idea, but may tweak it if necessary by just showing the user the basic components that they add the the painting after each question. It was also suggested to allow the user to keep their creation, which will are hoping to allow while we create a processing code that will either export the image or submit it to a library. I agree with a majority of the feedback given about my project, but I do not think that we will allow people to physically edit the Mona Lisa with mouses or buttons because I think that takes away from the overall purpose of a questionnaire that reflects the user’s mood, and thus, their interpretation of the painting. As of now, we are not planning on incorporating other feedback on our project, but if someone provides a better method of interaction or display, we are open to their opinions.

Recitation 8 Documentation (Isaac Schlager)

For this recitation, we practiced creating interfaces between Processing and Arduino. For the first assignment, we were instructed to create an etch a sketch using the two programs. This is an Arduino-to-Processing interaction that we had to create. When constructing my circuit, I used two potentiometers and attached to the Arduino. Below is the schematic as well as a picture of the circuit as it was on the bread board.


In the circuit we had two analogue inputs, A0 and A1 that each ran to the 2nd input pin on each potentiometer. Both potentiometers received the same 5 volt power source from the Arduino and had a pin going to ground (GND) as well.


Once i created my code, which involved two sensor values in Processing, I was able to manipulate the drawing of a pink circle on the screen from side to side using one value and from top to bottom using the other value (X and Y coordinates). Below is a picture of one of the designs I was able to make, as well as my code in Arduino and Processing for the project and a video.

Processing Code For Etch a Sketch:

// IMA NYU Shanghai
// Interaction Lab
// For receiving multiple values from Arduino to Processing

/*
* Based on the readStringUntil() example by Tom Igoe
* https://processing.org/reference/libraries/serial/Serial_readStringUntil_.html
*/

import processing.serial.*;
float x;
float y;
String myString = null;
Serial myPort;

int NUM_OF_VALUES = 2; /** YOU MUST CHANGE THIS ACCORDING TO YOUR PROJECT **/
int[] sensorValues; /** this array stores values from Arduino **/

void setup() {
size(500, 500);
background(0);
setupSerial();
}

void draw() {
updateSerial();
printArray(sensorValues);

// use the values like this!
// sensorValues[0] x=map(sensorValues[0], 0, 1023, 0, width);
y=map(sensorValues[1], 0, 1023, 0, height);
// add your code
fill(255, 155, 155);
ellipse(x, y, 50, 50);
//
}

void setupSerial() {
printArray(Serial.list());
myPort = new Serial(this, Serial.list()[ 13], 9600);
// WARNING!
// You will definitely get an error here.
// Change the PORT_INDEX to 0 and try running it again.
// And then, check the list of the ports,
// find the port “/dev/cu.usbmodem—-” or “/dev/tty.usbmodem—-”
// and replace PORT_INDEX above with the index number of the port.

myPort.clear();
// Throw out the first reading,
// in case we started reading in the middle of a string from the sender.
myString = myPort.readStringUntil( 10 ); // 10 = ‘\n’ Linefeed in ASCII
myString = null;

sensorValues = new int[2];
}

void updateSerial() {
while (myPort.available() > 0) {
myString = myPort.readStringUntil( 10 ); // 10 = ‘\n’ Linefeed in ASCII
if (myString != null) {
String[] serialInArray = split(trim(myString), “,”);
if (serialInArray.length == NUM_OF_VALUES) {
for (int i=0; i<serialInArray.length; i++) {
sensorValues[i] = int(serialInArray[i]);
}
}
}
}
}

Arduino Code for Etch a Sketch:

// IMA NYU Shanghai
// Interaction Lab
// For sending multiple values from Arduino to Processing

void setup() {
Serial.begin(9600);
}

void loop() {
int sensor1 = analogRead(A0);
int sensor2 = analogRead(A1);

// keep this format
Serial.print(sensor1);
Serial.print(“,”); // put comma between sensor values
Serial.print(sensor2);
Serial.println();

// too fast communication might cause some latency in Processing
// this delay resolves the issue.
delay(100);
}

For the next step of our recitation, we had to create a “musical instrument” using Processing-to-Arduino serial communication. Despite this circuit being simple, coding this was significantly harder than the previous project because we had to use the “tone()” function in Arduino to code different notes/noises and could only use one sensor value. Below are a picture of the circuit as well as a schematic.

Here we has one input from the Digital 6 pin running to the buzzer as well as a ground pin.

Arduino Code for Musical Instrument

#define NUM_OF_VALUES 4 /** YOU MUST CHANGE THIS ACCORDING TO YOUR PROJECT **/

#define NOTE_C4 262

#define NOTE_G3 196

#define NOTE_A3 220

#define NOTE_B3 247

/** DO NOT REMOVE THESE **/

int tempValue = 0;

int valueIndex = 0;

/* This is the array of values storing the data from Processing. */

int values[4];

void setup() {

Serial.begin(9600);

}

void loop() {

getSerialData();

// add your code here

if (values[0] == ‘a’){

tone(6, 131);

} else if (values[1] == ‘s’){

tone(6,165);

} else if (values[2] == ‘d’){

tone(6,196);

} else if (values[3] == ‘f’){

tone(6,247);

}

}

//recieve serial data from Processing

void getSerialData() {

if (Serial.available()) {

char c = Serial.read();

//switch – case checks the value of the variable in the switch function

//in this case, the char c, then runs one of the cases that fit the value of the variable

//for more information, visit the reference page: https://www.arduino.cc/en/Reference/SwitchCase

switch (c) {

//if the char c from Processing is a number between 0 and 9

case ‘0’…’9′:

//save the value of char c to tempValue

//but simultaneously rearrange the existing values saved in tempValue

//for the digits received through char c to remain coherent

//if this does not make sense and would like to know more, send an email to me!

tempValue = tempValue * 10 + c – ‘0’;

break;

//if the char c from Processing is a comma

//indicating that the following values of char c is for the next element in the values array

case ‘,’:

values[valueIndex] = tempValue;

//reset tempValue value

tempValue = 0;

//increment valuesIndex by 1

valueIndex++;

break;

//if the char c from Processing is character ‘n’

//which signals that it is the end of data

case ‘n’:

//save the tempValue

//this will b the last element in the values array

values[valueIndex] = tempValue;

//reset tempValue and valueIndex values

//to clear out the values array for the next round of readings from Processing

tempValue = 0;

valueIndex = 0;

break;

//if the char c from Processing is character ‘e’

//it is signaling for the Arduino to send Processing the elements saved in the values array

//this case is triggered and processed by the echoSerialData function in the Processing sketch

case ‘e’: // to echo

for (int i = 0; i < NUM_OF_VALUES; i++) {

Serial.print(values[i]);

if (i < NUM_OF_VALUES – 1) {

Serial.print(‘,’);

}

else {

Serial.println();

}}

break;

}}}

Processing Code for Musical Instrument

import processing.serial.*;

int NUM_OF_VALUES = 4; /** YOU MUST CHANGE THIS ACCORDING TO YOUR PROJECT **/

Serial myPort;

String myString;

// This is the array of values you might want to send to Arduino.

int values[] = new int[4];

void setup() {

size(500, 500);

background(0);

printArray(Serial.list());

myPort = new Serial(this, Serial.list()[ 13 ], 9600);

// check the list of the ports,

// find the port “usb modem 4213”

// and replace PORT_INDEX above with the index of the port

myPort.clear();

// Throw out the first reading,

// in case we started reading in the middle of a string from the sender.

myString = myPort.readStringUntil( 10 ); // 10 = ‘\n’ Linefeed in ASCII

myString = null;

}

void keyPressed() {

if (key == ‘a’) {

values[0] = ‘a’;

}

if (key == ‘s’) {

values[1] = ‘s’;

}

if (key == ‘d’) {

values[2] = ‘d’;

}

if (key == ‘f’) {

values[3] = ‘f’;

}

}

void draw() {

background(0);

sendSerialData();

echoSerialData(200);

}

void sendSerialData() {

String data = “”;

for (int i=0; i<values.length; i++) {

data += values[i];

if (i < values.length-1) {

data += “,”; // add splitter character “,” between each values element

}

else {

data += “n”; // add the end of data character “n”

}

}

myPort.write(data);

}

void echoSerialData(int frequency) {

if (frameCount % frequency == 0) myPort.write(‘e’);

String incomingBytes = “”;

while (myPort.available() > 0) {

//add on all the characters received from the Arduino to the incomingBytes string

incomingBytes += char(myPort.read());

}

print( incomingBytes );
}

In conclusion, this recitation taught us how to use serial communication between Arduino and Processing to create certain interactive projects. For the etch a sketch activity, Arduino was sending outputs to processing Inputs, which enable us to turn the potentiometers and and draw things in Processing. For the second activity of the music instrument, it was actually Processing sending the outputs to Arduino inputs. These outputs had to do with the pitch of the buzzer, therefore depending on where I moved my cursor and clicked, you would get a distinct 1 of 4 different tones. I programed mine to go up in a scale.