Final Project: Project Proposals by Isabel Brack

Project Proposals

Here are three different final project proposals mixing Arduino with processing. Two of these projects focus on the nostalgia of childhood recreating and enhancing childhood games and dreams. And one project focuses on more of a social/ environmental issue mixing media and raising awareness for a current issue the world is facing.

Project 1 :Piano Dancer

 This project took inspiration from a childhood memory of the light up pianos on the floor at malls or children’s play areas. Each key you step on lights up and plays a note. However, my twist on this game to involve processing is basically to hack a keyboard and make pressure sensors that act like key presses for floor pressure pads. Each pressure pad should have a different sound/note and would cause a different design/animation/mirage to appear on the computer screen. Possibly, we could create a light setup with arduino to have different light displays present different dance patterns for people to follow which would create a mini song with the notes but also create a visual story with an animation to match the song. The intended impact is focused around a nostalgia for childhood storybooks, song, and piano games which were present in many of our childhoods. This game/story has a bit of a dance dance revolution feeling along with the piano floor game, which were both large parts of my childhood experience that we can share with others and share the nostalgia through recreating and changing this game. A long time back, during research of arduino projects I looked into building your own DDR(Dance Dance Revolution), creating more sturdy wooden pressure sensors, which helped inspire this mixing of childhood games along with adding a visual story component. The DDR research I did made me understand how to use arduino and how to create your own sensor to function with a game. It also reminded me of my childhood memories playing this game with my brother and friends. My audience would be two groups those who share the same memories to bring nostagia to them and those who can be introduced to this game and create a new experience sharing a fun childhood game with a new twist on it.

Project 2 :Bleaching Effect

This project would involve mixed media including a processing animation of a coral reef. Similar to the last project this would also include linking the key press function to new self made buttons which would consist of different elements. Hopefully there would be different physical elements like different physical representations of sea creature which when you pressed them different elements of the coral reef scene would move around maybe a fish would swim by or some bubbles would escape to the surface. But if people touched the man made objects like sunscreen or plastic waste/glass bottles the coral reef would slowly begin to bleach which we could mimic through desaturating the colors of the reef scene. Basically, we could have a physical scene creating like a beach set up and when you touch different pieces of the scene the ocean view changes. This message focuses less on entertainment and more an environmental statement of the effects human’s plastic waste and different consumption like the use of sunscreen is rising sea temperatures, acidifying oceans, and bleaching the coral reefs slowly killing some of the most biodiverse ecosystems on the planet. This inspiration came from two very unrelated images I saw while researching arduino and processing projects. The first was just a visual of a circle growing and shrinking based on someone’s movement in front of an ultrasonic sensor. And the second image as of a plastic jellyfish lighting up when a hand pressed down on it. Those two ideas combined for me to think about how animations can be connected with different sensor uses and how to combine environmental/marine life with an interactive art piece. This idea especially speaks to me because of the experience it creates, surrounding people in a common experience of going to the beach and seeing familiar use items, then animating the effects of those products of environments that the average person will never see in their life. My audience is particularly directed at those who aren’t that informed about the current situation of human’s direct impact on the bleaching of coral reefs, hoping to cause people to think more about those actions.

Project 3 :Ultrasonic Treasure Hunt

This project would mix RC cars and ultrasonic sensors mounted on a servo so it can rotate. Essentially, the player would only be able to see the processing screen and be given a remote control car that has an ultrasonic sensor mounted to it. They would search for the treasure using the ultrasonic sensor and the screen projection of the information the sensor has picked up. Once they found the found the treasure they could pick it up using the car perhaps attaching another servo motor with a bucket/ scoop in the front to scoop the treasure up(would need to look further into options for how to pick items up with the car). We could even time each player and find the fastest time as a winner. Most of the research I have done around arduino and processing projects that intertwine has led me to see an ultrasonic sensor and some sort of radar on the processing screen. This gave me the idea to combine the ultrasonic radar with a game. These radar screens remind me a lot of different metal detecting or software  you would see on boats and planes. For me, this reminded me of some of the most fun games as children that revolves around pirates and searching for buried treasure, which was a childhood fantasy of most children I know. This game again reminds me of a shared childhood experience that I can now share with other students. Introducing them to a central part of my childhood, pirate treasure hunts, and conjuring nostalgia in those who shared similar childhood memories, bringing their pirate fantasies of finding buried treasure to life. This project’s audience is focusing on those young at heart who are still trying to fulfill their pirate treasure hunt dreams and introduce a major theme of my childhood to those who haven’t been introduced to pirate treasure hunts before.
Recitation 7: Arrays and Functions By Isabel Brack

Overview:

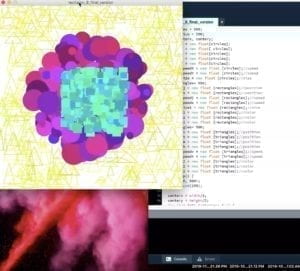
This recitation was the most interesting, as i could create a color blocked moving background. I started by creating each function for the three different shapes. Then I created different arrays for each variable within each shape, randomizing the color and size. The last step I did was make each shape move randomly. After that I altered the range of each shapes starting positions and their movement to create the blue square in the center. Then I used a distance function along with some research to define the area that the circles could bounce around in. The last step was the most difficult. At first, I also tried to limit the triangle function to bounce around in a triangle, but I couldn’t figure that out in the recitation time so instead I made the circles bounce in a circle area.

still image

Question 1:

In your own words, please explain the difference between having your for loop from Step 2 in setup() as opposed to in draw().

The for loop, when placed in setup, will complete its self a fixed or finite number of times equal to the i<100. The for loop in my code assigned values to all of my different arrays for each circle, triangle, and rectangle. Once the for loop completed assigning all the values it stopped. Contrastingly, the for loop in draw() continued to play and loop from when I began to run the code till when I stopped running the code, that for loop basically infinitely repeats itself. 

Question 2:

What is the benefit of using arrays?  How might you use arrays in a potential project?

The benefit of using arrays is the for loop in setup assigns each of my circles, triangles, and rectangles all the variables needed to move and randomize size, color, speed, etc all to the limits I assign. The arrays and for loops combine to drastically shorten the code automatically assigning values. Arrays can be used in any potential project to repeat a desired set of instructions for many different objects, especially if I want to have a background to some animation that is random in nature and uses many functions. If I want to assign any number of similar functions their own random values I would plan to use an array and for loop. 

Code

int circles = 500;
float radius = 220;
float centerx, centery;
float[] x = new float[circles];
float[] y = new float[ circles];
float r[] = new float[circles];
float g[] = new float[circles];
float b[] = new float[circles];
float []speedX = new float [circles];//speed
float []speedY = new float [circles];//speed
float []size = new float [circles];//size
int rectangles= 550;
float [] j = new float [rectangles];//position
float [] s = new float [rectangles];//position
float []speedj = new float [rectangles];//speed
float []speeds = new float [rectangles];//speed
float []size1 = new float [rectangles];//size
float []r1 = new float [rectangles];//color
float []g1 = new float [rectangles];//color
float []b1 = new float [rectangles];//color
int triangles= 500;
float [] v = new float [triangles];//position
float [] t = new float [triangles];//position
float [] w = new float [triangles];//position
float [] h = new float [triangles];//position
float []speedv = new float [triangles];//speed
float []speedt = new float [triangles];//speed
float []r2 = new float [triangles];//color
float []g2 = new float [triangles];//color
float []b2 = new float [triangles];//color
void setup() {
  size(600, 600);
  background(255);
  centerx = width/2;
  centery = height/2;
  
  for (int i=0; i<circles; i++) {
    x[i] = centerx;
    y[i] = centery;
    size[i]= random(20,80);
      speedX[i]= random(-1,1);
     speedY [i]=random(-1,1);
    r[i]= random (70,255);
     g[i]= 0;
      b[i]= random (70,255);
  }
 for (int i=0; i<j.length; i++){ // rectangles
    j[i]= random(200,400);
     s[i]= random(200,400);
     speedj[i]= random(-1,1);
     speeds [i]=random(-1,1);
     size1 [i]= random(5,30);
     r1[i]=0;
      g1[i]=random (100,255);
       b1[i]=random (100,255);
 }

   for (int i=0; i<v.length; i++){ // triangles
    v[i]= random(width);
    t[i]= random(height);
     w[i]= random(10,80);
    h[i]= random(10,80);
     speedv[i]= random(-5,5);
     speedt [i]=random(-5,5);
     r2[i]= random(210,255);
      g2[i]=random (210,255);
       b2[i]= (0);  
  }

}
void draw() {
  background(255);
  for (int i=0; i<x.length; i++){   
  triangleSimple(v[i],t[i],w[i],h[i],color(r2[i],g2[i],b2[i]));
   v[i] = v[i] + speedv[i];
  t[i] = t[i] + speedt[i];
  // check the edges for yellow
  if (v[i] > width || v[i]< 0) {
    speedv[i] = -speedv[i];
  }
 if (t[i] > height || t[i]< 0) {
   speedt[i] = -speedt[i];
 }
  }
  for (int i=0; i<x.length; i++){
  circle(x[i],y[i],size[i],color(r[i],g[i],b[i]));
   x[i] = x[i] + speedX[i];
  y[i] = y[i] + speedY[i];
  // check the edges 
  if (x[i] > 500 || x[i]< 100) {
    speedX[i] = -speedX[i];
  }
  }
  for (int i=0; i<circles; i++) {
      circle(x[i],y[i],size[i],color(r[i],g[i],b[i]));
   x[i] = x[i] + speedX[i];
  y[i] = y[i] + speedY[i];
  // check the edges 
  if (x[i] > 500 || x[i]< 100) {
    speedX[i] = -speedX[i];
  }
    if (dist(centerx, centery, x[i], y[i]) > radius-10) {
      float difx = x[i] - centerx;
      float dify = y[i] - centery;
      x[i] = centerx - difx;
     y[i] = centery - dify;
    }  
  }
 noFill();
  ellipse(centerx, centery, 500, 500);  
  for (int i=0; i<j.length; i++){
    
  rectangle(j[i],s[i],size1[i],color(r1[i],g1[i],b1[i]));
   j[i] = j[i] + speedj[i];
  s[i] = s[i] + speeds[i];
  // check the edges 
  if (j[i] > 400 || j[i]< 200) {
    speedj[i] = -speedj[i];
  }
 if (s[i] > 400 || s[i]< 200) {
   speeds[i] = -speeds[i];
 } 
  } 
}
void circle(float x, float y, float size, color c) {
  // display ball
   noStroke();
  fill(c);
  ellipse(x, y, size, size);
}
void rectangle (float j, float s, float size1, color c) {
  noStroke();
  fill(c);
  rect(j,s,size1,size1);
}
void triangleSimple(float v, float t, float w, float h, color c) {
  // A wrapper for standard triangle() command. 
  // triangleSimple has the lower left corner as x,y.
  // The top is above the base (or below it with a negative parameter for h).  
   strokeWeight(1.5);
  stroke(c);
  noFill();
  triangle(v, t, v+w/2, t-h, v+w, t);
}

Final Project Research and Analysis by Isabel Brack

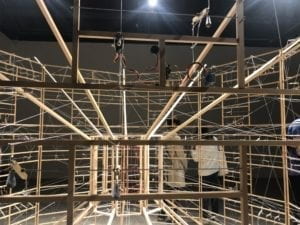
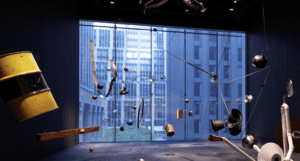
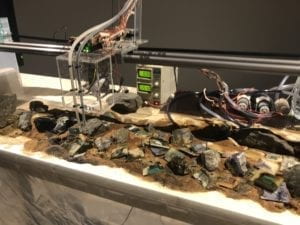
The Chronus Exhibition created an art experience that blended both technology and artistic vision. Each individual piece had an interactive element along with an artistic message and interpretation. The pieces allowed the audience it come to their own conclusion about each piece and then after reading the artist’s explanation learn the intention  of the peace. For instance,the Test Execution Host by Martin Howse, first appeared more like an environmental statement mixed with the current state of technology as a machine dispelled a dark liquid mixture and water on to pieces of technology that were placed in sand. However, rather than my assumption of the meaning of this piece, the artist’s intentions where focused around the ones and zeros of computer systems, taking a physical look and representation of a normally digital occurence of ones and zeroes. In addition to T.E.H.,I also closely observed the large wooden structure comprised of servo motors, strings, and more called Rechender Raum by Ralf Baecker. This piece acted like an inside-out or transparent machine.The first thing this piece reminded me of was a brain, what the artist later called a neural network, each connection being connected by strings that the servo motor controlled. At first, I only recognized the outside walls changing in movement and shape as each different string was pulled. Only after a while did I notice the center of the machine moving and changing shape based on all the outside manipulations, each working in tandem to create the center shape. This piece I understood much better than the T.E.H. before looking at the artists own interpretation. 

T.E.H.

Test Execution Host by Martin Howse

Rechender Raum by Ralf Baecker

Rechender Raum by Ralf Baecker

Compared to most of my experiences at art exhibitions before, this exhibition differed on it’s centrality around technology and its interactive function. Most art museums that I have been to like MOMA, the Louvre, or the Metropolitan consist of art exhibits that are interactive in the sense of engaging the audience with their views and interpretations and making the audience think deeper about a topic or idea, but those exhibitions normally do not involve any movement or programing. For instance, one of my favorite exhibits at the Met is their Costume Institute, which displays many historical costumes from all over the world from different time periods. Each costume is beautiful and kept mostly in their own glass box. Their audience is however, limited to exclude the general public and is very restrictive for the sake of keeping the textiles in tact. The pieces each elicit emotions, contemplation, and mindful participation from their audience, but they do not involve direct interaction between the two parties and do not move or have programming of their own. The information about these costumes however is more interactive, using an electronic interactive screen system to allow the audience to learn more about particular pieces. Many museums that carry the conventional style of physical art and visual art, now also include a technology component for a more interactive and experiential learning moment. MOMA currently has an a quite interactive art exhibit focusing around noise and sound, David Tudor and Composers Inside Electronics Inc., Rainforest V (variation 1). This exhibit is however for focused around live art rather than technology mixing with art and interactions. Most non-technology based art exhibits, excluding live performance are less interactive in the basic understanding of two actors with inputs, processing, and output, and more interactive on a scale of contemplation and making the audience think about a work as an experience.


RainforestRainforest V (variation 1)

We present a novel 3D display that applies projection mapping to a non-planar and reconfigurable fog screen, thus enabling interactive visual contents to be displayed at multiple depth levels. Users can perceive three-dimensionality naturally and interact with the unencumbered images by touching them directly in mid-air. The display can also be used in mixed reality settings where physical objects can co-exist and interact with virtual objects in physical space in real time. It does not require special glasses, head-mounted devices or eye/head-tracking, while allowing high-resolution, full-color 3D image to be observed from wide viewing angles by many people at the same time. Most importantly, our immaterial, mid-air display will allow users to intuitively touch and manipulate virtual objects in 3D under marker-free and barrier-free settings, which will open up immense tangible and creative interaction possibilities. This interactive experience is highly successful with its user-friendly interface and wide range of uses and interactions. LUMENS LED Panels at Cabrini Hospital Malvern is a less successful interactive art piece because although it is labeled interactive, their focus is mainly reactive. This art piece is an LED lit wall that screens different pixelated images which run whenever they are activated by a person whenever they walk by. In theory this is an interactive element that includes some sort of motion sensor whether it be infrared or something else. However, the LED display does not change or react based on the other participants movement, and does not create any complex and thoughtful interaction like a message or contemplation. Comparatively to the volumetric fog display, this LED screen is quite reactive allowing one side, the people, to participate in the interaction but the display runs on loop with preset images that don’t change.

My original definition of interaction for the group project was very rigid, including two actors and input, processing, and output. After reading What Exactly is Interactivity? , I defined interaction as involving two actors, which have an input, processing, and output. The author uses the analogy of one actor speaking and then the other listening, thinking, and reacting(5). The author also explained interaction as having levels of complexity. During the midterm project, I expanded my definition of interaction to involve the interaction of an experience, specifically the audiences thinking, contemplation, and experience of a greater theme or message. In our midterm project, my partner and I considered the experience a large part of our interaction, so we hung out piece from the ceiling to change the perspective and we used large themes about the environment and human’s consumption habits to spark greater contemplation, beyond the physical project itself. Now as I look back on those pieces of the interactive definition, I would like to clarify the different levels of interaction. There can be interaction, especially with interactive art that includes limited physical interaction. However, projects like the volumetric fog display allow for very complex and 3D physical interaction between the audience and the piece, which can create infinite outcomes of different drawings and different ideas only constrained by space, time, and human creativity. This personally, I see as a complex successful interactive experience that is ever changing as the audience is ever changing. Interactive experiences and projects can also be successful if they are engaging with the audience’s mind and thinking about how certain concepts work like the Chronus Exhibition pieces, specifically Rechender Raum and also what we strive to accomplish in our midterm project at a smaller level. However, the ultimate level of interaction comes from the interactive project being able to interact with many different users and have an easy to understand/ intuitive interaction. The volumetric fog display was extremely intuitive and user-friendly. Even some of the Chronus Exhibition pieces although interactive and extremely interesting were less intuitive as many students tried to touch the different art pieces where they were actually supposed to just observe them. Integrating the definition of interactive art based on TATE, interactive art was also a method for the artists to connect better with the environment and their audience, enhancing both the interactive elements coming from the audience and from the machine/art piece designed by an artist with intentions for certain interactions. Cumulatively, a successful interactive experience consists of two actors that communicate through a series of inputs, processing, and output, but the overall experience created also qualify as an enhance an interaction including forcing the audience to think deeper about a specific issue or concept. Interactive experiences exist at different levels of interaction some including for physical or more mental interaction and some including both.

Recitation 6 Processing Animation by Isabel Brack

My Personal Animation and Code:

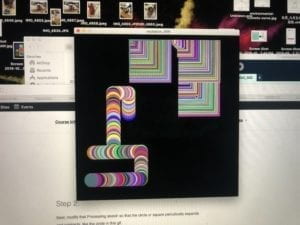
This animation consisted of three different main concepts: the blinking circle’s movement is controlled by A,W,S,D, acting like arrow keys. The color changing and growing/shrinking square outline’s movement is controlled by the normal arrow keys, and the , mouse resets the background. The concept behind this animation is just to be able to draw different pattern and other things with the moving circle and square. The Square outline growing and shrinking provides a cool 3D looking effect to the drawing as the different outline colors layer next to each other. The code is bellow and so are videos of the circle drawing and then the square drawing and both reseting using mousePressed function. Because the background was its own mousePressed function and not included in void draw that allowed each circle and square to not be erased when a new one was drawn which created continues “lines” to draw with made out of circles and squares. The most interesting function I used was keyPressed because it allowed me to designate certain letter keys and arrow keys to different movements, which allowed me to create an animation that is completely different every time it is run based on the user’s movement of the arrow keys. It allowed me to practice writing the code for both keyPressed normal keys and the arrow keys. The code is at the end with the code for the homework. 

Circle and Square Drawing

Video 1: Square moving and reset

Video 2 :Circle moving and reset

Recitation Homework:

Step 1:

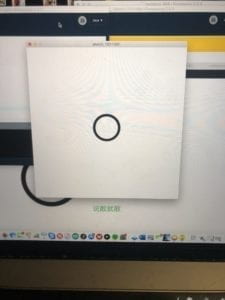
First I drew a black outlined circle with no fill in the center of a white 600×600 canvas. Code is at the end.

black unfilled circle

Step 2:

Then I made this black outline circle grow and shrink, which was not too difficult because I ha already used this for my recitation animation. In addition, we had a similar example code of a circle growing and shrinking during class. Code is at the end.

Step 3:

Next I made the circle change colors as it grew and shrunk which was more difficult. I changed the code first to randomize the color of the circle as it grew and struck and tried. I ended up using the same methods we used in class not Color mode because although I looked at the reference for color mode and asked other students and fellows about how to use color mode to have a smooth transition no one figured out quite how to write that correctly, so I stuck with the slightly choppier color transition I originally had used which looks more like a strobe or blinking effect. Code at the end.

Step 4:

In this step I made the circle move while shrinking and growing. This step was fairly easy just adding a keyPressed function identical to my recitation animation’s function only the background was added into void draw in order for the circle to be erased each time I draw a new one as it moves.

Code for my personal recitation animation:

int x;

int y;

int speed;

int c;

int u=200;

int v=200;

boolean rectIsShrinking=false;

void setup(){

  size(600,600);

  x= width/2;

  y= height/2;

  c=50;

  speed=5;

background(0); 

}

void draw (){ 

  float r= random (255);

  float g= random (255);

  float b= random (255);

  stroke (r,g,b);

  strokeWeight(5);

  noFill();

  rect (x,y,c,c);

  stroke (r,g,b);

  fill(r,g,b);

    noStroke();

  ellipse (u,v,50,50);

  if(rectIsShrinking)c–;

  else c++;

  if (c==0||c==150) rectIsShrinking= !rectIsShrinking;  

}

void keyPressed(){

  if (keyCode==UP){

    y=y-speed;

  }

  if (keyCode==DOWN){

    y=y+speed;   

  }

  if (keyCode==LEFT){

    x=x-speed;

  }

  if (keyCode==RIGHT){

    x=x+speed;

  }

   println(key);

  if (key == ‘w’ || key == ‘W’) {

    v=v-speed;

  }

  println(key);

  if (key == ‘s’ || key == ‘S’){

    v=v+speed;

  }

  println(key);

  if (key == ‘a’ || key == ‘A’){

    u=u-speed;

  }

 println(key);

  if (key == ‘d’ || key == ‘D’){

    u=u+speed;

  }

}

void mousePressed(){

  background(0);

}

Code for step 1 of the homework:

int x;

int y;

void setup(){

  size(600,600);

  x= width/2;

  y= height/2;

background(255); 

}

void draw (){

 background(255); 

  strokeWeight(10);

  noFill();

  ellipse (x,y,100,100);

}

Code for step 2 of the homework:

int x;

int y;

int speed;

int c;

boolean ellipseIsShrinking=false;

void setup(){

  size(600,600);

  x= width/2;

  y= height/2;

  c=50;

  speed=5;

background(255); 

}

void draw (){

 background(255);

  strokeWeight(10);

  noFill();

  ellipse (x,y,c,c);

  if(ellipseIsShrinking)c–;

  else c++;

  if (c==0||c==150) ellipseIsShrinking= !ellipseIsShrinking;

}

Code for step 3 of the homework:

int x;

int y;

int speed;

int c;

boolean ellipseIsShrinking=false;

void setup(){

  size(600,600);

  x= width/2;

  y= height/2;

  c=50;

  speed=5;

background(255); 

}

void draw (){

 background(255);

 float r= random (255);

  float g= random (255);

  float b= random (255);

  stroke (r,g,b);

  strokeWeight(10);

  noFill();

  ellipse (x,y,c,c);

  if(ellipseIsShrinking)c–;

  else c++;

  if (c==0||c==150) ellipseIsShrinking= !ellipseIsShrinking;

}

Code for homework Step 4:

int x;
int y;
int speed;
int c;
boolean ellipseIsShrinking=false;
void setup(){
size(600,600);
x= width/2;
y= height/2;
c=50;
speed=5;
background(255);
}
void draw (){
background(255);
float r= random (255);
float g= random (255);
float b= random (255);
stroke (r,g,b);
strokeWeight(10);
noFill();
ellipse (x,y,c,c);

if(ellipseIsShrinking)c–;
else c++;
if (c==0||c==150) ellipseIsShrinking= !ellipseIsShrinking;
}
void keyPressed(){
if (keyCode==UP){
y=y-speed;

}
if (keyCode==DOWN){
y=y+speed;

}
if (keyCode==LEFT){
x=x-speed;
}
if (keyCode==RIGHT){
x=x+speed;
}
}

Recitation 5: Processing Basic Isabel Brack

original

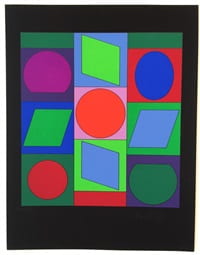
The original art piece Zaphir by Victor Vasarely

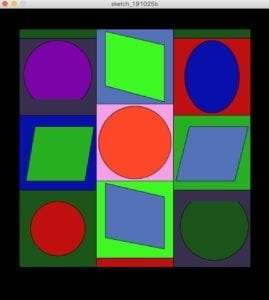
my recreation of this piece

My emulation of Zaphir

Why this piece?

I chose Zaphir by Victor Vasarely to recreate in processing because of the geometric shapes and bright colors. Originally I chose a different piece by the same artist but quickly realized it took too much time and color matching as there were over 30 different complementary shades used. I found this piece to be abstract and perplexing from the name of the piece all the way down to the arrangement of the shapes. This piece also was labeled Op art by the gallery and seller, which I found interesting as those pieces are often black and white or seem to be moving or creating an optical illusion. Compared to much of this artist’s other work, this piece focuses on a more static colorful image. But the bright colors drew me to this, and the fact that these shapes can be replicated in processing. My final piece closely represents the original art besides the fact that a small three boxes are a bit larger in his piece than mine. I choose to basically directly emulate his piece. The colors are also close but not perfect matches, the original art’s colors are more dull and deeper, were as mine are a bit more saturated.

Goals and Execution 

My goal for this piece was closely mimicking the original art, because it would allow me to learn many different functions in processing including arc and quad. This process also helped me learn how the math and spacing works in processing, getting everything to line up and be centered, especially the shapes in the center of each square. After our most recent lesson on processing, I know know how to simplify this code with for and which statements which would be helpful to make all the boxes in the background as I individually placed each, which required a lot of basic algebra. To accomplish this replication I first laid out the background and main large rectangle in the center, then filled in each smaller colored box by separating the width of the interior large box into three sections and the and creating three columns of boxes. Then, I filled all of the boxes with color. After that I started with the easiest shapes inside the smaller boxes like the ellipses first, then after the quads, which took a bit of trial and error to get the proportions correct. Lastly, I created the partial ellipse by layering an arc over an ellipse because no matter the combination of radian angles I tried for the arc, I could only create the inverse shape of what I wanted. In the end, I layered that inverse shape over a normal ellipse to create my desired shape. The most difficult aspect of this recreation was remembering which shape was which in the code, I had to label and relabel each component multiple times.

Overall, my piece and the original artist’s are pretty similar, the only small differences being his small boxes (the two green and one red) are a bit larger, the color match is not perfect, and one or two shapes could be aligned/ centered better than they are now. I think processing is a good interface to recreate a geometric piece like the one I choose because it is easier to write the code for a straight line and perfect circle than to draw one by hand. This kind of art piece is already geometric, so unlike a piece that is drawn by hand, using brush strokes, processing can recreate this art piece without it losing meaning or value from those imperfections. 

Code:

background(0,0,0);

size( 600,650); // define canvas size

fill(28,85,26);

rect(45,45,510,525); //x,y,width,height green box

fill(83,114,185);

rect(215,45,170,170); //x,y,width,height blue middle top

fill(61,250,33);

quad(235, 50, 365, 80, 365, 205,235, 170);//quad(x1, y1, x2, y2, x3, y3, x4, y4) green  middle top

fill(245,158,233);

rect(215,210,170,170); //x,y,width,height middle middle pink

fill(255,71,39);

ellipse(300,295,160,160); //x,y,width,height middle red circle

fill(61,250,33);

rect(215,380,170,170); //x,y,width,height middle bottom green

fill(83,114,185);

quad(235, 385, 365, 415, 365, 530,235, 505);//quad(x1, y1, x2, y2, x3, y3, x4, y4) blue  middle bottom

fill(193,14,14);

rect(215,550,170,20); //x,y,width,height red small middle bottom

fill(28,85,26);

rect(45,45,170,20); //x,y,width,height green top small left

fill(7,16,170);

rect(45,230,170,170); //x,y,width,height  blue left middle

fill(38,175,32);

quad(80, 260, 210, 260, 190, 380,60, 380);//quad(x1, y1, x2, y2, x3, y3, x4, y4) green left middle

fill(28,85,26);

rect(45,400,170,170); //x,y,width,height green left bottom

fill(193,14,14);

ellipse(130,485,120,120); //x,y,width,height left red circle

fill(56,47,77);

rect(45,65,170,170); //x,y,width,height purple left top

fill(123,3,167);

ellipse(130, 145, 150, 150);//top left pink/purple arc

noStroke();

fill(56,47,77);

arc(130, 147, 150, 150, radians(45), radians(135), CHORD); //arc(x, y, w, h, startangle, stopangle, mode)  

stroke(0);

fill(28,85,26);

rect(385,45,170,20); //x,y,width,height right top small

fill(38,175,32);

rect(385,230,170,170); //x,y,width,height right greed middle

fill(83,114,185);

quad(420, 260, 550, 260, 520, 380,390, 380);//quad(x1, y1, x2, y2, x3, y3, x4, y4) blue right middle

fill(56,47,77);

rect(385,400,170,170); //x,y,width,height right bottom purple

fill(28,85,26);

ellipse(475, 480, 150, 150); //bottom right dark green arc

noStroke();

fill(56,47,77);

arc(475, 479, 150, 150, radians(225), radians(315), CHORD); //arc(x, y, w, h, startangle, stopangle, mode)

stroke(0);

fill(193,14,14);

rect(385,65,170,170); //x,y,width,height right top red

fill(7,16,170);

ellipse(470,150,120,160); //x,y,width,height right blue oval