Familiar Faces-Isabel Brack- Inmi

Overview:

Image of our project set up

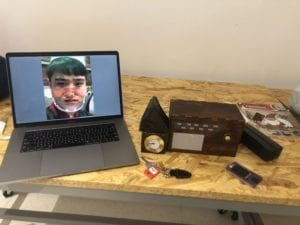
Project display including Processing images, house and key, radio, and card swiper with NYU card. (Not Pictured paper English Bios)

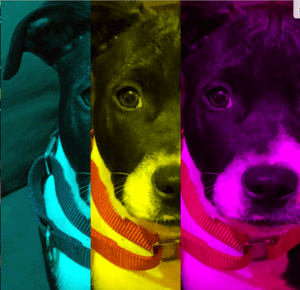
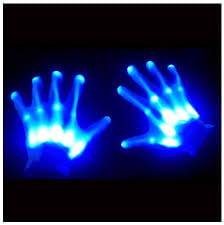
Throughout this project and the phases of design, fabrication, and production our project has completely transformed. Originally, our project was a game/activity in which people would place their hands against different gloves/hand. These hands would be linked up to the processing unit which would rapidly change faces split into three sections the eyes, nose, and mouth. These faces randomly cycled through in the array each time the hands were pressed against. Originally, the eyes section used the webcam to show the user’s face mixed in with the different students faces. However, during user testing we realized that the interaction itself was fairly boring and lacked a greater meaning and experience. During our user testing, we received lots of feedback about the physical difficulties with our project being the live webcam’s accessibility based on height, the connection between users’ actions and meaning is not explicit enough, and the interaction itself being non immersive and simplified. We received overall positive responses to the message and theme of our project is to try and understand and get to know different groups of people at our school that most students didn’t fully understand. Particularly we got feedback from professors and students about incorporating sound/interviews to allow people to tell their own stories. Our project we presented on Thursday is an interactive project intended to share the stories of the workers at NYUSH with the student body and faculty who often overlook them as people and classify them solely as school staff workers. This project involved a Processing element to control sound and visual which used different interview clips which we conducted and different faces which we cut up and assembled into three sections like our original project. Christina conducted most of the interviews and took the pictures along with doing fabrication, and we both contributed to design. I wrote the original code and modified it to this project adding in sound arrays with some help from various professors, fellows, and LAs. I also fabricated the physical projecta creating the buttons and helped Christina with the general fabrication of each element. In addition, I also wired the circuit and cut the audio and photo images to put into the different arrays. Our original inspiration came from face swapping interaction technology like snapchat filters and different face swapping programs, however we adapted this technology to better fit the goal we had, which was sharing the stories of workers who are often overlooked. Also, I came across a similar code to mine (in picture array context) which was inspiring for my code, specifically reminding me to place constraints on the picture. However, the use of his code was more interesting as he planned to share sexual assault survivors awareness through his interaction project, which began my thinking process on how to articulate a story through Processing.

CONCEPTION AND DESIGN:

Once we changed our plan after user testing and were influenced and informed by the user testing response we decided we would create three objects to represent each element of the story we would like to tell about the aiyi and workers at NYUSH. This was majorly informed by suggestions from user testing on what people would like to hear and see about the workers, including their interviews mostly in Chinese about work, life, where they are from, etc. People also liked the idea of seeing different faces all mashed up to show both a sense of individuality to the stories, belonging to each worker, but it also showed a bit of group identity representing the workers as a whole and how NYUSH students often overlook and generalize the workers and aiyi at our school. We chose a radio to represent the different stories the workers told with a button wired in to control an array of sound files from interviews where we asked workers a variety of questions about their everyday life including work and outside of school. The only issue we did not account for regarding this radio is once our class saw and heard what the radio did with the audio the only used the radio and disregarded the card swiper and house/house key for a few minutes. The second element to our project was the card swiper which included an NYUSH 2D laser-cut keycard designed to look like a worker’s card. The card and swiper changed the images of the processing unit each time a new “worker swiped in.”  This element was meant to bring a real work element of theirs into the interaction to help associate the interaction with our school and NYUSH staff. The last physical element was a house and key. When the user inserted the key audios about their family/home/hometown would play providing a personal connection and deeper background to each worker. This third element was directly impacted by the feedback we got during user testing, explaining people wanted deeper background information on each person to understand the person and their identity not just their face. During our prototyping we used cardboard and real gloves to make the original project, but after we changed ideas we had little time to make a prototype so we went straight to 2D laser cutting a box for the radio and a key card for the swiper. In addition, we used cardboard to and clear tape along with black paint to make our own card swiper creating a button at the bottom of the swiper which sent a 1 to Arduino every time pressure was applied with the key card. For the house and key we used my room key and built a 2D house from a laser cut box. We believed that 2D laser cutting would give us a fast, clean, and professional looking finished product will still be able to modify the final look by painting and adding details to transform the radio from a box into an old-time radio. We rejected the idea of 2D cutting the card swiper because it would be too many pieces and to complicated to add a pressure plate if we cut it. Instead we opted for cardboard and tap still getting a fairly finished look, but the building and assembly process was much quicker. Also, because of the button in the bottom of the swiper we needed access to the base which was easier with flexible cardboard. For the house and radio the 2D cut box was cleaner and we could glue all sides but one for easy access to the Arduino and the switch inside the house.

FABRICATION AND PRODUCTION:
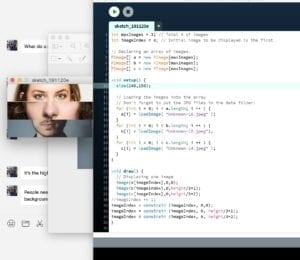
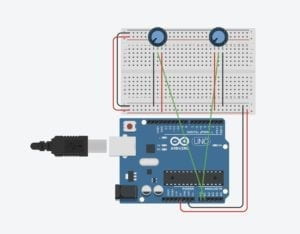
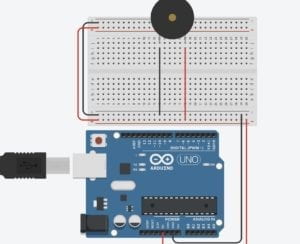
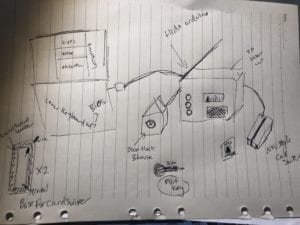
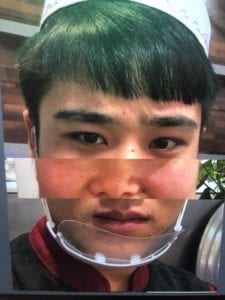
Full Sketch:

sketch of design

In fabricating and producing our final project we went through much trial and error to get the two pressure plates(learned from Building a DIY Dance Dance Revolution) we made work how we planned. Both the house and the card swiper had switches in them which we made with two wires, tinfoil, and cardboard. Each wire attached to a piece of tinfoil and the two sides had a cardboard buffer between them keeping the tinfoil from touching. But, when pressure is applied by the key card or key the tinfoil connects and sends a 1 to the Arduino. The trial and error of creating these buttons with a buffer that is not to think so a light pressure will trigger the button was quite difficult. In addition, building the radio box and physical house were the easiest as the laser cutting went well and all the pieces lined up. The User Testing completely changed our final product in the fabrication and physical output. Although the code for the first and second project are quite similar excluding the addition of sound arrays, the physical aspect of the project changed completely. Our design and production was mostly influenced by creating an accessible project and creating an interaction that connects the physical objects with the meaning to the piece more straightforwardly. We created the house and the radio to represent their background and stories. We also focused on the meaning of our project around getting to know and understand the workers of our school who are often overlooked. The card swiper, house, and radio were also more accessible to all audience no matter the height, which is why we removed the live webcam. I believe these major changes to the physical project helped connect the meaning of the project to the physical interaction and use an interface which matched the output better especially the card swiper and faces along with the radio and stories. Where are project could continue to progress in production is the language accessibility, compared to most other projects ours was geared more towards Chinese language speakers and learners, it would benefit from adding subtitles to the pictures like Tristan suggested during our presentation. The biographies were ok information however the paper interface did not match the digital Processing.

Working Card Swiper: photos change as card swipes

Working House Key: as the house key is fully inserted into the door lock the sound array of background information from different workers plays.

The Radio: As the radio button is pushed a random interview clip from a worker explains her  working conditions and how long she has lived in Shanghai.

processing display

CONCLUSIONS:

Although our project and meaning changed a lot throughout this process, our final goal was to share the stories of workers and aiyi at our school who are often misunderstood, overlooked, and even ignored. Many of the students both Chinese and international don’t have the chance or make the effort to understand and get to know the workers. We wanted to create an easily accessible interface for NYUSH students and faculty to hear the stories of the staff told by the staff along with sharing the familiar faces of the workers which people often recognize but don’t really know or understand. Through interviews with many different workers at the school including aiyi, Lanzhou workers, and Sproutworks workers we hoped to share their stories and their faces with our audience.  According to What Exactly is Interactivity?,understanding our original definition of interaction our project used input, processing, and output along with having two actors in each interaction. The input was the initial pressing of the button or using the card opr key. The processing occurred in Arduino and Processing to communicate between Arduino for the code and circuit and Processing for the code, sound, and visual. The output was the sound clips and the changing faces. However, beyond that definition of interaction, our project also created a larger interaction which made people experience and think about what these workers are saying and what their stories are, hopefully learning their names, a bit about them etc. We hope that the interaction included pushing the buttons and using they key and card but also involved understanding the stories of the workers and the broader message and a sound immersive experience. Although this project had no major user testing other that a few people we found because our final project changed completely after the User Testing, the interaction by our audience was mostly as expected people used the different elements of our project here many audio interviews with different workers and seemed eager to continue to listen and use the face changer. Once the audience used the car swiper and the key they became more intrigued and continued to use each element(but it took awhile for them to switch to the different elements other than just the radio). Overall, I would take many suggestions we heard to improve the project including adding and English element and trying to differentiate the different buttons we have to help the audience understand there are three different options. I would also like to make the piece more experiential and more interactive beyond buttons if you could somehow click on peoples faces or swap them on a touch screen to hear the different stories, but this is not fully realized. Due to the untimely setback/failure of our first project which we learned in user testing, I have learned to sketch, design, prototype, and fabricate(realize my project idea) much faster and more efficiently, which overall is an important skill. In addition, I have learned the value of enjoying your project and its message as the first project’s failure was probably partially due to my lack of understanding its purpose and meaning, but the second project was much more successful because I enjoyed working on it and understood the meaning. I believe the “so what” factor of our project was the importance of NYUSH students to not overlook the staff at NYUSH who work tirelessly to keep the building running. In addition, they should not only be not overlooked but also recognized for their work and their stories as our students often see them as just workers and not full people. One of the most interesting things I learned about these people when conducting interviews was all but one interviewee was from a different province than Shanghai, which means many of these workers are not only separated from their families but also deal with the harsh reality of China’s Hukou system.

Arduino Code:

// IMA NYU Shanghai
// Interaction Lab
// For sending multiple values from Arduino to Processing

void setup() {
Serial.begin(9600);
}

void loop() {
int sensor1 = digitalRead(9);
int sensor2 = digitalRead(7);
int sensor3 = digitalRead(8);

// keep this format
Serial.print(sensor1);
Serial.print(“,”); // put comma between sensor values
Serial.print(sensor2);
Serial.print(“,”);
Serial.print(sensor3);
Serial.println(); // add linefeed after sending the last sensor value

// too fast communication might cause some latency in Processing
// this delay resolves the issue.
delay(100);
}

Processing Code:

// IMA NYU Shanghai
// Interaction Lab
// For receiving multiple values from Arduino to Processing

/*
 * Based on the readStringUntil() example by Tom Igoe
 * https://processing.org/reference/libraries/serial/Serial_readStringUntil_.html
 */

import processing.serial.*;
import processing.video.*; 
import processing.sound.*;
SoundFile sound;
SoundFile sound2;

String myString = null;
Serial myPort;


int NUM_OF_VALUES = 3;   /** YOU MUST CHANGE THIS ACCORDING TO YOUR PROJECT **/
int[] sensorValues;      /** this array stores values from Arduino **/
int[] prevSensorValues;


int maxImages = 7; // Total # of images
int imageIndex = 0; // Initial image to be displayed
int maxSound= 8;
int maxSound2= 10;
boolean playSound = true;
// Declaring three arrays of images.
PImage[] a = new PImage[maxImages]; 
PImage[] b = new PImage[maxImages]; 
PImage[] c = new PImage[maxImages]; 
//int [] d = new int [maxSound];
//int [] e = new int [maxSound2];
ArrayList<SoundFile> d = new ArrayList<SoundFile>();
ArrayList<SoundFile> e = new ArrayList<SoundFile>();

void setup() {

  setupSerial();
  size(768, 1024);
  prevSensorValues= new int [4];

  imageIndex = constrain (imageIndex, 0, 0);
  imageIndex = constrain (imageIndex, 0, height/3*1);
  imageIndex = constrain (imageIndex, 0, height/3*2);  
  // Puts  images into eacu array
  // add all images to data folder
  for (int i = 0; i < maxSound; i++ ) {
    d.add(new SoundFile(this, "family" + i + ".wav"));
  }
  for (int i = 0; i < maxSound2; i ++ ) {

    e.add(new SoundFile(this, "fun" + i + ".wav"));
  }
  for (int i = 0; i < a.length; i ++ ) {
    a[i] = loadImage( "eye" + i + ".jpg" );
  }
  for (int i = 0; i < b.length; i ++ ) {
    b[i] = loadImage( "noses" + i + ".jpg" );
  }
  for (int i = 0; i < c.length; i ++ ) {
    c[i] = loadImage( "mouths" + i + ".jpg" );
  }
}


void draw() {
  updateSerial();
  // printArray(sensorValues);
  image(a[imageIndex], 0, 0);
  image(b[imageIndex], 0, height/2*1);
  image(c[imageIndex], 0, height/1024*656);


  // use the values like this!
  // sensorValues[0] 
  // add your code
  if (sensorValues[2]!=prevSensorValues[2]) {
    //imageIndex += 1;
    println("yes");
    imageIndex = int(random(a.length));
    imageIndex = int(random(b.length));
    imageIndex = int(random(c.length));//card
  }
  if (sensorValues[1]!=prevSensorValues[1]) {
    //imageIndex += 1;
    println("yes");
    
    int soundIndex = int(random(d.size()));//pick a random number from array
    sound = d.get(soundIndex); //just like d[soundIndex]
    
    if (playSound == true) {
      // play the sound

      sound.play();
      // and prevent it from playing again by setting the boolean to false
      playSound = false;
    } else {
      // if the mouse is outside the circle, make the sound playable again
      // by setting the boolean to true
      playSound = true;
    }
  }
  if (sensorValues[0]!=prevSensorValues[0]) {
    //imageIndex += 1;
    println("yes");
  
    int soundIndex = int(random(e.size()));
    sound2 = e.get(soundIndex); //just like e[soundIndex]
    if (playSound == true) {
      // play the sound
      sound2.play();
      // and prevent it from playing again by setting the boolean to false
      playSound = false;
    } else {
      
      playSound = true;
    }
  }

  prevSensorValues[0] = sensorValues[0];
  println(sensorValues[0], prevSensorValues[0]);
  println (",");
  prevSensorValues[1] = sensorValues[1];
  println(sensorValues[1], prevSensorValues[1]);
  println (",");
  prevSensorValues[2] = sensorValues[2];
  println(sensorValues[2], prevSensorValues[2]);

}


void setupSerial() {
  printArray(Serial.list());
  myPort = new Serial(this, Serial.list()[ 1 ], 9600);
  // WARNING!
  // You will definitely get an error here.
  // Change the PORT_INDEX to 0 and try running it again.
  // And then, check the list of the ports,
  // find the port "/dev/cu.usbmodem----" or "/dev/tty.usbmodem----" 
  // and replace PORT_INDEX above with the index number of the port.

  myPort.clear();
  // Throw out the first reading,
  // in case we started reading in the middle of a string from the sender.
  myString = myPort.readStringUntil( 10 );  // 10 = '\n'  Linefeed in ASCII
  myString = null;

  sensorValues = new int[NUM_OF_VALUES];
}


void updateSerial() {
  while (myPort.available() > 0) {
    myString = myPort.readStringUntil( 10 ); // 10 = '\n'  Linefeed in ASCII
    if (myString != null) {
      String[] serialInArray = split(trim(myString), ",");
      if (serialInArray.length == NUM_OF_VALUES) {
        for (int i=0; i<serialInArray.length; i++) {
          sensorValues[i] = int(serialInArray[i]);
        }
      }
    }
  }
}

Recitation 10: Serial Communication by Isabel Brack

Overview:

In this recitation we went to a workshop on mapping and then using serial communication to connect Arduino with Processing. The serial communication workshop leader had no major requirements for our recitation other performing serial communication, while using a mapping function. So following the instructor’s lead I mapped a potentiometer to the Y coordinate of a moving ellipse and the X coordinate was mouse X. Also, I used a button serial communication to change the color of the ellipse. I then used this serial communication in my final project code like the instructor suggested using buttons to switch the image faces.

This recitation mainly follows exactly what our instructor was doing. First we connected the circuit with the potentiometer and the button. Next we looked at the serial communication code for A to P and altered it to use one digital sensor and one analog. Finally we altered the processing code to map the potentiometer and to use a bullion to control the color of the ellipse which was most helpful as we want to use a button to control Processing in our final project.

Code for moving ellipse:

// IMA NYU Shanghai
// Interaction Lab
// For receiving multiple values from Arduino to Processing

/*
 * Based on the readStringUntil() example by Tom Igoe
 * https://processing.org/reference/libraries/serial/Serial_readStringUntil_.html
 */

import processing.serial.*;

String myString = null;
Serial myPort;


int NUM_OF_VALUES = 2;   /** YOU MUST CHANGE THIS ACCORDING TO YOUR PROJECT **/
int[] sensorValues;      /** this array stores values from Arduino **/


void setup() {
  size(500, 500);
  background(0);
  setupSerial();
}


void draw() {
  updateSerial();
  printArray(sensorValues);
   background(0);
  float posx= map (sensorValues[0],0,1023,0,255);
   ellipse(posx,mouseY,50,50);
   if (sensorValues[1]==1){
     fill(random(255));
   }

  // use the values like this!
  // sensorValues[0] 

  // add your code

  //
}


void setupSerial() {
  printArray(Serial.list());
  myPort = new Serial(this, Serial.list()[ 1 ], 9600);
  // WARNING!
  // You will definitely get an error here.
  // Change the PORT_INDEX to 0 and try running it again.
  // And then, check the list of the ports,
  // find the port "/dev/cu.usbmodem----" or "/dev/tty.usbmodem----" 
  // and replace PORT_INDEX above with the index number of the port.

  myPort.clear();
  // Throw out the first reading,
  // in case we started reading in the middle of a string from the sender.
  myString = myPort.readStringUntil( 10 );  // 10 = '\n'  Linefeed in ASCII
  myString = null;

  sensorValues = new int[NUM_OF_VALUES];
}


void updateSerial() {
  while (myPort.available() > 0) {
    myString = myPort.readStringUntil( 10 ); // 10 = '\n'  Linefeed in ASCII
    if (myString != null) {
      String[] serialInArray = split(trim(myString), ",");
      if (serialInArray.length == NUM_OF_VALUES) {
        for (int i=0; i<serialInArray.length; i++) {
          sensorValues[i] = int(serialInArray[i]);
        }
      }
    }
  }
}

Code for Final:

This is a work in progress code for the final project.

Arduino:

// IMA NYU Shanghai
// Interaction Lab
// For sending multiple values from Arduino to Processing

void setup() {
Serial.begin(9600);
pinMode(9,INPUT);
}

void loop() {
int sensor1 = digitalRead(9);
int sensor2 = digitalRead(8);
int sensor3 = digitalRead(10);
int sensor4 = digitalRead(6);
int sensor5 = digitalRead(7);

// keep this format
Serial.print(sensor1);
Serial.print(“,”); // put comma between sensor values
Serial.print(sensor2);
Serial.print(“,”);
Serial.print(sensor3);
Serial.print(“,”);
Serial.print(sensor4);
Serial.print(“,”);
Serial.print(sensor5);
Serial.println(); // add linefeed after sending the last sensor value

// too fast communication might cause some latency in Processing
// this delay resolves the issue.
delay(100);
}

Processing:

// IMA NYU Shanghai
// Interaction Lab
// For receiving multiple values from Arduino to Processing

/*
 * Based on the readStringUntil() example by Tom Igoe
 * https://processing.org/reference/libraries/serial/Serial_readStringUntil_.html
 */

import processing.serial.*;

String myString = null;
Serial myPort;


int NUM_OF_VALUES = 5;   /** YOU MUST CHANGE THIS ACCORDING TO YOUR PROJECT **/
int[] sensorValues;      /** this array stores values from Arduino **/

int maxImages = 2; // Total # of images
int imageIndex = 0; // Initial image to be displayed

 
// Declaring three arrays of images.
PImage[] a = new PImage[maxImages]; 
PImage[] b = new PImage[maxImages]; 
PImage[] c = new PImage[maxImages]; 
void setup() {

  setupSerial();
   size(240,150);
 
  // Puts  images into eacu array
  // add all images to data folder
  for (int i = 0; i < a.length; i ++ ) {
    a[i] = loadImage( "eyes" + i + ".jpeg" ); 
  }
  for (int i = 0; i < b.length; i ++ ) {
    b[i] = loadImage( "Unknown-15.jpeg"); 
  }
  for (int i = 0; i < c.length; i ++ ) {
    c[i] = loadImage( "Unknown-14.jpeg" ); 
  }

}


void draw() {
  updateSerial();
  printArray(sensorValues);
image(a[imageIndex],0,0);
image(b[imageIndex],0,height/3*1);
image(c[imageIndex],0,height/3*2);


imageIndex = constrain (imageIndex, 0,0);
imageIndex = constrain (imageIndex, 0, height/3*1);
imageIndex = constrain (imageIndex, 0, height/3*2);  

  // use the values like this!
  // sensorValues[0] 

  // add your code
if (sensorValues[0] == 1 || sensorValues[1]== 1 || sensorValues[2] ==1|| sensorValues[3] ==1|| sensorValues[4] ==1){
 //imageIndex += 1;
  imageIndex = int(random(a.length));
  imageIndex = int(random(b.length));
  imageIndex = int(random(c.length));
  sensorValues[0] = 0;
 sensorValues[1]= 0;
 sensorValues[2] =0; 
 sensorValues[3] = 0;
 sensorValues[4] = 0;
}


  // use the values like this!
  // sensorValues[0] 

  // add your code

  //
}


void setupSerial() {
  printArray(Serial.list());
  myPort = new Serial(this, Serial.list()[ 1 ], 9600);
  // WARNING!
  // You will definitely get an error here.
  // Change the PORT_INDEX to 0 and try running it again.
  // And then, check the list of the ports,
  // find the port "/dev/cu.usbmodem----" or "/dev/tty.usbmodem----" 
  // and replace PORT_INDEX above with the index number of the port.

  myPort.clear();
  // Throw out the first reading,
  // in case we started reading in the middle of a string from the sender.
  myString = myPort.readStringUntil( 10 );  // 10 = '\n'  Linefeed in ASCII
  myString = null;

  sensorValues = new int[NUM_OF_VALUES];
}


void updateSerial() {
  while (myPort.available() > 0) {
    myString = myPort.readStringUntil( 10 ); // 10 = '\n'  Linefeed in ASCII
    if (myString != null) {
      String[] serialInArray = split(trim(myString), ",");
      if (serialInArray.length == NUM_OF_VALUES) {
        for (int i=0; i<serialInArray.length; i++) {
          sensorValues[i] = int(serialInArray[i]);
        }
      }
    }
  }
}

Recitation 9: Media Controller by Isabel Brack

Overview

For this recitation I used an image of my dog and ovelayed two different tinted images at different X coordinates to create a paneled image. The opacity of the tints is controlled by a potentiometer, which I mapped to the tint. I also tried to map a blurring effect using a second potentiometer which worked but created a lot of lags and glitches so I ended up commenting it out for the final documentation of the recitation. The first try at mapping the potentiometer I only included one image tint and the mapping was a bit jumpy because there was a loose connection between the potentiometer and the breadboard.

Reading Connection

In contrast to the examples of computer vision from Computer Vision for Artist and Designers that spanned abstract, funny, and sociopolitical themes, my use of computer vision is quite basic comparatively only manipulating the opacity and tint of three different panels in a processing image of my dog. The technology I used did not capture a live image like many of the expamples like Suicide Box  or Cheese  that were both able to reckognize and record certain movements and actions like veriticle falling or smiling. Instead my project combined the physical interaction of turning a potentiometer to control the value and opacity of the different panels tint on my image. First technology was used in the physical circuit wiring, and it was also used in the display of the image and the connection between the potentiometer and the opacity of each color. I did not use any detection elements like tracking movement as I was not using live capture, but instead applied these concepts to a still image, manipulating the opacity and at some points blurring it too (but the blur created to much glitching and lagging in the program to have smooth transitions). Although I did not include a full body participation in the interaction by using a potentiometer, by reading Levin’s writing, I can appreciate the incorporation of full body participation in computer vision and in the interaction expanding the concept of interaction and making the interaction more engaging for the audience.

dog full opacity tint

The image at greatest opacity for color tints. (The picture is my dog, so there is no image citation.)

Working potentiometer mapped to the tint of a dog image.

IMG_5187

First try at mapping the potentiometer to the tint of an image.

Code

Processing:

import processing.serial.*;

String myString = null;
Serial myPort;


int NUM_OF_VALUES = 1;   /** YOU MUST CHANGE THIS ACCORDING TO YOUR PROJECT **/
int[] sensorValues;      /** this array stores values from Arduino **/
  
PImage photo;
PImage photo2;
 float tint;
 // float blur;


void setup() {
size(1000, 1000);
  background(255);

  setupSerial();
photo = loadImage("dog.jpeg");
 photo2 = loadImage("dog2.jpeg");
}


void draw() {
     float tint =map(sensorValues[0],0,1023,0,255);
     //float blur =map(sensorValues[0],0,1023,0,10);

  updateSerial();
  
  printArray(sensorValues);

tint(0, 255, 255, 20); 
image(photo, 0, 0);
//filter(BLUR);
//filter(BLUR, 0);
tint(255, 255, 0, tint); 
image(photo2, 300, 0);
tint(255, 0, 255, tint); 
image(photo2, 600, 0);
//filter(BLUR);
//filter(BLUR, blur);


  // use the values like this!
  // sensorValues[0] 

  // add your code

  //
}


void setupSerial() {
  printArray(Serial.list());
  myPort = new Serial(this, Serial.list()[ 1 ], 9600);
  // WARNING!
  // You will definitely get an error here.
  // Change the PORT_INDEX to 0 and try running it again.
  // And then, check the list of the ports,
  // find the port "/dev/cu.usbmodem----" or "/dev/tty.usbmodem----" 
  // and replace PORT_INDEX above with the index number of the port.

  myPort.clear();
  // Throw out the first reading,
  // in case we started reading in the middle of a string from the sender.
  myString = myPort.readStringUntil( 10 );  // 10 = '\n'  Linefeed in ASCII
  myString = null;

  sensorValues = new int[NUM_OF_VALUES];
  
}


void updateSerial() {
  while (myPort.available() > 0) {
    myString = myPort.readStringUntil( 10 ); // 10 = '\n'  Linefeed in ASCII
    if (myString != null) {
      String[] serialInArray = split(trim(myString), ",");
      if (serialInArray.length == NUM_OF_VALUES) {
        for (int i=0; i<serialInArray.length; i++) {
          sensorValues[i] = int(serialInArray[i]);
        }
      }
    }
  }
}

Arduino:

void setup() {
Serial.begin(9600);
}

void loop() {
int sensor1 = analogRead(A0);
//int sensor2 = analogRead(A1);
//int sensor3 = analogRead(A2);
//int theMappedValue = map(sensor1, 0, 1023, 0, 255);
//int theMappedValue2 = map(sensor2, 0, 1023, 0, 255);
// keep this format
Serial.print(sensor1);
//Serial.print(“,”); // put comma between sensor values
//Serial.print(sensor2);
// Serial.print(“,”);
// Serial.print(sensor3);
Serial.println(); // add linefeed after sending the last sensor value

// too fast communication might cause some latency in Processing
// this delay resolves the issue.
delay(100);
}

Final Project: Essay by Isabel Brack

Fragmented Faces

Our project is titles “Fragmented Faces” and aims to tackle the complex issue of identity and humans’ connections with others.

 PROJECT STATEMENT OF PURPOSE 

Our project aims to demonstrate the complexity of human identity and how identity can be represented through faces, emotions, and expressions. It also aims to show how complex and disorrienting understanding identity is when a person interacts with more and more people. The project entails using different images of peoples’ faces and cutting the images into three horizontal sections, and then randomizing the different pieces to create different faces out of many mouths, eyes, and noses. 

Our audience can be generalized to entail everyone as it is focused on inclusion and understanding the identities around us, but the audience can also be a more focused group of people who are trying to understand the identities of people who surround them and who are putting effort into understanding the complexity of identity. This project was mostly inspired by a few art pieces one video of an interactive simulation about identity crises and the complexity of self identity and the other focusing on the fragmentation and complexity of identity.

fragmented facecompilation face

Inspirational identity artwork

 PROJECT PLAN 

This project aims to create a dialogue and questions about identity and the connections people make based on identity, which are represented by each light-up pressure pad with a hand silhouette showing the connection. The simulation or game entails the user standing in front of the processing screen and 5-6 pressure pads each with a hand print that lights up. The different handprints will light up in a sequence that gets faster and faster and people will try to keep up with the lights, pressing their hand against the light up hand. Each time a button is pressed the faces will randomize. At first, when the simulation is easy to follow it will be easy to connect with each hand and see each identity change and create a new face, but as the simulation gets faster and more complex people will be unable to keep up with each individual interaction and the identities appearing on the screen. Once the simulation becomes impossibly complex all the hands will blink in unison and then turn off except the center hand which will remain lit and once the user presses it all the individual original images of the faces will appear together on the screen.

To complete this project we first will start with the processing and create a simple random face generator with one button and different image. I have already created the base code for that which has three images of faces correctly proportioned but is not randomized to include multiple options yet. After we create the processing basic code for random images, we will then add multiple buttons to control the randomization of the faces. This will be the prototype for the simulation. Next we will create the LED light flashing separately and simultaneously in Arduino and after figuring the two pieces out separately we will combine the codes and add LEDs to the buttons, which we will create out of cardboard or wood and plastic so the LEDs can show the hands lighting up. We would like to finish the basic processing code for the random faces this weekend. And add the signal communication and LED sequence by the end of next week. After the LEDs and the processing animation controlled by buttons are combined the work will mostly be focused on creating the environment and set up of the game, including the hand buttons.

face randomizer code

The work-in-progress code for assembling random faces in processing.

light up hands

Examples for the light up had prints that will also serve as buttons/pressure plates to cause the faces to change.

CONTEXT AND SIGNIFICANCE 

Originally I researched projects on light and sound designs including a storytelling animated wall. This project in general led me to think about the animation in processing which has gone through different variation but ultimately involve fragmented piece coming together to create a whole. Originally, I wanted to animate a process that I saw artist do still versions of people’s faces breaking into small pixel like units and the art piece becomes more and more abstract. But after talking it over, an easier and more straight forward animation to represent this fragmentation creating a whole would be to use three horizontal panels to create a whole image. Our project was more influenced by non-interactive art pieces that represented identity as it was harder to find interactive art exhibits that focus on issues of identity of human connection. Our project was also in part influenced by the Piano Dancer project proposal I suggested as our user interface will be quite similar with light up hand prints acting as buttons, similar to the light up piano keys. This project follows our expanded definition of interaction beyond the simple understanding of two actors communicating through input, processing, and output as discussed in What Exactly is Interactivity?. Interaction involves the entire experience including people thinking and possibly creating a dialogue about a project. As I researched interactive art is also based on ideas like TATE, interactive art was also a method for the artists to make connections with the environment and their audience, enhancing both the interactive elements coming from the audience and from the machine/art piece. Each art piece is created by an artist, who has an intention for their piece and the audience, whether that is completely understood and achieved or not. Combining all the definitions of interaction researched, a successful interactive experience consists of two actors who communicate using a series of inputs, processing, and output; however, the overall experience created enhances the interaction, including forcing the audience to think differently and more specifically about an issue or thoughtful concept. Every interactive experience exist at a different amount of interaction. Some interactions are simple interactions between two parties that meet the basic requirements of input, processing, and output, and some interactions are closer to human interactions that are always changing and evolving responding to each actor’s last action, including physical but also complex mental interaction. With our midterm project and now also the final project “Fragmented Faces” we hope to push our audience’s interaction to involve a more complex level of interaction, including contemplation of the work and the meaning of it, to hopefully create a dialogue or through process about what identity means and how its easy to stop understanding others’ identities the more interactions and connections you are having with people. The confusion of the hands and light/button sequence represents the chaos of understanding identity. Hopefully, this project’s uniqueness will come from creating a new dialogue or prompting people to think about identity and connections they make with people. Although the face swap and randomizer has been done before in other projects, we have specified out focus around what identity is and what it means to connect with people. We added the simulation/game of light up hands to create a more complex and ever changing interaction between the audience and the project. Many of the projects we looked at in researching identity artwork showed the fragmentation and confusion of self identity and other, and much of identity artwork is left much up to interpretation. Our project creates and interactive and changing interface for people to engage with a changing and confusing identity, building off of their artwork around identity. I especially appreciated the chaos and complexity of self identity represented in this simulation (mentioned and linked above too). Our main goal with this completed project is to spark either physical conversation and dialogue or internal thoughts and contemplation over what identity means to different people and with how chaotic life is and how many people one meets during life, they don’t truly understand the identity of most people because we don’t take the time to think about each individual. This project could in the future be built upon to understand and complicate the concept of self identity if the project also involved capturing people’s faces and including them in the random face generator. Particularly, our message fits with an audience of people who are interested in exploring the concept of identity and understanding the people around them, to better be able to talk and interact with others in the future. This goal especially fit with the mindset of many NYUSH students who come to this school to make connections and meet people from all over the world with very different backgrounds. But the longer these students become complacent talking to the same people from the same backgrounds the less they think about people from different backgrounds with different identities.

Recitation 8: Serial Communication by Isabel Brack

Exercise 1

etch a sketch circuit

The first exercise, the etch a sketch was fairly straight forward. First, I build the circuit as it was the same used in a class example and was very simple. Then, I modified the processing and arduino code that we downloaded. First, I changed the number of sensors to the correct number of potentiometers (2). After, I checked the port in processing to make sure my arduino connected properly. Next, I added to the code to create a line from the previous X and Y to the next X and Y based on the potentiometer. And I mapped the potentiometer to the size of my display. At first I had a bit of difficulty creating lines with the etch a sketch because I originally treated the code like I was moving an ellipse or point. But after I created a line function and began using previous X and Y coordinates, the etch a sketch began to work.

Exercise 2

circuit for buzzer

In the second exercise, I was a bit more confused on what are task was, but after seeking help from professors and a fellow, I altered the code we downloaded to create an If statement. When the If statement was true the buzzer would play the melody and when it was false it would stop. I made my if statement involve the position of mouseX and mouseY. When the mouse was on the display from 0-200 X and 0-200 Y the buzzer would create sound. When it was outside the dedicated range, it was silent.

Code for Etch A Sketch Processing

// IMA NYU Shanghai
// Interaction Lab
// For receiving multiple values from Arduino to Processing

/*
 * Based on the readStringUntil() example by Tom Igoe
 * https://processing.org/reference/libraries/serial/Serial_readStringUntil_.html
 */

import processing.serial.*;

String myString = null;
Serial myPort;


int NUM_OF_VALUES = 2;   /** YOU MUST CHANGE THIS ACCORDING TO YOUR PROJECT **/
int[] sensorValues;      /** this array stores values from Arduino **/

float preX;
float preY;


void setup() {
  size(1023, 1023);
  background(255);
  setupSerial();

  
}


void draw() {
  updateSerial();
  printArray(sensorValues);
  //float posx =map(sensorValues[1],0,1023,0,500);
 // float posy =map(sensorValues[0],0,1023,0,500);
  strokeWeight(4);
  line(preX,preY, sensorValues[1],sensorValues[0]);
    preX=sensorValues[1];
preY=sensorValues[0];

  // use the values like this!
  // sensorValues[0] 

  // add your code

  //
}


void setupSerial() {
  printArray(Serial.list());
  myPort = new Serial(this, Serial.list()[ 1 ], 9600);
  // WARNING!
  // You will definitely get an error here.
  // Change the PORT_INDEX to 0 and try running it again.
  // And then, check the list of the ports,
  // find the port "/dev/cu.usbmodem----" or "/dev/tty.usbmodem----" 
  // and replace PORT_INDEX above with the index number of the port.

  myPort.clear();
  // Throw out the first reading,
  // in case we started reading in the middle of a string from the sender.
  myString = myPort.readStringUntil( 10 );  // 10 = '\n'  Linefeed in ASCII
  myString = null;

  sensorValues = new int[NUM_OF_VALUES];
  
}


void updateSerial() {
  while (myPort.available() > 0) {
    myString = myPort.readStringUntil( 10 ); // 10 = '\n'  Linefeed in ASCII
    if (myString != null) {
      String[] serialInArray = split(trim(myString), ",");
      if (serialInArray.length == NUM_OF_VALUES) {
        for (int i=0; i<serialInArray.length; i++) {
          sensorValues[i] = int(serialInArray[i]);
        }
      }
    }
  }
}

Code for Etch A Sketch Arduino

// For sending multiple values from Arduino to Processing

void setup() {
Serial.begin(9600);
}

void loop() {
int sensor1 = analogRead(A0);
int sensor2 = analogRead(A1);
//int sensor3 = analogRead(A2);
//int theMappedValue = map(sensor1, 0, 1023, 0, 255);
//int theMappedValue2 = map(sensor2, 0, 1023, 0, 255);
// keep this format
Serial.print(sensor1);
Serial.print(“,”); // put comma between sensor values
Serial.print(sensor2);
// Serial.print(“,”);
// Serial.print(sensor3);
Serial.println(); // add linefeed after sending the last sensor value

// too fast communication might cause some latency in Processing
// this delay resolves the issue.
delay(100);
}

Buzzer Processing

// IMA NYU Shanghai
// Interaction Lab


/**
 * This example is to send multiple values from Processing to Arduino.
 * You can find the arduino example file in the same folder which works with this Processing file.
 * Please note that the echoSerialData function asks Arduino to send the data saved in the values array
 * to check if it is receiving the correct bytes.
 **/


import processing.serial.*;

int NUM_OF_VALUES = 2;  /** YOU MUST CHANGE THIS ACCORDING TO YOUR PROJECT **/


Serial myPort;
String myString;

// This is the array of values you might want to send to Arduino.
int values[] = new int[NUM_OF_VALUES];

void setup() {
  size(500, 500);
  background(0);

  printArray(Serial.list());
  myPort = new Serial(this, Serial.list()[ 1 ], 9600);
  // check the list of the ports,
  // find the port "/dev/cu.usbmodem----" or "/dev/tty.usbmodem----" 
  // and replace PORT_INDEX above with the index of the port

  myPort.clear();
  // Throw out the first reading,
  // in case we started reading in the middle of a string from the sender.
  myString = myPort.readStringUntil( 10 );  // 10 = '\n'  Linefeed in ASCII
  myString = null;
}


void draw() {
  background(0);

  // changes the values
//  for (int i=0; i<values.length; i++) {
//values[i] = i;  /** Feel free to change this!! **/
 // }
if (mouseX>0&& mouseX <200){
values[0]=1;}
else {
  values[0]=0;
}
if (mouseY>0&& mouseY<200){
values[0]=1;}
else {
  values[0]=0;
}
  // sends the values to Arduino.
  sendSerialData();

  // This causess the communication to become slow and unstable.
  // You might want to comment this out when everything is ready.
  // The parameter 200 is the frequency of echoing. 
  // The higher this number, the slower the program will be
  // but the higher this number, the more stable it will be.
  echoSerialData(200);
}

void sendSerialData() {
  String data = "";
  for (int i=0; i<values.length; i++) {
    data += values[i];
    //if i is less than the index number of the last element in the values array
    if (i < values.length-1) {
      data += ","; // add splitter character "," between each values element
    } 
    //if it is the last element in the values array
    else {
      data += "n"; // add the end of data character "n"
    }
  }
  //write to Arduino
  myPort.write(data);
}


void echoSerialData(int frequency) {
  //write character 'e' at the given frequency
  //to request Arduino to send back the values array
  if (frameCount % frequency == 0) myPort.write('e');

  String incomingBytes = "";
  while (myPort.available() > 0) {
    //add on all the characters received from the Arduino to the incomingBytes string
    incomingBytes += char(myPort.read());
  }
  //print what Arduino sent back to Processing
  print( incomingBytes );
}

Buzzer Arduino

// IMA NYU Shanghai
// Interaction Lab

#include “pitches.h”
/**
This example is to send multiple values from Processing to Arduino.
You can find the Processing example file in the same folder which works with this Arduino file.
Please note that the echo case (when char c is ‘e’ in the getSerialData function below)
checks if Arduino is receiving the correct bytes from the Processing sketch
by sending the values array back to the Processing sketch.
**/

#define NUM_OF_VALUES 2 /** YOU MUST CHANGE THIS ACCORDING TO YOUR PROJECT **/

int melody[] = {
NOTE_C4, NOTE_G3, NOTE_G3, NOTE_A3, NOTE_G3, 0, NOTE_B3, NOTE_C4
};

// note durations: 4 = quarter note, 8 = eighth note, etc.:
int noteDurations[] = {
4, 8, 8, 4, 4, 4, 4, 4
};
/** DO NOT REMOVE THESE **/
int tempValue = 0;
int valueIndex = 0;

/* This is the array of values storing the data from Processing. */
int values[NUM_OF_VALUES];

void setup() {
Serial.begin(9600);
pinMode(13, OUTPUT);
pinMode(9, OUTPUT);
}

void loop() {
getSerialData();

// add your code here
// use elements in the values array
// values[0] // values[1] // if (values[0] == 1) {
// digitalWrite(13, HIGH);
// } else {
// digitalWrite(13, LOW);
// }

if (values[0] == 1) {
tone (9, value[1]);
}

} else {
noTone(9);
}

}

//recieve serial data from Processing
void getSerialData() {
if (Serial.available()) {
char c = Serial.read();
//switch – case checks the value of the variable in the switch function
//in this case, the char c, then runs one of the cases that fit the value of the variable
//for more information, visit the reference page: https://www.arduino.cc/en/Reference/SwitchCase
switch (c) {
//if the char c from Processing is a number between 0 and 9
case ‘0’…’9′:
//save the value of char c to tempValue
//but simultaneously rearrange the existing values saved in tempValue
//for the digits received through char c to remain coherent
//if this does not make sense and would like to know more, send an email to me!
tempValue = tempValue * 10 + c – ‘0’;
break;
//if the char c from Processing is a comma
//indicating that the following values of char c is for the next element in the values array
case ‘,’:
values[valueIndex] = tempValue;
//reset tempValue value
tempValue = 0;
//increment valuesIndex by 1
valueIndex++;
break;
//if the char c from Processing is character ‘n’
//which signals that it is the end of data
case ‘n’:
//save the tempValue
//this will b the last element in the values array
values[valueIndex] = tempValue;
//reset tempValue and valueIndex values
//to clear out the values array for the next round of readings from Processing
tempValue = 0;
valueIndex = 0;
break;
//if the char c from Processing is character ‘e’
//it is signalling for the Arduino to send Processing the elements saved in the values array
//this case is triggered and processed by the echoSerialData function in the Processing sketch
case ‘e’: // to echo
for (int i = 0; i < NUM_OF_VALUES; i++) {
Serial.print(values[i]);
if (i < NUM_OF_VALUES – 1) {
Serial.print(‘,’);
}
else {
Serial.println();
}
}
break;
}
}
}