Duet – Haiyan Zhang – Prof. Marcela Godoy

User Test Oct. 18th

Presentation Oct. 22nd

Title:Duet

Partner: Ruben Mayorga

Context and Signification

It wouldn’t be fair to say that our Mid-term project is substantially inspired by my previous research (Group Project) due to my later enrollment into the course. However, I can see and therefore, make connections between these two projects. To my understanding, the first project Fitbox aims at personalized interaction and companion. But our Mid-term project Duet, ideally, aims at collaborative interaction between people aka players/users and enjoyable moments. Two projects that I researched are: The Bomb (an immersive experience and installation) and Hertzian Landscapes – The interactive space of a radio spectrum. The Bomb, as its subtitle indicates, offers viewers an immersive experience in a film about the nuclear bomb. It stimulates participants’ sensory organs from all aspects, which makes it educational and memorable. Hertzian Landscapes enables the audience to literally become participants in the project by letting visualized Hertzian waves react to their movements. The fact that these two projects communicate messages to the audience from multi-layers such as listening, seeing and moving confirms Crawford’s definition of interaction. Furthermore, Hertzian Landscapes specifically confirms my understanding of interaction as a conversation or a relationship since it vividly picturalize the result of a real-time dialogue. Its modality encourages participants not only to watch/ observe but to make the first move and create a part of their life. So I believe, interaction at a higher level must conduct a reflective, or meditative conversation. 

Our final product doesn’t come out as our initial ideal. The ideal is a two-person game: by touching boxes and cooperating with each other, players will receive their final reward – a winner’s song. This is the reason why we name it Duet – we want to provide Until the very last moment, we realized the basic principle behind is SIMON game and we created something already existed. 

However, if the ideal was successfully created, it will function as a game for multi-players in context like family reunion, friends’ party or college students’ orientation. The game requires immediate interaction with both the machine and other players. Therefore, communication should be happening in all aspects, whick will help people break ice easily. 
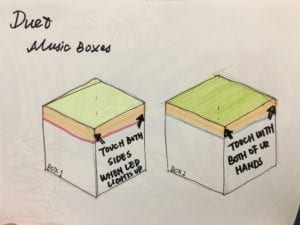
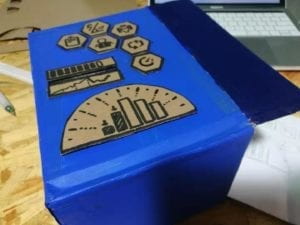
Concept sketch of Duet – Music Boxes

Conception and Design

We first imagine it to be a dance-pad-size thing consisted of at least 6 floor buttons. We want the users to trigger the circuit and music notes by stepping on each button. And in order to make cooperation happen, we decide to make at least 6 buttons. So in the case that more than two boxes light up simultaneously, players have to work together to generate one music note. However, after we learnt the human trigger circuit’s principle, we realized it was not pragmatic for users to step on two boxes at a time since it would either destroy the boxes or hurt the users. So we changed our vision of the whole project. This time, instead of stepping on the button, users would need to touch boxes to trigger the circuit.  Therefore, we chose conductive tape as a component to create a incomplete circuit. In order to let players touch the “button” with both of their hands, we decided to laser-cut palm-size boxes. Also, for the “button” has to be resistant enough, we chose wood as the printing material. The complete box will have a transparent lid over it. The led lights in boxes serves as indicative signs that tells users which box to touch. Different lights coresponds to different boxes. 

Now after user testing and final presentation, I won’t say all these material choices are the best fit for our project idea. For example, human trigger circuit is not the only solution to build this type of game. If we want the initial idea – music floor pad – to happen, then buttons or distance sensors can be qualified components. I will mention this point in my conclusion as well. We rejected this idea because we thought human trigger circuit was a fun concept and experimenting it would be a valuable experience for ourselves. On the other hand, considering what we have researched on human trigger circuit, if we can develop it and intergrate it better into our project, it will absolutely offer users amazing experience and make them feel like enacting music to happen with bare hands. 

Fabrication and Production

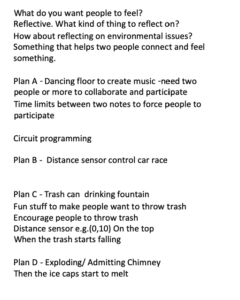
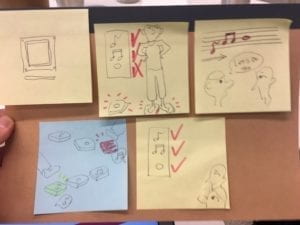
We strictly followed the design steps. We had two rounds of brainstorming. The first round I was basically lost in thoughts like “What we can do with technologies that we knew right now?”After realizing the significant question is “What do you want people to feel? What kind of experience do you want people to have?” We started the second stage of brainstorming. I wanted the project to create reflective experience for users. Ruben thought about enviromental issues. Our thoughts flew in the right direction. But in the end, we decided on the first idea that Ruben raised for a fun experience for users would also be of value. I drew the storyboard to visualize the imagined interaction. 
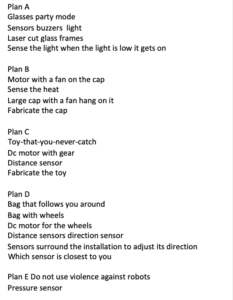

Brainstorming Stage 1

Brainstorming Stage 2

the StoryBoard of Duet

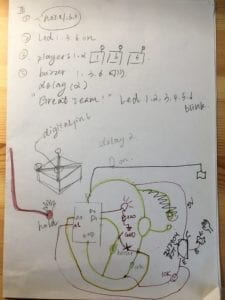
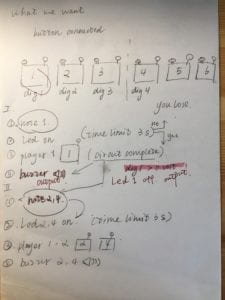
Then we went into the coding and frabrication. The lasercut model is found from MakerCase (website listed in the reference). While buidling the circuit, there were lots of unexpected difficulties. Arduino kept reading random analog values. The current in the circuit was not stable. The problem might be with the circuit. Again, at this stage, I drew the sequence of things that we wanted to happen to visualize the interactive process. This helped us write the code.

Prof. Tristan and IMA fellow Tina Zong gave us substantial support and help in building circuits, writing code and giving feedbacks. Tristan suggested that to help users understand what is happening, we can show the pattern at the very beginning. A pattern means what happens later: leds light up in a preset sequence, after which music starts. To inspire the sparkles of interest in users, Ruben decided to use the theme music from Game of Throne (music composed by online Arduino user, website listed in the reference) in the pattern. 
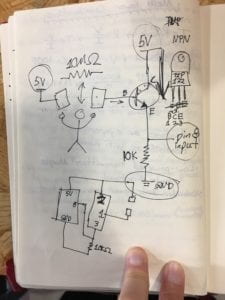
Human Trigger Circuit Diagram drawn by our Prof. Tristan 

Concepts and Sequence of Interaction

Sequence and Circuit Sketch (Circuit corrected by Prof. Tristan)

During the user testing, we saw bipolar reaction. First of all, all users told us it wasn’t obvious how they should interact with these two boxes. People tended to touch the boxes as soon as the leds light up. It wasn’t clear which part was the pattern and which was the game’s beginning. Therefore, many users got frustrated after failing too many times. On the other hand, many users were still very excited about playing the game and curious about what would happen later after they figured out the pattern. We also received valuable suggestions: 1. a speaker might be more suitable than a buzzer so that everyone can hear the music. During the user testing, people could barely hear the sound; 2. Giving general instructions would help a lot; 3. The conductive parts attached to boxes require higher sensitivity; 4. The loser song clearly indicates missing the note and losing the game, but there is no clear signals telling users if they successfully trigger the circuit; 5. Since now it is compromised to a one person game, and the sequence of lights is preset and always the same, why not omit the light after the pattern and make it a memory game? This would be way more exciting!

User Testing Video 1

User Testing Video 2

After the user testing, we collected the suggestions and reflected on them. We (1)used Serial.println() function to print real-time instructions on Arduino, (2)strengthened the conductive tape and assured the sensitivity, (3)deleted the lights after the pattern, (4) added a beep sound in the code to indicate correct operation. These adaptions were effective. But instructions printed in Arduino’s SerialReading window was not a considerate enough idea. Users were still unable to understand what was happening because they had no time to read the instructions while all their attention was caught by the led light pattern.
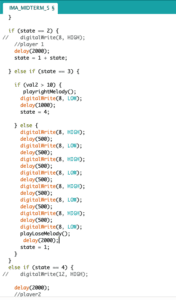
Duet Code (Partial – After User Testing)

Conclusions

As I stated earlier, if our ideal project was successfully created, it will function as a game for multi-players in contexts like family reunion, friends’ party or college students’ orientation. The game requires immediate interaction with both the machine and other players. Therefore, communication should be happening in all aspects, whick will help people break ice easily.  Moreover, I believe, interaction at a higher level must conduct a reflective, or meditative conversation. Nonetheless, due to lack of considerations, it was difficult for users to understand how to interact with it. Even after we wrote instructions on the box and on Arduino, it was still quite unclear. If we wrote instruction on paper, as suggested by our professors, it might be way easier since users could read it clearly. The compromisation we made due to time limit created an unignorable gap between our ideal and the realistic outcome. It is now a memory music game with only one preset sequence. It sort of goes on its own and repeats itself endlessly. The non-stop repeatedness exposes lack of interativity. Moreover, the project itself does not aligh with our idea of reflectivity. The message that we can potentially send to users is not clear at this stage. These setbacks result in our users’ confusion. Even if the result wasn’t that bright and lovely, we absolutely gained an abundance of fun and knowledge. Our gaining ability in tech will eventually serve our ideas. 

There are two issues I personally want to address. First, human trigger circuit is not the only solution to build this type of game. If we want the initial idea – music floor pad – to happen, then buttons or distance sensors can be qualified components. Second, what I learnt from other interactive projects that I like is that projects’ conception is of significant value. I enjoy watching players interacting with the female experience stimulation machine. And I love the Alice machine that reveals horrible facts about gambling. They are not merely an interactive product that uses technology. The most valuable part is that they shares information closely connected to human beings. These stories/ information/ inspiration are woven in people’s lives and are now reflected through these interactive projects. I believe this is the core of each project. And if I have time, I will think more about what messages I want to send, what audience I am talking to. Only after these reflecting stages will I finally come to the question: how can I take full advantage of skills I know to make the ideal happen? People should care for these interactive medium are now talking about everything people nowadays are wondering. The interactive is also the reflective. 

Reference 

“The Bomb”, a short video by VICE

An Experience at the Heart of Nuclear Annihilation,” a report by VICE staff, on VICE

“Hertzian Landscapes – The interactive space of a radio spectrum”, written by Filip Visnjic, on CREATIVE APPLICATIONS NETWORK

Music from Game of Thrones, https://github.com/robsoncouto/arduino-songs

Lasercut Box Model from https://en.makercase.com
Individual Reflection of Group Project 1 by Haiyan Zhang

Sept 27

Definition of Interaction

As I have mentioned in my Recitation 2 post, I think “[t]o me, moreover, ‘interaction’ is the process that conveys ideas. Eventually, it is the relationship between human beings rather than technology and human beings”. That was already an understanding based on readings. But after practice, I want to develop and have an improved definition of interaction (probably more in terms of artistic projects). In “What Exactly is Interactivity?”,  Crawford chooses the word “conversation” and accordingly gives a concise definition of “interactivity”: “a cyclic process in which two actors alternately listen, think, and speak”. Later on, he rearranges the words and articulate more: “This process of conversation cycles back and forth, as an iterative process in which each participant in turn listens, thinks and speaks”(p5).  More importantly, sometimes we can think of the “degrees of interactivity” so that “rather than either/ or proposition, we make it possible to accept that anything can be interactive” (p6). In the Introduction of Physical Computing, Crawford’s concept is summarized too. I notice the word choice of “relationship”. As I quoted in Recitation 2 post: When giving an explanation about “Intelligence Amplification”, it says “Rather than trying to imitate the autonomy of human beings, we want to support it”. and supports a human being’s autonomy by capturing and conveying a person’s expression. It counts on human beings to make the most interesting relationships and supports a human being’s autonomy by capturing and conveying a person’s expression (p. xviii, “Introduction”). To be more academic, we can also describe it as a “three-part cycle” “in computer terms: input, processing and output”, suggested by O’Sullivan and Igoe (p.XX).

Based on these, my improved definition of interaction is: a multi-actor participating process which normally conveys preset ideas and generates new messages in various relationships built by actors. Messages are conveyed through medium and received/ mutually communicated by different senses. 

The Bomb (an immersive experience and installation)

Hertzian Landscapes – The interactive space of a radio spectrum

I chose two projects that I understand as interactive. The first one is The Bomb. According to VICE report, the Bomb is “an immersive film, music, and art installation that puts viewers at the center of the story of nuclear weapons”(VICE). I also put the link of the whole video in the reference. In the video, we will see this film is immersive in sense that the huge installation surrounds the audience and invites the audience who step out to use all of their senses to perceive the full story of nuclear destruction. It invites the actors (audience) to listen, to process its messages, to communicate with the surroundings. However, viewing from the surface, I think compared to the second project, the Bomb enacts a lower level of interactivity for during the process, the installation is not necessarily affected by the audience’s reaction. However immesive, it is ready-made film that doesn’t need further interaction, which is also required by this particular genre of art to serve its great purpose.

On contrary, Hertizan Landscapes demonstrates a higher level of interactivity. In the report from Creative Applications Network, Filip Visnjic describes the project as “a live visualization of the radio spectrum”, which is very concise. “It includes a digital receiver to scan large swaths of radio spectrum in near real-time and using Three.js visualises thousands of signals into a panoramic electromagnetic landscape.” More importantly, when a human being approaches the installation and moves horizontally, she enacts changes in the picture. 

“Unlike visible light, waves in the radio spectrum cannot be perceived by us directly yet this space is teeming with human activity. The installation invites users to zoom in to specific frequencies by positioning themselves in front of the panorama as if controlling a radio tuner with their body, giving them a sense of walking through the spectrum.” In this case, participants are not only viewers of a ready-made product. They are effectively communicating with a project that will respon to their movement. Meanwhile, the changes engenders thoughts and curiosity in people’s minds, which enables people to create a moment in this installation that is individualized. According to my earlier defination, interaction sometimes generates new messages in the conversationg between two actors. This is what the Bomb lacks but Herzian Landscapes is endowed. 

Group Project Description

Due to my late enrollment, I joined the group very late. Compared to other members, I was definitely not someone who contributed a lot. My major task was to understand members’ ideas and perform during the presentation.

Hologram Scan Light & Special Sound …… Haiyan Zhang 

Out imaginary interactive product in2119 is a portable fitness device called “Fitbox”. 

FITBOX poster designed by Lydia Zhao

FITBOX model made by Anica Yue Yao 

Basically, Fitbox is a product developed on the foundation of hologram (and also AI, from my own perception). It has two modes: Workout and Support. After the user starts the machine, it first greets the user with personalized settings , communicates different messages according to the environment, such as time of the day. Whichever mode the user chooses, Fitbox will first emits scanning light to observe and record the user body’s conditions and data. Following the instructions Fitbox later gives, user does particular workout exercise. With the body conditions/ data in its memory, the box is able to exert real-time observation and therefore sets off hologram coach either to demonstrate the correct way of doing that exercise or to encourage/ push the user so that she insists on and finishes work-out. In Workout mode, Fitbox detects specific points (such as joints, shoulder) and reflects it on the hologram coach to help user better see herself and make improvements accordingly. Our project is definitely a multi-actor conversation. It must include one actor who initiates the machine, listens to its instructions, sees the correct way shown by hologram coach. The actor also must reacts to the messages sent by the Fitbox by following the instructions. The preset goal is purely to help and support the user develop better habits in daily workout, pay attention to her body conditions and adjust her way promptly. However, more personalized and specified messages are generated in the process of reacting to the user’s daily habit, body data, personal preference. Valued from different perspectives, Fitbox is an interactive project in my view. It only has a complete presentation when the other actor is in conversation. 


Reference

Recitation 2 Post by Haiyan Zhang

“What exactly is interactivity?” from The Art of Interactive Design, Crawford (pages 1-5)

Physical Computing – Introduction, O’Sullivan and Igoe

“The Bomb”, a short video by VICE

An Experience at the Heart of Nuclear Annihilation,” a report by VICE staff, on VICE

“Hertzian Landscapes – The interactive space of a radio spectrum”, written by Filip Visnjic, on CREATIVE APPLICATIONS NETWORK

Recitation 4: Drawing Machine by Haiyan Zhang

Oct. 11th 

Introduction (cited from Recitation 4 tutorial)

We need to create a ” drawing machines by using an H-bridge to control stepper motors attached to mechanical arms. Individually complete Step 1 and Step 2 to assemble a circuit using the L293D IC and the pre-installed Arduino Stepper Library.” 

Step 1: Build the circuit

Build the following circuit to control the stepper. You can use the stepper_oneRevolution(Arduino>File>Examples>Stepper>stepper_oneRevolution) example code to get your motor to make one revolution. If done correctly, your motor should rotate smoothly. Make sure you orient the IC in the correct position; this can be seen in the Components section at the bottom.

Step 2: Control rotation with a potentiometer

Add a potentiometer from your kit to the circuit in such a way as to allow you to read analog input. Then, upload the MotorKnob  (Arduino>File>Examples>Stepper>MotorKnob) example  to control your motor. Please modify the number of steps within the code to 200, because the 42STH33-0404AC Stepper Motor is a 200 step motor. You can use the function “map()” in order to match the movement of the knob with the rotation of the motor.

Step 3: Build a Drawing Machine!

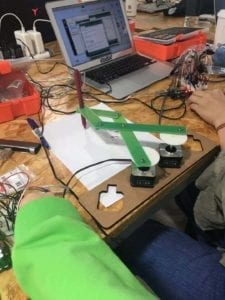
Once you have your motor moving via input from a potentiometer, find another person who has also completed Step 2 and pair up with them. Collect the materials needed for Step 3 and combine your parts into a mechanical arm that can hold a marker on paper, as seen in  the picture below. Use your potentiometers to make the motors turn and draw something.

Materials

For Steps 1 and 2

1 * 42STH33-0404AC stepper motor
1 * L293D ic chip
1 * power jack
1 * 12 VDC power supply
1 * Arduino kit and its contents

For Step 3

2 * Laser-cut short arms
2 * Laser-cut long arms
1* Laser-cut motor holder
2 * 3D printed motor coupling
5 * Paper Fasteners
1 * Pen that fits the laser-cut mechanisms
Paper

Description & Reflection

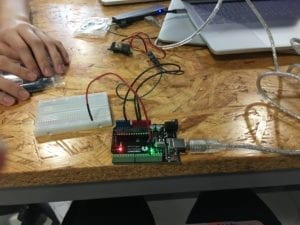
We were warned of the danger of damaging our Arduino and even our laptops if the circuit was not built correctly. There are basically two problems that we need to avoid to prevent this kind of situation. (1) “Groud goes together, Volts go separate.” which literally means to make the circuit neat and clean, we should group wires that go to groud together and separate wires that go to 5v on Arduino and that go to the power jack. (2) “Don’t put the H-Bridge” upside-down!” Always remember that the pin on the left side of the semicircle sign on the H-Bridge is the first pin. (as shown below in the picture from recitation 4 tutorial). 

L293D Integrated Circuit (H-Bridge):

Note on how to Identify the front of the IC:

To locate this IC’s front and pinout, look for a semicircle at its end. This semicircle indicates where the front of the IC is. The pin to the left is pin 1, and the diagram below depicts how the other pins are mapped.


Nonetheless, when building the circuit, I thought in the complete opposite direction. I placed the H-Bridge upside down which later caused unstable current in the circuit and failure in activating the motor. 

our drawing machine working (sort of) 1

our drawing machine working (sort of) 2

our drawing machine holding a red pen 

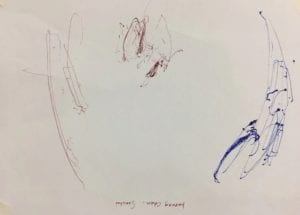
our final drawing created by drawing machine (and our movement for sure)


What I perceived from this creative process is more on the building process and the final drawing piece made by the machine. But fundamentally, the piece is not made by a machine that has its own ideas in mind. It is substantially created by us since we thought about which color to use, how thick we wanted the line to be, what patterns should be drawn where etc. What’s of importance here is what we as creators want the machine to accomplish and how we eventually intepret the drawing. 

Questions

Question 1:

What kind of machines would you be interested in building?Add a reflection about the use of actuators, the digital manipulation of art, and the creative process to your blog post.

I would be interested in building machines that are educational and provoking reflection among people. Therefore, it has to lay weight on human beings rather than the machine itself. Rather than following the grain, it can go against the grain in its language and final presentation. 

While building the drawing machine, we realized that what we were doing was more finding fit pieces to make the machine work rather than making our ideas work. Actuators’ movement was more random and uncontrollable than we thought. Seems like the digital manipulation can make art impressive and emotionally evoking but also challenging in that it needs the creator now to create some sort of art that moves, speaks, interacts… On the other hand, the advantage to it is that in the creative process, more ideas will be stimulated since creators are constantly interacting with it too. 

Question 2:

Choose an art installation mentioned in the reading ART + Science NOW, Stephen Wilson (Kinetics chapter). Post your thoughts about it and make a comparison with the work you did during this recitation. How do you think that the artist selected those specific actuators for his project?

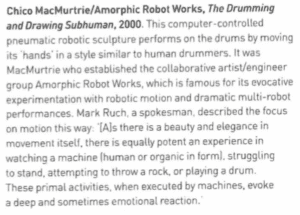
Chico MacMurtie/ Amorphic Robot Works, The Drumming and Drawing Subhuman, 2000 (screenshot of ART+Science NOW, Stephen Wilson)

As the spokesman describes about it (The Drumming and Drawing Subhuman,2000), it is about the “beauty and elegance in movement itself”, or the potent “experience in watching a machine struggling” to do movement like throwing a rock or playing a drum.   However the form of that sophisticated machine is, what matters is the movement is “primal” and evokes “emotional reaction”(p110).  Compared to this, the drawing machine we built during the recitation seems to evoke more “emotional reaction” in me after its movement resulted in a tangible object – a drawing that can be described as impressionist or minimalist depending on the human viewer’s opinion. Rather than the movement, it is the result that interests me most. 

I think artistis choose actuators according to what specific kind of interaction they want to take place between the art-tech piece and human participants. 

References

IMA Interaction Lab Recitations tutorial https://wp.nyu.edu/shanghai-ima-interaction-lab/category/recitations/

ART + Science NOW, Stephen Wilson (Kinetics chapter)


Recitation 3: Sensors by Haiyan Zhang

Sept. 27th 

Recitation Exercise Introduction (cited from Recitation 3 note):

Choose one of the sensors listed below and read about what it is and how it performs. Once you have picked a sensor, build a circuit that integrates this sensor with your Arduino. Use the data (input) from your sensor to drive an output (Servo-motor, LEDs, Buzzer, etc.). Document the finished circuit and your interaction with it. In addition, draw a diagram of how all the components are connected and add this to your documentation. If you finish your circuit early, swap out the sensor in your circuit with a different sensor.

For these circuits, think back to the lessons from class, such as how to map() an analog input, as well as how to set an analog output with an analog input. This can be seen in the example AnalogInOutSerial

Description & Reflection

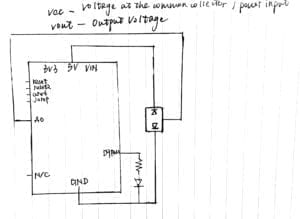
Out of moisture sensor, infrared distance sensor, vibration sensor, ultrasonic ranger and joystick module, we chose to play with the infrared distance sensor. As introduced in the recitation 3 note, the infrared distance sensor

“can by used by implementing the connections and code from a simple analog read sketch. In the case of Infrared Distance Sensors, using the “map()” function can be helpful.  This function maps the analog readings from the sensor to the distance between the sensor and the object”.

Therefore, we decided to build a circuit including a led light and the infrared distance sensor, and program a code to enable the led light to respond the the changes of the analog readings from the distance sensor.

Material:

Infrared distance sensor *1 

Arduino * 1

Breadboard * 1

Led light * 1

220Ω resistor * 1 

1 * USB A to B cable

A handful of wires 

circuit in progress…

circuit schematic 

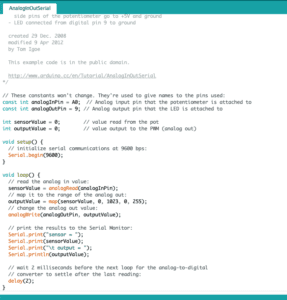
After completing the circuit, we went ahead into the programming part. This was when we encountered several obstacles. Our first step was testing if the circuit works correctly by running the AnalogInOutSerial code from Arduino library.

AnalogInOutSerial code from Arduino>File>Examples>Analog>AnalogInOutSerial 

We wanted to develop a code serving our purpose based on AnalogInOutSerial. Nonetheless, at first we tried digitalWrite() since we believed that since what we wanted is on/off of the led light, then it should be an either/or, namely,  a digital problem. Of course, this attempt ended in confusion and failure. After anxiously testing over and over and switching to other codes, we sought help from our dear learning assistant and realized the critical mistake. We should have tried AnalogWrite() because (1) the sensor connects to the analog pin; (2) we want the led light to react to a range of data! (wondering if there’s a way to articulate the second reason better.) 

Rather than using map() function recommended in the introduction, we chose AnalogWrite() and limit the range in which we want the led light to turn on. And any number out of the bracket would result in cutting off the power, and therefore the led light will turn off.  One point to note is that first of all, we need to know the range of the infrared distance sensor itself so that we can adjust our code. The video below shows our accomplishments. 

 Questions 

Question 1:

What did you intend to assemble in the recitation exercise? If your sensor/actuator combination were to be used for pragmatic purposes, who would use it, why would they use it, and how could it be used?

We intended to build a circuit that enables the led responds to the analog changes from the infrared distance sensor. Within The target using environment would be space like evacuation passageway/ fire safety passage where constant light is not needed unless someone passes that area. So when the distance from the user to the sensor detected is within the range preset in the code, then the light will be automatically turned on and kept until the user finishes action and leaves that area. Serving that kind of situation, convenience is provided to the maximum while waste of electricity is deduced to the minimum since the light reacts immediately the the analog readings of distance. 

Question 2:

Code is often compared to following a recipe or tutorial.  Why do you think that is?

I’m not so sure. But recipe and tutorial are both created by different individuals. So there must be great diversity in recipes to cook one dish or tutorials to solve one problem. Since what we want to accomplish is identical in a substantial way, however different the personality in a recipe and tutorial may seem, they are identical in some crucial steps and methods. I imagine code the same. It is entitled a sense a personality thanks to the creator. But it follows  and has to follow a rigid universal logic and language. 

Question 3:

In Language of New Media, Manovich describes the influence of computers on new media. In what ways do you believe the computer influences our human behaviors?

To review Manovich’s opinion on the transformation from old media to new media, let’s quote the tendencies he summarized in Language of New Media: 1. numerical representation, 2.modularity, 3.automation, 4.variability and 5.transcoding. To be honest, these concepts are still very vague to me even after reading through the article. 

But like the title of Manovich’s book, “Language of New Media“, I would say the computer influences us in a linguistic way. Living in a computerized city, contemporary people are not only interacting with other human beings, we are also interacting with computers. Human-computer interface has especially changed the way people conduct conversations. Therefore, the way people tend to express themselves are changing: we might tend to think faster and speak unthinkingly. 

References

Recitation 3 note:  https://wp.nyu.edu/shanghai-ima-interaction-lab/recitation-3-sensors/

p.27-48 Language of New Media by Lev Manovich

Recitation 2: Arduino Basics by Haiyan Zhang

September 20, 2019
Material

From Arduino Kit:

1 * Arduino Uno
1 * USB A to B cable
1 * breadboard
1 * buzzer
2 * LEDs
2 * 220 ohm resistors
2 * 10K ohm resistors
2 * pushbuttons
A handful of jumper cables

From cart:

2 * arcade buttons
1 * Multimeter (optional)

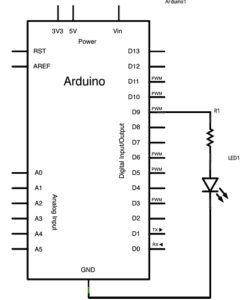
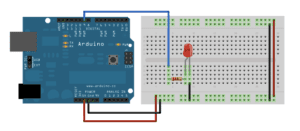
Circuit 1: Fade (tutorial)

*The schematic, diagram and description are from https://www.arduino.cc/en/Tutorial/Fade.

*The code is Arduino>File>Examples>03.Analog>Fading

Description:

This example demonstrates the use of the analogWrite() function in fading an LED off and on. AnalogWrite uses pulse width modulation (PWM), turning a digital pin on and off very quickly with different ratio between on and off, to create a fading effect.

Reflection:

This circuit isn’t complex. The dimming effect was obvious once we ran the code in Arduino.  The concept of PWM is new to me. And analogWrite’s working principle is based on PWM. As explained in the tutorial on Arduino’s official website, “brightness” is a variable used in the code. AnalogWrite() can change the PWM very fast, so at the end of the code delay is written to control the speed of the fading effect. 

Fade Schematic

Fade Circuit

  int led = 9; // the PWM pin the LED is attached to
int brightness = 0; // how bright the LED is
int fadeAmount = 5; // how many points to fade the LED by// the setup routine runs once when you press reset:
void setup() {
   // declare pin 9 to be an output:
   pinMode(led, OUTPUT);
}// the loop routine runs over and over again forever:
void loop() {
   // set the brightness of pin 9:
   analogWrite(led, brightness);   // change the brightness for next time through the loop:
   brightness = brightness + fadeAmount;   // reverse the direction of the fading at the ends of the fade:
   if (brightness <= 0 || brightness >= 255) {
   fadeAmount = -fadeAmount;
   }
   // wait for 30 milliseconds to see the dimming effect
   delay(30);
}

↑ Fade Arduino Code  

Circuit 2: toneMelody (tutorial)

*The schematic, diagram and code are from https://www.arduino.cc/en/Tutorial/toneMelody. 

*The code is  Arduino>File>Examples>02.Digital>toneMelody.

Description: 

“This example shows how to use the tone() command to generate notes. It plays a little melody you may have heard before.” 

“The code below uses an extra file, pitches.h. This file contains all the pitch values for typical notes. For example, NOTE_C4 is middle C. NOTE_FS4 is F sharp, and so forth. This note table was originally written by Brett Hagman, on whose work the tone() command was based. You may find it useful whenever you want to make musical notes.”

Reflection: 

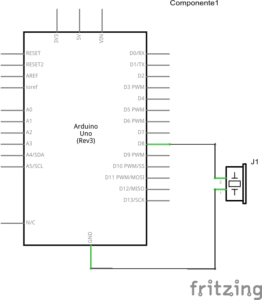
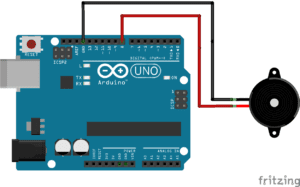
The full name for the buzzer is “piezo buzzer”. The circuit only needs two hookup wires and doesn’t require any resistor. On Arduino official website, it says “Digital pin 13 is harder to use as a digital input than the other digital pins because it has an LED and resistor attached to it that are soldered to the board on most boards” (https://wp.nyu.edu/shanghai-ima-interaction-lab/category/recitations/). But obviously in the circuit, the buzzer is connected to Digital pin 8, so the internal resistor is not here to account for that. A Question remains to be solved !!! 

toneMelody Schematic

toneMelody Circuit

toneMelody Arduino Code→

  #include “pitches.h”

// notes in the melody:
int melody[] = {
NOTE_C4, NOTE_G3, NOTE_G3, NOTE_A3, NOTE_G3, 0, NOTE_B3, NOTE_C4
};

// note durations: 4 = quarter note, 8 = eighth note, etc.:
int noteDurations[] = {
4, 8, 8, 4, 4, 4, 4, 4
};

void setup() {
// iterate over the notes of the melody:
   for (int thisNote = 0; thisNote < 8; thisNote++) {

     // to calculate the note duration, take one second divided by the note         type.
     //e.g. quarter note = 1000 / 4, eighth note = 1000/8, etc.
     int noteDuration = 1000 / noteDurations[thisNote];
     tone(8, melody[thisNote], noteDuration);

     // to distinguish the notes, set a minimum time between them.
     // the note’s duration + 30% seems to work well:
     int pauseBetweenNotes = noteDuration * 1.30;
     delay(pauseBetweenNotes);
     // stop the tone playing:
     noTone(8);
   }
}

void loop() {
   // no need to repeat the melody.
}

Circuit 3: Speed Game (tutorial)

*The diagram and code are from https://www.tinkercad.com/things/6MzvN5rlZlr-race-the-led-spring19

Description & Reflection:

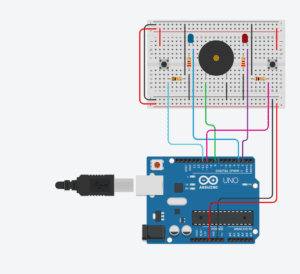
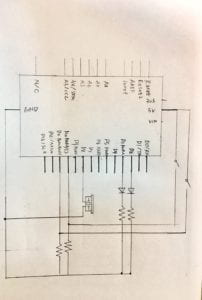
This circuit is a 2-person game. It wasn’t really difficult to build the circuit. But it was very easy to mess it up since there were 16 hook-up wires. So I needed to be careful and check which two points one wire was supposed to connect. At first, I missed one wire, so when the code was running, only “player 1” was recorded. Later the problem was solved.  

Speed Game Circuit

breadboard*1 Arduino*1
buzzerpin*1 Led*2
resistor(220Ω)*2

placed next to Leds

resistor(10k)*2

placed next to pushbuttons

pushbutton*2 hook-up wire*16


Speed Game Schematic

Speed Game Arduino Code (read from left to right)↓

int buzzerPin = 8;
int button1 = 11;
int button2 = 10;
int led1 = 3;
int led2 = 2;int goal = 10;
int buttonState1 = LOW;
int previousState1 = LOW;
int buttonState2 = LOW;
int previousState2 = LOW;int counter1 = 0;
int counter2 = 0;
boolean winner1 = false;
boolean winner2 = false;// the follow variables are long’s because the time, measured in miliseconds,
// will quickly become a bigger number than can be stored in an int.
long time = 0; // the last time the output pin was toggled
long debounce = 200; // the debounce time, increase if the output flickersvoid setup() {
// put your setup code here, to run once:
Serial.begin(9600);
pinMode(buzzerPin, OUTPUT);
pinMode(button1, INPUT);
pinMode(button2, INPUT);
pinMode(led1, OUTPUT);
pinMode(led2, OUTPUT);
Serial.println(“******************* RACE THE LED *******************”);
delay(1000);
Serial.println(“READY”);
delay(1000);
Serial.println(“SET”);
delay(1500);
Serial.println(“GO!!!!!!!!!!!!!!!!”);}void loop() {
// put your main code here, to run repeatedly:
buttonState1 = digitalRead(button1);
buttonState2 = digitalRead(button2);
//Serial.println(buttonState1);//this checks the times player 01 has pressed the button
if (counter1 < goal && winner2 == false) {
if (buttonState1 != previousState1 && millis() – time > debounce) {
if (buttonState1 == HIGH) {
counter1++;
Serial.print(“player 01: “);
Serial.println(counter1);
time = millis();
}
}
previousState1 = buttonState1;
if (counter1 == goal && winner2 == false) {
winner1 = true;
digitalWrite(led1, HIGH);
Serial.println(“PLAYER 01 WINS”);
playMelody();
}
}
//this checks the times player 02 has pressed the button

if (counter2 < goal && winner1 == false) {
if (buttonState2 != previousState2 && millis() – time > debounce) {
if (buttonState2 == HIGH) {
counter2++;
Serial.print(“player 02: “);
Serial.println(counter2);
time = millis();
}
}
previousState2 = buttonState2;
if (counter2 == goal && winner2 == false) {
winner2 = true;
digitalWrite(led2, HIGH);
Serial.println(“PLAYER 02 WINS”);
playMelody();
}
}

}

void playFreq(double freqHz, int durationMs) {
//Calculate the period in microseconds
int periodMicro = int((1 / freqHz) * 1000000);
int halfPeriod = periodMicro / 2;

//store start time
int startTime = millis();

//(millis() – startTime) is elapsed play time
while ((millis() – startTime) < durationMs) {
digitalWrite(buzzerPin, HIGH);
delayMicroseconds(halfPeriod);
digitalWrite(buzzerPin, LOW);
delayMicroseconds(halfPeriod);
}
}

void playMelody() {

playFreq(262, 100);
playFreq(294, 100);
playFreq(349, 100);
playFreq(294, 100);
playFreq(440, 200);
delay(100);
playFreq(440, 400);
playFreq(392, 400);
delay(300);
playFreq(262, 100);
playFreq(294, 100);
playFreq(349, 100);
playFreq(294, 100);
playFreq(392, 200);
delay(100);
playFreq(392, 400);
playFreq(349, 400);

}

Question 1:

Reflect how you use technology in your daily life and on the circuits you just built. Use the text Physical Computing and your own observations to define interaction.


I get so used to technology in my daily life that only when I went away from the urban circle and hid in the forest, would I notice the difference and realize how dependent I had been on technology. The word “manipulation”(sounds quite negative) came to my mind. Technology has been critical in terms of being the object (either tangible or intangible, visible or invisible) that serves human beings as the subject. Voice control lamp, water heater, central air conditioning – undoubtedly, it brings convenience. But on the other hand, my dependence on these items and the way my life has been changing and orienting around them are also the evidence for the conversation that happened the other way around. These changes can be positive, negative or rather neutral/ balanced of both sides. Therefore, rather than the word “manipulation”, “interaction” would be a better fit to describe this phenomenon between technology and human beings. 

I like the word ‘relationship’ in the text Physical Computing. When giving an explanation about “Intelligence Amplification”, it says “Rather than trying to imitate the autonomy of human beings, we want to support it”. and supports a human being’s autonomy by capturing and conveying a person’s expression. It counts on human beings to make the most interesting relationships and supports a human being’s autonomy by capturing and conveying a person’s expression (p. xviii, “Introduction”).  In a particular situation like a smartphone, ideas from designers are communicated to the user through the smartphone. Relationships are built between technology and human beings. More importantly, relationships are built between human beings through technology. “Interaction” is the concrete content of these relationships. It varies in forms (such as “listening, thinking and speaking”) and is actually composed of these variations (or put in other words, an interactive process is composed of these variations) (p. xx). 

A better definition of “interaction” then consists of two parts – its process/forms and its purpose. In Physical Computing, Chris Crawford’s definition is concise and emphasizes on the process and its actors. To me, moreover, “interaction” is the process that conveys ideas. Eventually, it is the relationship between human beings rather than technology and human beings. 

Question 2:

Why did we use the 10K resistor with the push button?

To regulate the current in the circuit and avoid blowing the push button. But I don’t know why we don’t use 220 ohm. Another question!

Question 3:

If you have 100,000 LEDs of any brightness and color at your disposal, what would you make and where would you put it?


(1)I will make an interactive painting made of LEDs. Square shape, approximately 30×30 cm. Over the LED-matrix is a piece of transparent flesh-color material. It reacts to the distance between the piece and the watcher and changes color and brightness so as to form different pictures.

(2)A very simple piece of stagecraft. I will install it for theatrical productions.

(3)A huge LED-assembled bulb. Put in the neighborhoods in the arctic circle, it will change its brightness and color according to time and need.

References

Fade tutorial https://www.arduino.cc/en/Tutorial/Fade

toneMelody tutorial https://www.arduino.cc/en/Tutorial/toneMelody

Speed game tutorial https://www.tinkercad.com/things/6MzvN5rlZlr-race-the-led-spring19

Introduction in Physical Computing  by Igoe and O’Sullivan