Preparatory Research and Analysis Essay by Haoquan Wang(Kenneth)

I have done some reading about interaction and made some interactive project so far. However, do I really understand what is the interaction? There is a necessity for me to rethink what interaction really is so as to have a better understanding and guidance for my final project. In my early group project this semester, my initial definition of interaction is that interaction should be a dynamic process which involves two parts of input and output. It is really simple: interaction, by this definition, is more like a conversation. I reached to this definition because I drew some inspiration from the first week’s reading. According to Crawford, interactivity is “a cyclic process in which two actors alternately listen, think, and speak. The quality of the interaction depends on the quality of each of the subtasks (listening, thinking, and speaking) (1)”. I designed my midterm project based on this initial definition. First, for my midterm project, we both have input side and output side. The process that users throw a ball is the input. The led lighting up and buzzer working is the output. The whole gaming process is dynamic for sure. So I think my project explains this definition pretty well.


To explore more about interaction, I research two interactive projects on YouTube. The first one is to Click Canvas overall project interaction, which is a project allowing many users to click many LED rectangle together to draw or just simple interaction. I think this project is very good as an interactive project. Because firstly it is aligned with my initial definition. What is more, is that this project enlightens me to evolve my definition of interaction. My initial definition of interaction just simple mentions “input” and “output”. But how many “input”? Or in other words, how many users can make input at the same time? Besides, can the output not be just simple, fixed feedback to input side? Can we design and create artificial output? These are all the aspects that I ignore to think about when I give a definition to interaction. This project that I research first makes me change my definition a little: Interaction is a dynamic process including a number of inputs and outputs which in a different pattern of manifestation.

Video Link:

https://www.youtube.com/watch?v=_j5Cqc82Gag


My second research project is Projective Game Surface, which is a projection game. It shows the characteristic that I have already realized: interaction is a dynamic process. In this project, two players need to keep moving to win the game. The interactive progress is constant, not only constant in the interaction between users and machines, but also in the one between user and user. This perfectly explains my initial definition and the definition given by Crawford—interaction is a continuing process which requires the users to keep making input and receiving output.

 Video Link:

https://www.youtube.com/watch?v=27d-k1h5oug

In conclusion, what is an interaction? My newest definition of interaction is: interaction is a constant, dynamic process including one or many inputs and outputs which is a different pattern of manifestation; this process can happen between people and machine, people and people.

 Sources:

1. Click Canvas overall project interaction

2. Projective Game Surface – Human Technology Interaction Project Work

 https://www.youtube.com/watch?v=27d-k1h5oug

3. The Art of Interactive Design, Crawford (pages 1-5)

http://s3-ap-southeast-1.amazonaws.com/ima-wp/wp-content/uploads/sites/3/2017/08/05164121/The-Art-of-Interactive-Design-brief.pdf


Recitation 7: Processing Animation by Haoquan Wang(Kenneth)

  1. My processing animation

int c = 0;
float r1 = 92;
float r2 = 91;
float r3 = 71;
float g1 = 65;
float g2 = 87;
float g3 = 72;
float b1 = 39;
float b2 = 88;
float b3 = 68;
void setup() {
noStroke();
size(1500, 1500);
background(192, 180, 165);
}

void draw() {
drawRect();
reset();
}

void drawRect() {
if (mousePressed) {
c = c + 1;
}

if (c>=10) {
fill(r1, g1, b1);
rect(10, 10, 1480, 1480);
}

if (c>=25) {
fill(r2, g2, b2);
rect(190, 190, 1200, 1200);
}

if (c>=35) {
fill(r3, g3, b3);
rect(450, 570, 700, 700);
}

if (c>=40) {
c = 0;
}
println(c);
println(keyCode);
}

void changeColor1() {
r1 = random(0, 255);
g1 = random(0, 255);
b1 = random(0, 255);
fill(r1, g1, b1);
}

void changeColor2() {
r2 = random(0, 255);
g2 = random(0, 255);
b2 = random(0, 255);
fill(r2, g2, b2);
}

void changeColor3() {
r3 = random(0, 255);
g3 = random(0, 255);
b3 = random(0, 255);
fill(r3, g3, b3);
}

void keyPressed() {
changeColor1();
changeColor2();
changeColor3();
}

void reset() {
if (mouseX > 1300 && mouseY > 1300) {
fill(0);
rect(0,0,1500,1500);
}
}

This is my processing animation code

The video is here:

2. Homework

int count = 0;
int cycle = 75;
float h;
float weight;
float size;
float mouseScale;
int x = 300;
int y = 300;
int xspeed;
int yspeed;

void setup() {
size(600, 600);
colorMode(HSB, 100);
frameRate(70);
rectMode(CENTER);
}

void draw() {
if (keyPressed) {
if (keyCode == UP) {
yspeed =-10;
xspeed = 0;
} else if (keyCode==DOWN) {
yspeed = 10;
xspeed = 0;
} else if (keyCode ==LEFT) {
xspeed = -10;
yspeed = 0;
} else if (keyCode == RIGHT) {
xspeed = 10;
yspeed = 0;
}
}
size = 125 * sin(PI * count / cycle)+225;
if (height-y<size/2f) {
yspeed = -10;
xspeed = 0;
}
if (y<size/2f) {
yspeed = 10;
xspeed = 0;
}
if (width-x<size/2f) {
xspeed = -10;
yspeed = 0;
}
if (x<size/2f) {
xspeed = 10;
yspeed = 0;
}
x += xspeed;
y += yspeed;
translate(x, y);
background(100);
stroke(h, 100, 100);
strokeWeight(15);
ellipse(0, 0, size, size);
h+=0.5f;
if (h > 100) {
h=0;
}
count++;
}

With the help of Tom, I fix some problem that I have. For example, my previous basic code will draw many white lines in the circle. And also I don’t know how to set the boundry.

Here is the video:

Interesting functions that I use:

The first thing is colorMode(). I never use it before. It is very convenient to use. Another one is translate(). For this function, I am not quite familiar with it. So in the future, I will often use it. What I learn from this recitation is that frameRate is really important because at first, I didn’t set it, which result that the animation is not good in quality.

Recitation 6 : Processing Basics by Haoquan Wang (Kenneth)

Recitation Exercise:

For today’s exercise, you will be working alone to draw an image in Processing based off of any image that inspires you.

Step 1: Choose an image to be your motif

In this step I choose two images: one is simple graphics consisting of several rectangles, the second is a complex geometry figure with circles, triangles, and rectangles.

First Picture:

https://www.guggenheim.org/artwork/174

Designed by Josef Albers

Second Picture:

https://www.guggenheim.org/artwork/1948

Designed by Vasily Kandinsky

The reason why I choose these two pictures is that according to the experience that I learn from the midterm project, I need to do my job step by step. So I choose a simple one and a difficult one. So the first picture is pretty simple, it only requires to fill() function and rect() function. The second is more complex.

Step 2: Draw your image in Processing

In this step, I tried so hard to calculate the position of each point. I think the calculation of position is the most difficult part of Digital Graphics.

First Image:

As we can see, I have an almost alike picture as the original one. But actually, I cannot achieve the effect of surface texture. After asking Tristan fellow for help, I know that in order to use this effect, I need to use noise() function to adjust the opacity of surface so as to imitate the texture feature of paint. But actually, it is still hard for me to overcome this challenge. I take a lot of time on it so I don’t have enough time for the second picture.

Second Picture:

As we can see, I have not finished yet and I still need a lot of time to finish it, especially the effect of several different colors within one circle. To be honest I have no idea how can I do it.

For both pictures, I mainly use noStroke() function, rect() function, triangle() function, fill() function and circle() function. 

For my final creation, I really want to imitate my motif. But actually, it is so hard to make a completed same one. Because with the limited knowledge that I have in processing, I don’t know how to make some fancy effects. But it is also good for me to get familiar with the basic processing language by imitating the basic figures of my motif.

For processing, I don’t think it is a good mean for design. Because when using processing to draw, the designer needs to calculate the position of each point and the starting position of the coordinate axis. It is too complicated and inefficiency for the design process. It is better to use pens to draw in my opinion. 

Skeee Ball Game Project – Haoquan Wang(Kenneth) – Young Chung

Midterm Reflection: Skeee Ball Game

Project Name: Skeee Ball Game

Group Member: Haoquan Wang (Kenneth), Celine Yu

CONTEXT AND SIGNIFICANCE:

Live demo:

My group research project is a future device which converts our thought to a digital signal. That changes the input of an interaction process. That Inspires me to do something different with the input of interaction for my midterm project. What kind of interaction input is interesting and different from those normal ones that we have been familiar with. Besides, I realized that the interaction process is constant and dynamic because in our group project the communication with the signal is constant. People keep sending out their thought and getting feedback from others. Hence the proposal of our project has two main features–Dynamic, unique input. 

For our Skee Ball Game project, it is definitely dynamic. The two users need to keep throwing balls into holes so as to get points. When the users win a point, they will get feedback from LEDs and buzzers. The first people who reach five points win the game. The whole game process is constant and dynamic. It not only includes the interaction between the project and users but also includes the interaction between two users. After examing every part of this project,  I find out that the input–throw a ball, output–LED light up and buzzer works when one wins constitute the whole interaction. It is a rounded system and it will keep running in interaction. Therefore, according to my group research project and this midterm project, my definition of interaction is that a constant, dynamic process which contains the input sides[Actors or the sides which give out signal] and output sides[Provides feedback to the input sides]. And this process will keep running itself when the input sides keep giving input.

The most significant point of our project is our input side and two-players mode. We spent a lot of time on deciding it. And we get the inspiration of throwing a ball as a way of input in interaction from the existing arcade game–Skee ball. But we change a bit. So the first, we take the input way from this arcade game. That is the basis of our project. But we remove the slope and reduce the number of getting points holes to reduce the difficulties of this project. What we contribute to this project and what we change based on the original game is that we add LEDs and buzzer to show feedback for the users so as to make it more interactive and more competitive– the original game is a credits game and only one player. 

Our project is designed for everyone–it is a game and with a lot of fun. People can play alone and also can play with a friend or stranger. There is no doubt that the value of our project is bringing fun to people. Beyond it, because the game is originated to the Carnival tradition, it can also help the users to learn different culture.

CONCEPTION AND DESIGN: 

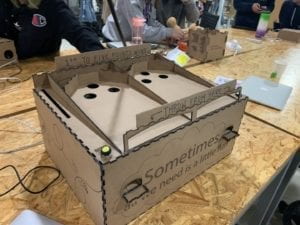
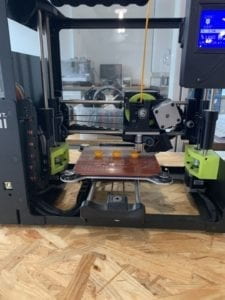
Firstly, my project is a game, a physical operation game, two players game. So I have to make a big stage for the game. We choose wood to make a huge box because it is stable, first of all. Besides, it is easier to glue and cut the wood board than other materials. Secondly, in order to take the ball back after throwing out the ball, we have three designs for it. One is that if users fail to throw a ball into one hole, we need to get back conveniently and we need to prevent it from flying out the stage. So we have barriers on the top board of the box. It will bounce the ball back if the ball fails to go into a hole and hit the barriers. Then the second design is the incline board inside the box. If the ball successfully goes into the hole, it needs to get out of the box. So we make a cardboard layer which there are some barriers that can lead the ball to the window we laser cut in advanced on. Users can get the ball back from the window. 

For the barriers, they need to be strong and hard enough, which can make it easy for me to glue them on the box and possible to bounce balls back. For incline layer inside the wood box, we choose cardboard because it has it is to some extent hard but not so. That is the advantage for us to put it into the box and glue. And at the same time, it will not be bent when balls fall down and strike it. They are the most suitable materials for our projects. It will become extremely complicated if we choose to use a transparent plastic board or soft cardboard.

FABRICATION AND PRODUCTION:

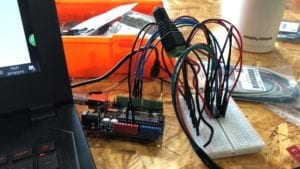
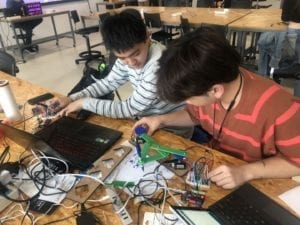
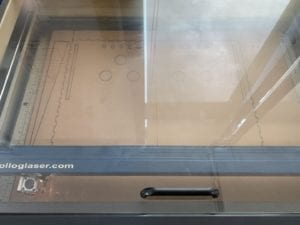
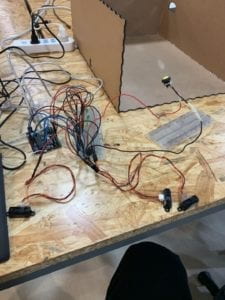
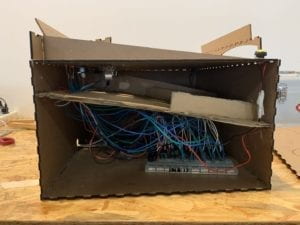
For fabrication and production, we both choose to use Laser Cutter and 3D Printer to make our project. The most successful decision of our project is the size of holes on the top board. We carefully and accurately calculate what size is most appropriate for our project. It needs to be big enough to let balls can freely fall in. And it should be not too big so as to limit the falling area so as to make sure that the distance sensors can detect balls when they fall down and make feedback to Arduino board. The biggest failure of our design is the two layers design. At first, we designed to put two cardboards inside the box–the first one is inclined board and I have mentioned it above; the second one is dividing board, which we eventually removed it. During the user testing, we realized that two layers of design are bad in space management inside the box. We don’t really need the dividing board because the incline board also has the function of dividing the space–upper space for the game, the rest is for breadboard and Arduino board. When we adopted two layers design, we don’t have enough space to place the hard wires, and all the wires are oppressed by the dividing cardboard, which resulted in the accidents when user testing that the wire connections are not stable, sometimes LEDs and Reset button didn’t work. So we only keep the incline board in the end and it perfectly solves our problem.

Also in the user testing,  we got the feedback from fellows and peers that we need more instruction for the users about how to interact with our project. That is really important for us to make our project better. Because we never noticed this problem. We are designers and we definitely know how to interact with our own project but others won’t. So we laser cutter again to have more instruction board. And we glue them on the original box.
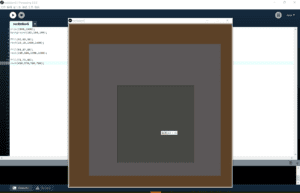
Final Box:

Laser Cutter:

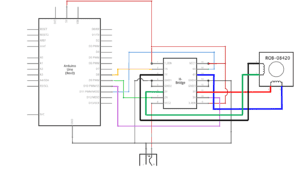
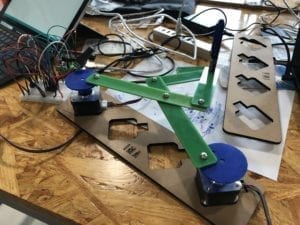
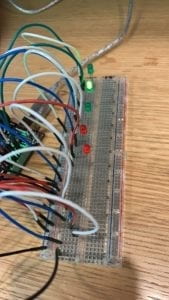
3D Printer and Basic Circuit:

CONCLUSIONS:

My project is to bring fun and different culture to the users through the interaction process. I will conclude that my project aligns with my definition of interaction. So first of all, I will simplify my definition of interaction into two words: Dynamic and Sense. Dynamic means constant, energetic. My project is a game, users need to actively get engaged in it for gaming time and he needs to keep throwing a ball and keep getting feedback. Sense is a general idea of feeling. What I mean by this is that people in interaction can have the sense that he is interacting with something else. For example, in my project, users can know he gets a point by watching the LED light up and he can know he wins when he hears the buzzer voice. For the goal of bringing fun, I think my project does a good job. But for cultural aim, it does not really work because we simplify the outlook and appearance. There are no cultural icon and a symbol like Carnival things occurring in my project. So actually users will not know that this game has a cultural background. 

Ultimately how my users interact with my project is just like what I expect and imagine before but there is still something that can be improved. For example, because the sensor is not so accurate, users sometimes cannot know that they get a point. Besides, they feel a little bit confused when the buzzer works. They take several seconds to realize that they win. So if I have more time, I will do some change: First, I will replace the ultrasonic sensor with infrared distance sensors. Actually, at first I want to use six infrared distance sensors but I only have four. So I replace two of them with the ultrasonic sensor, which works much more slowly than infrared ones. And then I will consider using two big led display to show the current points of each player. That will be more clear for showing the progress each player makes. In order to achieve the cultural aim, I will consider to 3D print some cultural products to decorate my project.

I take a lot away from this midterm project. The most valuable knowledge that I learn is that whatever I am doing, it is necessary and important for me to do every part of the job step by step. For example, when I build the basic circuit for my project, I firstly build a basic five LEDs circuit and then add one sensor to be the trigger for LEDs. After that, add the number of the sensor to three. Then, I design a block of code to count the points of the player, which can control the LEDs lighting-up sequence and keep them lighting up. And finally, I copy the same circuit and code for player2. The step-by-step strategy also works for physical set-up part of my project. When I put circuit and sensor into the box, I put everything into it in one time. However, it is hard for me to connect wires when there are countless wires, LEDs, sensors in front of me.  What worse, I need to do all the connection inside a box. What I did for the second times is to connect every electrical component one by one. So what I will do in future is to remind myself that don’t be too hurry. Do every job one by one. Check every part of work carefully.

Accident: LED lights up incorrectly

Another valuable thing that I learn is to keep calm when facing a crisis. We encounter a crisis that we don’t have enough infrared distance sensors and so we have to use ultrasonic sensors to replace infrared distance sensors. But actually, they are very different. First of the difference is the coding. In my original coding, I only write infrared distance sensors’ coding but ultrasonic sensors need trigger pin and echo pin to calculate the distance. I was really anxious because I need to rewrite part of the coding and test new sensor and finally put them into the box within one night. That is a huge work. But I try to calm myself down and fix each problem one by one just like what I mention above. And I realize that whatever kinds of situation I encounter, I can make it as long as I can keep calm and believe in myself. Finally, when putting the circuit into the box and glue the sensor, we still need to keep calm and do it step by step. As a result, we finish our project at 10:30 pm and we record a perfect live demo.
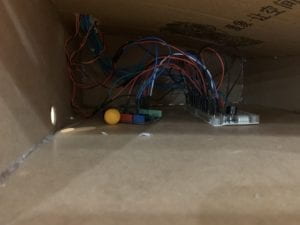
Inside:

In conclusion, the most important thing that I learn about interaction is that interaction is a process, which means that you need to keep going when you interact with something else. The reason why I think it is important is that that is the basic criteria for judging an interactive project good or not and it determines the quality of interaction.

Recitation4: Drawing machines by Kenneth

Macterials:

Step 1 and Step 2

1 * 42STH33-0404AC stepper motor
1 * SN754410NE ic chip
1 * power jack
1 * 12 VDC power supply
1 * Arduino kit and its contents

Step 3

2 * Laser-cut short arms
2 * Laser-cut long arms
1* Laser-cut motor holder
2 * 3D printed motor coupling
5 * Paper Fasteners
1 * Pen that fits the laser-cut mechanisms
Paper

Process:

sources:https://wp.nyu.edu/shanghai-ima-interaction-lab/category/recitations/

Step1:Build the circuit

I followed this diagram to connect the breadboard and Arduino. But I forgot to connect the two ground pins of ic to ground so the circuit was not a closed circuit. So it didn’t work. 

Another question is that I used two wires to connect two sides of breadboard. It was totally wrong. At first I wanted to connect them so that all the I could use both sides of board. But I forgot that 12v power will directly rush to the arduino, which only needs 5v power. The result of it was that the arduino board didn’t light up. I was scared by this because I thoungt that the strong power in 12v destroied my arduino. But luckily, with the help of fellow, I only kept the ground line connection and remove the wire which connected two power lines on breadboard. It finally worked.

Step2: Control rotation with a potentiometer

We went quite smooth in this part. What we only forgot is the map function. Because we didn’t remap the value of rotation from 0 to 1023 to 0 to 255, the my side’s stepper motor rotated too strong, resulting that when it worked, the drawing machine was draged strongly and was destroied by the force of motor. Thanks to the help of Young, we remap the value and we made it.

Step3:Build a drawing machines

When we built the drawing machines, the only problem that we encountered is the paper fastener. They were too fragile. We did not know the reason why we always broke the legs of those paper fastener. We also did not know how to fastened the drawing controling legs of drawing machines. So when the drawing machine worked, it could only maintain about 10s and the was destroied by the force of motor. But it worked.

Question1:

I want to make a automatic shoe-tight machines. Because I love shoes and I realize that sometime I am so lazy to suqart down and tie my shoes. Also, it is hard for the disable to tie shoeslace, especially the people who don’t have arms. The use of actuators is very interesting. I know how the machines in dairly life work by learning the use of actuators. Besides, I can do more engineering works for my project in the future. I am looking forward to using different kinds of acutators for my project in the near future! For manipulation of digital art, I think it is new to me because I never get touch to this field before and I think there is a necessity for me to explore it because I can use this digital art to help the disable and help more people reach to such beautiful things of art more easily. For creative process, I think at least it is hard for me now. I find out that I am hard to generate an excellent idea. I want to be unique and different from others. But it is difficult for me. So recently I just start from observing how the others do and try to get inspiration from them. I hope that in the near future I can do a better job, I can be a designer and creator. I love creating.

Question2:

There is a wooden mirrow projece designed by Daniel Rozin. It is a machines which can transfer to images of users to digital signal, then through computer programming to reflect on wooden mirrow( ART + Science NOW, Stephen Wilson (Kinetics chapter)). The manipulation of digital art in this project is to combine physical appearance of user and physical subject with computer  program, showing picture in the color of wood. We have seen several mirrow project before, this one is similar to the previous. 

Compared to what we have done in recitation four, this project is more interesting in interaction. The similar parts of this project and our drawing machines is that they all combine the physical things with digital technologise. We can bring technology, which is more conceptual to real life. The differences between them lies in interaction. Daniel’s project is more natural because he “hide” the input of his project–the users only need to stand in front of the wooden mirrow to get feedback. The interactive process is so natural and smooth that people can feel comfortable. Also a sense of magic will be brought to the users. Our drawing machines are just typical manipulating interaction.