Week 14: Final Project Documentation – Hanna Rinderknecht-Mahaffy

Project Link: imanas.shanghai.nyu.edu/~hrm305/elevator2/lobby

Group: Cara Chang, Hanna Rinderknecht-Mahaffy. To divide the work, Cara mainly worked on the drawing studio, while I mainly worked on the piano studio and elevator doors, although we both helped each other work out coding bugs at certain points. 

Description/Overview: 

For our web art project, we decided to create a sort of “virtual museum,” where the user can go to one of two studios and create their own art. The two studios are a piano studio and a drawing studio. The home page of the art project begins in a museum lobby which contains instructions telling the user to click on the elevators to enter and explore the studios. Once the user clicks on the elevator, they are taken to another elevator html page which shows an elevator door covering the html page with two floor button options for the two studios. Once the user clicks either of the buttons, the elevator doors will open and the user will click on the page to enter the chosen studio. The drawing studio has a blank white canvas where the user can draw their art. The user has the option to change the color of the pen tool, the thickness of the stroke, erase the strokes, or use animated stickers to draw instead of the pen tool. Additionally, there are two options to “clear” the sketch to get a blank canvas, or to “save” the drawing to the right of the drawing canvas. After saving the sketch, the user can continue drawing, and each consecutive save will update the saved drawing. The piano studio html page opens with instructions telling the user to use the computer keyboard keys to play the various notes. When the user plays the various notes, corresponding color flashes in seemingly random geometric quadrilaterals flash above the played note. This give the user both an auditory and a visual experience of what they are playing. 

Process: 

Our brainstorming process started by deciding that we wanted to have two art components, the piano and the drawing function. After discussing these ideas in more depth, we decided to combine them by having them be two ‘studios’ in a virtual ‘art museum.’ For the lobby homepage, we inserted and styled a full-page picture of a generic museum lobby. We added a text div welcoming the user to the museum and instructing them to click on the elevator to enter. 

For the elevator html page, the main goal was to have two buttons that, when clicked, would open the elevator doors, allowing the user to click to enter the studio. To create the look of being inside an elevator, we cropped a picture of elevator doors until we had two pictures, one of each side of the doors. These were then inserted into a p5 canvas inside the setup() function. Then, we created two buttons in html for the two elevator buttons for the studios. Inside javascript, the following code was employed to setup the function for when the button was clicked: 

This querySelector ‘selects’ the first button element found in the html code, and tells the computer to run the started code when the button is clicked. Then, inside the draw() function, the code to open the doors looks like: 

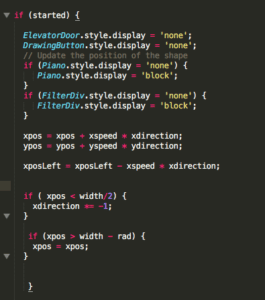
this if(started) statement runs the code inside only if the button is pressed. When the button is pressed and the “started” code runs, the xpos and ypos, which are the positions of the elevator door images, are set such that the elevator images translates off of the screen, making it seem like the elevator doors are opening on a button click. The code above also makes another button which links to the specified studio visible, allowing the user to then click on it and enter the studio. Another if() statement similar to the one above is also included for when the other studio button is pressed. 

For the drawing page, canvas was used to create a canvas and a pen drawing capabilities. We wanted to include some different drawing components rather than just a black pen stroke, so we decided to also include various colors for the pen stroke, as well as stickers which can be draw onto the canvas. To further the idea of it being a ‘create your own art’ studio, we also added save and clear functionalities, allowing the user to have more control over what they create. 

For the piano studio, the keys were created simply through a series of divs in html, and styling in css was used to format them to look more like an actual piano keyboard. To incorporate the key sounds, individual audio files were loaded in the html code and called in javascript using the following code: 

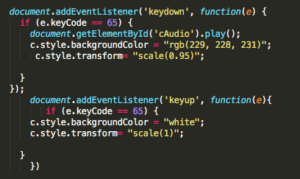
the EventListener checks for whether a key is pressed or not, and the if (e.keyCode ==65) {} code tells the computer that if the ‘a’ key is pressed, the ‘cAudio’ will play, the background color of that key will change to a slightly darker color, and the key will ‘scale’ to a slightly smaller size, giving the indication that the key has been pressed.  the ‘keyup’ eventListener returns the key to its original state of being unpressed. To incorporate a visual indication of the notes, a p5 canvas was drawn and lerpColor was used inside if statements that had the condition of if a keyIsPressed status == true AND if a specific key is pressed, a specific colored quad will fill at a set width and random height: 

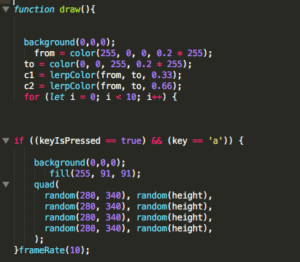
This fills the quad shape at a frameRate of 10 for a random height. This same code was repeated for every relevant computer key and each key quad was filled with a different color in the order of a rainbow. A final if() conditional says that if KeyIsPressed == false, a black rectangle would fill the entire canvas. This creates the effect that when a key is pressed and then let go, the color flash will appear and then disappear after the key is done being pressed. 

Challenges/New Concepts: 

One of the main challenges I faced while coding was in getting the elevator doors to properly translate on a button press. At first, I couldn’t get the document.querySelector to work for more than one button. I finally realized that since the querySelector only calls the first element of that type, it couldn’t read two buttons. I fixed this by making one of the elevator door ‘buttons’ a ‘btn’ instead. This then allowed me to have 2 querySelectors for ‘started’ and ‘started2’ which could be called inside the draw() function when the specific button was pressed. For the piano page, the difficulty came in the great amount of time it took to style both the piano keys, and the color bursts so that they exactly lined up and looked like a cohesive, believable auditory and visual piano experience. 

Conclusion: 

Overall, I feel like we met our project goal. We wanted to have the user ‘create their own art,’ and we aimed to connect the two art experiences through the creation of a ‘virtual museum.’ By allowing the user to navigate through a lobby, elevators, and then into the various studio html pages, I feel like we achieved the experience of moving through a museum. I think the creation of a drawing and piano studio also did a good job of balancing auditory and visual art pieces, with multiple types of interactivity, which give the whole experience more variety excitement. 

Week 13: Final Project Proposal/Description – Hanna and Cara

The concept for our final project is to create a “virtual art museum”, where the user can explore different art ‘studios’ where the user can create their own art. The main html page will show an image of elevators doors, as if the user is inside the elevators of an art museum. The user can then click one of two buttons to explore the two art studios: the piano studio, and the drawing studio. Clicking on the buttons for the specific studio ‘floors,’ will cause the elevator doors to ‘open’ (through employment of the draw() function in p5), and the user will click on the “Enter Studio” sign which is revealed to be behind the elevator doors. Depending on which button was clicked initially, the “Enter Studio” background will link to a new html page for the piano studio or the drawing studio.

For the piano art studio, a piano keyboard will appear on the web page and instructions will tell the user to press certain computer keys to play their corresponding note on the piano. As each specific computer key is pressed, its corresponding note will play and the corresponding piano key will look like it is being pressed and it will change color slightly to indicate the key being pressed.   To go with the auditory elements of the piano, we wanted to incorporate a visual representation of each note. To do this, we will assign a color to each key, so that when each piano key is pressed, its corresponding color will flash onto the screen above the piano key that was pressed. Our hope is that we can include a way to record the auditory and visual art that the user creates by playing the piano.

For the drawing studio, the web page will consist of a blank space with a pen tool and a variety of colors to choose from, as well as a range slider to adjust the thickness of the pen. We will also have a few stickers to choose from for users to have the option to add a sticker, or draw something with a streak of the chosen sticker. There is an eraser tool that the user can choose, or if the user is not satisfied, they can clear the entire template and start over. We also aim on having a background selection, where the user can choose to color in a template that we have provided, or choose to keep the space blank, and use their own creativity. Something that we want to implement is a “save” function, where if the user likes the work they have created, they can save it without fear of clearing the template and losing their work.

Week 12: Response to “Web Work: A History of Internet Art” – Hanna Rinderknecht-Mahaffy

While reading Greene’s article, I was particularly interested in the impacts of Jodi.org’s artistic influence. These projects showcase interactive websites that center around lines of HTML code, speaking to the user “in the language of network and hardware.” I like the concept of these type of projects, because for the average internet user, the code behind the webpage is not prominent in their minds.  By bringing the code to the forefront of the sites and in one case, hacking the user’s IP address, Jodi.org brings an awareness to the power of the technology behind a website. 

One aspect that the article addressed that I never considered much in the topic of ‘internet art,’ was the idea of using internet art to address social and political topics/tensions. When I think of ‘art’ in general, the first thing that comes to my mind is colorful paintings/drawings, etc. I initially thought about internet art as an extension of this, however after reading about the filmmaker Cheang’s projects on the topics of technology and access in Asia and a website on the life of Brandon for the Guggenheim, I realize that internet art can be powerfully used as a medium to create a dialogue around prevalent social, cultural, and political issues of our time. 

Week 11: “Superbad” Internet Art Project reflection – Hanna Rinderknecht-Mahaffy

The internet art project I chose was “Superbad,” by Ben Benjamin. Link to project:  http://www.superbad.com. The art piece is, according to the site, “like a game without rules.” The user clicks randomly through the art pieces, the user is linked to the next, sometimes random, page of art. For example: 


When the user click on the above art piece, the spinning flowers appear and disappear depending on which ones are clicked. Eventually, clicking the page leads to the next art piece shown below: 

The whole art project works in a similar way where the user has some semblance of narrative control over the art interactions, however there is an unknown element in terms of what will happen and which art piece will appear next. 

The artist, Ben Benjamin is a web designer who has created splash art for Rhizome which recreates the texture of Superbad, with abstract patterns and picture interaction. 

Week 11: Video Project Documentation – Hanna Rinderknecht-Mahaffy

Group: Grace, Xavier, Selena, Hanna

Link to Interactive Video: http://imanas.shanghai.nyu.edu/~hrm305/videoProjectFinal/

Conceptualization and Description of Project: 

The goal of our project was to create an interactive murder mystery video. The concept for the video was to have a police officer investigate the murder of an NYU student (both characters played by Xavier). The two suspects (played by Grace) are the victim’s best friend and the victim’s nemesis. We attempted to make the video funny and often over the top ridiculous in order to make it more entertaining. For the interactivity, we wanted the user to be able to “investigate” the crime throughout. This started with being able to choose which suspect to investigate, then continued throughout the story when the video pauses and the user clicks on ‘clues’ to explore more closely. The interactivity culminates in the ending of the story, once both suspects’ video stories have been investigate. At this point, a choice pops up allowing the user to click on the nemesis or the best friend, whereby a popup video, showing what the respective character was doing during the murder, appears. 

Process:

Our process began by first conceptualizing how to integrate our visual video story with our desired interactivity. Once that was decided, we focused on filming the different storylines. We filmed all of the footage at the academic building, which caused us to get creative in terms of finding different spaces to film scenes which  were set in different locations. While some of our chosen locations were not exactly realistic (for example Xavi’s character’s ‘dorm room’), this actually added to the comic feel of the video. The filming part of our project was quite time-consuming, as we needed to film over multiple days in order to meet all of our scheduling needs. Throughout the video process, we edited together our main video in Premier. During the Premier editing stage, we placed the video clips into the desired sequence, adjusted sound levels, added background mystery-themed music, and edited the clips to color-correct them. 

The interactivity of our website involved many conditional statements and hidden divs. To begin the website creation, we inserted the main video into the browser and styled its size. The next step was using java script to create conditional statements inside the video’s function “playVideo”. Inside this function, we used conditional if else statements to have interactive elements at certain currentTime’s in the video. For example, the code: 

If, else conditionals causing a hidden interactivity div to appear

creates a condition that if the mainVid current time is between 11 and 12 seconds, the video will pause and a “ChooseSuspect” div will appear on the screen. This div contains the two button images of the friend and nemesis with a prompt asking the user who they want to investigate first? The NemesisFlashback and FriendFlashback functions associated with these buttons then makes the ChooseSuspect div disappear and makes the video jump to either the nemesis or friend interview and story, depending on which button was pressed. Similar code is used throughout the various videos to pause the video and allow the user to click to investigate certain clues throughout the stories. The final interactivity involves another div, “GuessTheMurderer” which appears at certain times of the videos (after both stories are investigated by the user). This div format is similar to the ChooseSuspect one, however the buttons now cause popup windows to appear with the nemesis and friend videos of what they were doing at the time of the murder. 

Challenges/Difficulties: 

In terms of filming, we had some difficulty when some of our video clips went out of focus part way through filming. We solved this by refilling the scenes at a few different times. 

In terms of the code, the biggest difficulty was figuring out how to only have certain divs be visible (or not visible) at certain times in the story. Since we were essentially skipping around one long video in order to give the user choices in which story to explore at what time, certain divs shouldn’t or should have appeared to the user depending on which ‘path’ they chose. At first, I attempted to solve this by creating if else conditional statements for if a certain button was pressed (e.g explore the nemesis path at 11 seconds) and if the video was at a certain currentTime, however this didn’t end up working at all. In the end, this was solved by the code:

which created two more identical main videos with different ids. By setting the myVideo2 and myVideo4 display to ‘none’ in css initially, these videos could replace the original ‘myVid’ by simply setting the style.display = “block” for the relevant video. This allowed more if else conditionals similar to the code used in the first image on this documentation to be used inside the ‘playVideo2’ and ‘playVideo4’ functions. This way, different interactive elements could appear at different times depending on which of the three videos was playing for the various narration ‘path’ options. By changing the main video pause() and play() and .currentTime commands inside the various functions for button clicks, we created smoother interactivity experience which allowed the user to explore the whole story in different sequences depending on their decisions. 

Post-project Reflection: 

Overall, I think our project was successful in meeting our goals. We wanted to create a murder mystery video that was engaging and interactive, allowing the user to ‘investigate’ the murder themselves. I think our comedic approach to the video to make it somewhat over the top and ridiculous made it more entertaining than trying to create an extremely serious murder mystery video. In terms of interactivity,  we accomplished what we intended, in that the main video stops at multiple times and allows the user to investigate clues or decide what/who they want to investigate. If we were to have more time for the project, we might work more on filming and including more clips to even further expand the narrative that we’ve created. It would also be cool to not only allow the user to interact to investigate what happened, but to also have their decisions actually change the outcome of the crime. This would likely be a bigger endeavor than we had time for here, as it would require many ending options.