Final Project: Alice and the Rabbit Hole – Rosie (Parren)

Name Rosie Gao

Instructor Eric Parren

Title
Alice and the Rabbit Hole

Project Description

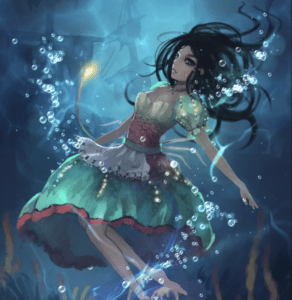
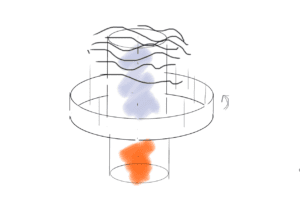
Alice and the Rabbit Hole is a kinetic light project portraiting the scene of Alice chasing the rabbit into the rabbit hole at the beginning of the story Alice’s Adventures in Wonderland. The project uses 3D printed and laser cut components to form the motion part, and Arduino to form the light part. 

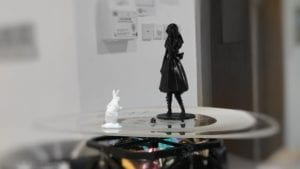
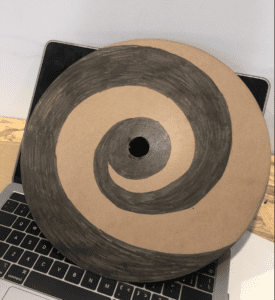
As shown in the video above, the user can spin Alice and the Rabbit using a handle, forming a chasing and falling effect between the two characters. The spiral pattern on the platform below is also for creating a hypnotizing feeling while spinning. By looking through the platform and into space between two characters, the user can see changing candy-theme lights sparkling, just like when Alice looks down the rabbit hole seeing a vague image of the mysterious wonderland. 

Perspective and Context

I choose this scene in Alice’s Adventures in the Wonderland because of my personal connection to this part of the story. Alice chases the rabbit into the rabbit hole, jumping into a whole new world with unexpected dangers, challenges, chaos and adventures and escaping from reality. I feel so related to Alice’s confusions, hesitations, excitement, and amazement of the moment she stops in front of the rabbit hole and watches the lights coming out of it, which is the so similar to my own fears and hopes while stepping out of my comfort zone and making reckless decisions as an individual, a young 20 in my life. I would like the users to feel the same while experiencing my project, as they spin the handle, they understand how beautiful the wonderland might be but also how dangerous it could be. 

Development & Technical Implementation

I: Structure Design 

The original design of the project is a zoetrope-like device with Alice spinning in the circle and with the torch in her hand as the center light source. The torch releases a shoot of light creating a rabbit-shaped pattern on the “Woods” around her.

Project Design ver.1

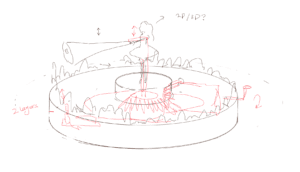
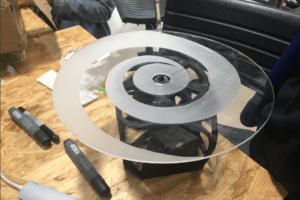
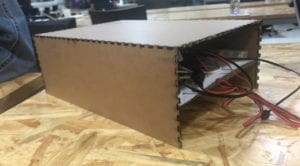
However, while producing the project physically, I encounter the difficulty of design as if the light is on the spinning platform, the circuit should be spinnable, which requires much more precise calculations on the arrangement of structure. As I divide the production process into two parts, motion and lights, I decide to use a more flexible way to express the Alice scene by putting Alice at one side of the platform and the rabbit on the other side. Inside of coming from Alice, the illustration is put from below the platform using RGB LED stripe. Also, since the location of light has changed, the platform below Alice is also changed from wooden to transparent material.
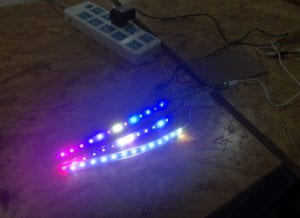
Final Outcome on the platform: Alice and the Rabbit facing each other
The original design of the platform
The transparent platform

II: Color Decision

code 

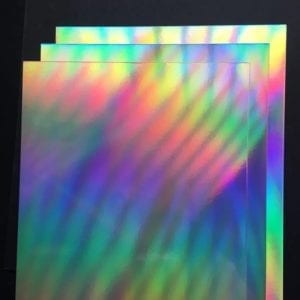
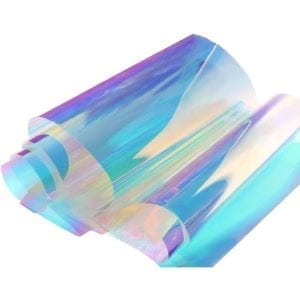
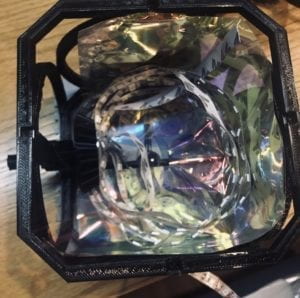
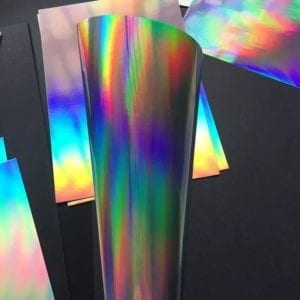
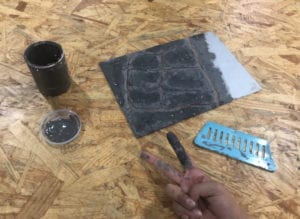
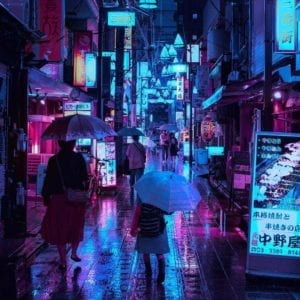
The code above controls the colors of RGB LED light. I mainly choose this set of the light blue, pink, green and white color group for the art style inspiration I get from Alice’s Adventures in the Wonderland adaptation produced by Spicy Horse Studio “Alice: Madness Returns”, specifically the underwater scene. It gives me a feeling of illusions and mystery, which fits the expectation of my project. To add on the effect, I use the leftover of my midterm project, the transparent glass paper around the LED stripes to make the color outcome more interesting and attractive.

The Glass Paper
Alice: Madness Returns (Under Water Design)
One of the final color effect

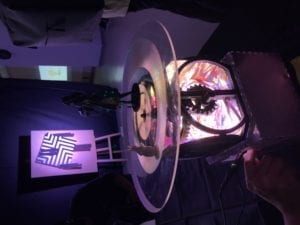
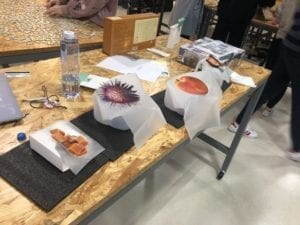
Different from the colorful fairy colors I used in the light part, I am using only black white and grey in the design of the physical part, including Alice in black, Mr. Rabbit in white, the platform in white and transparent, the spinning part in black and the circuit box in grey. I would like to show the contrast between reality and the wonderland and also, the yes or no decision Alice is facing. (Pictures can be seen above)

III: Make Alice and Make Alice Spin

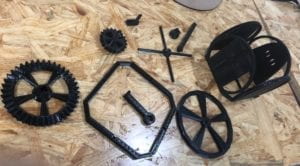
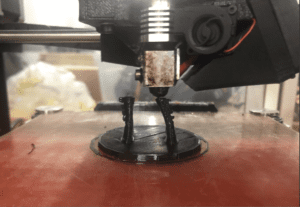
3D print plays an important role in this project and is the main challenge I face with as this is the first time I have ever worked with 3D print techniques and almost all the components in this projected are 3D printed in my design. I find the footage of Alice and the rabbit model from Yeggi, but making Alice spin on the platform takes more efforts and time than I planned. Originally I was going to use a stepper motor, however, I eventually decide to add interactivity elements into the project as users will automatically stare into the rabbit and feel the spinning effect from a first-person perspective when they use the handle. Also, I am excited by the “A-ha” moments of the users when they find out the functions of my project.

The Rotary axis

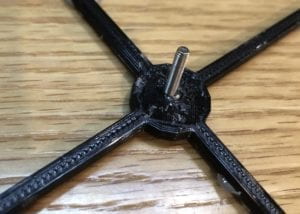
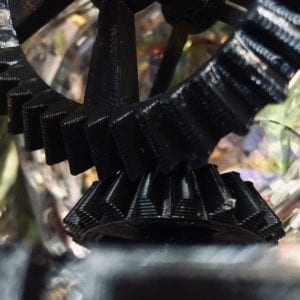
Among all components, the rotary axis causes the most problems. I originally printed out a plastic stick but it turns out to be unstable and easy to break even I print it three times in different sizes. I end up using screw according to Eric’s suggestion which works out perfectly. The design of gears is also new to me, as the gears are working in different dimensions to transfer the actions of users into Alice’s movements.

Gears

Alice in Printing

Presentation
In the class presentation, I get many suggestions that help me to improve my project before the IMA show. The biggest problem is that since I have changed the light source from above to the bottom, the models above the platform would not be seen as clear if the project is presented in dark rooms. Also, the height of the project affects the angle users are looking into the lights, which are also a bit too bright since the LED stripes are facing out. I am actually unsatisfied in my performances in class presentation, as I was not giving strong enough responses when I am asked “why”s by my classmates. 

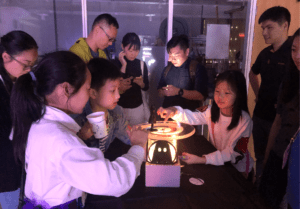
During the IMA show, I had a wonderful experience hiding among the users and observing their reactions. The biggest problem is that it takes time for users to find out the project is spinnable thought the handle, which is also pointed out by my classmate in class presentation. I was thinking of making the handle bigger, but it turns out putting a note around saying “try the handle” will also work. It is the best thing seeing the surprised faces of the users when Alice starts to spin and hearing users explaining their understandings to each other. When a girl shouts out: “Hey, look, Alice is chasing the rabbit”, I smiled so big that a lady beside me immediately asks me if I am the one made it.

Conclusion

When it comes to the production process, I am not in full control of the design of my projects, all the obstacles and problems I ran into have shaped my original design totally, though in a good way, but also caused chaos to my schedule. This is because I did not make the model design precisely enough and did not leave enough space for testing to make the schedule flexible.  

For presentation, I have learned from the presentation in class and improve my ways of presentation in the IMA show by making modifications in heights, light balance and instructions, which I could have worked on earlier. I think the most important thing is to think about all the details and give out reasons for every decision for more controls in the project itself. When you are sure about your project, the project itself will also be more touching to others.

As a conclusion, I am happy with the where I have reached in this project, but I can definitely do better and do more. The project itself has fully expressed what I want to make and show my audience, but it takes more works than I need to reach this point. For future development, I would like to add in a light source from above as a stage for Alice’s decision or create something according to my original design.

Project 3: Kinetic Light Proposal – Rosie (Parren)

Name Rosie Gao

Instructor Eric Parren

Perspective and Context

Rueben Margolin’s waves, using light hard materials to show soft waves-like patterns. I would like to adapt his design of using hard material to show soft illusions, however, I would choose transparent materials to print out my own pattern as they can interact with light better.

Silhouette Zoetrope by Christine Veras, utilize human eyes’ function to show animation with simple kinetic light devices and strategies. This is the main inspiration of my project, as I am really inspired by how simple it is made and how powerful the outcome can be. Instead of playing with light and shadow, I would like the animated materials to be a part of the show as well, that more changes and different art style will be potential. 

Project Description
I would like to make a light zeotrope using stepper motor and 3D printing materials. As shown in the sketch, I will laser cut out a platform to put on the stepper motor box(orange) and on the platform, I will place a light source (purple part) inside a laser-cut column, with holes on the surface to let out the light, and with 3D printed waves on the top and around the light source to create different patterns. When the platform starts rotating, the support material of the 3D printed waves around the edge of the platform will be invisible, and the users can see a moving, shiny sea-surface-like pattern.

Production Schedule

  • 04/24 (wed) – Project Proposal Due
  • 04/25 (Thu) – Project Approval
  • 04/30 (Tue) – Sketch finished 
  • 05/02 (Thu) – Coding finished
  • 05/07 (Tue) – 3D print and laser cut file ready, sample scheduled/ tested
  • 05/09 (Thu) – Physical model first sample connected and finished, ready for user test/ second time printing (if anything wrong with the model)
  • 05/14 (Tue) – Pre-Final Critique
  • 05/16 (Thu) – Project 3 Presentation
  • 05/23 (Thu) – Project 3 Blog Post Due

Project 2: That Night I Saw Fireworks on the Airplane – Rosie (Parren)

Name Rosie Gao

Instructor Eric Parren

Title
That Night I Saw Fireworks on the Airplane

Project Description

By Rosie
City Night View of Jiangxi, from the Internet

That Night I Saw Fireworks on the Airplane is a sculptural light object with a sandbox city landscape and lights underneath programmed to display a deliberate generative composition. Using Laser cut,  FakeCandy Processing, and Digital LED Strips, the project tends to show an aerial city night view.

I got the inspiration during a flight from Dunhuang to Shanghai, from which I saw fireworks among city lights through the clouds at midnight. Such a different perspective of normal views reminds me of the beauty in humans’ creation even though they look so small from above, and I would like to document this view to my audience to transfer this touching moment. Different from the common aerial city views we see from photos and videos, I would like to use lights in motion to create the effects of sparkling city lights, moving car flows and burning fireworks.

Perspective and Context
My intention of the project is to review human’s creation in different perspectives. On the one hand, a human-created landscape like city skyline is usually treated as envrionment-unfriendly and artificial comparing to the natural landscape, and on the other hand, we always experience cities as a part of it, confused by its illusions and glories. However, when we look at the city from above, it changes our perception of it. The buildings and roads no longer exist, and what we see it is a lively human creation in the natural environment.

Development & Technical Implementation

Rough Design of the landscape. Yellow: Digital LED Stripes Purple: CIty and lands Grey: River

Based on my inspiration photos I took and I find online, I first sketch a rough design of the landscape with divided city districts, the shore, and the river. To make these elements, I have a difficult time settling on the material decisions. With professor Parren’s suggestions, I pick fiber optic to make the small fireworks and the frosted acrylic board to be the platform of the landscape as it can scatter the lights of LED stripes. For the city landscape, I pick the landscaping mud which is a classical material for landscape production, and I chose the color grey as it reminds me of the concrete city. For the river surface, I decide to use opaque laser paper stuck to the bottom of the board to both to cover the wires and to reflect the city lights as the river does.

Fibre Optic
30cm *20cm Frosted Acrylic board
Landscaping Mud (Grey)
Laser Paper
The circuit with three digital LED stripes 22 dots
30cm * 20cm * 10cm Laser Cut Box with the board hot melt glued into it
Creating the landscape with the landscaping mud
The final work

 Midterm Code

Tokyo Neon by LIAM WONG, edited and spliced

As for the coding, I use mainly the 64 flame example and change the sample fire picture to a group of looping CyberPunk photos by Liam Wong. As the lights underneath the board flowing randomly with organic color choices, the fireworks made from fiber optic will sparkle and the river will reflect the colors.

Presentation
The basic landscape makes sense to the audience as it is a classic shape of city miniature. However, the fireworks do not work as effective as straight lights will be needed underneath and it is difficult for me to stabilize the location of the strips. Another problem is that I put the platform in the middle depth of the box which I planned to gather the light inside while having the stripes and wires underneath. While presenting, it actually distracts the user experience as they have to bend down to look into the box to get the whole view, and I am also suggested the put the box on the ground as well. Last but not least, I think the order of presenting the object and introduction really matters as the inspiration story really helps the audience to understand the project and lead them into the scene. 

Conclusion
Reviewing my project, I would say I paid a lot of attention into the material choices and the producing process of my project in order to make it realistic to the view I am trying to recreate, which brings interior meanings to my project. However, there is a gap between the realism effect and the aesthetic effect and I could have worked more on that by studying more on the outcomes of the stripes and materials I am using. Working with materials I am not familiar with is a big risk, and I don’t have enough backup plans created for it. For the presentation, my choice of the location of the board shows my lack of user tests before the final presenting. It also shows the importance of a more precise design in advance.

LED Light composition Homework- Rosie (Parren)

Name Rosie Gao

Instructor Eric Parren

Project 1  Melon 

code

Melon” is a 1-minute composition with Analog RGB LED Strip based on Ocha’s music piece with the same name. I want to use LEDs to visualize the beats and melody of the song through coding based on what we have learned in senses relationship and synesthesia.

During the presentation, I get feedback from the audience on the strings and circuits part exposing and the lack of variation in the light frequency of the composition. The audience mainly experiences the project by staring into the lights, which is too straight forward, kind of boring and eyes-hurting. The connection between the music and the pattern makes sense, but it is not strong enough.

I would consider my work in this project as incomplete, partly due to the misunderstanding of me not getting the device I need to code upon in creation process, and also not investing enough time and thoughts into it. Also, thinking about the decoration of the physical project is of great importance, which is something I ignore in my creation as well. 

Project 2  Jellyfish 

Partner: Tiger Tian

code-Rosie

code-Tiger

Jellyfish is a group project of a 2-minute composition in light with two Digital RGB LED Strips using Arduino + FastLED. We have the original inspiration from Tiger’s original soundtrack and the pattern of jellyfish, especially tube jellyfish in the sea which looks exactly like the LED stripes we use in the project. We want to create the feeling of mystery, live and fantasy of sea creatures. 


We use a cardboard box which we color blue and cover with laser cardboard to reflect the lights. Then we use transparent laser plastic paper to extend the light range and play with the tone of colors of LED light colors.


The biggest hardship we encounter in the creation process is to figure out how to work with FastLed Arduino library. We spent hours to debug our code realizing we were using the NUM_leds wrongly and to modify the code to suit the rhythm and timeline of the music. We use different solutions in our codes eventually with me using millies and Tiger using delay because I am trying to the Fire sample code of FastLed in my stripe. The choice of using two stripes causes more difficulty of hiding the wires, but create more variation of visual effects in our final outcome.

During the presentation, it is surprising to see how the audience’s interpretation of our project varies from each other. Some consider it as a tree and some say fireworks, which is also playable. I as the creator do not hate the thought of leaving the audience the space of imagination in the experience.

The lesson I learn from this project is the importance of studying through a library I am using and the use of functions in coding which saves works of repeating the code or mess up with inputs. I still need to find out the reason why the millies function I use does not work in plans in time controls, which I would like to explore more in future coding.

Project 1: The Illusion Box – Rosie (Parren)

Name Rosie Gao

Instructor Eric Parren

Project Description

The goal of my project is to study how the image we see affect our feelings of items. I believe there is a relationship of synesthesia between visual and touching senses, and I would like to see how strong this relationship can be by showing users similar but different items visually and through touching at the same time. 

The Rubber Hand Illusion

My inspiration for the project comes from my own experience of some kind of the rubber hand illusion, that when the researcher sees a rubber hand being touched while being not able to see his or her own hand, he or she will feel like they are touched as well. I was fooled by a similar illusion while being touched in real life during playing horror VR games and got frightened by how I felt about a cold human’s hand while seeing ghosts around me. I am interested in how our brains get confused two different sources of senses information and I decide to play with this illusion, which might work in the entertainment fields like gaming, or other fields like dealing with patients’ fears against a treatment.

Perspective and Context

In his work The World of Perception,  Merleau-Ponty describes how Descartes understand illusion created by senses interaction that:

When I assume I am seeing the wax, all I am really doing is thinking back from the properties which appear before my senses to the wax in its naked reality, the wax which, though it lacks properties in itself, is nonetheless the source of all the properties which manifest themselves to me. (Merleau-Ponty 42)

Such an illusion is the reason why Descartes makes the claim that we should release our intellect from the confusion and trust the leads of science, however, Merleau-Ponty holds the point of view that “we have rediscovered a way of looking at works of art, language and culture, which respects their autonomy and their original richness.”(Merleau-Ponty 101) by considering perception as part of our natural experience with life and art. It is an experience worth studying, researching and playing with, as we cannot separate the concept of an item from our perception of it as an animal. In my case, I would say the rubber hand illusion is an interesting topic to work on because it is not only a process to know about how our brain is fooled by our senses but also a way to learn the features of different items in different users’ experience. I believe such a process contains the beauty of variation and fun.

Development & Technical Implementation

In my initial design, I was going to put touched items in boxes with sensors and use serial communication between Arduino and Processing to call out images of seen items on the laptop screen to create a connection between two items. After proposing this idea in class, I changed my mind for I have a limited amount of time and also a more simplified lower-tech solution can actually work even more effectively as the user have more intimate experience with the items if I just put the image on the top of the box. 

There are three main decisions I make which are very important for the final result of my project: the container of items, the pairing of items and the methods of presenting the items. For the containers, I first want something as a draw box with a hole on the top that the user can stick their hand in. However, I want the users to be able to directly look at the images while feeling the items, so I decided to cut the hole on the side of the container. I get the material from two 4L mineral water bottles, cut them in half and create holes on the side as shown in the below picture. Then I used hot-melt adhesive to stick unclear plastic cloth around the hole to block the users’ sight without causing trouble for them to touch the item. I also put a black foam paper below to make it neater, easier to set up and more stable.


For items matching, I had a couple of ideas before I narrowed them down to four. I mainly picked them according to my personal experience (bitten by a sea urchin once),  cultural mixing (Ma Jiang and Toffee) or just simply by how interestingly gross the experience can be (bogger and sticky peach juice over your hand). I did some user test among my peers, friends, fellows, and faculties on whether these items can be the trigger of the items in the images, and then I collected them from my belongings or the internet. Then I printed out the photos and stuck them on the plastic cloths.


To experience the project, the users can just simply put their hands into the hole under the cloth while looking at the pictures. After feeling them, they can take out the items and feel them again while looking at them to compare two experiences.  I was planning to have all the containers out at the same and ask the users to choose on their own of the order to feel, but prof Parren gave me the advice to think about present them one after another to keep the user focused and curious. It was helpful.

Presentation

(Taken by my peer Candy Bi, 2021)

You can tell from the video that the user appears to stay curious within the whole process. Some similarities were fully understood while some were not, which is in my initial design. However, I was pushing the process to actively, taking the time for the user to experience carefully, and using too many words to lead her imaginations. The process turns to be much shorter than I planned this way. 

Conclusion

Generally, I am satisfied with the final work of my project. I built up the relationship between two senses as planned by using the concept of the rubber hand illusion, and I chose a low-tech method to make sure I get the device ready in time. I found some very interesting items to show based on my user survey and daily observation, and I made good use of materials I have to build the devices. The users do experience a sense of confusion and find it interesting, which proves my choice of containers and items matching was effective.

However, I was focusing too much on the outcome of the presentation rather than a result of my study, the user survey on how they feel about the items rather than how they feel throughout the whole experience. As a result, though I was expecting to have different feedbacks, I did not get a clear response on how users feel differently while looking at the image or the item itself, instead, they gave the answer of “it does feel interesting of being fooled by my vision”, which is unnecessarily bad, but not in my plans. Second, I did not design the presentation clean and effective enough by only giving instructions and leave the user to decide what they feel about the device. I chose to guide their feelings, which might take their attention away, and that is a part I did not prepare for and should approve in my future projects.