NOT A MOUSE – Feifan Li – Marcela

  • CONTEXT AND SIGNIFICANCE

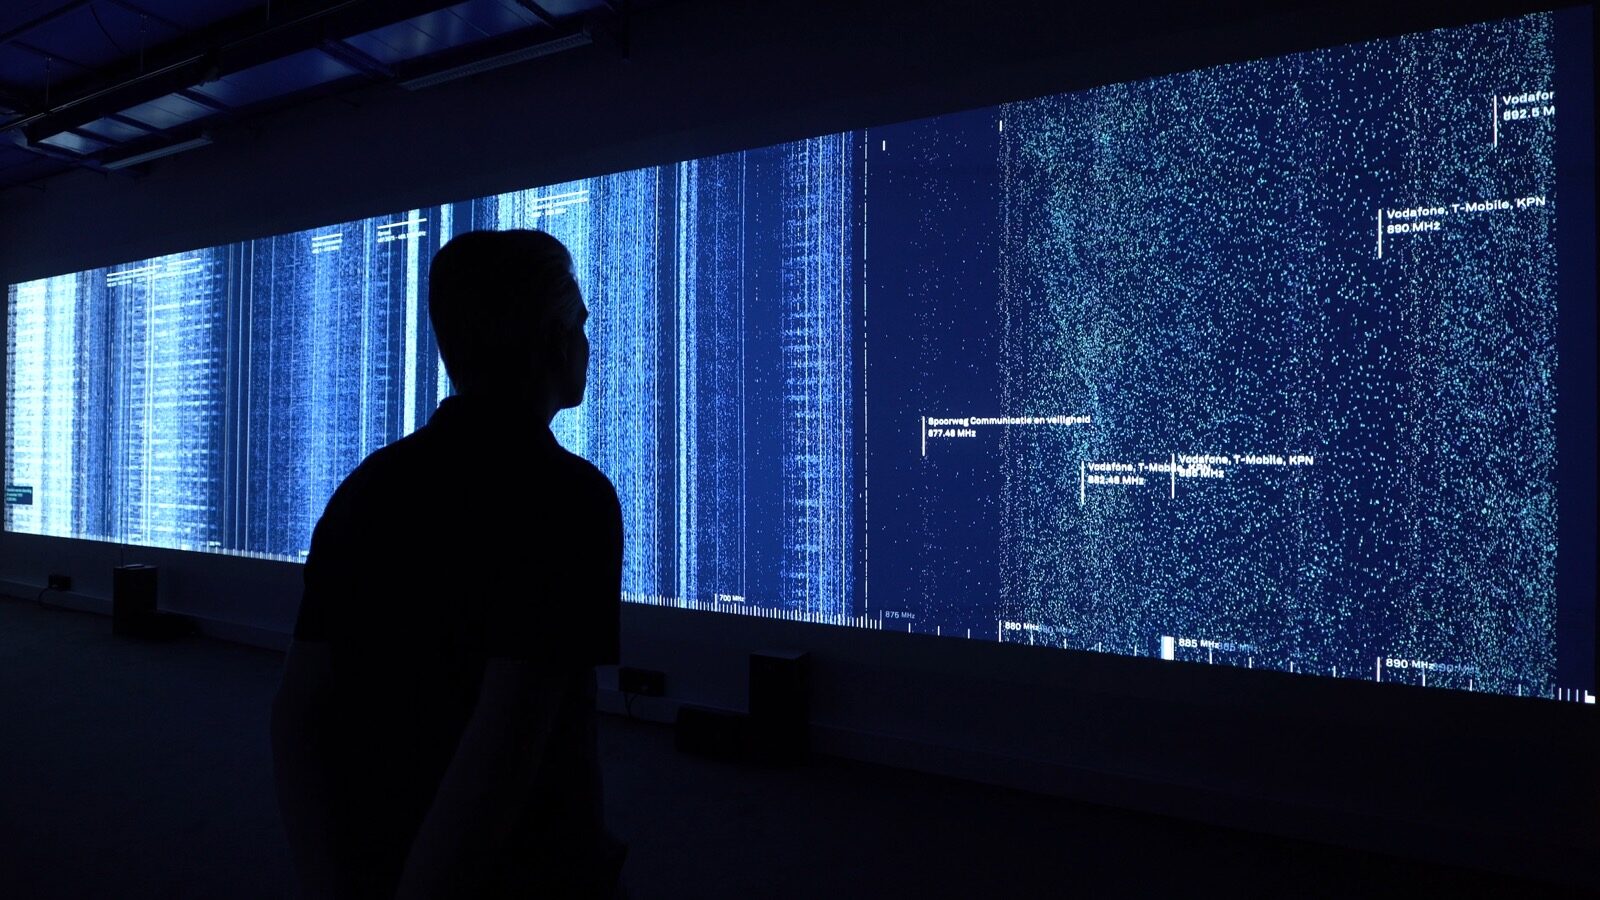
My previous group project as well as the research I have done informed much of this project. One important feature I identified from the class reading “What Exactly is Interactivity” by Crawford is that the concept of “interactivity” should involve an input and a subsequent output. But the project should not be merely responsive. Inspired by a project called “Hertzian Landscapes” by Richard Vijgen, I think my project should contain more than a simple cycle of action and reaction. In Vijgen’s live visualization of a radio spectrum, the user keeps moving, and it feels the user is walking through the entire radio spectrum. It is not simply a responsive process, but an interaction where the user changes simultaneously as the device responds to him/her. So I think “interactive” means 2 subjects acting with each other, while “responsive” means an object is acting in response to the subject. I hope my project can have a certain degree of autonomy – it does not merely respond to me, but also asks me to act differently according to its response.

I also want my project to be unique in terms of its meaning and purpose. Like the belt piece referring to surveillance by Lozano Hammer, my project should be something with a special meaning. It just so happens that my partner Ellie has two kitten in her apartment, and from a pragmatic point of view we decided to make an interactive cat entertainment device. Originally we wanted to make it in the shape of a mouse, so that a cat would chase it constantly. The special feature of our project is that it moves with the cat’s movement and we initially wanted to make the device move in the opposite direction of the cat, so that the cat can never catch the ball on the device and the game will never end. I think this shows my concept of “interactivity” instead of being merely “responsive.”

  • CONCEPTION AND DESIGN:

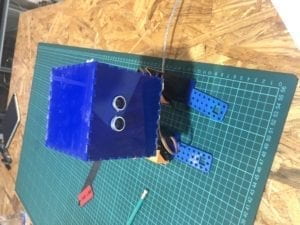
Since the target audience of our project is primarily cats (although humans can also have fun with it), we tried to cater the device to the taste of a cat. First we decided to make the device in the shape of a mouse, which would potentially attract cats. So when we laser-cut the body of our device, we left the pointy ears in the front and later we added the mustache to it. Also we replaced the wooden arm with wires after the user testing session, which is more flexible when it swings and functions better when the cat is trying to catch the ball. But with that change the users reminded us that our device looks like a cat too. So we decided to call it “NOT a mouse”. We make the ultrasonic sensor the eyes of the “mouse”, which we think are very lovely. For the digital fabrication process, we chose to laser-cut the body part of the “mouse” with the eye part and tail part open so that we can design and add features to them later. I think we chose handy materials – we got all of our materials from the studio, except for the hanging ball. Although the materials are not sophisticated, we think the design of the cat is very creative. The other option is to 3D print. But we thought it cost too much time and is not suitable for our wooden device. We do not need too much precision in making the device, so designing the shape on the computer and then laser-cutting it would be an efficient choice.

cardboard prototyping

  • FABRICATION AND PRODUCTION:

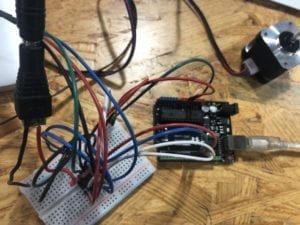
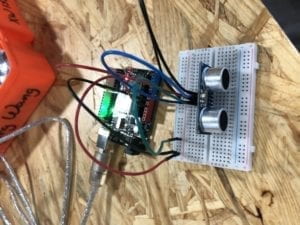
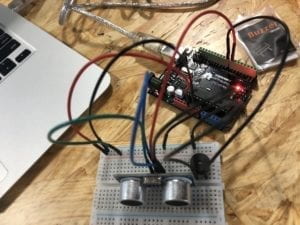
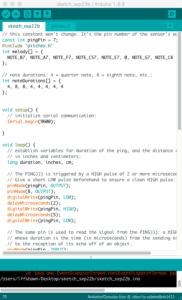
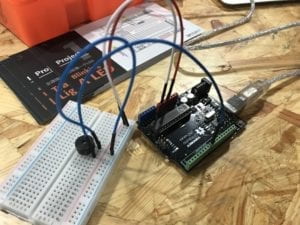
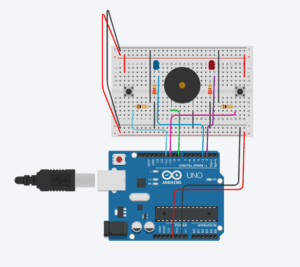
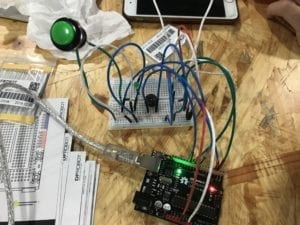
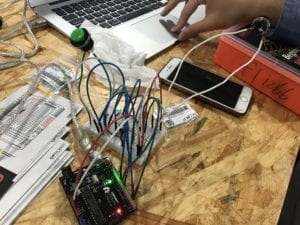
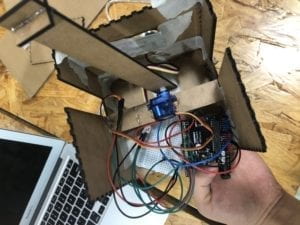
In the initial stage we were trying to fix the sensor and the code. We had the problem of integrating the servo and the ultrasonic sensor. With Professor’s help we successfully integrated the code and get the technical part working. (Thanks to Marcela!) Then we tried to design the shape of the laser-cutting using Illustrator. Neither my partner nor I had previous experiences with this software and we found it not so easy for beginners. Thanks to Fellow Linda’s help, we were able to design the shape successfully. One mistake we encountered during laser-cutting is that the machine engraves instead of curving in the beginning. It turned out we did not check every line carefully. Later when we tried to install the servo we had to find screws that fit the size of the servo, and it is with Rudi’s help that I successfully fixed the servo tight, so that the servo does not easily fall off.

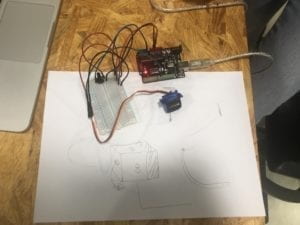
(the successful integration of servo and sensor)

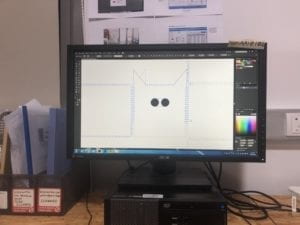
(our design of shape for laser cutting)

the inspiration of our design shape: a former student’s project

(a mistake: it is engraving instead of curving! )

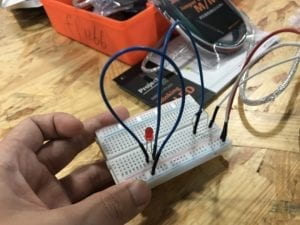
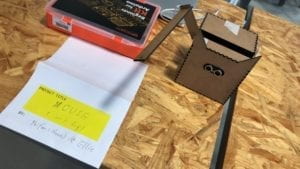
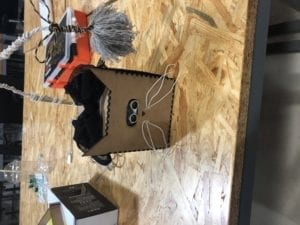
The user testing session was also very helpful. One piece of advice we accepted was to change the wooden arm into a tail so that it swings better and can be higher up – which makes the ball more difficult to catch and more entertaining. Also, the original wooden arms are too close to the body part and may be hindered by the sides of the body. So we took the arms down and installed a long tail behind the device – making it look more like a cat. We also change the smaller servo into a bigger one, which is more powerful when it works, partly because the small one was malfunctioning. Even though this meant we had to redo the servo part and glue it again, it turned out to be worthwhile. 

before user testing – the wooden arm

(after user testing – the moving tail)

  • CONCLUSIONS:

    The goal of our project is to create an entertaining cat toy. The device resembles the shape of a cat, with a moving tail high up. A ball is attached to the tail, and when the cat tries to catch the ball, the tail would move so that the cat misses the ball and tries again. What aligns with my definition of interaction in the project is that the ball would move according to the user’s movement, making it not simply a reaction, but an interaction the ball is trying to avoid the cat. Ultimately, the audience interacted with the project in a fun way. Many users find the swinging tail entertaining and the shape of our design lovely. But one shortcoming of the project is that the movement of the tail might become a little bit predictable after the user gets familiar with the device. One suggestion in the user testing session is to randomize the movement of the tail, but that would require a major change to our code, and possibly more sensors on other sides of the device. I think that would definitely make the project much more entertaining, but we did not have enough time to include that change. The take-away of the project is that we can finish a big project step by step more easily. My partner and I divided the project into several steps, including sensor and servo integration (with code), design of the shape using illustrator, laser-cutting, combining the elements together and improvement after the user testing session. When divided, these steps become more achievable in the production process. My partner is very creative and we had a good time making this interesting project. Also, it is certain that we will go through trial and error in the process, what is important is that we set our hands onto it so that the project would finally be completed after many unavoidable mistakes.

    Finally, I think what makes the concept of “interaction” so fascinating is that users constantly get feedback from the device and the feedback may vary. “NOT A MOUSE” did a good job in this aspect as it swings the tail unpredictably, and it is a very handy and concise little device that can really entertain cats and humans.

Works Cited

Crawford, “What Exactly is Interactivity,” The Art of Interactive Design,  pp. 1-5.

Visnjic, Filip. “Hertzian Landscapes – The interactive space of a radio spectrum.” Creative Applications Network. https://www.creativeapplications.net/js/hertzian-landscapes-the-interactive-space-of-a-radio-spectrum/

Hemmer, Lozano. “Standards and Double Standards.” http://www.lozano-hemmer.com/artworks/standards_and_double_standards.php

Recitation 4. Drawing Machines By Feifan Li

Introduction

In the 4th recitation we were asked to make a drawing machine using a stepper. First I built a very complex circuit to include the stepper, then I added a potentiometer to the circuit to control the rotation of the stepper, and finally I paired with a classmate to make a real drawing machine. My partner Yiwen Hu and I successfully built a drawing machine and drew a “beautifully messy” picture.

Step 1: Building the Circuit

Materials:

1 * 42STH33-0404AC stepper motor
1 * L293D ic chip
1 * power jack
1 * 12 VDC power supply
1 * Arduino kit and its contents

In the first step, the very first thing to pay attention to is the position of the IC (Integrated Circuit, or H-Bridge). To identify the pin number, we need to look for the semicircle at its end. And Pin 1 is to its left, as indicated below. I almost got it wrong in the beginning.

After making sure I did orient the IC correctly, I slowly built a very complex circuit.  The schematic is pasted below. It is worth noting that the wires of 5V and 12V cannot be connected together, but the wires go to the same ground. I tested my circuit first to see if the stepper motor could rotate once successfully, and luckily it did. But I think this circuit is really complicated and it took me a long time to finish building it.

H-bridge circuit diagram

Following the schematic I built the circuit above. And it works well.

Step 2: Control rotation with a potentiometer

To control the rotation of the stepper motor, we need a potentiometer. After connecting a potentiometer almost every class, I finally remember where the wires should go from the 3 different ports. Also, we need to modify the code and make sure the number of steps within the code is in line with that of the motor (in this case, a 200-step motor). And we need to use “map()” to make the motor rotate in the same direction as we rotate the knob.

part of the code:

 int val = analogRead(0);
  map(val, 0, 1023, 0, 200); 

The motor rotates in the same direction as the knob:

Step 3: Build a Drawing Machine!

Then I paired with Yiwen Hu to combine our motors and make a drawing machine. My motor is on the right and Yiwen’s is on the left. Mine seemed to work fine, but Yiwen’s motor was not rotating much, it kind of just vibrated. We did not know exactly the cause of the issue, but I guess there might be something wrong in step 2 with Yiwen’s motor. But anyway the drawing machine seemed to work fine.

Question 1: What kind of machines would you be interested in building?Add a reflection about the use of actuators, the digital manipulation of art, and the creative process to your blog post.

I am interested in building a lucky cat. It can work with a similar actuator we used in this recitation. It would also need a distance sensor, so that it can detect people when they go near and start waving its hand as a welcome, which means soliciting customers and fortune. I think the basic principle behind lucky cats sold in shops is pretty simple and achievable with our experience with sensors and motors.

Question 2: Choose an art installation mentioned in the reading ART + Science NOW, Stephen Wilson (Kinetics chapter). Post your thoughts about it and make a comparison with the work you did during this recitation. How do you think that the artist selected those specific actuators for his project?

One installation that caught my attention in the reading is Gastarbyter by London Fieldworks. I think the installation appears very unique – a human is trapped in an enveloping chair with strange noise and light going on around him. The artists’ purpose behind the design is to create “an intense multi-sensual experience.” I think it is about infiltration and differentiation of different human senses like sound, sight and touch. We are often overwhelmed by our sight and pay little attention to listen or feel the world around us. I think this installation is a metaphor that encourages people to listen and feel more in daily life.

Compared to what I did in the recitation, this installation involves more aspects and offers multi-sensual experience, while my drawing machine is primarily for sight only. 

Group Research Project Individual Reflection. By Feifan Li

Reflection on Group Research Project

The research

Inspired by Crawford’s article “What Exactly is Interactivity,” my definition of “interaction” involves a clear input, a processing procedure of the input and an output that is different from the original input. The initiator of the input can be humans, animals or other live objects, and they can consciously or unconsciously devote their input. The input can be in many forms (motion, sound, temperature, hormone…), and it will be identified and processed into information that computers/machines can understand. After the processing the computers/machines would “understand” that input and generate an output that responds to the input. The output is generally different from the original input and serves as a feedback about the input.

In my research, one project that aligns with my definition is “Hertzian Landscapes” by Richard Vijgen, which is essentially about a live visualization of a radio spectrum. This project includes a digital receiver which receives frequencies generated by human activity (input). Users can position themselves in front of the installation as if they are tuning the radio with their body. Then the frequencies received are processed and a live visualization of the radio spectrum would appear on a panoramic electromagnetic landscape (output). If the user keeps moving, it feels like walking through the spectrum. This aligns with my definition because it clearly involves the 3 elements in my definition: input, processing, output. And the feedback (changing spectrum) is different from the original input (human motions).

link here: https://www.creativeapplications.net/js/hertzian-landscapes-the-interactive-space-of-a-radio-spectrum/

One project that does not align well with my definition is called  “the bomb.” It is essentially a nuclear experience simulation where the audience is immersed in an artistic environment which features nuke-related films and live music. It is aimed to show the terrible consequences of using nuclear weapon. In the experience, the audience is engaged with a band called The Acid, and it can be an interactive experience since it is live performance, but there seems no clear input from the audience, although they might feel greatly impressed or moved by the performance. Therefore, this project does not align perfectly with my definition although it is very interesting itself.

link here: https://www.vice.com/en_us/article/kbn5xa/the-bomb-nuclear-film-tribeca-film-festival

Our Project

My group members and I discussed our definitions of “interaction” and came up with a design called “Watch α.” It can be conveniently worn on the wrist and sense chemicals, hormones, voices/sounds, lighting and many health inputs of the user like heart rate, temperature, blood pressure, breath rate and so on. This is the input in our definition of interaction. Then the sensors will send the inputs to a modem which will process the inputs and translate and assess the information. Then it will instruct the smart kitchen at home to make corresponding food depending on different situations. The modem does the processing job and the food is the final output. For example, when the user feels sick with a cold, the sensor would send the user’s health information to the modem which will process it, and the smart kitchen would make a chicken soup.

the prototype

In retrospect, we did a good job presenting our design and this project aligns with my definition of interaction well because it generates helpful feedback about the user’s unconscious input. With modern technology humans do not have to bother to input some data to instruct the machine, the machine can sense it for us and produce what we need. My group members and I believe that this is an interesting form of interaction which is suitable for those “lazy” people.

The specific form and function of the device we make might change as technology evolves, but the key concept behind it – interaction – will remain central to the user experience. Because people just love the feeling of interaction. Whenever people devote an input, a completely different form of output can be achieved through some processing. This feedback system gives people a sense of fulfillment. Perhaps because humans are inherently social, the interaction between humans and others, be it interpersonal communication or human-machine interaction, is central to our daily life. Understanding the mentality behind people’s fascination with “interactive experience” can help us develop better projects that meet our needs and satisfy our desires.

Works Cited

Crawford, “What Exactly is Interactivity,” The Art of Interactive Design,  pp. 1-5.

Visnjic, Filip. “Hertzian Landscapes – The interactive space of a radio spectrum.” Creative Applications Network. https://www.creativeapplications.net/js/hertzian-landscapes-the-interactive-space-of-a-radio-spectrum/

“An Experience at the Heart of Nuclear Annihilation” VICE. https://www.vice.com/en_us/article/kbn5xa/the-bomb-nuclear-film-tribeca-film-festival

Recitation 3. Sensors By Feifan Li

Introduction

In the third recitation we were asked to choose a sensor and build a circuit that integrates the sensor with Arduino. My partner Xueping Wang and I chose the Ultrasonic Ranger Sensor which can detect distance and built a working circuit. We also added a buzzer to the circuit and changed the code so that the circuit would work as a FamilyMart-style doorbell.

Ping Ultrasonic Range Finder Circuit

Hardware

  • Arduino or Genuino Board
  • Ultrasonic Range Finder
  • hook-up wires
  • (buzzer)

Following the schematic we successfully connected the Ultrasonic Ranger Finder to Arduino. What’s worth noting is that the Trig and Echo of the Ultrasonic Ranger should be connected to the same digital pin.

After copying the code from the website, the Ultrasonic Range Finder is properly functioning…!

And then we decided to add something to the existing circuit to make it a real design. My partner chose the buzzer and we decided to make a Family-Mart-Style door bell. Connecting a buzzer to the circuit was not too difficult, but changing the code was a challenge for us.

We tried to combine the code for the Ultrasonic Ranger and that for the toneMelody Buzzer. However, simply copy-pasting the old codes is not enough in this case. We have to adjust the code to the right sequence and define the note. We used the “If” sentence so that when the distance is < 10 cm, the door bell will go off. We failed a few times, but with the help of a fellow, we identified our mistakes and corrected them. We first forgot to define the notes in a new tab, so the door bell did not work. We also forgot to set the pinMode. And the “}” was kind of annoying because we often did not know if we are missing one at the end of a sentence. I think I still need a bit more practice in coding so that I can be more familiar with the language.

The code for the toneMelody is in the former link in Recitation 2: https://www.arduino.cc/en/Tutorial/toneMelody

Finally we got the code right and the device was working as we expected! Whenever my hand comes close to the sensor (within 10 cm), the buzzer would go off.

Question 1:

My partner and I intended to assemble a door bell that works based on the distance. We added a buzzer to the circuit that has a ultrasonic ranger finder and changed the code ourselves. When something comes near the sensor (within the distance of 10 cm), the buzzer would be triggered like a door bell. In real life, I think our design is quite useful. For example, the automatic “Welcome”sound in FamilyMart is designed based on the same principle. When customers enter the shop, an automatic “Welcome”can make them feel different.

Question 2:

Because coding is about following certain rules in a programming language. One needs to sort out the steps of coding and follow the sequence  in order to make the codes work. The codes have to be complete and done in the right order.

Question 3:

I believe the computers influence how humans view the world and even how humans think. Before the existence of this new media, people were not able to see things far away at home. What they get to see and experience is largely limited by their geographic location. But the introduction of computer and the Internet has made it easy for people to enjoy the fantasies around the world in front of a screen. This has significantly changed people’s way of life, but it is also sometimes a illusion. Now not only do we submit homework and document our designs on the computer, we also allow the computer to shape our understanding of the world. This new media, as Manovich refers to Adorno’s theory of “culture industry,” may even manipulate human thoughts. As the computer can bring almost anything instantly in front of us on the screen, we may get impatient and spoiled. We may not feel as excited about real-life experiences as we did before. Computers give humans convenience but also the tendency to be lazy, especially lazy in thinking.

Recitation 2. Arduino Basics By Feifan Li

Introduction

In the second recitation we were asked to do both circuit building and coding with Arduino. My partner Xu You and I completed the three circuits before the class ended, so we tried the fourth one together with another group, but we did not succeed because the coding was too difficult.

Circuit 1: Fade

Hardware:

  • Arduino or Genuino board
  • LED
  • 220 ohm resistor
  • hook-up wires
  • breadboard

circuit 1

The first circuit is pretty simple and we quickly connected all the wires following the instruction. After copying the code into Arduino, we see the fading light…

Circuit 2: toneMelody

Hardware

  • Arduino or Genuino board
  • piezo buzzer or a speaker
  • hook-up wires
  • breadboard

The second circuit is about making a buzzer sing. The circuit is not difficult either, we built it together successfully in one attempt. Then we copied the code from the website into the Arduino and here is the buzzer singing:

Circuit 3: Speed Game

Hardware

  • Arduino or Genuino board
  • piezo buzzer or a speaker
  • hook-up wires
  • 220 ohm resistor
  • 10k ohm resistor
  • Switch
  • LED
  • Arcade Button

Circuit 3 is much more complex. It involves 4 resistors, 2 LED, 2 switches, 2 Arcade Buttons, a buzzer and countless wires. To build them on the breadboard took my partner and I a lot of time. What I learned from my partner in this process is that we can connect 5V to the “+ row” on the breadboard so that the entire row can be used as the power. Also, the circuit is actually symmetric, so it would take less effort if we do the symmetric parts together.

Reflection and Evaluation:

This recitation is about building the circuit and copying the code to make the circuit work. I gradually got accustomed to connecting the wires, but the coding still seemed beyond my reach. We did not successfully make the optional circuit work because we did not know how to alter the code especially when it involved the “if” sentence.

Answer to Question 1:

Interaction requires an input, an output and the processing in between. For example, when I use a remote control to turn on the AC, the remote control gives out an signal which is an input, and through the processing inside the AC, the machine turns on, which is an output. Also circuit 3 is a good example, as we push the button, we give an input, and the processing is our accumulation of points, and the output is one of the LED shining.

Answer to Question 2:

Because the 10K resistor provides larger resistance than the 220 ohm one, which is more suitable for the Arcade Button.

Answer to Question 3:

Since the LEDs are of any color, I would make a rainbow out of them. I can make each piece of the rainbow with same color LEDs. And since I have 100,000 of them, I will probably put the rainbow in the Power Station of Art in Shanghai and tag it “modern art,” so that its meaning is open to all kinds of speculation and interpretation.

*All the photos and videos in this post are shot by my partner Xu You.