Space Piglet Off Balance – Feifan Li – Marcela 

CONCEPTION AND DESIGN:

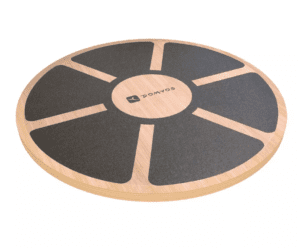
When my partner and I were making design decisions, we first wanted to make our project a piece with a deep meaning. Influenced by my peers’ ideas which are all very “profound,” we also want to make our project a statement piece, or an experience that would educate people in the end. We proposed ideas like a game that would educate people on the unnecessary nature of social media and various other apps, but we struggled to create an engaging experience that would show our purpose. After consultation with Professor Marcela, my partner and I realized the more important thing about our project should be the experience itself. If we can create a new type of experience that is really interactive and engaging, we do not have to add some grand purposes to our project. Inspired by Marcela, we decided to focus on new forms of interaction – new experiences. Cathy suggested using the balance board for the user to stand on, and it turned out to be a great idea for our game by going beyond the usual keyboard experience. Our idea is to engage the entire body of the user, instead of merely part of his/her body like the fingers, so the balance board is really a great tool to realize that. Furthermore, the balance board is originally used in the gym, which adds another layer of meaning to our game – have fun while training your balancing ability! To suit the swinging nature of the balance board, we decided to use the sensor accelerometer to detect the user’s movement. We wanted to design a game that would require the user to constantly swing the board while keeping the balance – a fun way of interaction.

FABRICATION AND PRODUCTION:

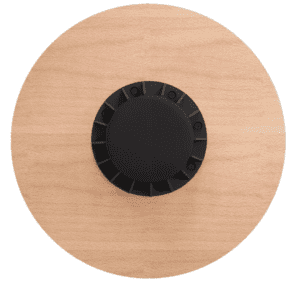
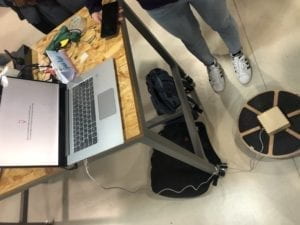
In the production process, we first wanted to do the digital fabrication. At first my partner and I were thinking about making the balance board through 3D printing ourselves. But after consultation with Andy we realized the materials we have might not be so strong to sustain some users’ weight on the board. So we directly purchased a balance board and decided to do laser-cut a small box to put on the board. We hid the Arduino and sensor inside the box. The box serves as a protection from the user’s feet, which later in the user-testing was very important.

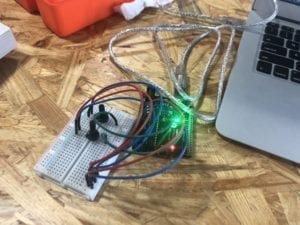
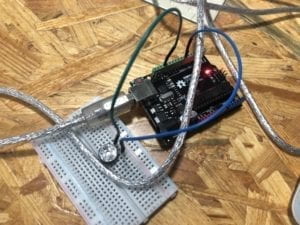
After the digital fabrication, we focused on testing the sensor and the code for the game. We were completely unfamiliar with accelerometer, but thanks to Tristan and Marcela’s help, we downloaded the guideline from the Internet and kept trying to make the sensor right. At first we were unable to detect the changes of the x and y values regardless of how we tried. We later discovered that it is because one port of the sensor was not working. After changing a new sensor and following the guideline, we managed to put the sensor in order.

Then we focused on designing the game. We wanted to use the round shape of the board in our game too, so we were thinking about the life-saving board in the sea at first. We also make the main figure a piglet from Winnie the Pooh. But later Marcela reminded us that we need to create a scenario for our game to better engage the user. So we created a space scenario where the balance board was a future vehicle in the space, and the piglet wearing a space helmet was exploring the space. Where the piglet goes is controlled by the user standing on the board – whichever direction he/she leans to, the piglet moves in the same direction. The moving board in the space is the safe board which the asteroids cannot hit. The piglet would love to have some fun outside the board, but it cannot stay outside for too long because it needs to breathe – after 5 seconds outside the board it dies from suffocation. Or if it gets hit by the moving asteroids directly, it dies instantly. In order to create the atmosphere of this scenario, we decided that the background should be the space. But inserting a image directly would cause the processing to progress too slowly. We tried to fix the problem but Tristan told us there is no easy solution. So I made a relatively simple but nice black background with shiny yellow stars scattered in it. This helps our game run smoothly. Thanks to my partner Cathy, we managed to make the code for the bouncing asteroids right. Although the sketch seems simple, it has the basic elements of a space game.

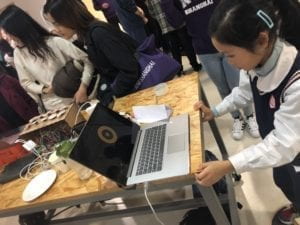
The user-testing session is very helpful. The users liked our idea of the moving board, and we collected much feedback for modification, such as the speed of the traveling piglet should be faster to make the game more engaging, the moving board can become smaller as time goes by, the moving boundary of the board can be expanded, and the placing of the wire should be switched to make it easy for the user to stand on. About the game concept, users also suggested we creating a game scenario that involves more elements, like bonus scores for “reaching” some stars for the piglet, and the showing of the time limit for the piglet staying outside the board. Marcela also suggested we adding sound to the game in our presentation, which adds a lot more to our game. We took almost all of this advice and modified our game base on that. The changes make our game more complete and engaging. One user also suggested making the fabricated box smaller and moving the Arduino onto the table instead of on the board, but we did not follow that because we had limited time and thought it was more important to focus on the game itself.

CONCLUSIONS:

The goal of my project is to create a new game experience that involves the movement of the user’s entire body. By standing on the balance board to control the movement of the piglet, the user tries to stay balanced as well as engage in the game to make sure the piglet survive as long as possible. The project aligns with my definition of interaction in that the user needs to constantly react to the changing location of the board and asteroids in the game to adjust the location of the piglet. What stands out in our project is that the extended experience is really novel – users have fun interacting with the game while shaking on the board. Ultimately, in the final show, many users tested our game and liked our idea of using the balance board. Some offered suggestions of improving the details of our game setting and code, but most of them find standing on the board very entertaining. One area we can keep working on is that the movement of the board becomes predictable after the user gets familiar with the game. We can randomize the movement of the board or speed it up – dividing the game into several rounds depending on the speed of the movement, so that the game can be more exciting and challenging.

In the production process, I came to realize the importance of exploring on our own. For example, the accelerometer sensor which I had no idea how to use can actually be mastered by self-learning online. The project can be complicated and what we learnt in class maybe insufficient, but we can always try to explore how things work ourselves and seek for help. The ability of self-learning is important in creating something of our own.

From the successes and failures of doing the final project, I also realized the importance of user “experience.” For both the project conception and the game design, we all need to create a scenario that serves the experience of the project. It is the experience that matters most for the user, and creating new forms of interaction really brings new experience and new feelings to the users. What we can further explore is how to inspire such new experiences, either by involving different parts of the human body like we did in our project or by other means. The combination of human body and new technology is very interesting and explores the new human need in the context of new technology today. Humans constantly want new forms of interaction with the technology to extend their conventional human experiences.

Recitation 10. Workshops By Feifan Li

Introduction

In this recitation I first attended the map() workshop and then chose to go to the media manipulation workshop. The exercise for the workshop is to pick a tv show/music video/entrance video and recreate it using images and videos from the web. I chose a black-and-white music video from Vimeo and decided to do something creative about it.

Processing Code to play the original video:

import processing.video.*;
//import video library
Movie myMovie;
void setup() {
  size(1000, 600);
  myMovie = new Movie(this, "music video.mp4");
  myMovie.play();
//define the state of the video
}
void draw() {
  if (myMovie.available()) {
//read my file when it can be read
    myMovie.read();
//read the current frame of the video
  }
  image(myMovie, 0, 0);
//draw the frame
}

original video:

my code for speed manipulation and pixels:

import processing.video.*;
//import video library
Movie myMovie;
void setup() {
  size(1000, 600);
  myMovie = new Movie(this, "music video.mp4");
  myMovie.play();
//define the state of the video
}
void draw() {
  if (myMovie.available()) {
//read my file when it can be read
    myMovie.read();
//read the current frame of the video
  }
  image(myMovie, 0, 0);
//draw the frame
float speed =map(mouseX,0,mouseY, 0,4);
myMovie.speed(speed);

if(keyPressed){
  int rectsize = 20;
  int w = myMovie.width;
  int h = myMovie.height;
  for (int x=0; x<w; x+=rectsize){
  for (int y=0; y<h; y+=rectsize){
    int a = x+y*w;
    fill(myMovie.pixels[a]);
    rect(x, y, rectsize, rectsize);
  }
  }
}
}

The effect I want to create is faster speed and pixels. I used keypressed() to create rectangles with size of 20 to pixelate the video, which makes the video seem more flat and two-dimensional. Also I used map() to speed the video up according to the location of my mouse. The faster speed makes the video more exciting and the change of objects in the video more dramatic. This works well most of the times, but when it speeds up there is no sound, and sometimes the video would stuck at a scene. But the pixels and speeding up can work at the same time. Below is my recorded videos of the special effects.

Recitation 9. Media Controller By Feifan Li

Introduction

In this recitation we are required to control media with a Processing sketch through using a physical controller made with Arduino. First I used two potentiometers to control the location of the image I chose. Then I changed the function of one potentiometer to controlling the size of the image.

Controlling the Location:

Arduino Code (from the example):

// IMA NYU Shanghai
// Interaction Lab
// For sending multiple values from Arduino to Processing

void setup() {
Serial.begin(9600);
}

void loop() {
int sensor1 = analogRead(A0);
int sensor2 = analogRead(A1);

// keep this format
Serial.print(sensor1);
Serial.print(“,”); // put comma between sensor values
Serial.print(sensor2);
Serial.println(); // add linefeed after sending the last sensor value

// too fast communication might cause some latency in Processing
// this delay resolves the issue.
delay(100);
}

Processing Code (based on the example):

// IMA NYU Shanghai
// Interaction Lab
// For receiving multiple values from Arduino to Processing

/*
 * Based on the readStringUntil() example by Tom Igoe
 * https://processing.org/reference/libraries/serial/Serial_readStringUntil_.html
 */

import processing.serial.*;

String myString = null;
Serial myPort;

PImage img;

int NUM_OF_VALUES = 2;   /** YOU MUST CHANGE THIS ACCORDING TO YOUR PROJECT **/
int[] sensorValues;      /** this array stores values from Arduino **/

void setup() {
  size(500, 500);
  background(0);
  img=loadImage("figure0.jpeg");

  setupSerial();
}


void draw() {
  background(0);
  updateSerial();
  printArray(sensorValues);
float a = map(sensorValues[0], 0, 1023, 0, 280);
float b = map(sensorValues[1], 0, 1023, 0, 280);
tint(b, 180, 205);
image(img,a,b);
  // use the values like this!
  // sensorValues[0] 

  // add your code

  //
}


void setupSerial() {
  printArray(Serial.list());
  myPort = new Serial(this, Serial.list()[ 2 ], 9600);
  // WARNING!
  // You will definitely get an error here.
  // Change the PORT_INDEX to 0 and try running it again.
  // And then, check the list of the ports,
  // find the port "/dev/cu.usbmodem----" or "/dev/tty.usbmodem----" 
  // and replace PORT_INDEX above with the index number of the port.

  myPort.clear();
  // Throw out the first reading,
  // in case we started reading in the middle of a string from the sender.
  myString = myPort.readStringUntil( 10 );  // 10 = '\n'  Linefeed in ASCII
  myString = null;

  sensorValues = new int[NUM_OF_VALUES];
}


void updateSerial() {
  while (myPort.available() > 0) {
    myString = myPort.readStringUntil( 10 ); // 10 = '\n'  Linefeed in ASCII
    if (myString != null) {
      String[] serialInArray = split(trim(myString), ",");
      if (serialInArray.length == NUM_OF_VALUES) {
        for (int i=0; i<serialInArray.length; i++) {
          sensorValues[i] = int(serialInArray[i]);
        }
      }
    }
  }
}

I used tint() in my code and connected the location with color. When the image moves up and down, its color changes simultaneously. 

Controlling Location as well as Size:

Arduino Code is the same as above.

Processing Code:

// IMA NYU Shanghai
// Interaction Lab
// For receiving multiple values from Arduino to Processing

/*
 * Based on the readStringUntil() example by Tom Igoe
 * https://processing.org/reference/libraries/serial/Serial_readStringUntil_.html
 */

import processing.serial.*;

String myString = null;
Serial myPort;

PImage img;

int NUM_OF_VALUES = 2;   /** YOU MUST CHANGE THIS ACCORDING TO YOUR PROJECT **/
int[] sensorValues;      /** this array stores values from Arduino **/

void setup() {
  size(500, 500);
  background(0);
  img=loadImage("figure0.jpeg");

  setupSerial();
}


void draw() {
  background(0);
  updateSerial();
  printArray(sensorValues);
float a = map(sensorValues[0], 0, 1023, 0, 255);
float b = map(sensorValues[1], 0, 1023, 0, 500);
tint(b, 180, 205);
image(img,a,100,b,b);
  // use the values like this!
  // sensorValues[0] 

  // add your code

  //
}


void setupSerial() {
  printArray(Serial.list());
  myPort = new Serial(this, Serial.list()[ 2 ], 9600);
  // WARNING!
  // You will definitely get an error here.
  // Change the PORT_INDEX to 0 and try running it again.
  // And then, check the list of the ports,
  // find the port "/dev/cu.usbmodem----" or "/dev/tty.usbmodem----" 
  // and replace PORT_INDEX above with the index number of the port.

  myPort.clear();
  // Throw out the first reading,
  // in case we started reading in the middle of a string from the sender.
  myString = myPort.readStringUntil( 10 );  // 10 = '\n'  Linefeed in ASCII
  myString = null;

  sensorValues = new int[NUM_OF_VALUES];
}


void updateSerial() {
  while (myPort.available() > 0) {
    myString = myPort.readStringUntil( 10 ); // 10 = '\n'  Linefeed in ASCII
    if (myString != null) {
      String[] serialInArray = split(trim(myString), ",");
      if (serialInArray.length == NUM_OF_VALUES) {
        for (int i=0; i<serialInArray.length; i++) {
          sensorValues[i] = int(serialInArray[i]);
        }
      }
    }
  }
}

I changed the function of one potentiometer, and it is now controlling the size of the image. Maybe I should add one more potentiometer so that I can control both the size and the location of two directions.

Reading Reflection

This week’s reading refers to Myron Krueger’s legendary Videoplace, which was developed in the 1970s by his “deeply felt belief that the entire human body ought to have a role in our interactions with computers.This examples inspires me in doing my final project. My partner and I are trying to create a new interactive experience, and the old way of keyboard or mouse interaction with the computer can no longer satisfy us. To expand the boundary of interaction, we look to the human body. We plan to use the motion of human bodies as input in our final project, and we think the game involving the entire human bodies (preferably >=2) would be more interactive and fun. In Krueger’s words, we can create a “multi­-person virtual reality.” It is fascinating to learn the history and pioneering work of human body interaction with the computer from the reading.

Work Cited

Golan Levin and Collaborators. “Computer Vision for Artists and Designers: Pedagogic Tools and Techniques for Novice Programmers.” Journal of Artificial Intelligence and Society, Vol. 20.4. Springer Verlag, 2006.

Final Project Essay By Feifan Li

A. PROJECT TITLE: “Keep The Balance!”

B. PROJECT STATEMENT OF PURPOSE

At first we were trying to design a computer game like the bouncing ball which only involves a keyboard experience. We were worried that our project does not have a high purpose, but after talking to Professor Marcela, we realized that our project is not lacking in meaning, but a new experience. Marcela showed us the example of decoding the bomb, which involves collaboration between two players. The example of running around the room for sensors also reminds us that we can extend the experience from merely on the keyboard to a real space. Based on this research and discussion, we decided to revise our original plan. This time we want to create a new experience in the game we design. It came to us that we can create a game based on the movement of our entire body, using the balance board below.

The purpose of this design is to take our movement on the board as the input of interaction, and due to the constant movement the game will be very interactive.The balance board is originally for gym, but in our game the players can not only try his/her sense of balance but also collaborate to have fun and thrive with uncertainty. This game is targeted at pairs of good friends we are well-coordinated in achieving a common goal in the game.

C. PROJECT PLAN

The first step is to get 2 balance boards shown above. We can either digital fabricate them or buy them directly. After talking to Andy who advised us to buy those boards directly and make modifications on them, we decided to buy 2 boards from the Internet.

While the boards are being delivered, we will start working on the processing code. We will need a screen for the game, as the players’ bodies move and stretch, the corresponding figures on the screen would also move. We want to create a scenario in which we the two players need to first play individually and then collaborate to achieve victory. We are still thinking about what code we exactly need to create a smooth game experience. Ideally we will finish this step at the end of Thanksgiving holiday.

After working on Processing we will turn to Arduino and sensors on the balance board. We may need to dig holes in the board to place the sensors, and we might decorate the board a little bit and add some digital fabrication component to it. Finally we will communicate Arduino and Processing and work on the code and put everything together. We will try to finish the project at the end of next week.

D. CONTEXT AND SIGNIFICANCE

In the preparatory stage, I decided that my definition of interaction would involve an input and a changing output. Ideally the output will be unpredictable and a new input is needed so that the project will be more interactive instead of merely reactive. Also the project needs to expand the human experience – from fingertips to the entire body. I consider these elements central to our project and I think my current proposal fits such criteria.

The unique part in our project is the adaptation of the balance board. In order not to fall, humans have to try to keep the balance on the board, a metaphor for our constantly shaking life as well. With the uncertainty we need to move or stretch our body carefully to achieve our goals, and sometimes we have to ask help and collaborate with our friends to achieve a common goal. I think this game can be physically challenging and fun. We can also adapt the game scenario as we want later. Also there seems no already existing game like this. It can be a great tool to bring laughter and strengthen friendship.

Recitation 8. Serial Communication By Feifan Li

Exercise 1: Make a Processing Etch A Sketch

Working with an ellipse:

Arduino Code:

void setup() {
// initialize serial communication at 9600 bits per second:
Serial.begin(9600);
}

// the loop routine runs over and over again forever:
void loop() {
// read the input on analog pin 0:
int sensorValue1 = analogRead(A0);
int sensorValue2 = analogRead(A1);
// print out the value you read:
Serial.print(sensorValue1);
Serial.print(“,”);
Serial.print(sensorValue2);
Serial.println();
delay(1); // delay in between reads for stability
}

Processing Code:

import processing.serial.*;

String myString = null;
Serial myPort;


int NUM_OF_VALUES = 2;   /** YOU MUST CHANGE THIS ACCORDING TO YOUR PROJECT **/
int[] sensorValues;      /** this array stores values from Arduino **/


void setup() {
  size(500, 500);
  background(0);
  setupSerial();
}

void draw() {
  updateSerial();
  printArray(sensorValues);
ellipse(sensorValues[0],sensorValues[1], 80, 80);

}

void setupSerial() {
  printArray(Serial.list());
  myPort = new Serial(this, Serial.list()[ 2 ], 9600);

  myPort.clear();
  // Throw out the first reading,
  // in case we started reading in the middle of a string from the sender.
  myString = myPort.readStringUntil( 10 );  // 10 = '\n'  Linefeed in ASCII
  myString = null;

  sensorValues = new int[NUM_OF_VALUES];
}


void updateSerial() {
  while (myPort.available() > 0) {
    myString = myPort.readStringUntil( 10 ); // 10 = '\n'  Linefeed in ASCII
    if (myString != null) {
      String[] serialInArray = split(trim(myString), ",");
      if (serialInArray.length == NUM_OF_VALUES) {
        for (int i=0; i<serialInArray.length; i++) {
          sensorValues[i] = int(serialInArray[i]);
        }
      }
    }
  }
}

Working with a line:

I modified the Processing code a bit to change from drawing with ellipse to line.

import processing.serial.*;

String myString = null;
Serial myPort;


int NUM_OF_VALUES = 2;   /** YOU MUST CHANGE THIS ACCORDING TO YOUR PROJECT **/
int[] sensorValues;      /** this array stores values from Arduino **/

int a;
int b;

void setup() {
  size(800, 800);
  background(255);
  setupSerial();
}


void draw() {
  updateSerial();
  printArray(sensorValues);
  fill(0);
line(a, b, sensorValues[0],sensorValues[1]);
a=sensorValues[0];
b=sensorValues[1];

void setupSerial() {
  printArray(Serial.list());
  myPort = new Serial(this, Serial.list()[ 2 ], 9600);

  myPort.clear();
  // Throw out the first reading,
  // in case we started reading in the middle of a string from the sender.
  myString = myPort.readStringUntil( 10 );  // 10 = '\n'  Linefeed in ASCII
  myString = null;

  sensorValues = new int[NUM_OF_VALUES];
}


void updateSerial() {
  while (myPort.available() > 0) {
    myString = myPort.readStringUntil( 10 ); // 10 = '\n'  Linefeed in ASCII
    if (myString != null) {
      String[] serialInArray = split(trim(myString), ",");
      if (serialInArray.length == NUM_OF_VALUES) {
        for (int i=0; i<serialInArray.length; i++) {
          sensorValues[i] = int(serialInArray[i]);
        }
      }
    }
  }
}

The difficult part in this drawing experience is that the potentiometer is difficult to control. From the video you can see that the lines I draw change abruptly – a result of the instability of potentiometers. I wonder if it is a problem of precision with our potentiometers?

Exercise 2: Make a musical instrument with Arduino

Processing Code:

import processing.serial.*;

int NUM_OF_VALUES = 2;  /** YOU MUST CHANGE THIS ACCORDING TO YOUR PROJECT **/


Serial myPort;
String myString;

// This is the array of values you might want to send to Arduino.
int values[] = new int[NUM_OF_VALUES];

void setup() {
  size(500, 500);
  background(0);

  printArray(Serial.list());
  myPort = new Serial(this, Serial.list()[ 2 ], 9600);
 
  myPort.clear();
  // Throw out the first reading,
  // in case we started reading in the middle of a string from the sender.
  myString = myPort.readStringUntil( 10 );  // 10 = '\n'  Linefeed in ASCII
  myString = null;
}


void draw() {
  background(0);

  // changes the values
  for (int i=0; i<values.length; i++) {
    values[0] = mouseX; 
    values[1] = mouseY;
  
    /** Feel free to change this!! **/
  }

  // sends the values to Arduino.
  sendSerialData();

  // This causess the communication to become slow and unstable.
  // You might want to comment this out when everything is ready.
  // The parameter 200 is the frequency of echoing. 
  // The higher this number, the slower the program will be
  // but the higher this number, the more stable it will be.
  echoSerialData(200);
}

void sendSerialData() {
  String data = "";
  for (int i=0; i<values.length; i++) {
    data += values[i];
    //if i is less than the index number of the last element in the values array
    if (i < values.length-1) {
      data += ","; // add splitter character "," between each values element
    } 
    //if it is the last element in the values array
    else {
      data += "n"; // add the end of data character "n"
    }
  }
  //write to Arduino
  println(data);
  myPort.write(data);
}


void echoSerialData(int frequency) {
  //write character 'e' at the given frequency
  //to request Arduino to send back the values array
  if (frameCount % frequency == 0) myPort.write('e');

  String incomingBytes = "";
  while (myPort.available() > 0) {
    //add on all the characters received from the Arduino to the incomingBytes string
    incomingBytes += char(myPort.read());
  }
  //print what Arduino sent back to Processing
  print( incomingBytes );
}

Arduino code:

// IMA NYU Shanghai
// Interaction Lab

/**
This example is to send multiple values from Processing to Arduino.
You can find the Processing example file in the same folder which works with this Arduino file.
Please note that the echo case (when char c is ‘e’ in the getSerialData function below)
checks if Arduino is receiving the correct bytes from the Processing sketch
by sending the values array back to the Processing sketch.
**/

#define NUM_OF_VALUES 2 /** YOU MUST CHANGE THIS ACCORDING TO YOUR PROJECT **/

/** DO NOT REMOVE THESE **/
int tempValue = 0;
int valueIndex = 0;

/* This is the array of values storing the data from Processing. */
int values[NUM_OF_VALUES];

void setup() {
Serial.begin(9600);
pinMode(13, OUTPUT);
pinMode(9, OUTPUT);
}

void loop() {
getSerialData();

//Serial.println(values[0]);
// add your code here
// use elements in the values array
// values[0] // values[1] if (values[0] > 150) {

if (values[0] == 1) {
digitalWrite(13, HIGH);
} else {
digitalWrite(13, LOW);
}
if (values[1] == 1) {
tone(9, values[2]);
} else {
noTone(9);
}
}

//recieve serial data from Processing
void getSerialData() {
if (Serial.available()) {
char c = Serial.read();
//Serial.println(“gjkg”);
//switch – case checks the value of the variable in the switch function
//in this case, the char c, then runs one of the cases that fit the value of the variable
//for more information, visit the reference page: https://www.arduino.cc/en/Reference/SwitchCase
switch (c) {
//if the char c from Processing is a number between 0 and 9
case ‘0’…’9′:
//save the value of char c to tempValue
//but simultaneously rearrange the existing values saved in tempValue
//for the digits received through char c to remain coherent
//if this does not make sense and would like to know more, send an email to me!
tempValue = tempValue * 10 + c – ‘0’;
break;
//if the char c from Processing is a comma
//indicating that the following values of char c is for the next element in the values array
case ‘,’:
values[valueIndex] = tempValue;
//reset tempValue value
tempValue = 0;
//increment valuesIndex by 1
valueIndex++;
break;
//if the char c from Processing is character ‘n’
//which signals that it is the end of data
case ‘n’:
//save the tempValue
//this will b the last element in the values array
values[valueIndex] = tempValue;
//reset tempValue and valueIndex values
//to clear out the values array for the next round of readings from Processing
tempValue = 0;
valueIndex = 0;
break;
//if the char c from Processing is character ‘e’
//it is signalling for the Arduino to send Processing the elements saved in the values array
//this case is triggered and processed by the echoSerialData function in the Processing sketch
case ‘e’: // to echo
for (int i = 0; i < NUM_OF_VALUES; i++) {
Serial.print(values[i]);
if (i < NUM_OF_VALUES – 1) {
Serial.print(‘,’);
}
else {
Serial.println();
}
}
break;
}
}