Final Project Proposals

Project Proposals

Proposal 1: Forget-Me-Not Umbrella

The Forget-Me-Not Umbrella eliminates the issue of forgetting to bring one’s umbrella. When I was researching projects that I could use as inspiration, I was drawn to the idea of creating a wearable interactive device. I viewed things like dresses that reacted to motion around them, or a shirt that changes color based on air quality, but I would like to make something that would be useful a college student’s everyday life. The user would attach it to their backpack, and it will always be with them. The special thing about this umbrella is that it uses a moisture sensor to sense when it is raining. Once the sensor feels rain, the umbrella springs up to shield the person from the rain. The ease of a simple attachment makes the product ideal for anyone who commutes to work or school on foot and often forgets their umbrella. They attach it, and then let the sensor wait for it to rain. 

Proposal 2 : “Step Into the Newsroom”

“Step Into the Newsroom” focuses on keeping people informed on the events that are occurring in the world as they happen.  With a simple step on the area in the world, the user can know what new is occurring there. This would be a great way to keep students informed on the world during the school day. During my research, projects that connected those around the world peaked my interest. While this is not directly creating conversation between people, knowing information on events around the world helps to create an understanding of other countries. The idea of “Step Into the Newsroom” being a carpet came from my wish to create a product that was more usable in everyday life. Whether it be in a classroom or in someone’s living room, breaking current events are (literally) steps away. 

Proposal 3: “Paint Perfecto”

This product is ideal for the artist who may not enjoy mixing the paint colors that they need to use. This idea came from the project “Moon” by Ai Weiwei and Olafur Eliasson where they created a sphere where people could draw on. Again, I wish to make something that has a physical use to everyday life. To create their color, the artist would use the computer to choose their color, and then the machine would mix the paints to create the desired pigment. In search of creating a physical way easing color mixing, the best day to do this would to use palette knives. The artist can clearly see the color being made, and will be able to make adjustments as needed.

Recitation 7: Functions and Arrays

Intro

During this recitation, we explored the way that arrays can make creating many of one object much easier. We did this by implementing arrays into a code that made one simple shape, from this we could make 100 of the shape. The introduction of arrays into our code will make it much easier to create multiples of one function, without having an extremely long code.

Step 1

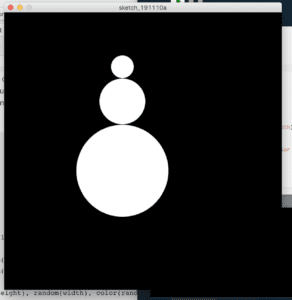
For step one we had to create a function that made any shape that we wanted. I created a snowman out of three circles, and rightfully named it snowman(). I made sure to include an x, y, and color parameter, so later  I could color and place them randomly.

void setup() {
size(600, 600);
}

void draw() {
background(0);
noLoop();

for (int i=0; i<1; i++) {

float x = random(width);
float y = random(height);

snowman(random(height), random(width), color(random(255)));
}
}
void snowman(float x, float y, color c) {
circle(x, y, 50);
circle(x, y+75, 100);
circle(x, y+225, 200);

}

Step 2

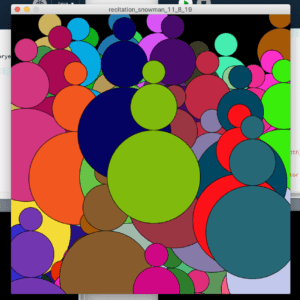
Step 2 asked us to create 100 of our shape and to make it randomly colored. To do this, all I did was change the range inside of the if statement from i<1 to i<100. To change the color, I changed the color function inside of the snowman function to have all three colors be random instead of just black and white.

void setup() {
size(600, 600);
}

void draw() {
background(0);
noLoop();

for (int i=0; i<100; i++) {

float x = random(width);
float y = random(height);

snowman(random(height), random(width), color(random(255), random(255), random(255)));
}
}
void snowman(float x, float y, color c) {
  fill(c);
circle(x, y, 50);
circle(x, y+75, 100);
circle(x, y+225, 200);

}

Step 3

Step 3 asked us to add arrays to store the data of the code. I added one for the x, y, and color. To place the snowmen randomly, I made the x and y positions be at a random place along the width and height. I did the same with color to make each snowman a random color. 

 This isn’t the same image as before, I promise

float[] xpositions = new float[100];
float[] ypositions = new float[100];
color[] coloryes = new color[255];

void setup() {
size(600,600);

for(int i=0; i<xpositions.length; i++) {
xpositions[i] = random(width); 
ypositions[i] = random(height);
coloryes[i] = color(random(255), random(255), random(255));

}
printArray(xpositions);
println();
printArray(ypositions);

}

void draw() {
background(0);

for(int i=0; i<xpositions.length; i++) {
snowman(xpositions[i], ypositions[i], coloryes[i]);
 }
}
void snowman(float x, float y, color c) {
fill(c);
circle(x, y, 50);
fill(c);
circle(x, y+75, 100);
fill(c);
circle(x, y+225, 200);
}

Step 4

Step 4 wanted us to make our shapes move slightly. To do this I gave the snowmen a random placement, but only within -5 and 5 of it’s original position.  We did this part in class, so thank you Eric.

shimmying snowmen

float[] xpositions = new float[100];
float[] ypositions = new float[100];
color[] coloryes = new color[255];

void setup() {
size(600,600);

for(int i=0; i<xpositions.length; i++) {
xpositions[i] = random(width); 
ypositions[i] = random(height);
coloryes[i] = color(random(255), random(255), random(255));

}
printArray(xpositions);
println();
printArray(ypositions);
}

void draw() {
background(0);
for(int i=0; i<xpositions.length; i++) {
snowman(xpositions[i], ypositions[i], coloryes[i]);
  xpositions[i] += random(-5, 5);
    ypositions[i] += random(-5, 5);
}}

void snowman(float x, float y, color c) {
fill(c);
circle(x, y, 50);
fill(c);
circle(x, y+75, 100);
fill(c);
circle(x, y+225, 200);
}

Step 4

Step 4 was difficult, but after receiving some help from a fellow, I understand. In order for the snowmen to not cross the border of the canvas, I had to set them to move somewhere else when they approached the border. When the width got within 100 of the border, I had the snowmen move 100 toward the center. The height was similar, but I had to tweak the numbers to make it work. 

shimmying snowmen in a fence

Here is the entire code

float[] xpositions = new float[100];
float[] ypositions = new float[100];
color[] coloryes = new color[255];

void setup() {
size(600,600);

for(int i=0; i<xpositions.length; i++) {
xpositions[i] = random(width); 
ypositions[i] = random(height);
coloryes[i] = color(random(255), random(255), random(255));

}
printArray(xpositions);
println();
printArray(ypositions);

}

void draw() {
background(0);

for(int i=0; i<xpositions.length; i++) {
snowman(xpositions[i], ypositions[i], coloryes[i]);
  xpositions[i] += random(-5, 5);
    ypositions[i] += random(-5, 5);

if(xpositions[i] >= width-100) { 
      xpositions[i]=width-100;
    }
     if(xpositions[i] <= 100) { 
      xpositions[i]=100;
    }
    if(ypositions[i] >= height) { 
      ypositions[i]=height;
    }
    if(ypositions[i] >= 250) { 
      ypositions[i] = 250;
    } if(ypositions[i] <= 25) {
      ypositions[i] = 25;
}}}

void snowman(float x, float y, color c) {
fill(c);
circle(x, y, 50);
fill(c);
circle(x, y+75, 100);
fill(c);
circle(x, y+225, 200);
}

Questions

Question 1

Having the loop in setup() only allows it to run once. Having the loop in draw() lets it run over and over again. If you want something to be animated, you must put it in draw(). 

Question 2

Using array shortens the code immensely. This is because arrays store information inside of them, this means that if you put information into an array, you don’t need to put it into the code over and over again. I would love to use this to create an animation that is more complicated that snowmen shimmying, but arrays will come in handy when I want to run a large amount of loops. 


Recitation 6: Processing Animation

Intro

During this recitation we were asked to create an animation in Processing. This was to integrate the new types of coding that we learned in class, into the drawing that we created last week.

Original Animation

Maze processing code

When I was creating this maze animation, I used a number of techniques that we had learned in class. I used the drawing skills that we learned last week to create the walls of the maze. In order to make the circle move I had to use the keyPressed() function. This was a challenge only because I had forgotten to initialize the x and y directions of the circle. 

int circleX;
int circleY;
int speedY =10;
int speedX = 10;
int r;

void setup() {
size(600, 300);
r = 10;

}

void draw() {

background(0);
noStroke();
rect(100, 0, 400, 100);
rect(0, 50, 50, 500);
rect(50, 150, 300, 200);
rect(350, 400, 500, 350);
rect(400, 200, 150, 300);

ellipse(circleX, circleY, r, r);

}

void keyPressed() {
if (keyCode == RIGHT){
circleX=circleX+speedY;}
if (keyCode == LEFT){
circleX=circleX-speedX;}
if (key == CODED) {
if (keyCode == UP) {
circleY=circleY-speedY;}
if (keyCode == DOWN) {
circleY=circleY+speedY;}
}}

Homework

growing and shrinking

I struggled a lot with this homework. I originally had the circle able to grow, but it never stopped growing. With the help of a fellow, they reminded me of the use of the !. This meant that now once a certain radius was hit, the circle would shrink in the opposite direction. The color also raised issues for me as well, I had a hard time figuring out what the parameters were that went with the colorMode(HSB) function. 

int r;
boolean circleShrinks=false;
int circleRadius = 200;
int circleX;
int circleY;
int speedUpd = 10;
int speedLr = 10;

void setup() {
size(600, 600);
r =200;
circleX = height/2;
circleY = height/2;
}

void draw() {
background(255);
colorMode(HSB, 360, 100, 100, 100);
background(360);
stroke(r,100,255);
fill(360);
strokeWeight(20);
ellipse(circleX, circleY, r, r);
if(circleShrinks)r–;
else r++;
if(r==0 || r==400) circleShrinks=!circleShrinks;
}
void keyPressed() {
if (keyCode == RIGHT){
circleX=circleX+speedLr;}
if (keyCode == LEFT){
circleX=circleX-speedLr;}
if (key == CODED) {
if (keyCode == UP) {
circleY=circleY-speedUpd;}
if (keyCode == DOWN) {
circleY=circleY+speedUpd;}

}}

Interesting Functions

keyPressed() – This function can be used to allow movement of shapes by the use of the arrow keys. It can also assign different keys on the keyboard to change thing like color, or transparency. 

colorMode(HSB)- This changes the way that Processing displays color

Recitation 5: Processing Basics

Intro

During this recitation, we were asked to create an image based on a motif of our choosing. The purpose of this was to explore the different components that Processing uses. We were able to compare the functions with those that we used in Arduino, and also experimented with new functions. 

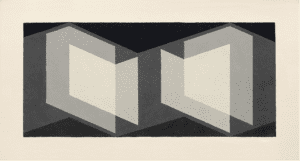
 Josef Albers -Biconjugate
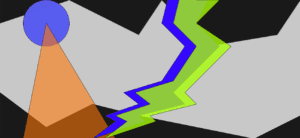
I chose this image because I like the transparency that can be seen with the lightest colored shapes. I also enjoy that the shapes are not normal shapes, so it would be more of a challenge. 

My drawing!!!

The image that I created was not a direct copy of Albers’ piece. I took inspiration from the darkest, zig-zag shape because I see it as a cloud. From this cloud idea I created a thunderstorm. While they may not look similar, these two pieces have many of the same things happening. For example, the cloud that I created is similar to the one in the original piece. To create the cloud and the lightning bolts, I used the beginShape()/ endShape() functions.  This proved to be a big challenge. I spent along time guessing and checking where each my vertices would be placed. I played with layering shapes, and their transparencies, which can be seen in Albers’ painting. To move the lightning bolt over from its original position so they would look layered,  I simply added 50 pixels to the original x value. Unlike the original piece, I added color because I wanted to experiment with Processing past just using shape. I found it very easy to use the color function because of the color selection option. You can mix a color, rather than figure out what number correspond to the perfect color. Processing, while finding the vertices was difficult, was very easy to use to create my image. I believe that creating simple designs will be the best way to use this program. Complex designs would take a very long time because of the issue of finding vertices, but overall this program is very useful when creating simple designs. 

The code 

vertex(700, 0);
vertex(900, 200);
vertex(1200, 150);
vertex(1300, 0);
vertex(1300, 500);
vertex(1100, 600);
vertex(600, 500);
vertex(400, 450);
vertex(200, 550);
vertex(0, 400);
endShape();
fill(#575BF0, 250);
ellipse(200, 100, 200, 200);
fill(#FF7708, 150);
triangle(200, 100, 500, 600, 100, 600);
fill(#3408FF);
beginShape();
vertex(800, 0);
vertex(900, 0);
vertex(850, 100);
vertex(950, 200);
vertex(750, 400);
vertex(800, 450);
vertex(600, 500);
vertex(625, 525);
vertex(400, 600);
vertex(500, 525);
vertex(455, 500);
vertex(600, 450);
vertex(535, 400);
vertex(700, 350);
vertex(800, 200);
vertex(700, 100);
vertex(725, 0);
endShape();
fill(#A8FF08, 200);
beginShape();
vertex(850, 0);
vertex(950, 0);
vertex(850, 100);
vertex(1000, 200);
vertex(800, 400);
vertex(850, 450);
vertex(650, 500);
vertex(675, 525);
vertex(450, 600);
vertex(550, 525);
vertex(500, 500);
vertex(650, 450);
vertex(585, 400);
vertex(750, 350);
vertex(850, 200);
vertex(750, 100);
vertex(775, 0);
endShape();

Preparatory Research and Analysis

Chronus Exhibition

This exhibition contained many inspiring, technology pieces. I enjoyed this exhibition much more than other art galleries because they made you think. In order to understand these machines, you had to walk around them, and see how they are performing their purpose. This contrasts completely to non-technology artwork because there is a higher degree of interaction between us and the technology pieces rather than the non-tech pieces. I really liked walking around the machines, and trying to figure out what each part of it did. There was only one piece that was directly interactive, and this was the machine that moved according to one’s position in front of the sensor. Experimenting with my position in from of the sensor created the interactivity between myself and the machine. It sensed by location and acted accordingly.

Research

“Walking City”  -Ying Gao

I think that this dress is a good example of interaction. It responds to stimuli from its environment and moves accordingly. It uses motion sensors in order to detect distance from an object to itself, and when an object gets too close, it moves rapidly to tell the other object to move away. Despite following the basic structure of an interactive experience, listening to stimuli, thinking about it, and responding outwardly, this project lacks a continuous motivation for interaction. While it does move, it does not provide an other kind of interaction. 

“Moon” – Ai Weiwei and Olafur Eliasson

The project to “draw on the moon” is an interactive website that allows users o draw on a square on a sphere that they have labeled the moon. This website is a fantastic example of an interactive experience. While on the website you can not only draw on your own square, but you can maneuver around the moon, and click on others squares to view their drawings. 

An Interactive Experience

Earlier this year, I defined interaction as two parties both sending an output to each other, thinking about the stimuli, and responding based on the information they receive. My midterm project has two forms of output after receiving information, an LED lit up and a buzzer sounded. While I achieved the standard definition of an interactive experience, I was left feeling like there should be more to my project. I learned from the midterm that a good interactive experience will make the user want to interact with the project again. If a motivation to keep interacting isn’t there, then there is almost no point is interacting at all. The two projects that I did research on represent this perfectly. These two projects are very different, and both strive to achieve different types of interaction. The dress achieves physical interaction, while the moon allows the user to interact with the world created digitally. Between the two I think that the moon project creates a better interactive experience. This is because there is more to interact with on the website, and seeing all of the different drawings creates a motivation to keep interacting. When interacting with the dress, there is only one type of output, which is just it moving as a reaction to movement around it. While wearable interaction is an amazing innovation, so far the better interactive experience comes from the website.