Final Project- Emily Wright

Map(Tweeter)

Purpose of Project

The idea to create this project came from my experience going throughout the American school system. In my school district, there was not a focus on current event in any of the classes, despite the knowledge of current events being an important part of education. Because of this, I wished to introduce a more interactive way to have news presented. My original plan was to take the most current events that I would find on Google, and program processing to display what ever news story I chose. While this would have worked, I wished to have information that was a recent as possible. The project “Moon” by Ai Weiwei and Olafur Eliasson, gave me the inspiration to include the news from regular people around the world, and from this we chose to use Twitter as our new source. This project was targeted more toward children, as it has a very whimsical look to it. It would be best used in a classroom setting where children can actively see where in the world they are receiving news from. This helps create knowledge on current events, and it also helps children further develop geography skills. 

Process of Creation

Coding- 

To integrate the use of Twitter’s information into our project, we used the API that connects Twitter with Processing. We had a difficult time getting this to work. In the beginning, we could not figure out how to get the permission to use the API at all. After this, it was a matter of integrating the components of the project into the API coding. We had to integrate the use of buttons, LEDs, the whistle sound, and code the interface in Processing to look nice. The most interesting part about using the Twitter API was that we would place any keyword we wanted into the code, and it would find the most recent tweet that has to do with that key word. This means that this project could be tweaked in many ways to serve more specific projects. We actually thought about focusing our entire project on climate, but we decided to keep the key word as news in order to generate more tweets. This was the most interactive project that I have made because of the programs ability to search for a keyword and then find the most recent tweet. It aligns perfectly with my definition of interaction, two parties able to receive information, think about it, and then respond. Overall, the coding proved to be the most difficult part of this project, but it reaped very cool result when we figured out how it worked. 

Physical Project- 

We were originally going to create the physical box by laser cutting a box, but the map that we used was far too large to cut a box. From this, we decided to use cardboard, but this meant that our original plan of our project being something that you can step on would not work. This proved to be a better option because the project would last longer through testing and presenting. After adding supports to the bottom, the project was very sturdy. The only thing that was a problem was integrating the buttons and LEDs. A lot of hot glue was necessary.

Fabrication- 

Our original fabrication plan was to print a compass and have it spin with a servo motor. We had the compass printed, but then we came back to find it after we had finished the rest of the project and it was no where to be found. In a mild state of panic, we decided to use the old printed parts from our midterm project to create another compass. While we were disappointed to have lost the original compass, our makeshift did the job. 

User Testing

Our physical project did not change very much from user testing. The buttons for Australia and the world did not work, so we had to fix that. The main change came in the interface that the viewer saw in Processing. We originally had the webcam working, and then the tweet would pop up next to the user’s face. The idea behind this was that we wanted to highlight the inclusivity of Twitter, that everyday people are able to voice their opinions. This was not received as well as we had hoped during user testing. We loved the feedback we received, and it defiantly moved our project to a higher level. We were suggested and decided to change the interface to resemble the physical map, and have the tweets pop up over the continent that the user pressed. This was to give the project more cohesion, and I think it paid off. 

Conclusions

I really enjoyed making this project. The interaction between the user and project was interesting because it took the the familiar idea of Twitter and put it into a new kind of interaction. Our final project received very good feedback, people were interested in continuing to interact with it because of the constant updates of information. My continuation of this project would be to make the physical display more like our original idea of having it be a carpet. I would like to continue to work with the Twitter API; to see what kind of projects can be made with it, and to see other ways we can spread news. 
Recitation 10: Workshops

Intro

This week we had workshops to help us with our projects. I chose the media manipulation workshop. In my project we are going to have images pop up by the press of a button so I did the same in my video recreation. The video I chose to recreate is the first section of the BTS dance “Fake Love”. They walk in a line to the left, so I had images move toward the left by the press of buttons. 

Here is the original video

Here it is in Processing

fake love but make it processing

From this workshop I was able to practice integrating images into the keyPressed() function. This will be important to my project, so it was very helpful. I hope to play with the code further so I can make it as efficient as possible. 

Processing Code

PImage photo1;
PImage photo2;
PImage photo3;
PImage photo4;
PImage photo5;
PImage photo6;
PImage photo7;

 void setup() {
size(1500,600);
  background(0);
  photo1 = loadImage("hi tae.jpg");
  photo2 = loadImage("yoongles.jpg");
  photo3 = loadImage("hobi.jpg");
  photo4 = loadImage("kook.jpg");
  photo5 = loadImage("jin.jpg");
  photo6 = loadImage("jim.jpg");
  photo7 = loadImage("joon.jpg");
}
void draw() {

if(keyPressed) {
  photo7.resize(200,200);
  photo6.resize(200,200);
  photo5.resize(200,200);
  photo4.resize(200,200);
  photo3.resize(200,200);
  photo2.resize(200,200);
  photo1.resize(200,200);
}
}
void keyPressed() {
 
  println(key);
    if (key == 'a' || key == 'A') {
   image(photo1, 1200, 300);
    }
  if (key == 'q' || key == 'Q') {
   image(photo2, 1000, 300);
  }  
  if (key == 'w' || key == 'W') {
    image(photo3, 800, 300);
  }  
  if (key == 'e' || key == 'E') {
    image(photo4, 600, 300);
  }
    if (key == 'r' || key == 'R') {
    image(photo5, 450, 300);
    }
      if (key == 't' || key == 'T') {
    image(photo6, 250, 300);
      }
        if (key == 'y' || key == 'Y') {
    image(photo7, 100, 300);
        }

}

Recitation 9: Media Controller

Intro

This purpose of this recitation was to further connect Processing and Arduino.  This time we used media as the bridge between them, in hopes that we can use this knowledge to help with our final projects. 

Processing Code

import processing.serial.*;

String myString = null;
Serial myPort;

int NUM_OF_VALUES = 3; /** YOU MUST CHANGE THIS ACCORDING TO YOUR PROJECT **/
int[] sensorValues; /** this array stores values from Arduino **/
PImage photo;

void setup() {
size(500, 500);
background(0);
setupSerial();
img = loadImage(“IMG_5849.JPG”)
rectMode(CENTER);
}

void draw() {
updateSerial();
printArray(sensorValues);

fill(sensorValue[0]);
rect(width/2, height/2, width/2, height/2);
 map(sensorValue[0], 0, 1023, 0, 255);
if (sensorValue[0]>= 0) {
tint(0, 0, 255, 150);
}

}

void setupSerial() {
printArray(Serial.list());
myPort = new Serial(this, Serial.list()[67], 9600);
myPort.clear();
myString = myPort.readStringUntil( 10 ); // 10 = ‘\n’ Linefeed in ASCII
myString = null;

sensorValues = new int[NUM_OF_VALUES];
}

void updateSerial() {
while (myPort.available() > 0) {
myString = myPort.readStringUntil( 10 ); // 10 = ‘\n’ Linefeed in ASCII
if (myString != null) {
String[] serialInArray = split(trim(myString), “,”);
if (serialInArray.length == NUM_OF_VALUES) {
for (int i=0; i<serialInArray.length; i++) {
sensorValues[i] = int(serialInArray[i]);
}
}
}
}
}

Recitation 8: Serial Communication

Intro

This week we were introduced to the ways that Processing and Arduino interact with each other.  From this recitation we saw how the two use serial communication with image and sound. 

Etch A Sketch

etch a sketch

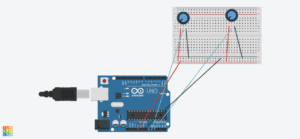
The interaction of this circuit comes from the potentiometers giving Processing an x and y location. One gives the x and the other gives the y, just like an etch a sketch. The interactivity from computer to human requires the user to turn the potentiometer for an image to be drawn. 

The Processing Code

import processing.serial.*;

String myString = null;
Serial myPort;


int NUM_OF_VALUES = 2;   /** YOU MUST CHANGE THIS ACCORDING TO YOUR PROJECT **/
int[] sensorValues;      /** this array stores values from Arduino **/
float psensorValue0;
float psensorValue1;


void setup() {
  size(500, 500);
  background(255);
  setupSerial();
}


void draw() {
  updateSerial();
  printArray(sensorValues);
   float x = map(sensorValues[0], 0, 1023, 0, width);
   float y = map(sensorValues[1], 0, 1023, 0, height);
  stroke(0);
  strokeWeight(2);
  line( psensorValue0, psensorValue1, x, y);
  psensorValue0 = x;
  psensorValue1= y;


  // use the values like this!
  // sensorValues[0] 

  // add your code

  //
}


void setupSerial() {
  printArray(Serial.list());
  myPort = new Serial(this, Serial.list()[ 73 ], 9600);
  // WARNING!
  // You will definitely get an error here.
  // Change the PORT_INDEX to 0 and try running it again.
  // And then, check the list of the ports,
  // find the port "/dev/cu.usbmodem----" or "/dev/tty.usbmodem----" 
  // and replace PORT_INDEX above with the index number of the port.

  myPort.clear();
  // Throw out the first reading,
  // in case we started reading in the middle of a string from the sender.
  myString = myPort.readStringUntil( 10 );  // 10 = '\n'  Linefeed in ASCII
  myString = null;

  sensorValues = new int[2];
}


void updateSerial() {
  while (myPort.available() > 0) {
    myString = myPort.readStringUntil( 10 ); // 10 = '\n'  Linefeed in ASCII
    if (myString != null) {
      String[] serialInArray = split(trim(myString), ",");
      if (serialInArray.length == NUM_OF_VALUES) {
        for (int i=0; i<serialInArray.length; i++) {
          sensorValues[i] = int(serialInArray[i]);
        }
      }
    }
  }
}

Code from Arduino

void setup() {
Serial.begin(9600);
}

void loop() {
int sensor1 = analogRead(A0);
int sensor2 = analogRead(A1);
Serial.print(sensor1);
Serial.print(“,”); 
Serial.print(sensor2);
Serial.println(); 

delay(100);
}

Musical Instrument 

Buzzer Buzzing

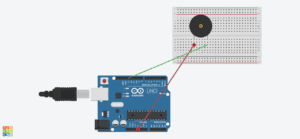
This exercise showed serial communication between Arduino and Processing through sound. The interactivity came when the mouse was pressed and moved around the screen. The sound reacted in response to this. 

Arduino Code

#define NUM_OF_VALUES 2

int tempValue = 0;
int valueIndex = 0;

int values[2];

void setup() {
Serial.begin(9600);
pinMode(13, OUTPUT);
pinMode(9, OUTPUT);
}

void loop() {
getSerialData();

if (values [1] == true) { //if mouse is pressed which is at position 1 (which is mouse press) then…
tone(13, values[0]); //at pin 11 play the mouse x values frequency
}
else {
noTone(13);
}
}

void getSerialData() {
if (Serial.available()) {
char c = Serial.read();

switch (c) {

tempValue = tempValue * 10 + c – ‘0’;
break;

values[valueIndex] = tempValue;

tempValue = 0;

valueIndex++;
break;

case ‘n’:

values[valueIndex] = tempValue;

tempValue = 0;
valueIndex = 0;
break;
/
for (int i = 0; i < NUM_OF_VALUES; i++) {
Serial.print(values[i]);
if (i < NUM_OF_VALUES – 1) {
Serial.print(‘,’);
}
else {
Serial.println();
}
}
break;
}
}
}

Processing Code

import processing.serial.*;

int NUM_OF_VALUES = 2;  

Serial myPort;
String myString;

int values[] = new int[NUM_OF_VALUES];

void setup() {
  size(500, 500);
  background(0);

  printArray(Serial.list());
  myPort = new Serial(this, Serial.list()[ 73 ], 9600);
 

  myPort.clear();
  
  myString = myPort.readStringUntil( 10 );  // 10 = '\n'  Linefeed in ASCII
  myString = null;
}


void draw() {
  background(0);
values [0]= mouseX;//frequency is changing based on moving the mouse around, sends to arduino
values [1]=int(mousePressed);// turn true or false (boolean) into an integer that can be sent 

  
  sendSerialData();

    echoSerialData(200);
}

void sendSerialData() {
  String data = "";
  for (int i=0; i<values.length; i++) {
    data += values[i];
   
    if (i < values.length-1) {
      data += ","; // add splitter character "," between each values element
    } 
   
    else {
      data += "n"; // add the end of data character "n"
    }
  }
  //write to Arduino
  myPort.write(data);
}


void echoSerialData(int frequency) {
  
  if (frameCount % frequency == 0) myPort.write('e');

  String incomingBytes = "";
  while (myPort.available() > 0) {
   
    incomingBytes += char(myPort.read());
  }
 
  print( incomingBytes );
}

Project Essay

“Step Into the Newsroom”

The aim of this project is to promote the knowledge of current events in schools. My inspiration for this project came from a family member telling me that they do not often discuss current events in school. From this, I was inspired to create a project that would make learning current events simple, but reliable for children in school. This is where the idea to make an interactive carpet came about. In “A Brief Rant on the Future of Interactive Design”, Bret Victor highlights the the importance of keeping tactile interactions alive in the technology age. Creating a project where students have to step on certain parts to hear the news, despite being able to Google it, allows for a more dynamic interaction. 

I hope to create a sense of fun with this project as well. From the act of stepping on the carpet, I want to create a more fun experience that just reading the news on your phone. The look of the carpet will be a world map with large button over each continent and largely populated country. This makes is so the user can easily choose where they would like to hear news from around the world. When the button is pressed, an LED will light up, and then on the laptop screen a tweet that includes the name of the country will randomly be found. Because this project is intended to be in schools, we will have to take precautionary steps to make sure that the tweets are appropriate. By Nov 25-26, my partner and I have to create the carpet itself and begin figuring out how to generate tweets in our code. After the carpet is done and looks like a world map, we can create the buttons for the user to press and attach them to the carpet. This should be done by Dec 2. The code should be finished in time with the carpet. This leaves us with just over a week to add the finishing touches. I would like to see if it is possible to have the tweets read out, but this is what the extra time is left for. 

As I said above, my major inspiration for this project was my family members lack of current events in school. I was loosely inspired by another project as well. This project was “Moon” by Ai Weiwei and Olafur Eliasson. Their vision was to create a space where people from all around the world impact how users interact with the project. I wanted the same, but I am doing it with tweets. Using tweets aligns with my definition of interaction perfectly. The project will have to “read, think, and speak” in order to display relevant tweets. It will read which button has been pressed, locate a tweet that has to do with the selection region, and display it on the screen. I think my project has significance in that it is an educational tool. It is intended for the use of students in school, but it could be simplified or advanced to fit different audiences. For example, instead of reading tweets, elementary schoolers could press the buttons and the carpet would read the name of each country. This project could be easily built upon to teach different things, but the overarching meaning is that it educates.