Recitation 7: Processing Animation – Dominick Nardone

During this week’s recitation, I learned a lot about how modulation makes just about everything much easier in processing. For my in class exercise, I created a bouncing rectangle that grows or shrinks depending on where it is on the screen. I also gave users the ability to randomly teleport it to somewhere else on the screen. Coding the teleportation was a little difficult at first, because the rectangle would constantly just teleport ten times all over the screen from a single button click. To fix this, Tristan told me to check out the keyReleased function, which was super helpful. 

Code (Sorry for some reason my snipping tool is not working):

float speedX,speedY;
float x,y;
float size = 20;
void setup() {
size(600,600);

speedX = random(15);
speedY = random(15);
}

void draw() {
background(0);
rectMode(RADIUS);
rect(x, y, size, size);
x += speedX;
y += speedY;
RectBounce();
RectSize();
}

void RectBounce() {

if ((x > width) || (x < 0)) {
speedX *= -1;
RectColour();
}
if ((y > height) || (y < 0)) {
speedY *= -1;
RectColour();
}
}

void RectColour() {
rect(x, y, size, size);
fill(random(50,255),random(50,255),random(50,255));
}
void keyPressed(){
TeleportRect();
}
void TeleportRect() {
if (key == ‘t’) {
x = random(width);
y = random(height);
speedX = random(5,15);
speedY = random(5,15);
rect(x, y, size, size);
}
}
void RectSize() {
if ((x < width/2) || (y < height/2)) {
size–;
}
if ((x > width/2) || (y > height/2)) {
size++;
}
}

Video:

Homework:

I had a lot of problems with figuring out the coloring for the homework for this recitation. I couldn’t get the colors to smoothly transition no matter what I did. I thought that you could apply separate delays with modulation, but it turns out that it putting a delay anywhere effects the frame rate of he program. 

code:

boolean Shrinking;
int x = 300;

void setup() {
size(600, 600);
smooth(2);
background(255);
ellipseMode(CENTER);
frameRate(120);
}

void draw() {
background(255);
ellipse(mouseX, mouseY, x, x);
Color();
if (Shrinking) {
x–;

}

if (!Shrinking) {
x++;
}
if (x < 100) {
Shrinking = !Shrinking;
}
if (x > 300) {
Shrinking = true;
}
}
void Color() {
strokeWeight(20);
colorMode(RGB);
stroke(random(255),random(255),random(255));
}

video:
Recitation 6: Processing Basics – Dominick Nardone

Credit: link

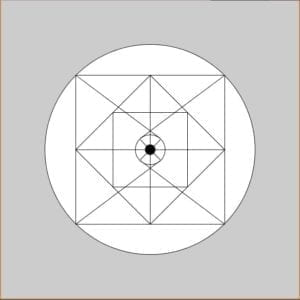
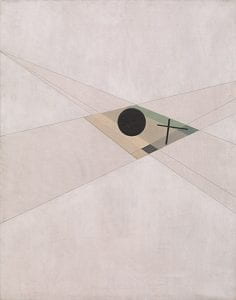
I chose this image because I really like how it is a collection of lines based around one focal point, a black shaded ellipse. Although, there a few things that I do not like about it, the shading and the lack of symmetry, which I incorporate in my drawing. I wanted to take this idea though, of a focal point and the cross, and make it symmetrical and simplistic. To achieve this, I created an ellipse in the center of my canvas, and began to work away at creating lines that reflect symmetry. I was able to utilize my understanding of the grid in processing to make this relatively easy, although it took a lot of time. Although my motivation’s art has a perspective to it, while mine is more of a bird-eye view, I find them similar in very subtle ways and different in various ways. I think drawing in processing is a good means of producing my design. I am very incapable of producing anything with a pen or pencil, especially a straight line that is the exact length as other lines. 

coding:

size(600,600);
ellipse(300,300,423,423);
rectMode(CENTER);
rect(300,300,300,300);
ellipseMode(RADIUS);
fill(255);
ellipse(300,300,30,30);
ellipseMode(CENTER);
fill(0);
ellipse(300,300,20,20);

line(300,300,280,280); //lines within the circle
line(300,300,320,320);
line(300,300,280,320);
line(300,300,320,280);

line(320,277,150,150); //lines within the rectangle,outside the circle
line(280,322,450,450);
line(320,322,150,450);
line(280,277,450,150);

line(300,300,300,150); //lines going from center dot to border of rectangle
line(300,300,150,300);
line(300,300,300,450);
line(300,300,450,300);

line(150,300,300,450); //diamond within the rectangle, outside of the circle
line(150,300,300,150);
line(300,150,450,300);
line(450,300,300,450);

line(225,225,225,375); //smallest square
line(225,225,375,225);
line(375,225,375,375);
line(375,375,225,375);

Production:

Locker Buddy Alarm System – Dominick Nardone – Professor Rudi

My research into Alias for the group project definitely inspired my for the Locker Buddy Alarm System. Alias, a parasitic system that alters the interaction between users and their smart devices by making it so the device is incapable of listening in on it’s users when not prompted led me to change my definition of interaction to include having a meaningful impact on at least one of the actors. In the case of Alias, it allowed smart device users to feel more comfortable in their own homes, without fear that their smart devices are listening to what they’re saying at all times and take advantage of that information. The meaningful impact it had on these users is massive, users were absolutely amazed, and also impressed by the side-effect of the parasitic device, it wouldn’t think you were talking to it and activate when having a conversation with another person. This led me to think of a device that would have a meaningful impact on students here at NYUSH. What immediately came to my mind was the great locker thief of 2015-16 that discouraged students from being comfortable using their lockers. Even with a locker with a lock, there was never a guarantee that your stuff would still be in your locker when you got out of class. In order to make students comfortable once again, I came up with the Locker Buddy Alarm System. To begin, I had to think what the best way to go about this would be. With some experience with Infrared Sensors from the Sensors Recitation, I decided to stick with that. After doing some digging, I came across this project that made an alarm with IR sensors. To add on and make a better alarm for the system, I found the code for a siren sound here. I had to do some adjusting to the code, as the original project used two IR sensors and triggered whenever the values were not the same, and I used one sensor that triggered whenever the value was larger than the distance of the locker door being closed. 

There were several routes I could have taken for how the user would interact with the device to deactivate it, yet, due to time restraints, I went with a hidden button. During user testing, I was having massive problems with buzzer, as the siren code was broken, the Arduino was struggling to relay the deactivation code from the button to the alarm. On top of that, I did not have the fabrication done at this point, so it was just students interacting with a wired mess and too much was left to imagination. Ideally, I would have like to use a fake book, to help it blend in with the nature of a locker at a school. this would make it significantly harder for a thief to be able to find and destroy the alarm system. Another, more secure option, would be to use a metal that was painted the same color as its intended locker of residence. 

During the production phase, I knew I needed the wiring for the button to be fairly long, this would give users the ability to easily, and discretely, hide the button anywhere within their locker. I also wanted the other components, the buzzer and IR sensor, to be connected with short wires, in order to make the encasing small enough to not take up too much space in the locker. Due to the coding problems, after user testing, I met with Tristan for close to an hour, working together to debug my code and ensure that the deactivation code would allow for the button to communicate properly with the buzzer. Also, a great tip I received was to change it so the alarm did not go off immediately after opening the locker, which resulted in my adding a delay to the IR sensor’s communication with the buzzer. 

My goal was to make students feel more secure about the goods within their locker. I believe I did that to an extent, but the deactivation process (the hidden button) was a simple process that could found with some effort. If I had more time, there are so many ways I could improve my Locker Buddy Alarm System. To begin, I would have fabricated a proper encasing for the device. I would also make a more complex deactivation system, such as using multiple buttons and requiring them to be pushed in a certain order in order to deactivate the alarm system. A great idea that was given during my presentation was that I could add a camera and have it take a picture every time someone opens the locker (similar to many android phones that use facial recognition when unlocking the phone). I could also set up the system to send a message to Public Safety and notify them that a locker has an intruder. The biggest thing I learned is to be more creative with my thinking. I tend to be a very straight forward thinker, and I am not very creative, which results in fairly straight forward projects. Also, I should give more time for developing my projects. 

Group Research Project – Dominick Nardone

To me, interaction is an act of communication that allows for the transfer of meaningful information between two things. For example, Alias , acts as a middleman that streamlines communication between users and smart devices. This allows the interaction between the user and the device more efficient, only listening to meaningful or useful information, and preventing the device from listening to users when not intended. On the other hand, South Korea’s Greeting Bots, are not interactive in my opinion. As I do not find greetings to be meaningful information. Rather, the ‘interaction’ that users get from these bots are merely a for-show action that provides little to no useful or meaningful information to the user. 

After the group project, the only change that I would make from my previous definition of interaction is that it doesn’t necessarily have to be a meaningful transfer of information, but it can also be an interaction between two things that has an effect on the user. This better fits with my understanding of the Alias, as it may make the users feel more comfortable in their own home, without fear that their smart devices are listening to what they are saying at all times. Applying this new definition, the South Korea bots can align better with my definition, as there are several videos of young children also greeting the robots back, signifying that the robots had an effect on them that was enough for the children to justify a greeting back. 

The idea that we really focused on during our group project, was to have a meaningful impact on someones life. At first we just wanted to make a device that 3D prints footwear with no purpose in mind. Then, we sat down and thought of all the people who could benefit off this device. This quickly brought us to developing it with fashionistas in mind, but to the point where it could benefit those with less. Folks experiencing homelessness could benefit significantly from this device. Older folks with back problems could benefit by have a shoe fitted with the proper arch support. This fits both of my definitions for interaction, as the device would receive meaningful information on the shape of the user’s foot and be capable of printing a shoe that works best for their foot and it could have a meaningful impact on the user. 

This is comparable to how the Alias can make users feel more comfortable at home, but the impact is even more meaningful. People spend so much time on their feet, and have proper arch support can have a significant impact on everything from posture, muscles, to sleep. Combating these things has a massive effect on improving an individual’s quality of life. 

Final Project Essay – Dominick Nardone

Space Invaders: Hand Edition

 The topic that I really wanted to work towards was providing methods for improving the user’s visuomotor control, aka hand-eye coordination. In the last five years, there have been several studies on the effectiveness of video games improving users’ visuomotor control and reactivity. Yet, there is still a significant gap in the industry that lacks support for gamers  with physical disabilities. Although there are several organizations working towards adaptive controllers, Warfighter Engaged, the AbleGamers Charity, and SpecialEffect, the accessibility to these controllers is still relatively low. Through the use of Infrared Sensors, I’d like to provide a button free controller that works with a few games to help improve the visuomotor control of young gamers with physical disabilities.

In order to do this, I first had to acknowledge the current conditions for video games improving visuomotor control. Typically, this is achieved with a standard micro-controller, an Xbox or PlayStation controller, or a mouse and keyboard combination. In the last five years, there have been several studies that prove that playing video games improve users visuomotor skills and reactivity. As said previously, I’d like to create a couple games that work through the use of infrared sensors to provide a fun and interactive way for young gamers with physical disabilities to improve their visuomotor skills, reactivity, and to have fun. In order to do this, I will first have to develop an infrared sensor component that will act as the controller. Following this, I would like to create at least two games that utilize the Infrared sensors to allow users to easily interact with the games. To really involve interactivity, the games and the position of the Infrared sensors will be setup to have the in-game character move in tandem with the user’s hand, as if their hand is the character. Although not to the extent of intended audience for these games, a friend recently fractured their wrist, rendering him incapable of using the standard gaming controllers comfortably. Due to this tragic convenience, he will be the mechanism used to provide feedback for player testing. I believe he will be able to provide information on usability of the games, as well as allowing me to better understand and empathize with my intended audience.

My plan for attacking this project is to first come up with two games that utilize hand movement in two different ways. After developing the ideas, I want to begin designing the games in processing to make it aesthetically pleasing for the user and reflect some form of achievement and to ensure the games are fun to play. Once this is done, I will begin user testing with my friend mentioned above to see if there is anything that needs changed and make those changes. In order to make sure that I have a better understanding, I will complete the first game within a week and do my user testing on that before developing the idea for the second game.

While doing my preparatory research, I knew I wanted to create a videogame and did some research on the positive impacts that video games have. Originally, I just wanted to create a fun video game that was designed for a specific audience. But then, I came across a NYTimes article on adaptive controllers for gamers with physical disabilities and completely changed my idea to better accommodate young gamers with physical disabilities. My thought process that followed was that although gamers with physical disabilities had access to these adaptive controllers, they may not have the developed visuomotor skills to make these games usable and fun. No one enjoys a game that they don’t have the reactivity or skills to play, causing them to just die. It is frustrating and off-putting. Having a basis at a younger age, that lacks the complications of buttons, can give young gamers the confidence and visuomotor skills to eventually progress to these adaptive controllers for more complicated games. My idea of interaction is a little more radical than most, I define interaction as a form of communication that provides information and a feedback mechanism of useful information. In terms of my final project, the hand acting as the in-game character makes the user physically feel as a part of the game. After my project is completed, I think it could potentially act as a basis for one of the organizations above to create a further developed platform for young gamers with physical disabilities.