Connor S. – Final Project Essay

“Soccer Skills Assister”

Physical interaction has seemed to have taken the gaming world by storm — systems like the Nintendo Wii and Xbox Kinect became massively popular upon their release, and demonstrate how marketable physically interactive systems can be. I really enjoy the idea of taking an experience or activity that would normally require a large amount of space, and shrink it down into something much more accessible, and equally stimulating. I was initially inspired by the soccer free kick simulator I referenced in a previous post as it played into my love of soccer, and sparked my interest in the concept of creating small-scale versions of things that require more space. My project follows a similar trajectory, which incorporates my love of playing soccer with the idea that people can have fun learning and playing the sport without leaving their home, and let alone going to a soccer field. The “Soccer Skills Assister” would give people the opportunity to learn soccer skills to better themselves as players, or get a bit of fun out of an exercise that may operate differently than pretty much anything else on the market right now. 

My plan for the project is essentially to first recreate the game Dance Dance Revolution using Arduino and Processing, and transposing it to be soccer related. My idea would of course include a soccer ball, and four cardboard sensor pads around the ball to the upper right, upper left, lower right, and lower left of the ball. After selecting the skill move the user wishes to learn from a menu on a computer in front of them, a video of someone doing the move appears on the screen, and replays as many times as the user needs to understand how the move is performed. When the user is ready, a countdown timer starts on the screen, prompting the user to get ready to attempt the move. When the countdown reaches zero, the pads on the ground will light up, directing the user to step on them in the same sequence they saw in the video on the screen. My idea is after a certain skill move is selected from the menu, the speed at which the user has to perform the move increases each time, until the fastest viable speed to perform the move is reached. The first round will be fairly slow, to allow essentially any able-bodied person to get  the basics of it, regardless of skill level. By the third or fourth round, the speed will have increased significantly, leaving only skilled players, or people who played the game a lot, a chance of succeeding. I plan on spending a substantial chunk of the next two weeks making sure my sensor pads work properly, because if people are unable to step on them or the sensors are not sensitive enough, then I think the whole thing is a total loss. Once I make sure the sensors are working properly for the project’s intended purpose, I will write the code for the game itself, creating the menu, making sure the pads light up correctly depending on the chosen skill, etc. 

The research I have done so far in relation to this project has essentially been limited to my admiration for games like Dance Dance Revolution in that they take the activity of learning how to dance and make it both easily accessible and fun. I thought a lot about my definition of interaction when drafting the idea for my final project, and concluded that out of the ideas I brainstormed, this one would be the most interactive. I personally think a soccer ball sitting on the ground would be reason enough for someone to approach my project, just out of curiosity. When the potential user approaches the project, my goal is to get them to say: “Hey, let me see if I can move my feet quickly like a pro soccer star” rather than “Eh it’s just a sports game and I don’t even like soccer, I’m not interested.” I think what makes my project particularly unique/significant is the fact that it can attract both people with an interest in soccer/athletics, as well as those without a strong interest in sports, but who are nonetheless somewhat interested in the idea of a quickness game where they can get some exercise and have fun. I’d say this project is also significant in that it can be made into both a casual, arcade style game, and a more serious soccer drill for players to develop their skills. If I were to continue improving upon this idea, I would probably make two versions of it: A casual, arcade soccer skills game, and a serious tool for coaches to buy for their players to use at practice.           
Connor Schone Interaction Lab Midterm Project Documentation

Context and Significance

Going into the midterm project, my work with my previous group inspired me to want to work with lights and buttons. To elaborate, while our work on the initial group project produced something interesting and potentially usable concept  in the year 2119, I was excited to take the general concept further by creating something truly interactive with the help of a relatively simple and easy to comprehend interface for those who experience it. Our midterm project followed the definition for interaction I layed out previously in that it involved a back and forth exchange between the user and the product. One thing I wish we added before the final presentation was some sort of instruction explaining how the game functions, maybe in the form of text, or flashing the LEDs in a certain pattern to prompt the user to perform the intended actions. We came to understand by the end of the process that not everyone would be familiar with the game “Simon,” so was encountered some trouble as people began to press buttons without first learning what the objective was. The way we designed the game generally fit the model of others like it, except we made it larger so as to make it more presentable to a larger audience. 

Conception and Design

Aside from our mistake in not including an effective prompting mechanism, we decided to make the project fairly simple, so as to not add any additional confusion in operating the game. We were considering adding different interactive elements like vibration sensors, or something to do with the user stepping on a sensor on the ground, but decided on a more simplistic approach for the sake of easier usability. For the same reason, we chose a design that would not clutter the space, or make it difficult for the user to intuitively understand what to do, or at least what would or would not be an option to engage with. 

Fabrication and Production

After implementing our initial code for the game, we had a fair amount of tinkering to do. For example, we decided to extend the allotted wait time between button presses so as to not catch the user off guard, especially if they had just begun a new game for the first time. After user testing, we noticed those unfamiliar with the game’s concept would start pressing buttons during the somewhat drawn out intro of all three LEDs flashing simultaneously 5 times. For this reason, we chose to cut the number of times they flashed to three, and reducing the wait time between flashes. We learned that this decision worked to grab the user’s attention without necessarily prompting them to start pushing buttons before the game actually began. 

Conclusions 

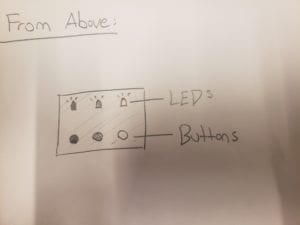
The main goal of our project was to create an interactive experience that would not alienate the user. While one may not know how to play the game “Simon” initially, we wanted to ensure that there would be little to no confusion about what in the project the user could, and could not engage with. By creating a large, plainly decorated box with three buttons, each parallel to corresponding LED lights, we noticed that. despite in some cases users’ initial difficulty understanding the goal of the game, people were rarely, if ever, confused by how to go about operating the device on a base level. As stated previously, despite the simple and easy to understand layout of the device, additional planning was necessary to effectively prompt the user to engage with the product as it was intended; in instances where the user did not understand the premise of the game itself, the intended usability collapsed to an extent. 

Key takeaways from this project included: 

  • Prompting is a key aspect of a successful interactive experience. Even though our interface was presented without too many distractions and clean, users often had difficulty understanding the parameters of the game itself. 
  • Without proper directions and/or an obvious and clear prompting mechanism, people will use their own discretion in engaging with the project. For example, we decided to shorten the time of the simultaneously blinking LEDs because users would spring to mash buttons expecting some result, and will not wait for the project if they see no clear reason to do so. 

Connor Schone – Interaction Lab Individual Reflection

Interactivity, as I came to understand the term so far in the course, is a process by which a prompt from one singular entity invites one or multiple separate actors to alter their behavior in some way, after which an ensuing reaction from the initial “prompter” generates another response, beginning a self-sustained series of actions and reactions. For an interaction to occur, all parties involved must be aware of/alert to their respective counterparts’ behavior (or lack thereof) to determine whether to engage in some behavioral adjustment. 

I arrived at this definition primarily from a combination of The Art of Interactive Design by Chris Crawford, as well as my own observations and line of reasoning from class discussions. I think Crawford’s mention of thinking, listening, and speaking in discussing interactivity influenced the main body of my definition. I also the need to add the condition of there being some prompt in my own definition of interactivity. An interaction can not occur without an initial catalyst that works to establish communication. For example, if the remote used to operate a toy car worked, but didn’t have clearly marked buttons or appear to be associated with the car in any way, then I would hesitate to call it interactive. In this case, someone (ie. an external actor) would have to approach you to tell you how the remote works before you could use it, changing the nature of the interaction to be non self-contained; the remote control car is in itself not interactive.     

In one of the slides from our first class meeting, a definition of interaction appears next to a .gif of a child bowing back to a bowing robot. The bowing robot might meet my conditions for interactivity depending on its specific qualities, specifically whether it is responding directly to the little girl’s actions. The robot prompts the girl to approach it by exhibiting recognizably human traits. My definition of interaction, however, presupposes a degree of reciprocity from both actors, which means the robot must have been able to identify the girl as having approached it, and respond as a result. 

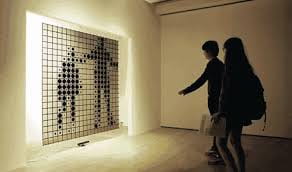
The second possible examples of interactivity I looked at were various art installations that involved moving or changing components that responded to the viewer’s motions. The installation below fits my first criteria in that by being framed against a wall facing open space, the piece prompts the viewer to approach it. The piece then responds to the people’s behavior (in this case their movements), and adjusts accordingly. This installation meets all my subsequent conditions for interactivity in that each movement by the viewer produces a reaction, and achieves an ongoing exchange between the different actors. 

Our project, “The Heal-O-Matic 5000” was predicated on the idea that by 2119, technology will have progressed to the point were people will be able to obtain an accurate diagnosis of any ailments quickly and on the spot from a machine. The title and accompanying graphics on the front of the machine prompt the user to place their hand on its surface where the outline of the hand is shown. The machine would then respond to the action by the user by identifying the persons problem and dispense the appropriate prescription.  

Displaying mmexport1570638881122.jpg

Connor Schone – Interaction Lab Documentation #3

In the third lab, we had access to different types of sensors, which we used to better understand different possibilities of things to make with the arduinos, as well as how different types of sensors could function and be implemented in our daily lives. 

The first sensor we worked with was a vibration sensor and without any additions, which did not work very well. The circuit and code were fairly simple. But when we ran the code and started moving and tapping the sensor, there was no response from either the arduino LED or the computer monitor. We asked Eric to help us, and he told us to grab a different sensor. We used the second sensor with more success, but the readings it gave us were extremely variable. Eric then changed the ordering of the wires and resistor on our breadboard, which fixed the problem for the most part. 

Attempt 1:

Displaying 20190922_141615.jpg

Final circuit:

Displaying 20190922_141610.jpg

The second sensor we used was a joystick, which used a lot of cables. We were able to figure out where the 9 cables connecting to the joystick were supposed to go on the breadboard and arduino, but the process was long. 

Question 1:

In theory, a vibration sensor could be used to detect earthquake intensity, and maybe even predict future earthquakes by slight disturbances in the ground. 

Question 2:

Like a recipe from a cookbook, code uses its own language and format to convey to the reader (in the case of code, the computer) exactly what it needs to do to achieve the intended result.

Question 3:

Computers and interactivity impact daily life in many ways. For instance, when typing chinese characters on a computer, the computer reads the input as pinyin and has an algorithm where it predicts the intended sentence or phrase and converts it to characters. 

Connor Schone – Interaction Lab Documentation #2

In the second Interaction Lab workshop, we were able to successfully complete the following circuits: 

  1. Fading Light – A circuit using an arduino connected to a breadboard with an LED light and a single resistor via two wires. The circuit was relatively straightforward to build, and after plugging in the code from the website it worked  perfectly.  

Displaying 20190920_141316.jpg

  1. Button Pushing + Game – A circuit using an arduino connected to a breadboard with a speaker, two LEDs, multiple resistors, and over a dozen wires. On our first attempt, we had some trouble connecting the many wires correctly to the breadboard, and ended up having to start over. On our second try, we were much more systematic with planning the positioning of the wires on the breadboard, and ended with a successful game. 

Displaying 20190920_150140.jpg

Displaying 20190920_150038.jpg

Question 1:

In everyday life, technology like fading lights is everywhere, but often unnoticeable due to how pervasive and simple they are. These instances of technology can be both non-interactive and interactive. For instance, lights on top of buildings to prevent planes and helicopters from crashing into them, or lights with sensors on them lining the edge of runways to prevent planes from crashing into them.  

Question 2: 

Resistors reduce the number of volts passing through the circuit, and in the case of the push button, a 10k resistor was necessary. 

Question 3:

I would use most of them to line the sides of roads around the city along with sensors on the road itself so lights will illuminate the road as a car approaches. With the remaining LEDs, I would illuminate the bottom of a moped or car to make it glow in a cool way.