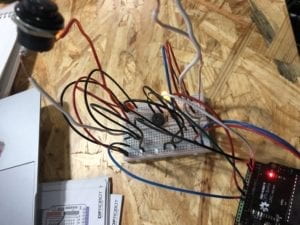
CONSUMING LIFE- Christina Bowllan- Inmi Lee 

CONTEXT AND SIGNIFICANCE 

In the previous group project, we created a device that would help people learn how to dance by mimicking the teacher’s motion. The conclusion I had drawn about interaction from this project is, yes, interaction is on the surface “a cyclic process in which two actors listen, think and speak (Crawford 3)” , but within this class, we should aim to create meaningful interactions. Meaningful interactions to me means that the user is somehow learning from the interaction or is benefitting from it. One great example of this is a device called Nail O which allows you to move the computer screen up and down while scrolling along the device. This project fit all parts of my definition because not only is the user interacting with the device, but it serves a purpose which is to help people while cooking. Thus, when Izzy and I created our midterm project, the Nail O served as inspiration because I wanted our project to have an impactful effect as well. In addition, while we were researching, we looked at various whack-a-mole and memory games to get ideas of how to physically build our idea and incorporate an interactive button. 

Izzy and I for the midterm project created an interactive art piece that informed users of peoples’ dependence on consuming. We realized that a lot of our friends are obsessed with having the latest brand items and buying more than they need at stores, so we wanted to call our generation’s attention to this modern dilemma. Within the next sections, you will read about the challenges we faced and how our ideas evolved into the final project. 

CONCEPTION AND DESIGN:
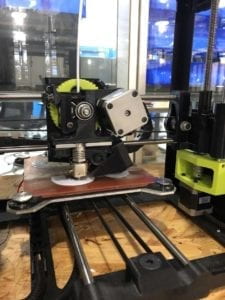
While designing the project, we went  back and forth of the best way to do it. We realized from Tigoe’s reading that the interactive device should be self-explanatory, so we tried to model our idea after this. Firstly, we decided to build a realistic model of a human because we thought that the users looking at it would realize that this a phenomenon related to people. In order to build the model, we used the 3d printer to create a human heart which would have a hole for the button; This later on would be placed inside of a toy box to signal that our hearts are the “product” of consumption.
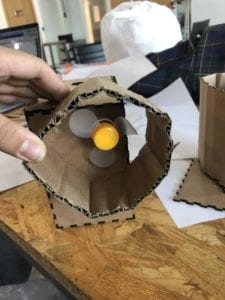
The next, and hardest part, was to craft the lungs. We used trash bags to represent lung sacs and then placed little fans inside of them in order inflate and deflate the lungs. Trash bags were a great conceptual choice because they signaled to the users that, at our core, we are becoming the consumer culture, but the material itself was really difficult to work with. We spent hours constructing a way for the fans to not touch the plastic bags when they would deflate and we ended up putting cardboard around the fans to avoid this problem.
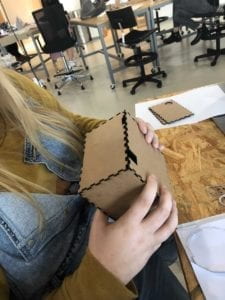
Then, we created a box using the laser cutter to hold the arduino board and the various jumper cables. The box material itself was great to work with, but we had to adjust the online sketch many times in order to make the “puzzle piece” ridges work.
Finally, when we constructed the whole art piece, we hung the heart and lungs side by side from a hanger because the hanger looks like human shoulders and we hid the arduino box behind the other pieces. We also decided to make this a hanging art piece because we wanted the users to be at eye level with the problem. And, hanging from the box with the heart, we had a hidden button disguised in a price tag, so when the user would check the price, the lungs would start to inflate and deflate.   
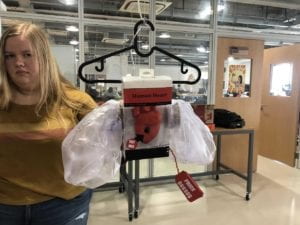
(Pardon Izzy in this photo)

  • FABRICATION AND PRODUCTION:

In the previous section, that is a description of what the project physically looked like in the end but before user testing, our project had a different meaning and construction. Our first idea was to create a human body, but the trash bag lungs were supposed to represent environmental issues and how we use too much plastic. 
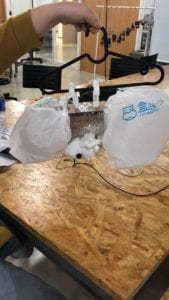
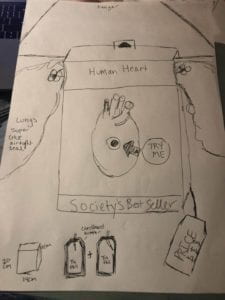
During user testing, however, we realized that the students and teachers did not understand this meaning because we had not decorated enough. We afterwards could have continued to strengthen the environmental idea, but we decided to create a model around consumption because we had some interesting conversations about this with the teachers. So, from this step, Izzy focused primarily on changing the code, and I focused mostly on the design. In terms of the code, we added and changed a few different things. First, we changed the direction of the fans to make it look like the lungs were inflating and deflating. Before user testing, the lungs would continuously blow up, but we heard from the users that it did not look realistic. We also added a button in the heart, and when people touched it the LED lights would turn on which provided a fun toy box effect. The biggest coding adjustment we made was we changed the sensor of the button connected to the lungs and disguised it in a price tag so the interaction had a greater meaning. The idea behind this interaction is, if the users care enough to touch the price tag to check the cost, then they are willing to buy it, and the act of wanting to buy everything consumes our life. Thus, the lungs would start to inflate showing we are embodying this lifestyle. In addition to this, in order to convey the same meaning, we put the heart inside of a box to show that we are being taken over by shopping culture. 
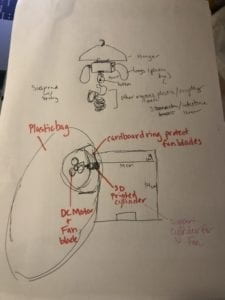
sketch phase 2. entire organ system on hanger

  • CONCLUSIONS:

My goal for this project was to create an interactive art piece that also possessed a greater meaning. Our final project in a lot of ways did align with my definition; We had two different types of buttons that users could interact with and it was self-explanatory how to use them. In terms of the greater meaning, we definitely had that, but the users did not understand this from the first usage. While people were interacting with it, the atmosphere was quiet which created the thought-provoking environment we wanted, but the users did not realize that the overall meaning was related to consumption. If we had more time, I think adding more body parts could help people reach the conclusion faster because they would realize that the meaning had something to do with humans. Also, maybe this would hint at our idea too much, but I think adding a poem about peoples’ obsession with consumption or something related to this topic might give a better sense of our overall meaning.

The biggest lesson I have taken away from this project is definitely patience– all great things come with time, right? While I was constructing the lungs, it took hours to make it so that the cardboard would not touch fans and then ultimately not touch the plastic bags. It was beyond frustrating at times because I would be so close to making it work, and then something would go wrong. Also, I learned from this project that accepting help and feedback is what makes the project better. I am so used to thinking that doing everything by myself is the best way to do it, but hearing everyones’ feedback during the user testing is how we learned how to fix our mistakes. 

Overall, my generation’s obsession with shopping and consuming is extremely  problematic. It seems like the more we shop and care about having the latest IPhones makes our conversations and friendships shallow because we are only concerned with superficial things. If we want to preserve authentic connections, people should be aware that when our mind and heart are consumed by the act of consumption, that is all we can handle. 

Arduino Code

int motor1pin = 6; 
int motor2pin = 7; 
// h bridge pin
int ButtonState = false;
int ButtonState2 = false;
int Button = 2;
int Button2= 4;
int red1= 8;
int red2= 9;
int red3= 10;
boolean toggle = true;
void setup() {
 
  pinMode(motor1pin, OUTPUT);
  pinMode (motor2pin, OUTPUT);
    pinMode(red1, OUTPUT);
  pinMode(red2, OUTPUT);
  pinMode(red3, OUTPUT);
 
  pinMode(Button, INPUT_PULLUP);
   pinMode(Button2, INPUT_PULLUP);
  
}
 
void loop() {
 
  int ButtonState = digitalRead(Button); 
  if (ButtonState == LOW)
  {
    if(toggle)
    { 
      digitalWrite(motor1pin, HIGH); // motor turns on
      digitalWrite(motor2pin, LOW);
       delay (4000);
      digitalWrite(motor1pin, LOW); // motor turns on
      digitalWrite(motor2pin, LOW);
      delay (100);
     digitalWrite(motor1pin, LOW);
      digitalWrite(motor2pin, HIGH);  
     delay (3000);
      digitalWrite(motor1pin, HIGH);
      digitalWrite(motor2pin, LOW);// motor and Redled turn off after 3 seconds after blinking finishes
     delay (4000);
      toggle = !toggle;
      digitalWrite(motor1pin, LOW); // motor turns on
      digitalWrite(motor2pin, LOW);
      delay (100);
     digitalWrite(motor1pin, LOW);
      digitalWrite(motor2pin, HIGH);  
      delay (3000);
      digitalWrite(motor1pin, HIGH);
      digitalWrite(motor2pin, LOW);// motor and Redled turn off after 3 seconds after blinking finishes
   
      delay (4000);
      digitalWrite(motor1pin, LOW); // motor turns on
      digitalWrite(motor2pin, LOW);
      delay (100);
     digitalWrite(motor1pin, LOW);
      digitalWrite(motor2pin, HIGH);  
      delay (3000);
      digitalWrite(motor1pin, HIGH);
      digitalWrite(motor2pin, LOW);// motor and Redled turn off after 3 seconds after blinking finishes
 
      delay (4000);
      digitalWrite(motor1pin, LOW); // motor turns on
      digitalWrite(motor2pin, LOW);
       delay (3000);
       digitalWrite(motor1pin, LOW); 
      digitalWrite(motor2pin, HIGH);
    // motor and Redled turn off after 3 seconds after blinking finishes
      delay (4000);
       digitalWrite(motor1pin, LOW);
      digitalWrite(motor2pin, LOW);
      delay (13000);
    }
    else
    {
      digitalWrite(motor1pin, LOW); 
      digitalWrite(motor2pin, LOW);/// motor turns off 
      toggle = !toggle;
    }
 
 
}
 int ButtonState2 = digitalRead(Button2); 
 if (ButtonState2 == LOW)
  {
    if(toggle)
    { 
      digitalWrite(red1, HIGH);   // turn the LED on (HIGH is the voltage level)
  digitalWrite(red2, HIGH); 
  digitalWrite(red3, HIGH); 
  delay(1000);                       // wait for a second
  digitalWrite(red1, LOW);    // turn the LED off by making the voltage LOW
  digitalWrite(red2, LOW);  
  digitalWrite(red3, LOW);  
  delay(1000);     
  digitalWrite(red1, HIGH);   // turn the LED on (HIGH is the voltage level)
  digitalWrite(red2, HIGH); 
  digitalWrite(red3, HIGH); 
  delay(1000);                       // wait for a second
  digitalWrite(red1, LOW);    // turn the LED off by making the voltage LOW
  digitalWrite(red2, LOW);  
  digitalWrite(red3, LOW);    
      toggle = !toggle;
  
    }
    else
    {
      digitalWrite(red1, LOW); 
      digitalWrite(red2, LOW);/// motor turns off
       digitalWrite(red3, LOW);  
      toggle = !toggle;
    }
 
 
}
}

P.S- Thanks to Andy, Rudy and Inmi for all of their help in the lab!!

Recitation 4 Blog Post by Christina Bowllan

Blog Post

In this week’s recitation, the goal was to use an H-Bridge to control the stepper motor which all together would create a drawing machine. While I was intimidated at first because we were tasked with working alone, I gained confidence throughout the process despite some setbacks that occurred. 

Materials:

For Steps 1 and 2

1 * 42STH33-0404AC stepper motor
1 * L293D ic chip
1 * power jack
1 * 12 VDC power supply
1 * Arduino kit and its contents

For Step 3

2 * Laser-cut short arms
2 * Laser-cut long arms
1* Laser-cut motor holder
2 * 3D printed motor coupling
5 * Paper Fasteners
1 * Pen that fits the laser-cut mechanisms
Paper

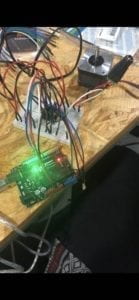
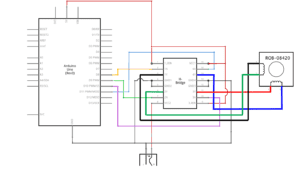
The first step was to connect jumper cables from the H-Bridge to stepper motor and arduino board in order to make the stepper motor rotate. For the most part, I did well following the schematic, but I wasn’t clear at first when the instructors told us to not plug in 12V and 5V on the same line. I realized later if these power sources were on the same horizontal line,  we could damage the arduino board, or even worse, our computers! 

[My video for this one exceeds what word press can handle, but in this picture, you can see that all of the wires are attached correctly and the stepper motor is moving]

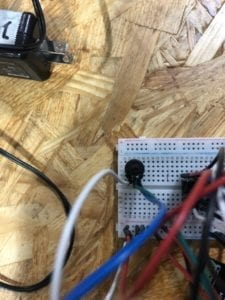
The next step was to attach a potentiometer onto the breadboard in order to control the rotation of the stepper motor and this is where things became complicated for me. The main problem was that the first time I plugged in the potentiometer, I connected all of the jumper cables on the same horizontal line, which meant my arduino board wouldn’t turn on. Then I realized that each prong of the potentiometer should have the jumper cables vertical so each of them are connected individually. However, even when I did this, I couldn’t control the stepper motor and the fellows around me were confused as well… AIYA! We thought that there could have been something wrong with the code, but I used the map function and wrote map(val, 0, 1023, 0, 200). Eventually, once we had switched H-Bridges and called over one of the professors, we  found out we were actually controlling the stepper motor all along, but the movement was slower than we anticipated, so we did not think it was working. 

[I can’t figure out why the picture is coming out blurry, but it shows how each of the jumper cables connected to the potentiometer are in their own slot vertically which is correct]

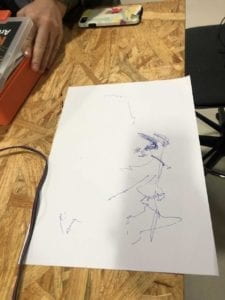
After all of this back and forth, finally my partner and I put together the drawing machine and the pen was moving pretty slowly, but it was moving, so we had accomplished the recitation task! 

Question 1:

What kind of machines would you be interested in building?Add a reflection about the use of actuators, the digital manipulation of art, and the creative process to your blog post.

Whenever I look at the revolutions on the stepper motor, it reminds me of the same movement of a skip it toy that we would use as kids. You would put a hoop around your ankle and, as you skipped, the ball attached to the string would have to go under your other foot. It sounds like a complicated game, but I would want to bring an interactive game like this back to life using the stepper motor. The stepper motor would be inside of the ball of the skip it machine in order to make the revolutions and we would use a potentiometer to control how fast the revolutions of the string were. Unlike the other skip it machine where your body momentum is what is moving the toy, in this game, the stepper motor is controlling the revolutions. Then, the cool new part would be, we would attach chalk or a sidewalk pen, and the speed and movement of the child would translate into art on the streets!

  Image result for skip it toy

Question 2:

Choose an art installation mentioned in the reading ART + Science NOW, Stephen Wilson (Kinetics chapter). Post your thoughts about it and make a comparison with the work you did during this recitation. How do you think that the artist selected those specific actuators for his project?

One art installation that I found interesting in this article was The Drumming and Drawing Subhuman. This art piece uses motors to move the arms of the robot up and down to make the sounds on the drums. I am not sure the name of the actuator, but I am sure the artist used a motor similar to ours in that it should be able to control the movement of the arms, while the potentiometer would regulate the speed in order to make different sounds which is expected in music. This reminded me of the drawing project we made in the class because we also used a interactive motor in order to manifest physical art that people could experience. 

Christina Bowllan Individual Group Project Reflection

             The most common way to think about interaction is as a conversation; One person says something to their friend, this person processes the statement and then provides a response. Crawford, the author of The Art of Interactive Design, has a similar definition of interaction which is “a cyclic process in which two actors listen, think and speak (3).” While I agree with both of the interpretations above, interaction has taken on an extended definition for me. Firstly, an interaction done correctly should not have to be explained to other people. Tigoe, who wrote Making Interactive Art: Set the Stage, Then Shut Up and Listen, states “What you’re making is an instrument or an environment (or both) in which or with which you want your audience to take action. Ideally they will understand what you’re expressing through that experience.” In addition, through watching videos and projects in class, I have realized that interactive projects should not just be a communication between you and the computer, but should have a greater goal to simplify someone’s life.

            In order to shape my understanding of interaction, I researched a few projects that helped formulate this definition. The first project I looked at was Richard Vijgen’s ‘Hertzian Landscapes.”  The motive behind this project is to allow people to experience the frequencies of radio spectrum by moving their body along the wall panorama. This project is fascinating to watch, but it does not fit my definition of interaction. If I was the person testing it, I would not understand what I was looking or why my body moving changes the panorama video. Therefore, the author would have to step in and explain the technology behind it which is not a good interaction project. In addition, someone could argue that the greater goal of this project is to provide knowledge of a world we cannot see with our eyes, but it is hard to imagine that someone’s life is being helped because of it.

            On the other hand, a project that did align with my definition is a project developed at an MIT Media Lab called NailO. This device is connected to your computer or smartphone and can detect five different gestures to move the screen up and down. So, if someone is cooking, they don’t have to worry about making their computer or phone dirty. This is not only interaction between the person, device and computer, but also serves a practical use. And, while watching the GIF of the device, it is easily understood how and why to use it.

            When creating our “Let’s Dance” Interactive Project, we took all of these criteria under consideration. Firstly, we thought about what the basic communication should look like between the person and the device. We would program the teacher and student suit to be in sync with one another so that the student could learn the movements from the teacher. Secondly, when presenting the project, it was critical that the audience knew what the device was and why it was important for people to buy it. This is why we exaggerated the frustration of learning new dance moves, because then the student would be at ease when he put the dance suit on. And lastly, related to this point, the student’s life was easier  when he could learn the movements from the teacher. Similarly to the NailO project, something that you could not do before, was helped because of the machine.

Documentation 3 Sensors by Christina Bowllan

Blogpost

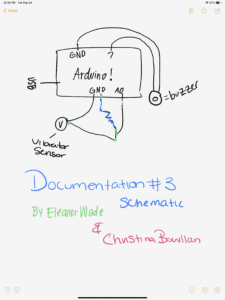
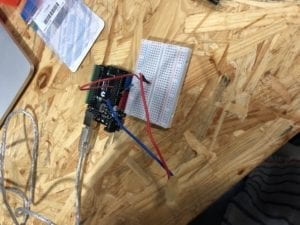
In this week’s recitation, my partner and I used the vibrator sensor to interact with the buzzer. It was fairly easy to assemble because there were not many jumper cables to connect, but the programming was more complex. We learned that we could control the volume and tone of the pitch by changing the code in the knock function. If we plugged in values for: tone (pin, frequency, duration), then the buzzer would just play a sound if we touched the sensor. However, if we used the code: tone (7, Sensor Value*x, 500), depending on how hard or softly we touched the sensor, this would translate the analog numbers into various frequencies because of the sensor value. 

Question 1:

In this recitation, we intended to assemble a circuit where if you pressed the sensor with various pressures, different sounds would be produced. I think a museum could take advantage of a device like this, because they could install the sensor on different parts of the artwork, and if people end up touching it, then the buzzer will make a sound notifying security. 

Question 2:

If you want an output or product to come out correctly, then you need to add the right amount of ingredients, just like coding. If we want the buzzer to ring or light to turn on, then we need to follow the instructions of code. 

Question 3:

Manovich discusses how computers have caused new media objects to all be described numerically and expressed via algorithms. This influences our human behaviors because when we use various social media platforms, people’s approval of our photos are expressed in numbers and our friends are also shown in this way. When you put a numerical value to these social behaviors, it creates an obsessive culture or game to reach the highest amount of likes and followers. Also, since these numbers can be expressed like an algorithm, the companies use this addiction against us in order to make money. 

Documentation 2 Arduino Basics: Christina Bowllan

In this week’s recitation, we built three basic circuits using our new Arduino kits. The materials that we needed for these projects included the following:

From Arduino Kit:

1 * Arduino Uno

1 * USB A to B cable

1 * breadboard

1 * buzzer

2 * LEDs

2 * 220 ohm resistors

2 * 10K ohm resistors

2 * pushbuttons

A handful of jumper cables

From cart:

2 * arcade buttons

1 * Multimeter (optional)

CIRCUIT ONE: FADING 

In the first circuit, the goal was to make the LED light fade on and off. There were no problems with coding because we used the example ones on Arduino, but we had some trouble placing the jumper cables. At first the light was not turning on because we had the cables plugged into the digital portion, but we later realized that the power should come from the analog output. 


CIRCUIT TWO : toneMelody

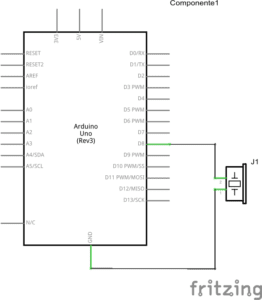
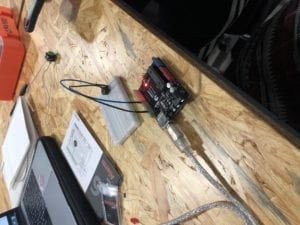
In circuit two, the goal was to use the Arduino board to make the buzzer make a sound. We did not encounter any problems with this one because plugging in the jumper cables to pin 8 and ground was straightforward. 

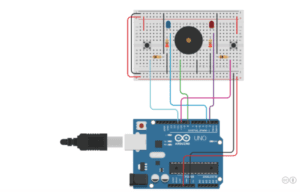
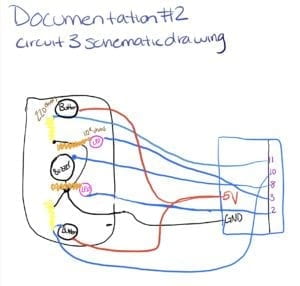
CIRCUIT THREE: Speed Game 

In circuit three, we used arduino to create a speed game. The goal was to use two buttons to play, and the person who clicked their button the most in 10 seconds won which meant their LED would flash on. While the concept of the game was easy to follow, we encountered many problems putting the breadboard together. Firstly, my partner was working on one half of the bread board while I was working on the other half so this meant we were mixing up which jumper cables we had used. We ended up starting over which helped because one of us worked on the breadboard while the other person interpreted the schematic, but then we had problems with the buzzer. We realized after a few trials that we had placed the jumper cables connected to the buzzer on both halves of the breadboard which meant it was not receiving ground or power.  The next time we do this, we will start by placing the cables vertically on the same half of the board and then putting in the buzzer. Another problem we encountered was we used a 220 resistor when we should have used a 10K resistor, so the LED would not turn on. 

Schematic:

Question 1:

Interaction, as defined by the text Physical Computing, is “ an iterative process of listening, thinking, and speaking between two or more actors” which in computer terms can be thought of as “input, processing, output.” In everyday life, I realized that it is impossible to avoid using technology— in fact, I am having to interact with my computer as I write this response. When I move my finger across the trackpad or type on the keyboard, this interacts with the computer and produces an output. 

Question 2:

We used a 10K resistor with the push button because we needed the right voltage to power it and this is a generic resistor to use when the output, like the button, is simple. 

Question 3:

If I had 100,000 LEDs of any brightness or color, I would create Shanghai’s best selfie station in People’s Square! People could pay 20 kuai for eight minutes and control the colors and brightness to take a great picture.