Familiar Faces-Christina Bowllan-Inmi Lee

Familiar Faces- Christina Bowllan- Inmi Lee

For our final project, Isabel and I wanted to address why it is that people do not naturally befriend others from different cultures. While this of course does not relate to everyone, we realized in our school that people who speak the same language oftentimes hang out together and people from the same country do as well. This does answer one part of the question, but the real problem is we fail to realize that people from other cultures are more similar to us than we think; We all have hobbies, hometowns, things we love to do, foods that we miss from our hometowns, struggles within our lives, etc. In order to illustrate this, we interviewed several workers within our school such as the aiyis and halal food people because we wanted to open their stories since they are a group in our school that we often overlook. 

827 (Video 1)

829(Video 2)

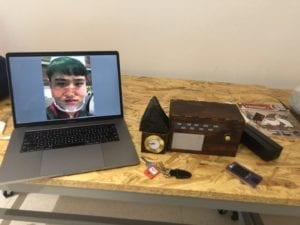
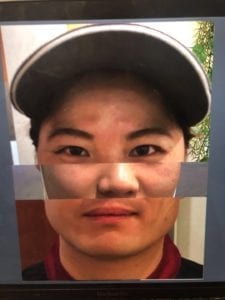
In order to create this project, we had three different sensor spots: one was a house, one was a radio and one was a key card swiper. When the user would push the key inside the house, the audio relating to the workers’ home experience would play, the radio played miscellaneous sound clips about what they missed from their hometown or what they do in Shanghai over the weekends, and the card swiper randomized their faces on the processing image. We decided to create these different physical structures because we wanted each to be a representation of a different aspect of their lives and we created the processing image in order to show people our stories are not that different than one another— after all, we all have eyes, a nose and a mouth. We tried to make the interaction resemble what people do in their everyday lives, or if they do not use a radio, for example, have different structures that the users would already know how to interact with. On the whole, this worked because people knew how to use the card for the swiper and push the radio button, but for some reason, people did not understand what they should do with the key. So, in order to construct each part, we did a lot of laser cutting as this is what our house and radio were made out of it. This proved to be a great method because the boxes were really easy to put together, they looked clean, and the radio could hold our arduino as well. In the early stages, we had thought about maybe 3d printing, but it would be hard to construct a sensor inside this material. For the card swiper, it would have been too difficult to build all of the pieces for laser cutting, so we designed it using cardboard, which proved to be effective. We were able to tape up the various sides and it held the sensor in place very well, so the interaction between processing and arduino was, spot on!

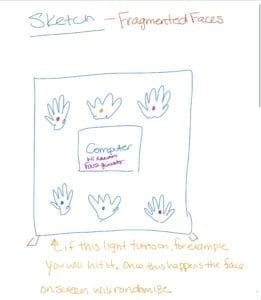
Above shows how our final project ended up, but it did not start this way. Our initial idea was to hang four different types of gloves on the wall which would all represent people from different backgrounds and classes. And the user was intended to high five the gloves which would change the randomized face simulation to show if we cooperate and get to know one another, we can understand that our two worlds are not that different. For user testing, we had the gloves and the randomized face simulation, but the interaction was a bit basic. At first we wanted to put LED lights on each glove so that people could have more of a reason to interact with our game, but the project in general was not conveying our meaning. Users found the project cool and liked seeing pictures of their friends change on the screen, but they did not recognize the high five element to show cooperation or the bigger idea. The main feedback we got was that we needed to be more specific in what it means for people from all backgrounds to come together.

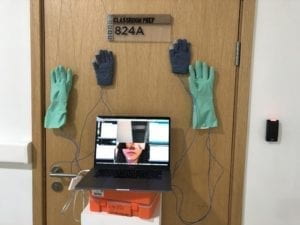
At this point, we decided to create what was our final project and focus in on a certain group of people to show that we have shared identities. So, while the gloves were great, we did not end up using them, and we created the house, radio and card swiper to show different connection points between people. 

For our project, we wanted to show people that we are not so different after all and we used the different workers within our school to illustrate this idea. Our project definitely aligned with my definition; We did have “a cyclic process in which two actors, think and speak” (Crawford 3) and we created a meaningful interaction which we should strive for in this class. Ultimately, I think people did understand our project through the final version we created, but if we continued working on it, of course we could make some changes. Some examples included, we could add subtitles of the interviews so that English speakers understand and Tristan had a good idea to add a spotlight so people know which interaction to focus on. Also, I mentioned this above, but people did not really know what to do with the key… It ended up working out because I believe that slowly understanding what to do with each part resembles what it’s like to get to know someone, but this was not our intended interaction. I have learned from doing this project that “all. good. things. take. time”. I am so used to “cranking out” work in school and then not looking at it again, so it became tedious having to fix different dilemmas here and there. But, once I did the interviews and constructed the card swiper by myself, I felt a wave of confidence and that motivated me to keep working on the project. Overall, people should care about our project because if you care about building a cohesive and unified community and improving school spirit, this is an unavoidable first step. 

CODE

Arduino Code:

// IMA NYU Shanghai
// Interaction Lab
// For sending multiple values from Arduino to Processing

void setup() {
Serial.begin(9600);
}

void loop() {
int sensor1 = digitalRead(9);
int sensor2 = digitalRead(7);
int sensor3 = digitalRead(8);

// keep this format
Serial.print(sensor1);
Serial.print(“,”); // put comma between sensor values
Serial.print(sensor2);
Serial.print(“,”);
Serial.print(sensor3);
Serial.println(); // add linefeed after sending the last sensor value

// too fast communication might cause some latency in Processing
// this delay resolves the issue.
delay(100);
}

Processing Code:

// IMA NYU Shanghai
// Interaction Lab
// For receiving multiple values from Arduino to Processing

/*
 * Based on the readStringUntil() example by Tom Igoe
 * https://processing.org/reference/libraries/serial/Serial_readStringUntil_.html
 */

import processing.serial.*;
import processing.video.*; 
import processing.sound.*;
SoundFile sound;
SoundFile sound2;

String myString = null;
Serial myPort;


int NUM_OF_VALUES = 3;   /** YOU MUST CHANGE THIS ACCORDING TO YOUR PROJECT **/
int[] sensorValues;      /** this array stores values from Arduino **/
int[] prevSensorValues;


int maxImages = 7; // Total # of images
int imageIndex = 0; // Initial image to be displayed
int maxSound= 8;
int maxSound2= 10;
boolean playSound = true;
// Declaring three arrays of images.
PImage[] a = new PImage[maxImages]; 
PImage[] b = new PImage[maxImages]; 
PImage[] c = new PImage[maxImages]; 
//int [] d = new int [maxSound];
//int [] e = new int [maxSound2];
ArrayList<SoundFile> d = new ArrayList<SoundFile>();
ArrayList<SoundFile> e = new ArrayList<SoundFile>();

void setup() {

  setupSerial();
  size(768, 1024);
  prevSensorValues= new int [4];

  imageIndex = constrain (imageIndex, 0, 0);
  imageIndex = constrain (imageIndex, 0, height/3*1);
  imageIndex = constrain (imageIndex, 0, height/3*2);  
  // Puts  images into eacu array
  // add all images to data folder
  for (int i = 0; i < maxSound; i++ ) {
    d.add(new SoundFile(this, "family" + i + ".wav"));
  }
  for (int i = 0; i < maxSound2; i ++ ) {

    e.add(new SoundFile(this, "fun" + i + ".wav"));
  }
  for (int i = 0; i < a.length; i ++ ) {
    a[i] = loadImage( "eye" + i + ".jpg" );
  }
  for (int i = 0; i < b.length; i ++ ) {
    b[i] = loadImage( "noses" + i + ".jpg" );
  }
  for (int i = 0; i < c.length; i ++ ) {
    c[i] = loadImage( "mouths" + i + ".jpg" );
  }
}


void draw() {
  updateSerial();
  // printArray(sensorValues);
  image(a[imageIndex], 0, 0);
  image(b[imageIndex], 0, height/2*1);
  image(c[imageIndex], 0, height/1024*656);


  // use the values like this!
  // sensorValues[0] 
  // add your code
  if (sensorValues[2]!=prevSensorValues[2]) {
    //imageIndex += 1;
    println("yes");
    imageIndex = int(random(a.length));
    imageIndex = int(random(b.length));
    imageIndex = int(random(c.length));//card
  }
  if (sensorValues[1]!=prevSensorValues[1]) {
    //imageIndex += 1;
    println("yes");
    
    int soundIndex = int(random(d.size()));//pick a random number from array
    sound = d.get(soundIndex); //just like d[soundIndex]
    
    if (playSound == true) {
      // play the sound

      sound.play();
      // and prevent it from playing again by setting the boolean to false
      playSound = false;
    } else {
      // if the mouse is outside the circle, make the sound playable again
      // by setting the boolean to true
      playSound = true;
    }
  }
  if (sensorValues[0]!=prevSensorValues[0]) {
    //imageIndex += 1;
    println("yes");
  
    int soundIndex = int(random(e.size()));
    sound2 = e.get(soundIndex); //just like e[soundIndex]
    if (playSound == true) {
      // play the sound
      sound2.play();
      // and prevent it from playing again by setting the boolean to false
      playSound = false;
    } else {
      
      playSound = true;
    }
  }

  prevSensorValues[0] = sensorValues[0];
  println(sensorValues[0], prevSensorValues[0]);
  println (",");
  prevSensorValues[1] = sensorValues[1];
  println(sensorValues[1], prevSensorValues[1]);
  println (",");
  prevSensorValues[2] = sensorValues[2];
  println(sensorValues[2], prevSensorValues[2]);

}


void setupSerial() {
  printArray(Serial.list());
  myPort = new Serial(this, Serial.list()[ 1 ], 9600);
  // WARNING!
  // You will definitely get an error here.
  // Change the PORT_INDEX to 0 and try running it again.
  // And then, check the list of the ports,
  // find the port "/dev/cu.usbmodem----" or "/dev/tty.usbmodem----" 
  // and replace PORT_INDEX above with the index number of the port.

  myPort.clear();
  // Throw out the first reading,
  // in case we started reading in the middle of a string from the sender.
  myString = myPort.readStringUntil( 10 );  // 10 = '\n'  Linefeed in ASCII
  myString = null;

  sensorValues = new int[NUM_OF_VALUES];
}


void updateSerial() {
  while (myPort.available() > 0) {
    myString = myPort.readStringUntil( 10 ); // 10 = '\n'  Linefeed in ASCII
    if (myString != null) {
      String[] serialInArray = split(trim(myString), ",");
      if (serialInArray.length == NUM_OF_VALUES) {
        for (int i=0; i<serialInArray.length; i++) {
          sensorValues[i] = int(serialInArray[i]);
        }
      }
    }
  }
}

Recitation 10 by Christina Bowllan

For this week’s recitation class, we were tasked with creating a “knock-off” music video using images and videos, so I decided to create Rebecca Black’s “Friday” music video! First, I uploaded an image of a few girls riding around in a car. In order to do this, I used the variable “PImage” and put the photo code into void setup because I wanted the image to play one time. Next, I downloaded a video from the internet of a girl riding around in a car. In order to put this in processing, I imported the movie from my library and then put the movie processing code into void draw to to play the video. Then, since I wanted to play the image and then the video, I put in this code “if (millis()/1000 > 5)” which allowed me to telling processing that after 5 seconds, I wanted the image to end and start the video. Lastly, I talked to Marcela and she helped me insert music as well. I downloaded a simple sound code, and then downloaded the “Friday” song. I used boolean so that when the song plays, it will not be affected by the image and video changing as well; At first, when we didn’t have boolean, the song would repeat itself after 5 seconds because of the “millis” or time code.

import processing.video.*;
import processing.sound.*;
Movie myMovie;
SoundFile soundfile;
PImage photo;
boolean isPlaying=false;//this helps us so that the song won't restart with the millis starting over


void setup () {
  size (550, 380);
  background(255);
  photo =  loadImage ("download.jpg");
  //Rebecca Black - Friday.mp3
  image (photo, 100, 100);
  myMovie = new Movie (this, "friday.mp4");
  soundfile = new SoundFile(this, "Friday3.mp3");
}

void draw () {

  if (myMovie.available ()) {
    myMovie.read ();
  }

  if (millis()/1000 > 5) {
    //println(millis()/1000);
    background(255);
    myMovie.loop();
    myMovie.volume(0);
    image (myMovie, 0, 0);
    if (isPlaying ==  false) {
      playSong();//if it's not playing, then it'll play
    }
  }
}

void playSong() {
  isPlaying=true;  //this will make it play through one time 
  soundfile.play();
}

VIDEO:IMG_0299 2

Recitation 9 by Christina Bowllan

Arduino Code

// For sending multiple values from Arduino to Processing

void setup() {
Serial.begin(9600);
}

void loop() {
int sensor1 = analogRead(A0);
int theMappedValue = map(sensor1, 0, 1023, 0, 255);

// keep this format
Serial.write(theMappedValue);
//Serial.println(); // add linefeed after sending the last sensor value

// too fast communication might cause some latency in Processing
// this delay resolves the issue.
delay(100);
}

Processing Code

// IMA NYU Shanghai
// Interaction Lab
// This code receives one value from Arduino to Processing 

import processing.serial.*;


Serial myPort;
int valueFromArduino;
PImage photo;
float opacity; 


void setup() {
  size(500, 413);
  background(0);
 photo = loadImage ("bob.jpg");

  // this prints out the list of all available serial ports on your computer.

  myPort = new Serial(this, Serial.list()[ 15 ], 9600);
  // WARNING!
  // You will definitely get an error here.
  // Change the PORT_INDEX to 0 and try running it again.
  // And then, check the list of the ports,
  // find the port "/dev/cu.usbmodem----" or "/dev/tty.usbmodem----" 
  // and replace PORT_INDEX above with the index number of the port.
}


void draw() {
  // to read the value from the Arduino
   //float opacity = map (valueFromArduino,0,1023,0,255); //we need a float because we want processing to catch all the numbers from arduino 
  while ( myPort.available() > 0) {
    valueFromArduino = myPort.read();
  }
   printArray(Serial.list());
   println(valueFromArduino);
   //tint (0,0,255, opacity);
  image(photo, 0,0);
  
  if (valueFromArduino <150){
   tint(255,0,0); 
  } else if(valueFromArduino > 200) {
    tint (0,255,0);
  }

 
 //This prints out the values from Arduino
}

During this week’s recitation, I used a potentiometer to tint the image from red to green. The main challenge I faced was inserting an “if else” statement in processing. At first, when I did not have the “if else” statement, the Spongebob image would tint red but would not change after that. However, once I added the “if else” statement,  I told processing when the colors should change, so then the image tinted colors. 

In this week’s reading, the Suicide Box relates well to what we did in this task. Whenever the camera sensed a vertical motion, then it would record people falling and track information. This reminds me of the “if else” statement that we used in this task to control the color tint. In both projects, we are giving the computer parameters to know when they should perform tasks. 

Fragmented Faces- Final Project Proposal by Christina Bowllan

Fragmented Faces by Christina and Isabel

Project Statement of Purpose

For this project, Izzy and I want to create a dialogue based on identity and how this forms and changes based on the connections we make with people. My inspiration for this project comes from Zach Lieberman’s Play the World , because he shows using a piano that can play sounds from around the world that we are more connected than we think. From his project, I started to question why is it that people think we are divided in the first place and what can we do in order to change this. We believe that collaboration and mutual understanding of another person’s background will not only bring people together, but can also alter our identities. Within this project, we strive for students at our school to question the types of connections and relationships they are building with others in the community and how this immersion is changing the way they view themselves. 

Project Plan

In order to make this project, we aim to create a game of sorts. When people come to our simulation, they will be faced with 5-6 hands on a board which each will have an LED light in them. Before they interact, they will see that on the screen that all parts of the randomized faces will be blurry and floating around. When the user presses the start button, different lights will begin to flash on the hands and the pace will become increasingly faster. The user’s job will be to high five each one, and every time they make this contact, the faces on processing will randomize. The idea is that, at first, it will be easy for the user to create these connections and look at the screen to watch the different parts of the face randomize, but once it becomes faster and they are giving high fives to so many hands, he/she will no longer be able to keep up with the effect and see the new faces form. There is no way of losing the game, but instead, once the user has had enough, the simulation will turn off. The hands in this project represent the people that you come across and the act of giving each one a high five represents you collaborating and understanding someone else. The processing simulation that follows the high fives will be created to represent these two things but can also take on a new meaning for the user : 1) the fact that different parts of different people’s faces come together to make one face shows that we are all working in unison with one another 2) The randomize faces will suggest that once you start collaborating with people, you start to take on new traits and learn ideas from others. 

The first step in creating the project will be to create a random face generator in processing and connect this with a button in arduino. Once we have figured out how to control the randomization with one button, we will then add multiple buttons for each hand and add more faces to the randomization. We should develop this within the next week so that we know it works. Next, because each hand needs to have an LED light, we will program the lights to turn on first, and then when the button is pressed, the processing simulation will start. Then, when we have this figured out, we will create a wall using the laser printer, and attach five (maybe) 3d printed hands to the wall all which will have a button behind them and a small hole for the LED button. This should be pretty simple for us to create because we 3d printed a heart using tinkercad for our midterm project which also needed a hole. Also, in the middle of the wall, we will have to create a big square hole for a computer to display the randomized face images. Assembling the wall with hands will be the most time consuming aspect, so we should begin working on this the week we get back from Thanksgiving Break. What we still need to figure out is, 1) how will we be able to hold the arduino boards and wires behind the wall , 2) how are we going to attach the hands to the wall, 3) what will we paint on the hands to add to the art piece? For this last question, I was thinking of maybe painting different flags in order to show that when you collaborate with people from around the world, these new identities forms. 

A successful interaction project is one that is engaging, thought-provoking and easy to use, and this is what we hope to create for the final project. During my research, I found a project called the Wishing Wall, and it has continued to inspire me. I like that they took an abstract idea such as dreams and created butterflies in order to evoke a hopeful feeling. We are similarly taking an abstract idea of connecting identities and people to people connections and crafting our own vision of what this looks like using the random face generator on processing. Our project is unique because we are taking the well-known concept of bridging cultures to the next level. A lot of times, our school will talk about how we need to “Make the World Our Major” and branch out to people from different parts of the world, and we are giving students a visual representation of what this looks like. 

Recitation 8 by Christina Bowllan

ETCH A SKETCH- Exercise 1 

[Processing code] FROM ARDUINO TO PROCESSING

ETCH A SKETCH 
// IMA NYU Shanghai
// Interaction Lab
// For receiving multiple values from Arduino to Processing

/*
 * Based on the readStringUntil() example by Tom Igoe
 * https://processing.org/reference/libraries/serial/Serial_readStringUntil_.html
 */

import processing.serial.*;

String myString = null;
Serial myPort;


int NUM_OF_VALUES = 2;   /** YOU MUST CHANGE THIS ACCORDING TO YOUR PROJECT **/
int[] sensorValues;      /** this array stores values from Arduino **/
float B;
float C;
void setup() {
  size(500, 500);
  background(100);
  setupSerial();
  
}


void draw() {
  updateSerial();
  printArray(sensorValues);
  float x = map(sensorValues[0],0,1023,0,width);//these are values that are being calculated, 0 to width part is making it compressed 
  float y = map(sensorValues[1],0,1023,0,height);// different scale
  line (x,y,B,C);//makes the line change the position based on the sensor values
   B=x;// where we start the next time will be where "x" was
   C=y;//where we start the next time will be where "y" was 
   
}

  // use the values like this!
  // sensorValues[0] 

  // add your code

  //


void setupSerial() {
  printArray(Serial.list());
  myPort = new Serial(this, Serial.list()[ 15 ], 9600);
  // WARNING!
  // You will definitely get an error here.
  // Change the PORT_INDEX to 0 and try running it again.
  // And then, check the list of the ports,
  // find the port "/dev/cu.usbmodem----" or "/dev/tty.usbmodem----" 
  // and replace PORT_INDEX above with the index number of the port.

  myPort.clear();
  // Throw out the first reading,
  // in case we started reading in the middle of a string from the sender.
  myString = myPort.readStringUntil( 10 );  // 10 = '\n'  Linefeed in ASCII //'n'=next line
  myString = null;//start fresh

  sensorValues = new int[NUM_OF_VALUES];
}


void updateSerial() {//reading information
  while (myPort.available() > 0) {
    myString = myPort.readStringUntil( 10 ); // 10 = '\n'  Linefeed in ASCII
    if (myString != null) {
      String[] serialInArray = split(trim(myString), ",");//seperating three values based on commma
      if (serialInArray.length == NUM_OF_VALUES) {//then your putting it into an array
        for (int i=0; i<serialInArray.length; i++) {
          sensorValues[i] = int(serialInArray[i]);
        }
      }
    }
  }
}

||

Arduino code [ARDUINO to PROCESSING]

// IMA NYU Shanghai
// Interaction Lab
// For sending multiple values from Arduino to Processing


void setup() {
  Serial.begin(9600);
}

void loop() {
  int sensor1 = analogRead(A0);
  int sensor2 = analogRead(A1);
  //int sensor3 = analogRead(A2);

  // keep this format
  Serial.print(sensor1);//whatever value from sensor 1 value and then put a comma next to it
  Serial.print(",");  // put comma between sensor values, this is separating the data with both sensors 
  Serial.print(sensor2);
  //Serial.print(",");
  //Serial.print(sensor3);
  Serial.println(); // add linefeed after sending the last sensor value, you NEED this break
  //

  // too fast communication might cause some latency in Processing
  // this delay resolves the issue.
  delay(10);
}

ETCH-A-SKETCH Write-Up Description

For this exercise, we were challenged with creating an Etch-A-Sketch Animation connecting both the arduino and processing platforms. These are the steps I took in order to do it:

Arduino Code

  1. First, I set up two potentiometers and called these “sensor 1” and “sensor 2” in void loop. I put this here because we want the values to repeat themselves. 
  2. Then, under this, I connected each of the sensors in Serial. print because we want the sensors to produce number values. These values not only tell us that the connection is working, but are also what processing will read in order to create the image. We also add a comma after each one to distinguish the sensor values from one another. 

Processing Code

  1. Before void setup: The first step was to establish that we have two sensor values coming in from arduino— “int NUM_OF_VALUES =2.” I also added float b and float c because these are the x and y coordinates that will be controlled by the potentiometers.
  2. void draw: Within void draw, I created float x and float y because these are the values that are being calculated on the x and y coordinates. I wrote them within the map function like this: “float x map(sensorValues[0],0,1023,0,width);” because we want to calculate all of the values that processing can from “0-1023” and then compress it within the size of our screen “0-width.” 
  3. Then, I wrote ” line (x,y,B,C)” because “x and y” are one point on the line and “B and C” are another point of the line. We want to establish this in void draw so processing knows that this is what we want to draw. 
  4. Lastly, in order to make the etch-a-sketch create various lines that are connected, we needed to tell processing that when the potentiometer sensor values change, we want the new B and C values to start where the x and y stopped. Therefore, these values should equal one another.

ETCH A SKETCH VIDEO

Exercise 2

Within this exercise, we had to attach processing and arduino and make it so that when you press around the mousepad, a different frequency will play. 

PROCESSING TO ARDUINO [Arduino Code]

// IMA NYU Shanghai
// Interaction Lab


/**
  This example is to send multiple values from Processing to Arduino.
  You can find the Processing example file in the same folder which works with this Arduino file.
  Please note that the echo case (when char c is 'e' in the getSerialData function below)
  checks if Arduino is receiving the correct bytes from the Processing sketch
  by sending the values array back to the Processing sketch.
 **/

#define NUM_OF_VALUES 2    /** YOU MUST CHANGE THIS ACCORDING TO YOUR PROJECT **/


/** DO NOT REMOVE THESE **/
int tempValue = 0;
int valueIndex = 0;

/* This is the array of values storing the data from Processing. */
int values[NUM_OF_VALUES];


void setup() {
 Serial.begin(9600);
 pinMode(13, OUTPUT);
 pinMode(9, OUTPUT);
}

void loop() {
 getSerialData();

 if (values [1] == true) { //if mouse is pressed which is at position 1 (which is mouse press) then... 
   tone(11, values[0]); //at pin 11 play the mouse x values frequency 
 }
 else {
   noTone(11);
 }
}


//recieve serial data from Processing
void getSerialData() {
 if (Serial.available()) {
   char c = Serial.read();
   //switch - case checks the value of the variable in the switch function
   //in this case, the char c, then runs one of the cases that fit the value of the variable
   //for more information, visit the reference page: https://www.arduino.cc/en/Reference/SwitchCase
   switch (c) {
     //if the char c from Processing is a number between 0 and 9
     case '0'...'9':
       //save the value of char c to tempValue
       //but simultaneously rearrange the existing values saved in tempValue
       //for the digits received through char c to remain coherent
       //if this does not make sense and would like to know more, send an email to me!
       tempValue = tempValue * 10 + c - '0';
       break;
     //if the char c from Processing is a comma
     //indicating that the following values of char c is for the next element in the values array
     case ',':
       values[valueIndex] = tempValue;
       //reset tempValue value
       tempValue = 0;
       //increment valuesIndex by 1
       valueIndex++;
       break;
     //if the char c from Processing is character 'n'
     //which signals that it is the end of data
     case 'n':
       //save the tempValue
       //this will b the last element in the values array
       values[valueIndex] = tempValue;
       //reset tempValue and valueIndex values
       //to clear out the values array for the next round of readings from Processing
       tempValue = 0;
       valueIndex = 0;
       break;
     //if the char c from Processing is character 'e'
     //it is signalling for the Arduino to send Processing the elements saved in the values array
     //this case is triggered and processed by the echoSerialData function in the Processing sketch
     case 'e': // to echo
       for (int i = 0; i < NUM_OF_VALUES; i++) {
         Serial.print(values[i]);
         if (i < NUM_OF_VALUES - 1) {
           Serial.print(',');
         }
         else {
           Serial.println();
         }
       }
       break;
   }
 }
}

PROCESSING TO ARDUINO [Processing code]

// IMA NYU Shanghai
// Interaction Lab


/**
 * This example is to send multiple values from Processing to Arduino.
 * You can find the arduino example file in the same folder which works with this Processing file.
 * Please note that the echoSerialData function asks Arduino to send the data saved in the values array
 * to check if it is receiving the correct bytes.
 **/


import processing.serial.*;

int NUM_OF_VALUES = 2;  /** YOU MUST CHANGE THIS ACCORDING TO YOUR PROJECT **/


Serial myPort;
String myString;

// This is the array of values you might want to send to Arduino.
int values[] = new int[NUM_OF_VALUES];

void setup() {
  size(500, 500);
  background(0);

  printArray(Serial.list());
  myPort = new Serial(this, Serial.list()[ 31 ], 9600);
  // check the list of the ports,
  // find the port "/dev/cu.usbmodem----" or "/dev/tty.usbmodem----" 
  // and replace PORT_INDEX above with the index of the port

  myPort.clear();
  // Throw out the first reading,
  // in case we started reading in the middle of a string from the sender.
  myString = myPort.readStringUntil( 10 );  // 10 = '\n'  Linefeed in ASCII
  myString = null;
}


void draw() {
  background(0);
values [0]= mouseX;//frequency is changing based on moving the mouse around, sends to arduino
values [1]=int(mousePressed);// turn true or false (boolean) into an integer that can be sent 

  // sends the values to Arduino.
  sendSerialData();

  // This causess the communication to become slow and unstable.
  // You might want to comment this out when everything is ready.
  // The parameter 200 is the frequency of echoing. 
  // The higher this number, the slower the program will be
  // but the higher this number, the more stable it will be.
  echoSerialData(200);
}

void sendSerialData() {
  String data = "";
  for (int i=0; i<values.length; i++) {
    data += values[i];
    //if i is less than the index number of the last element in the values array
    if (i < values.length-1) {
      data += ","; // add splitter character "," between each values element
    } 
    //if it is the last element in the values array
    else {
      data += "n"; // add the end of data character "n"
    }
  }
  //write to Arduino
  myPort.write(data);
}


void echoSerialData(int frequency) {
  //write character 'e' at the given frequency
  //to request Arduino to send back the values array
  if (frameCount % frequency == 0) myPort.write('e');

  String incomingBytes = "";
  while (myPort.available() > 0) {
    //add on all the characters received from the Arduino to the incomingBytes string
    incomingBytes += char(myPort.read());
  }
  //print what Arduino sent back to Processing
  print( incomingBytes );
}

Exercise 2 Explanation

Processing

1). Before void setup: I established that we will be working with two values: mouse pressed and mouse x. 

2. In void draw:

values [0]= mouseX;

values [1]=int(mousePressed);

In order to send the information about the frequency of the buzzer or where the mouse is pressed to arduino, we needed to place “mouse x” and “mouse pressed” within  the values functions so that the numbers can be translated for arduino. 

Arduino

  1. Before void setup- #define NUM_OF_VALUES 2 — We had to tell arduino here that it should be expecting two values from processing
  2. Within void setup- {  Serial.begin(9600);  pinMode(11, OUTPUT);  pinMode(9, OUTPUT); } In this section, we needed to tell arduino at which pin value is the buzzer connected to 
  3. Within void loop: { getSerialData();  if (values [1] == true) { tone(11, values[0]);   }  else {    noTone(11);  } } — Here we are saying, if the mouse is pressed (which is at position 1), then play the frequency which is at pin 11. However, if the mouse is not pressed, then don’t play the tone.  

Exercise 2 Video