Recitation 6: Processing Basics(Alex Wang)

This weeks recitation we are tasked with finding any image as our motif, and use it as an inspiration to create a new artwork inside processing.

I really liked this artwork of falling cherry blossoms that I found, and I wanted to make something that looks like this

 
Falling sakura cherry blossom on black

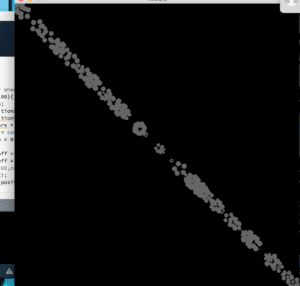
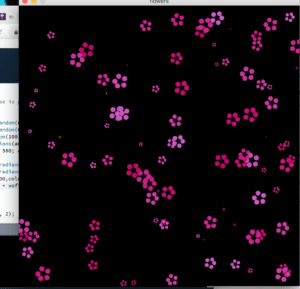
I started in processing and used the Pulses drawing example to work off of, the example is a simple program that draws ripple-like pulses if the mouse is clicked. I first removed the code that stops it from drawing when the mouse is not pressed, then I created a variable that controls the function to only draw 100 times. I replaced what used to be mouse position with a randomly generated position and now the code generates a image that looks something like this

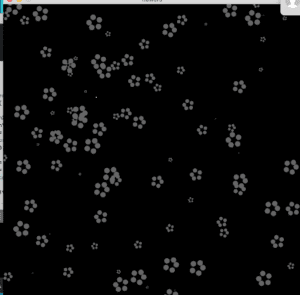
I used the same position variable for both X and Y coordinates which resulted in a line, I fixed this by declaring a new random variable that is solely for Y position and now the code functions as I want it to be.

now that the flowers are positioned randomly across the canvas, it looks much more artistically appealing. I decided to continue and add some colors to make it look like real cherry blossoms,

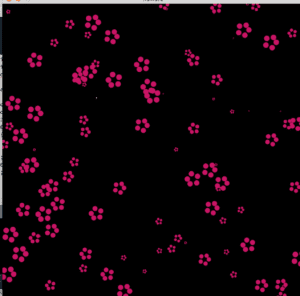
I put the rgb value of pink as parameters to create pink flowers.

some more random variables for rgb value makes the color of flowers different and more interesting to look at.

specifically I messed around with the values in such a way too keep the colors pink/purple-ish 

part of the code responsible for colors

float colors = random(100)+100;

fill(200,colors-100,colors);

This keeps the color pinkish without using three different variables for each parameter of rgb. Yet still giving the color some variance.

Complete code below:

int repeat = 0;
int angle = 0;

void setup() {
size(640, 640);
background(0);
noStroke();
fill(0);
}

void draw() {
// Draw only when mouse is pressed
if (repeat<100){
angle += 5;
float positionX = random(640);
float positionY = random(640);
float colors = random(100)+100;
float val = cos(radians(angle)) * 12.0;
for (int a = 0; a < 360; a += 75) {

float xoff = cos(radians(a)) * val;
float yoff = sin(radians(a)) * val;
fill(200,colors-100,colors);
ellipse(positionX + xoff, positionY + yoff, val, val);
}

fill(255);
ellipse(200, 200, 2, 2);
repeat+=1;
}
}

The picture still looks different from actual cherry blossoms, but this is a pretty close representation using computer algorithms. The simple code that I wrote in this recitation looks way more cartoon than the actual thing because it is hard to implement visual aspects such as shadows or reflections. Despite the generated image looking different from the motif, I think it is a great representation as it definitely reminds me of cherry blossoms when I look at it. I think processing and computer software in general is a great way to create art and specifically for my cherry blossom design as it can draw with absolute precision, with the use of math formulas and some random generated numbers, it can create artwork that is very appealing to the human eyes.

Final result:

Recitation 4: Drawing Machines (Alex Wang)

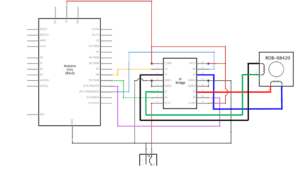
In week 4 recitation we are tasked with building a circuit that controls a motor with the analog input of a potentiometer. Then we can combine our motor circuit with someone else’s motor circuit, using 3d printed parts we can create a drawing machine with arms controlled by two different motors.(Schematics below).

Process:

The building of the initial circuit was good. The H bridge is capable of switching the polarity and also the center to this circuit, so I placed it in the center first, then worked around it for efficiency. Then I added the potentiometer, which caused some error in the functioning of the motor. I later found out that it was because I haven’t modified the code so that the values of analog input is mapped from 1023 to 200 which is the steps of the motor.

Videos:

Working machine

initial circuit without potentiometer

with potentiometer

tried drawing without the arms connected and accidentally drew on my laptop

Modified Code:

/*
* MotorKnob
*
* A stepper motor follows the turns of a potentiometer
* (or other sensor) on analog input 0.
*
* http://www.arduino.cc/en/Reference/Stepper
* This example code is in the public domain.
*/

#include <Stepper.h>

// change this to the number of steps on your motor
#define STEPS 200

// create an instance of the stepper class, specifying
// the number of steps of the motor and the pins it’s
// attached to
Stepper stepper(STEPS, 8, 9, 10, 11);

// the previous reading from the analog input
int previous = 0;

void setup() {
// set the speed of the motor to 30 RPMs
stepper.setSpeed(30);
}

void loop() {
// get the sensor value
int val = analogRead(0);
val = map(val,0,1023,0,200);
// move a number of steps equal to the change in the
// sensor reading
stepper.step(val – previous);

// remember the previous value of the sensor
previous = val;
}

Reflection:

I really enjoyed this weeks recitation as it gives us a taste of what is achievable  even with our current knowledge of engineering and coding, it is a great combination of what we have learned so far. With the assistance of 3d printing, we are able to create something that actually can have applications in real life, if more time was spent on developing the code for the drawing machine, we can potentially make automated writing robots. I had a lot of fun creating the machine, and very surprised how little it is to make something cool.

Documentation questions:

Q1:What kind of machines would you be interested in building?Add a reflection about the use of actuators, the digital manipulation of art, and the creative process to your blog post.

I am interested in building machines that are capable of bringing human interaction closer to the digital world, the drawing machine that we created for this recitation would be a great example, it is fairly useless in terms of actually being used for writing or drawing, but it acts as a tool for the user to interact with the machine and get it to act accordingly with the actuator. These types of machines enables us to interact with art in a new way, unlike the traditional way of only being able to draw with a pen, we can now have new ways to draw, such as a drawing machine. Even if the machine is hard to control, it is a way to offer us a new perceptions of how art can be created and opening up new possibilities and a new creative process.

Q2:Choose an art installation mentioned in the reading ART + Science NOW, Stephen Wilson (Kinetics chapter). Post your thoughts about it and make a comparison with the work you did during this recitation. How do you think that the artist selected those specific actuators for his project?

out of the projects mentioned in the reading, the one that stood out to me was the drumming robot. As a drummer myself, I often find myself questioning the meaning behind the music that I am playing. With advancing accuracy in the field of midi softwares, the only advantage of having real musicians play instead of machines would be the subtle differences that the midi signals can’t replicate perfectly. With the robot drumming through actual physical bodies made possible by appropriate actuators and circuits for drumming just like the ones we made in recitation, the only difference being that the ones we made was for drawing rather than drumming, it takes digital music to another level.

Group Research Project Individual Reflection (Alex Wang)

To me, I understand interaction simply as the process of performing and action and getting some form of feedback in response. This goes for all sorts of interaction, but for machine interaction specifically, the quality of interaction depends on how comfortable the user is with the machine. In this case, the feedback has to be of more relevance to the user for the product to be considered good and interactive. The ability to be able to get a difference in feedback depending on the input you give, and get an accurate response of what you expected the machine to do, is how I personally judge the interactiveness of a machine or program.

The two interactive projects that I looked into were the Pom Pom Mirror and Short++ . Both projects was cool and holds certain value to them, but their interpretation of interaction was very different. The interactions of the pom pom mirror was very aligned to my interpretation of interaction, the user stands in front of the mirror, do any gesture or pose and it will be picked up by the mirror which gives the user feedback of graphics that is changed according to the user, and is also responsive to new changes. The user lifts their hands, expecting to see the mirror react accordingly, and the mirror does exactly what was expected. Short++ ,on the other hand , is a mechanical shoe that can boost the height of the user based on commands given by their phones. I agree on how it can be useful for shorter people to perform tasks that requires height, but despite how good the idea is, this projects interaction does not align with mine. The shoe is controlled by a phone which is used as a remote control in this case, however, a project that truly wants a immersive interaction between the technology and the human, it needs a more human like interactivity. The only reason why people chooses to use a remote is because it is easy to make, and easy to program it so that it is accurately giving the machine input from the user. You simply click a button to give it command, simple and accurate. But if I were to improve this project in a way so that it interacts with the user in a more natural way, it would be to put sensors over the mechanic shoe, and when the sensors gets data that suggest the user wants to lift themselves up, it will perform the action of lifting them up without the need to get phones and buttons involved. This is how I came to conclusion that interaction is supposed to feel natural to the human body and mind, as technologies get better and better, buttons and touch screens should be replaced by sensors that are more human friendly, able to recognize gestures or other ways that humans communicate and interact before the existence of machines.

With this concept in my mind me and my teammates came up with the design of a robot that can deliver water to you, it is also given human like features so that the user can expect to interact with them like interacting with humans. You can speak to it or communicate to it through body language and hand gestures, it can also pickup sounds such as clapping or whistling as these are also common ways that humans use to grab others attention. These features for the robot came directly from the things that I have learned from looking into the two interaction projects. To allow the user to interact with the machine in a natural way, just like how the user will interact with other humans. Giving it the ability to comprehend human action and act responsively.

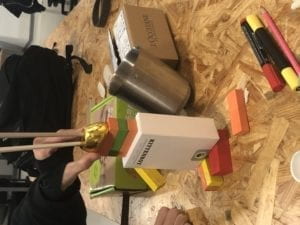
Pictures of cardboard prototype:

Recitation 3: Sensors(Alex Wang)

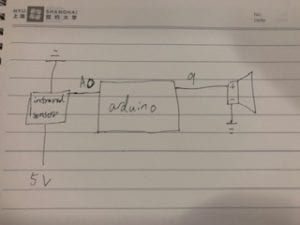
In week 3 recitation we are tasked with building a circuit that utilizes a sensor as input. And then use the Arduino to process the input value and output it into a different part of the sensor to create some kind of corresponding feed back. There is no schematic provided for this recitation as we are designing it ourselves. The sensor I chose was the infrared distance sensor and my output is the buzzer.(hand drawn diagram below)

Process:

The process was very smooth, I used the code I wrote during lecture and simply changed a few variables to match the new circuit, plugged everything in and it worked with no problem. The code that I wrote utilizes the analog input to generate tone, and as the input value gets larger, the length of the note decreases and the tone increases, the generated sound is very cool and natural. Since I finished early I also swapped the infrared sensor with a moisture sensor, I also later replaced the buzzer with an LED just to see if other output works, and the LED lights up very responsively(Working video below).

My Code:

int var = 0;
int buzzer = 9;
void setup() {
pinMode(buzzer,OUTPUT);
pinMode(A0,INPUT);
Serial.begin(9600);
}

void loop() {
var = analogRead(A0);
int mapped = map(var,0,1023,0,1000);
Serial.println(var);
if(mapped>=50){
tone(9,mapped*4,100-(mapped/10));
}
else{
analogWrite(buzzer,0);
}

delay(100);
}

Reflection:

With the sensors I am able to get a better sense of the interaction that is possible with technology and machines. Even though the code and circuit it self is pretty much as simple as it can be, The moment that the LED lights up and when the buzzer starts responding to my interaction, it feels very nice.

Documentation questions:

Q1:What did you intend to assemble in the recitation exercise? If your sensor/actuator combination were to be used for pragmatic purposes, who would use it, why would they use it, and how could it be used?

I assembled an circuit with distance as input and sound as output, if it were to be used for practical purposes, I think it resembles a sonar alarm on a car used when parking. It is very common for all car owners to use, as the tone and frequency of the beep increases as the car gets closer to a wall. 

Q2:Code is often compared to following a recipe or tutorial.  Why do you think that is?

The reason why Code is compared to recipe or tutorial is because it requires clear instructions that is not ambiguous, a tutorial that is ambiguous will leave the user confused, a code with bad syntax will cause an error. Everything have to be done in a good structure so that the computer can understand the code.

Q3:In Language of New Media, Manovich describes the influence of computers on new media. In what ways do you believe the computer influences our human behaviors?

Computer and technology in general changes human in so many ways, one thing that I found interesting is how humans expect to interact with computers, as modern day user interface is designed to be very user friendly and easy to understand, Humans get more and more used to touching, speaking, to their machines, and expect a feedback. Just like in the amazon alexa advertisement, the users expects the lamp to talk back to them, just like how my parents sometimes touches a computer screen assuming its touch screen. This is whats interesting about human behaviors, we are born to interact with things around us using the senses we are given, and when we get a feed back that does not match up with our expectation, we feel weird.

Recitation 2: Arduino Basics(Alex Wang)

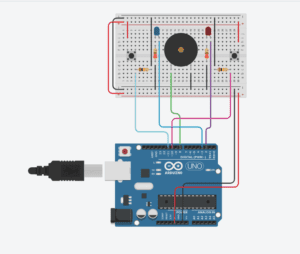
In week 2 recitation we are tasked with building basic circuits just like week 1 recitation, but this time we included the use of Arduino code. Specifically an automated fading led, an music player, and a led racing game with the optional improvement for adding multiplayer.(Schematics below)
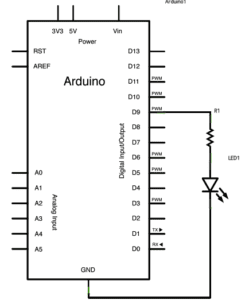
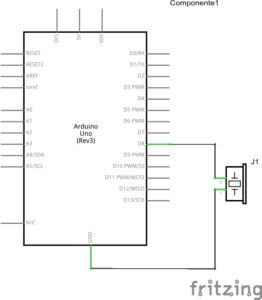
Process:

For this weeks recitation I haven’t ran into any problems, we built the circuits and ran the code, everything went smoothly. We are also extra careful during the process and made sure no connection was loose, unplug power source when editing circuit, etc. I was able to complete the optional circuit fairly quickly too, we left our LED racing circuit as it is, and added another groups circuit to our initial circuit. instead of the pins assigned from the original code, I attached the buttons to `5 and `6 and the LEDs to 12 and 13 on the Arduino, and then modified the code to match the pin slots as well as adding win conditions and variables for the newly added player3 and player4(Hand Drawn diagram and video of working circuit below).
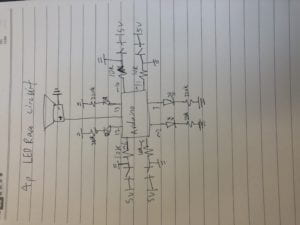
9

10

Modified code:

//led race game modified for 4 players
int buzzerPin = 8;
int button1 = 11;
int button2 = 10;
int button3 = 5;
int button4 = 6;
int led1 = 3;
int led2 = 2;
int led3 = 13;
int led4 = 12;

int goal = 10;
int buttonState1 = LOW;
int previousState1 = LOW;
int buttonState2 = LOW;
int previousState2 = LOW;
int buttonState3 = LOW;
int previousState3 = LOW;
int buttonState4 = LOW;
int previousState4 = LOW;

int counter1 = 0;
int counter2 = 0;
int counter3 = 0;
int counter4 = 0;
boolean winner1 = false;
boolean winner2 = false;
boolean winner3 = false;
boolean winner4 = false;

// the follow variables are long's because the time, measured in miliseconds,
// will quickly become a bigger number than can be stored in an int.
long time = 0; // the last time the output pin was toggled
long debounce = 200; // the debounce time, increase if the output flickers

void setup() {
// put your setup code here, to run once:
Serial.begin(9600);
pinMode(buzzerPin, OUTPUT);
pinMode(button1, INPUT);
pinMode(button2, INPUT);
pinMode(button3, INPUT);
pinMode(button4, INPUT);
pinMode(led1, OUTPUT);
pinMode(led2, OUTPUT);
pinMode(led3, OUTPUT);
pinMode(led4, OUTPUT);
Serial.println("******************* RACE THE LED *******************");
delay(1000);
Serial.println("READY");
delay(1000);
Serial.println("SET");
delay(1500);
Serial.println("GO!!!!!!!!!!!!!!!!");

}

void loop() {
// put your main code here, to run repeatedly:
buttonState1 = digitalRead(button1);
buttonState2 = digitalRead(button2);
buttonState3 = digitalRead(button3);
buttonState4 = digitalRead(button4);
//Serial.println(buttonState1);

//this checks the times player 01 has pressed the button
if (counter1 < goal && winner2 == false && winner3 == false && winner4 == false) {
if (buttonState1 != previousState1 && millis() - time > debounce) {
if (buttonState1 == HIGH) {
counter1++;
Serial.print("player 01: ");
Serial.println(counter1);
time = millis();
}
}
previousState1 = buttonState1;
if (counter1 == goal && winner2 == false && winner3 == false && winner4 == false) {
winner1 = true;
digitalWrite(led1, HIGH);
Serial.println("PLAYER 01 WINS");
playMelody();
}
}

//this checks the times player 02 has pressed the button

if (counter2 < goal && winner1 == false && winner3 == false && winner4 == false) {
if (buttonState2 != previousState2 && millis() - time > debounce) {
if (buttonState2 == HIGH) {
counter2++;
Serial.print("player 02: ");
Serial.println(counter2);
time = millis();
}
}
previousState2 = buttonState2;
if (counter2 == goal && winner2 == false && winner1 == false && winner3 == false && winner4 == false) {
winner2 = true;
digitalWrite(led2, HIGH);
Serial.println("PLAYER 02 WINS");
playMelody();
}
}

//for player 3
if (counter3 < goal && winner1 == false && winner3 == false && winner4 == false) {
if (buttonState3 != previousState3 && millis() - time > debounce) {
if (buttonState3 == HIGH) {
counter3++;
Serial.print("player 03: ");
Serial.println(counter3);
time = millis();
}
}
previousState3 = buttonState3;
if (counter3 == goal && winner3 == false && winner1 == false && winner2 == false && winner4 == false) {
winner3 = true;
digitalWrite(led3, HIGH);
Serial.println("PLAYER 03 WINS");
playMelody();
}
}
//for player 4
if (counter4 < goal && winner1 == false && winner3 == false && winner4 == false) {
if (buttonState4 != previousState4 && millis() - time > debounce) {
if (buttonState4 == HIGH) {
counter4++;
Serial.print("player 04: ");
Serial.println(counter4);
time = millis();
}
}
previousState4 = buttonState4;
if (counter4 == goal && winner4 == false && winner1 == false && winner3 == false && winner2 == false) {
winner4 = true;
digitalWrite(led4, HIGH);
Serial.println("PLAYER 04 WINS");
playMelody();
}
}

}

void playFreq(double freqHz, int durationMs) {
//Calculate the period in microseconds
int periodMicro = int((1 / freqHz) * 1000000);
int halfPeriod = periodMicro / 2;

//store start time
int startTime = millis();

//(millis() - startTime) is elapsed play time
while ((millis() - startTime) < durationMs) {
digitalWrite(buzzerPin, HIGH);
delayMicroseconds(halfPeriod);
digitalWrite(buzzerPin, LOW);
delayMicroseconds(halfPeriod);
}
}

void playMelody() {

playFreq(262, 100);
playFreq(294, 100);
playFreq(349, 100);
playFreq(294, 100);
playFreq(440, 200);
delay(100);
playFreq(440, 400);
playFreq(392, 400);
delay(300);
playFreq(262, 100);
playFreq(294, 100);
playFreq(349, 100);
playFreq(294, 100);
playFreq(392, 200);
delay(100);
playFreq(392, 400);
playFreq(349, 400);

}

Reflection:

I really liked this weeks recitation. Since I have previous experiences in coding, I was able to complete the tasks very smoothly. Learning form last weeks mistakes, I am now always extra careful during the construction to make sure that the connections are all secured, cause as the circuits that I am making gets more and more complex, it gets harder to keep track of every single thing, and as long as one part of the connection is not done properly, the whole thing stops working. I feel like building a circuit is very similar to coding, one part goes wrong and you have to spend a long time trying to find where the error is.

Documentation Questions:

Q1:Reflect how you use technology in your daily life and on the circuits you just built. Use the text Physical Computing and your own observations to define interaction.

I believe that technology plays a great role in my daily life, either for communication or transportation or even for entertainment. I guess for this weeks LED racing game, it would be for the entertainment for users. Just like how I would play video games on my computer. As for defining interaction, I agree with Chris Crawford on how the computers have similar phases of interaction just like humans: listening, thinking, and speaking. But unlike humans, computers use sensors to listen, CPU to think, and some kind of output to “speak” back to us.

Q2:If you have 100,000 LEDs of any brightness and color at your disposal, what would you make and where would you put it?

If I have 100,000 LEDs, I will probably create a huge art project with it. to build a huge screen of lights and display images through these LEDs.