Final Project 侬čÆ“å•„ ļ¼ˆWhat did you say?) – Alexander Cleveland

Project Title
侬čÆ“å•„ ļ¼ˆWhat did you say?)

Conception and Design
When my partner and I were first designing the outline to our project, we knew it had to be simple and easy to understand. Our audience was targeted at young kids so they would be able to learn and understand their native Chinese dialect. We tried to think about how young kids approached learning. From my own experience growing up, I personally remembered loving to make and build things. Whether was with blocks of wood or legos, it was fun for me. Inspired by this, we eventually we decided that a puzzle of China would be a suitable method to help kids understand both the geography and dialect culture at the same time. To make a puzzle, we used Tinkercad online to manually piece together Chinese provinces and then laser cut the file on a wood board. Because the pieces were going to be taken out of the puzzle many times, we wanted a sturdy material so we avoided cardboard. During the process we thought about 3-D printing the map, but because we wanted it to be roughly 15 inches by 15 inches, it wouldā€™ve taken days to individually 3-D print separate parts and piece them together later.  Below are pictures of the initial base surrounding the puzzle and also the puzzle pieces fitted into the base.

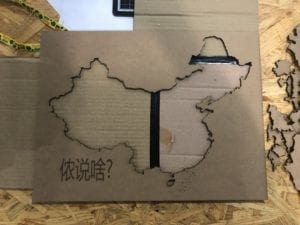
Base of the puzzle by itself

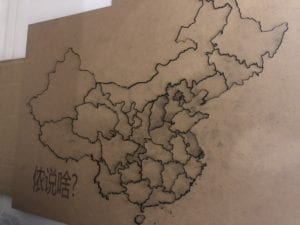
Base with puzzle pieces inside

Fabrication and Production
In our initial plan, the puzzle was to be raised 3 inches off the ground and a motion sensor would be put under each province that we selected. It was meant to be a puzzle that one would put pieces into, but we changed it so that pieces would be taken out for the sake of the using sensors underneath. Simplified initial sketches of the design can be found below.
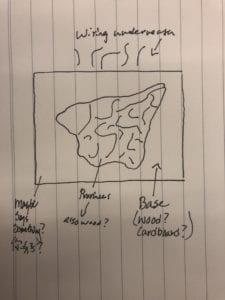
Sketch of the base

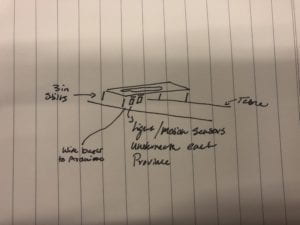
Sketch including  proposed sensors below

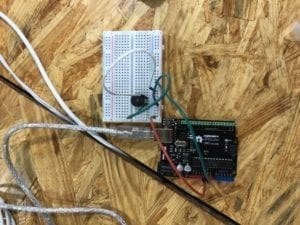
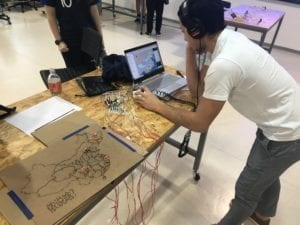
But, when we attempted to raise the puzzle, all of the pieces fell to the ground because they were not fastened in tight enough by themselves. We shifted the idea and placed the puzzle flat onto a cardboard background. Alongside this, we created a map online through processing and arduino which displayed the same physical map. We connected a joystick so that participants would be able to hover over provinces and hear a whisper of the dialect, and thus be incentivized to then pick up the puzzle piece. Unfortunately during user testing, we were not able to connect any sensors to the physical map, so our project was only displayed through the online map. One of the tips was received was to make the joystick easier to use and control our character on screen. So, we changed the initial code to support diagonal movements on screen and improve the fluidity of movement. Another crucial tip we received was a way to involve the physical puzzle pieces of our map in correlation with the online map. Using this advice, we poked holes in the bottom of the cardboard base corresponding underneath each province we had a recording for. We used a wire to connect from Arduino to the map and placed conductive tape over the wire once it was stuck through so just the foil tip ways displayed. We then placed conductive copper tape on the selected puzzle pieces to ensure that the energy from our body would be transferred through the tape on the piece to the wiring below and back into Arduino. This method made it possible to play the native dialect of the province when that particular piece was touched. It was essential to our project and half of it wouldā€™ve been incomplete without it. Because it was a last minute adjustment, many of the wires became tangled, but the attempt to beautify the project was our last priority at this design stage. Below are pictures of our project during user testing day.

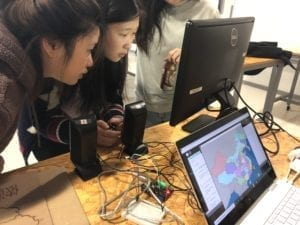
Participants using the joystick

Conclusions
The goal of my project was to create an educational experience focused on exposing audiences to different Chinese dialects from separate provinces. I think we accomplished this and more by sparking a discussion on how important preserving these dialects are in user testing and presentation days. Within the context of interaction, I think it aligned with my original definition that ā€œInteraction is a continuous conversation between two or more corresponding elementsā€ because it was constant involvement either when using the puzzle, listening to the dialects, or controlling the joystick. The conversational element was representative when the participant would remove a puzzle piece and a dialect would play in response. This call and response constituted for me as a conversation between human and machine. Although, it may not necessarily be continuous because it only works when the participant picks up the puzzle piece. Thus, it isnā€™t interactive in the sense of a game where one is constantly playing. In our puzzle the subject is always thinking, but not necessarily interacting. Ultimately, our audience didnā€™t end up picking the pieces up, but rather just touching them. This was because they figured out that the sound would play as long as they touched it. It had the same educational effect as picking it up so this was just a minor diversion from our original intentions. When we concluded that it was not possible to use the light or motion sensors, I felt a sense of defeat. Through the help of professors and our classmates, we strayed from our comfort zone and used conductive tape, a material both my partner and I were not accustomed to working with. While it was indeed difficult to grasp at first, we became aware of the tapeā€™s advantages and it eventually tied our entire project together. The main thing Iā€™ve taken away from this project is that nothing is possible without the help and advice of those around you. Many of the notable alterations in structure came out of comments from our professors and classmates. For this, I am grateful to have such a unique community here at NYU Shanghai that is always willing to help and give feedback at almost any time of the day. Below is a picture of Kevin using our project on the final presentation day and also at the IMA fair. 
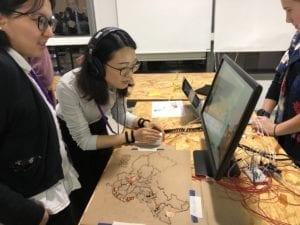
Presentation Day

Recitation 10: Workshop by Alexander Cleveland

Serial Communication

Although I was not present during this week’s observation, I choose to use the serial communication workshop with Young as a baseline of learning. I choose this workshop because I wanted to use past examples my work to further understand how I can use serial communication in the future. Alongside the workshop slides by Eszter and Jessica, I found both workshops to be very helpful by scanning through their notes and slides online.

Example of Serial Communication Using the Map Function

Because there is not a specific exercise involved with this workshop, I’ve chosen to properly showcase the mapping skills I’ve used throughout this class through the image tint I previously worked on.  The code for the image tinting is as follows:

My Code

Arduino

int a;
void setup() {
  Serial.begin(9600);
}


void loop() {
  int sensor1 = analogRead(A0);
  Serial.write(sensor1);
  int a = map(sensor1, 0, 1023, 0 , 255);
  Serial.write(a);
//  Serial.print(sensor1);
//  Serial.println();
  

  // too fast communication might cause some latency in Processing
  // this delay resolves the issue.
  delay(10);
}

Processing

import processing.serial.*;
PImage img;
Serial myPort;
int valueFromArduino;
int sensor1;


void setup() {
  size(600, 600);
  img = loadImage("HK.jpeg");
  imageMode(CENTER);
  background(255);
  
  printArray(Serial.list());
  myPort = new Serial(this, Serial.list()[16], 9600);
}

void draw() {
  if (img.width > 0) {
    image(img, 300, 300, width, height);
    //float a = map(sensor1, 0, 1023, 0, 600); 
    
    while ( myPort.available() > 0) {
    valueFromArduino = myPort.read();
  }
  println(valueFromArduino);//This prints out the values from Arduino
}
  
  if ( valueFromArduino > 150) { 
    tint(0, 0, 255, 150);
    image(img, 250, 0);
  }
 else if (valueFromArduino < 149) {
  tint(0, 255, 0);
 }
  }

 Video example

Through this code, I created a mapping value in the Arduino code of “int a = map(sensor1, 0, 1023, 0 , 255)” and by doing so, I correlated the “int a” value with the values of sensor 1 (potentiometer). The reasoning for this was to create the lowest possible and highest possible values within the potentiometer in the second and third slots of the mapping. In the third and fourth slots I wrote in my lowest target value and highest target value. I also wrote in Sensor 1 so that all of the value in slots 1-4 would correlate with it. Through serial communication, these mapped out values were transferred to processing. The corresponding lines of code in processing were represented by “if ( valueFromArduino > 150) {     tint(0, 0, 255, 150);     image(img, 250, 0);   }  else if (valueFromArduino < 149) {   tint(0, 255, 0);” These values of 0-255 were the original target values I created in my map on Arduino. And thus by printing “println(valueFromArduino)” it was then possible to correlate the two programs to work together. 

Final Project Essay: Alexander Cleveland

A. Title 

侬čÆ“å•„ ļ¼ˆWhat did you say?)

B. Project Statement of Purpose

In this project, my partner and I are aiming to educate young children on the dying languages and dialects in different provinces around China. Unlike most Western countries, China has multiple languages and variations of language spoken throughout the country. Even though Mandarin is the most common one, some cities like Shanghai also have their own dialect called ā€œShanghaineseā€ (äøŠęµ·čƝ) (Asia Society). In order to preserve cultural dialects such as Shanghainese and others, my partner and I have devised a plan to educate younger children on the many dialects throughout China. In many articles, it is evident that languages other than Mandarin in China are being phased out because the Government is requiring people to use Mandarin in official scenarios (GaoKao exam and government forms for example) (The Atlantic). It is important to maintain the vast array of cultures in China through spoken language . We will appeal to the younger generation through a puzzle game which displays a map of China. The child will take one of the provinces (a singular puzzle piece) out and trigger the screen and audio to begin playing a clip from a native speaker of that region. Each province that is available to source from will have a native speaker from NYU Shanghai introducing themselves. This way children can listen, practice, and most importantly, be aware of the diversity among languages in China. Hopefully through this project, my partner and I can inspire classmates, teachers, mentors, and children to keep dialects alive in China.

C.  Project Plan

The main goal of this project is to preserve the cultural traditions of different languages and dialects around the provinces of China. In order to appeal to younger kids through education, weā€™ve created a puzzle game which correlates with a screen, joystick, and audio speakers. The first component is creating a map of China, which is split into different puzzle pieces based on provincial boundaries. Each province puzzle piece will be linked through wires to the screen so that when it is taken out of the puzzle, a video of the native speaker from that selected province introducing themselves plays. The joystick will be linked to the screen and control a cursor which can move over a virtual map of China. As the cursor mouses over a province, the voice of that dialect begins to whisper, creating intrigue in the participant. My partner and I plan to film and record different students from NYU Shanghai who come from separate provinces such as Guangdong, Shanghai, Beijing, Hebei, Sichuan and more. We realize that not every province is represented at our school, so we will try and accrue as many as possible. Although, the search process for finding students that speak dialects other than Mandarin has been difficult because of the Government mandated policy of Mandarin only learning in recent years. We have designed the base of the puzzle and plan to laser cut it while we will 3-D print the model of China and its pieces to fit within the base. We also need to coordinate the sensor wires with the puzzle pieces once they are fully printed. After, we will link the joystick with the on screen graphics through the Arduino values weā€™ve learned and processing skills to create a virtual map.

D. Context and Significance

In my preparatory research for this project, I stumbled upon a similar project named Phonemica which also aims to preserve Chinese cultural dialects by physically traveling to those places and recording the people there. I found it very inspiring that there were other people who are also passionate about preserving the local culture of China. Our project differs from Phonemica though in that we are only in one location and are recording people in our school. We are also trying to appeal to a younger generation by making it a game, rather than a website. Another project that inspired me was the musical bikes, just a block away from our school. The premise of this project was interactivity through music and exercise. When all four people were riding the bikes, the whole song would play. I think that our puzzle and joystick feature creates a similar incentive because at first the voice whispers when they mouse over it with the joystick and only once the child takes the puzzle piece out will it fully play the phrase. The joystick creates an incentive to take out a puzzle piece just as the songs created an incentive for all four people to be exercising on the bikes. I think our project is unique in that we are enlisting the help of the whole school to guide our educational process. Itā€™s not only my partner and I working to preserve Chinese dialects, but those from that region too. To me, it aligns with my definition of interaction because it involves a child playing with a puzzle which translates a result to the screen and helps that child learn. Itā€™s a conversation through the physicality of the puzzle, and the encouragement to repeat the phrase after they are finished watching the video. Just as Chris Crawford explains in what exactly is interactivity? , interactivity has to do with conversations moving back and forth between the user and the machine. Itā€™s not just once, but multiple times in a fluid back and forth process (Crawford). I agree with Crawford and think that my project on interaction is a conversational learning process geared towards children. Hopefully, this project can inspire others in the future to build similar models such as Phonemicaā€™s to help maintain cultural identities in China. These educational tools such as speech repetition games, apps, and computer games could possibly be used in schools around China and specifically in each province too. Seeing as the future is digital, I hope Chinese dialects can survive the new wave of technology.

Works Cited

https://asiasociety.org/china-learning-initiatives/many-dialects-china (Asia Society)

http://www.phonemica.net/

Dix au carre

https://www.theatlantic.com/china/archive/2013/06/on-saving-chinas-dying-languages/276971/ (The Atlantic)

Chris Crawford, What exactly is interactivity? (In class reading)

Recitation 9: Media Controller by Alexander Cleveland

Introduction

In recitation 9, the goal was to create a processing sketch alongside Arduino code and have a physical tool on the breadboard which manipulates that sketch in some way. In this recitation, my goal was to use the core concepts of tinting we learned from class and tint an image. I didn’t want to use an image from the examples in class, so I used an image of my favorite building in Hong Kong, the Bank of China building designed by famed architect I.M. Pei. In this recitation, I used one potentiometer to control the values 0-1023 on a picture. With these values, I manipulated the picture of the Bank of China building to be tinted either blue or green, depending on which values the potentiometer was turned to. Although my project is minuscule compared to those in Computer Vision for Artists and Designers: Pedagogic Tools and Techniques for Novice Programmers, the interactive models inspired my method for tinting the picture. In the beginning, I thought it would be fine to just use a push button and correlate that with tinted values. But this fared far too simple as I wanted to push it just a little bit further. So, using Rafael Lozano-Hemmer’s Standards and Double Standards for inspiration, I used a potentiometer instead.

Building and Implementation

In order to initiate the coding sequence, I used one value from Arduino to Processing examples from class. These two templates gave me a base to write the rest of my code. In Arduino, I used Serial.write(sensor1) because I needed to translate these values from Arduino to processing since I would be controlling the tint with my potentiometer. After this, I mapped the possible values for a potentiometer (sensor1) (0-1023). Then I used serial.write(a) again to then translate these values into processing. All Arduino code can be viewed at the bottom of my sketch under “my code”

In the processing side of things, I needed to incorporate a few more parts to get the project up and running. I inserted the image “HK.jpeg” under a loadImage name. I did this also by defining PImage = img at the top of my code. After loading the image in, I fit it to the screen by using an if statement under void draw. This ensured that it was all visually pleasing before trying to tint it. Then I had to use the array given in the tint example in order to insert my port [16]. For this next step of tinting the image, I first defined sensor1 as (int sensor1) at the top of my code so that the Arduino code and processing code could interact. I also defined valueFromArduino which printed out the value from Arduino into processing. I then created an if statement saying that if valueFromArduino was greater than 150 on a scale of 255, then the picture would turn blue. I also correlated this with an “else if” that said if the potentiometer value is less than 149, then the image will turn green. Below both of these statements, I placed the tint function (red or green) colors. Below is a video of the completed project. 

In the beginning I was trying to use pixelation and pointillism, but realized it would not be possible to abide by the original rules of the recitation. When I switched to just a classic tint, everything worked out as planned. In the future, I might possibly employ the use of two different potentiometers to correlate with two different tinted colors.

My Code

Arduino

int a;
void setup() {
  Serial.begin(9600);
}


void loop() {
  int sensor1 = analogRead(A0);
  Serial.write(sensor1);
  int a = map(sensor1, 0, 1023, 0 , 255);
  Serial.write(a);
//  Serial.print(sensor1);
//  Serial.println();
  

  // too fast communication might cause some latency in Processing
  // this delay resolves the issue.
  delay(10);
}

Processing

import processing.serial.*;
PImage img;
Serial myPort;
int valueFromArduino;
int sensor1;


void setup() {
  size(600, 600);
  img = loadImage("HK.jpeg");
  imageMode(CENTER);
  background(255);
  
  printArray(Serial.list());
  myPort = new Serial(this, Serial.list()[16], 9600);
}

void draw() {
  if (img.width > 0) {
    image(img, 300, 300, width, height);
    //float a = map(sensor1, 0, 1023, 0, 600); 
    
    while ( myPort.available() > 0) {
    valueFromArduino = myPort.read();
  }
  println(valueFromArduino);//This prints out the values from Arduino
}
  
  if ( valueFromArduino > 150) { 
    tint(0, 0, 255, 150);
    image(img, 250, 0);
  }
 else if (valueFromArduino < 149) {
  tint(0, 255, 0);
 }
  }

Sources

Computer Vision for Artists and Designers: Pedagogic Tools and Techniques for Novice Programmers by FLONG.

Recitation 8: Serial Communication by Alexander Cleveland

Introduction

The goal of this recitation was to first create an etch-a-sketch game through the use of processing and Arduino combined. In part 2, I also used processing and Arduino in tandem to create musical sounds based on the positioning of the mouse. In order to begin the process for part 1, I used the provided folder that sends multiple values from Arduino to processing for both my Arduino and Processing sketches. In this particular project, I hope to gain a broader understanding of how I can manipulate different variables within the project. By this I mean that I don’t just want to do the minimum, but I want to go beyond that and push the boundaries if I have time to do so. All code that I mention throughout this documentation can be viewed in the “My code” section at the bottom of this document.

Part 1

In order to begin this part, I first needed to physically set up my breadboard and Arduino by plugging in two different potentiometers to the board. These two potentiometers were to serve as my controls for the etch-a-sketch once the final process was in motion. For now, I assigned these two potentiometers in Arduino coding as serial.print (sensor 1) and serial.print(sensor 2) with comma lines in between. During this, I also assigned each sensor value to the correlated analog value (in this case A0 and A5) under void loop. Through these steps, my Arduino code was set and ready to use processing as a canvas. For the processing portion of this step, I also used Arduino to processing under the multiple values folder to facilitate the process of connecting the code with the physical board. To create this, I first inserted my port # [6] and also created 2 number values defined at the beginning of my code. These two values correlated with the 2 sensor values I had created in Arduino to link with the two potentiometers I had. After doing so, I created an ellipse ( ellipse(sensorValues[0], sensorValues[1], 150, 150); ) so become the base of the etch-a-sketch. After, I ran the processing sketch and used the potentiometers to control the x and y orientations on my screen which created a messy picture. A video of the process can be viewed below.

Part 2

The objective of part two was to create a musical instrument using techniques from Arduino and processing combined together. For the physical portion, I just need a buzzer to convey the sound of my instrument. In the draw portion of processing I inserted high and low notes to correlate with different sections of the canvas. To split the canvas in half and have each note correlate with one side of it. To do this, I created (mouseX > width/2) which said whenever I move the mouse to a select side, the note (high or low) would play on that side. To send a value to the Arduino, I also created the same code (mouseX > width/2) along with the high and low notes. Somehow the video I recorded that day has become lost within my computer so while I cannot give a comprehensive video of the project, I can provide this picture of the setup. Essentially, when I would move my mouse to one side of the screen it would make a high pitched note. And when I would move my mouse to the opposite side of the screen, a low pitched sound would play on the speaker as a result. 

Reflection

In both projects, my code and process went as planned. So far as smoothness goes, this was my most successful recitation. Unfortunately, I did not get to further work with my projects and manipulate their variables as planned. In my off time, I plan to further pursue the musical project to an extent and possibly include it in my final project. I think for my project, it could be a useful tool when hovering or clicking on things on the screen. Seeing as the basis of my project so far is allocated on processing and involved with sound, this is an extremely useful skill to have for the future. 

My code

Part 1 Etch-a-sketch

Arduino code:

// IMA NYU Shanghai
// Interaction Lab
// For sending multiple values from Arduino to Processing


void setup() {
  Serial.begin(9600);
}

void loop() {
  int sensor1 = analogRead(A0);
  int sensor2 = analogRead(A5);

  // keep this format
  Serial.print(sensor1);
  Serial.print(",");  // put comma between sensor values
  Serial.print(sensor2);
  Serial.println(); // add linefeed after sending the last sensor value

  // too fast communication might cause some latency in Processing
  // this delay resolves the issue.
  delay(100);
}

Processing code:

// IMA NYU Shanghai
// Interaction Lab
// For receiving multiple values from Arduino to Processing

/*
 * Based on the readStringUntil() example by Tom Igoe
 * https://processing.org/reference/libraries/serial/Serial_readStringUntil_.html
 */

import processing.serial.*;

String myString = null;
Serial myPort;


int NUM_OF_VALUES = 2;   /** YOU MUST CHANGE THIS ACCORDING TO YOUR PROJECT **/
int[] sensorValues;      /** this array stores values from Arduino **/


void setup() {
  size(500, 500);
  background(0);
  setupSerial();
}


void draw() {
  updateSerial();
  printArray(sensorValues);
  ellipse(sensorValues[0], sensorValues[1], 150, 150);


  // use the values like this!
  // sensorValues[0] 

  // add your code

  //
}


void setupSerial() {
  printArray(Serial.list());
  myPort = new Serial(this, Serial.list()[6], 9600);
  // WARNING!
  // You will definitely get an error here.
  // Change the PORT_INDEX to 0 and try running it again.
  // And then, check the list of the ports,
  // find the port "/dev/cu.usbmodem----" or "/dev/tty.usbmodem----" 
  // and replace PORT_INDEX above with the index number of the port.

  myPort.clear();
  // Throw out the first reading,
  // in case we started reading in the middle of a string from the sender.
  myString = myPort.readStringUntil( 10 );  // 10 = '\n'  Linefeed in ASCII
  myString = null;

  sensorValues = new int[NUM_OF_VALUES];
}


void updateSerial() {
  while (myPort.available() > 0) {
    myString = myPort.readStringUntil( 10 ); // 10 = '\n'  Linefeed in ASCII
    if (myString != null) {
      String[] serialInArray = split(trim(myString), ",");
      if (serialInArray.length == NUM_OF_VALUES) {
        for (int i=0; i<serialInArray.length; i++) {
          sensorValues[i] = int(serialInArray[i]);
        }
      }
    }
  }
}

Part 2 Musical Instrument:

Arduino code:

// IMA NYU Shanghai
// Interaction Lab
// This code sends one value from Processing to Arduino 

import processing.serial.*;

Serial myPort;
int valueFromArduino;


void setup() {
  size(500, 500);
  background(0);

  printArray(Serial.list());
  // this prints out the list of all available serial ports on your computer.
  
  myPort = new Serial(this, Serial.list()[6], 9600);
  // WARNING!
  // You will definitely get an error here.
  // Change the PORT_INDEX to 0 and try running it again.
  // And then, check the list of the ports,
  // find the port "/dev/cu.usbmodem----" or "/dev/tty.usbmodem----" 
  // and replace PORT_INDEX above with the index number of the port.
}


void draw() {
  // to send a value to the Arduino
  if (mouseX > width/2) {
    myPort.write('H');
  } else {
    myPort.write('L');
  }
}

Processing code:

// IMA NYU Shanghai
// Interaction Lab
// This code sends one value from Processing to Arduino 

import processing.serial.*;

Serial myPort;
int valueFromArduino;


void setup() {
  size(500, 500);
  background(0);

  printArray(Serial.list());
  // this prints out the list of all available serial ports on your computer.
  
  myPort = new Serial(this, Serial.list()[6], 9600);
  // WARNING!
  // You will definitely get an error here.
  // Change the PORT_INDEX to 0 and try running it again.
  // And then, check the list of the ports,
  // find the port "/dev/cu.usbmodem----" or "/dev/tty.usbmodem----" 
  // and replace PORT_INDEX above with the index number of the port.
}


void draw() {
  // to send a value to the Arduino
  if (mouseX > width/2) {
    myPort.write('H');
  } else {
    myPort.write('L');
  }
}