Final Project: Pirate Chase 2.0 – Audrey Samuel – Professor Rudi

For our Final Project we decided to improve upon Pirate Chase (our midterm project) and create a new and improved version of our game! Pirate Chase 2.0 is a boat racing game which requires two or more players to blow on their boats to reach the Treasure Chest. Players are allowed to blow on the other participants boats and must avoid letting their boats sink. In the Final Project, we included a few moving obstacles to make the game even harder. We gave our game a Pirate theme because we wanted to see how competitive the participants would get when trying to capture the treasure. We got our inspiration for this from the Economic Theory of the Tragedy of the Commons and wanted to analyze how far individuals would go to push their opponents away from reaching the treasure. In thinking about how our participants would interact with our project, we decided to use a round baby pool (60cmx30cm) as our “ocean” instead of the original rectangular shaped box, as we thought it would be more interactive if individuals could move freely around the circle, without being constrained by the four corners of a box. We also incorporated Processing into our game, by setting up a countdown as well as graphics to display when players should start the game and when a player wins the game. We also downloaded the Sound and Minim library to help us play the Pirates of the Caribbean theme song.
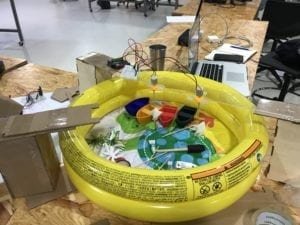
   

We included two obstacles, namely wave-making machines that produced waves in the water making it harder for individuals to blow on their boats directly towards the treasure. We also painted our boats blue, red, green and yellow to improve the design of our previous boats and make it more clear to users as to which boat belonged to which participant. We 3D printed wider boats as people had been complaining earlier that the boats sunk really fast. We also still used the infrared sensor to detective when the boats reached the treasure chest. We thought of using the color sensor to detect which boat won and customize the screen to show the winner but unfortunately we were not able to implement this fully.
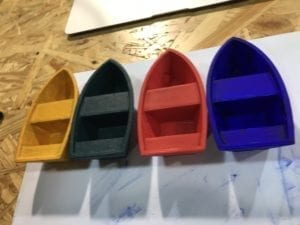
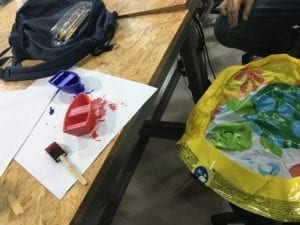
Painted Boats

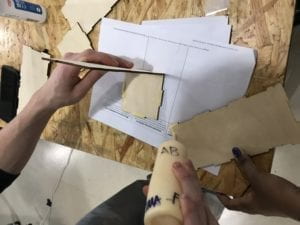
The production process involved a lot of work but we had a fun time throughout the entire process. We 3D printed four new boats and painted them in different colors. We also laser cut two boxes to support our “bridge” on which we would place our obstacles. Initially we had planned to place the treasure chest and infrared sensor on the bridge as well but we found that the pool was too small and the game would end sooner than we expected. We therefore fixed the infrared sensor and treasure chest separately on one end of the pool and the obstacles in the middle of the pool to make it harder for participants to reach the treasure. During the user-testing session, we were told that the users could not see the screen and play the game at the same time because we had placed the laptop screen on the side. We therefore had the screen lifted up and placed it right behind the treasure chest so that the participants could clearly see when the timer had gone off and when they had won the treasure. We were also told to hide the arduino and breadboard as it was pretty distracting. One thing we had to keep in mind was the obstacles falling into the water. Using water and electronics together was quite scary but we were able to pull it off in the end. At the end of the day, our ultimate aim was to see how competitive the users would get over non-existent treasure, and it worked just as we had assumed. People became more competitive when they were told there was an end goal to meet. Applying this to the Tragedy of Commons theory, individuals will be more likely to compete and drive their opponents away in an attempt to achieve limited resources, and in our case this was the treasure chest.

In conclusion, the main aim of our project was to showcase the “Tragedy of the Commons” concept (which was first introduced by American ecologist Garrett Hardin) through a fun and interactive game. Through the game we hoped to see how participants would react in a situation where there exists limited resources in a specific area, and in our case it was the treasure chest. Most importantly, we wanted our project to be as interactive as possible. Referring back to my definition of interaction, I stated that I had originally seen interaction as a form of communication, however I added to this definition stating that it is not only a form of communication, but also a way of blending technology and human abilities together in the most natural way without undervaluing the capabilities of humans, to therefore fulfill a greater aim. By allowing students to blow on the boats, I hoped to show how important human interaction was in using electronics. 

The participants who took part in the game loved the idea of blowing on the boats and said they had a lot of fun competing against their friends. If we had more time, we would get a bigger pool, so that all four boats could be used in the game instead of two. We would also include stable obstacles such as shark fins to make the game even harder. With respect to the Processing side of things, we would add  more audio/visuals to show who won, perhaps by including the sound of coins to represent treasure. We had to keep revising our project, making sure our boats floated as our first ones had not, and by merging both human interaction and computer interaction, our project in the end aimed to show these two things can work together in harmony. Bret Victor encourages us to not restrict interaction to the use of a single finger on a touch screen which is why we decided to incorporate “blowing” and physical movement in our project. This therefore allows individuals to truly feel as though they are not being undervalued, with the computer doing all the work, but rather sets an equal balance between man and machine. Ultimately, by the end of the class I have learnt what interaction truly means and how we can incorporate both human interaction and computer interaction into a project to help users learn something useful while also having fun. (Find below a video of our Project during the IMA End Of Semester Show).

Recitation 10: Workshops – Audrey Samuel

During this week’s recitation, we were required to attend two separate workshops, one on the map() function hosted by the learning assistants and another of our choice. I chose to attend the Media Manipulation workshop with Jingtian and Linda. I thought it would be helpful to learn more about video editing in Processing as my final project also incorporated videos/images/sounds in Processing. 

Media Manipulation

During the workshop, Jingtian went over how we can upload images and videos onto Processing and how we can manipulate these videos using the various in-built functions. After the presentation, we were asked to complete an exercise which required us to pick a tv show/video and recreate it, whiles also using the map() function. For this exercise, I decided to choose a clip from the Disney Pixar movie “Coco”. I made sure I imported the video library from Processing first and then typed in the code to import the video I had downloaded. Next I wanted to manipulate my video using the functions provided, so I first used the Pixels example code given to us in class. Using this code, I was able to create small  rectangles (size 6) for each Pixel in the movie frame. I had to use a for function for() this line of code and define my int variables as well. I then used the speed() function which sets the relative playback speed of a movie. I thought it would be good to incorporate the map() function here using mouse pressed. If the mouse went farther right within the screen the speed would increase but if it went left it would slow down. This controlled the speed at which the movie was playing, using my mouse. I finally decided to add one more line of code incorporating the jump() function. This function shifts the location of the playback head to a specific time within a movie, similar to the “fast forward” buttons on a t.v. remote. I used keyPressed for this function and so anytime I pressed a key on the keyboard the movie would fast forward. 

Video

Code

import processing.video.*;
Movie myMovie;

void setup() {
  size(640,360);
  frameRate(30);
  myMovie = new Movie(this, "coco1.mp4");
  myMovie.loop();
 
}

void draw() {
  if(myMovie.available()){
    myMovie.read();
  }
  tint(255,150,0);
  image(myMovie, 0,0);
  image(myMovie,width/4,0);
  noStroke();
  int rectSize = 3;
  int w = myMovie.width;
  int h = myMovie.height;
  myMovie.loadPixels();
  for (int y = 0; y<h; y=y+rectSize){
  for (int x = 0; x<w; x=x+rectSize){  
    int i = x + y*w;
    fill(myMovie.pixels[i]);
    rect(x,y,rectSize, rectSize);
  float newSpeed = map(mouseX, 0 , width, 0.1,5);
  myMovie.speed(newSpeed);
}
  }
  myMovie.updatePixels();
}
void keyPressed(){
  myMovie.jump(random(myMovie.duration()));
}

Recitation 9: Media Controller – Audrey Samuel

During this week’s recitation we were required to control an image or video by manipulating that media’s attributes using a physical controller made with Arduino. I decided to choose my image from Creativity103.com which was given to use in the resource file. I chose a “Christmas Light” image and decided I would use the Filter example, specifically using the “blur” function. On my Arduino board, I used a Potentiometer to manipulate the “blurriness” of the picture I had chosen. 

I began by opening the provided Serial Communication example code given to us. I used the Serial One Value codes as I was only sending a single value.  I then opened up the “filter blur” example and typed in the code onto the ‘one value from AtoP processing’ code. I then went onto the Arduino Serial One Value code and included the map function to transmit my Potentiometer values from Arduino to Processing. To do this, I included an int value: int picture = map(sensorValue, 0, 1023, 0, 300). I then made sure I included ‘picture’ in the Serial.write code. On my Processing code, I had to include PImage and under void setup() I loaded the photo I had used which I named “colors.jpg.”. I wanted to control the range of blurriness depending on which values my Potentiometer was projecting so I included an If statement under void draw() which stated that if(valueFromArduino > 150) then it would filter(BLUR, 2); but if(valueFromArduino <100 then it would filter(BLUR, 5).  Find below video. 

Christmas lighting effect

Reading

The article Computer Vision for Artists and Designers draws light to the importance of computer vision through vision-based detection and tracking techniques to show how computer vision can be used in society to benefit its people. Most people assume “computer vision” has no greater aim or purpose and cannot really do anything that will contribute to the betterment of individuals in society, however this article proves this assumption wrong. One of the examples provided that I found was a really smart way to incorporate technology was Rafael Lozano­Hemmer’s installation: Standards and Double Standards (2004). This installation consisted of fifty leather belts which were suspended at waist height with the help of servo-motors located on the ceiling. Through computer vision tracking system, the belts would turn towards an individual depending on their movement. This project metaphorically illustrates the power of the patriarchy in an artistic manner. This had me thinking about how we could use Arduino and Processing to distort/illustrate images to reveal a deeper meaning and convey a deeper message to society. Art through computer vision is an interactive and engaging way to capture the attention of the public and allow them to see the pressing issues faced within society that need to be addressed. 

Resources:

Computer Vision for Artist and Designers

Final Project – Essay – Audrey Samuel

Title: Pirate Chase! – A Tragedy of the Commons

Project Statement of Purpose: My partner and I decided to expand upon our midterm project and focus more on the psychological/experimental aspect of it. Our updated project: Pirate Chase! is a boat chasing game between four people. The participants will be positioned on four different corners of the circle (which will serve as the ocean) and have to blow their boats to the island in the middle. There will be a few obstacles in between which will serve to push the boat beneath the water or drive it in the opposite direction. Through previous research, we would like to use the ‘Tragedy of the Commons’ scenario to see if individuals will blow their opponents boats away from each other or collaborate to go onto the island together and share the treasure.

Project Plan: We would like to use our project as a psychological experiment to test the ‘Tragedy of the Commons’ economic concept with students as our target. We will first begin by building our ‘ocean’ by purchasing a miniature kiddie pool (61cm wide 12cm high) and filling it with blue water. We will then 3D print four boats, making sure they are all in different colors in order to clearly distinguish between the four players. Next we will build our island and the obstacles we plan on using. We hope to build a bridge across the circular pool in order to keep the electronic objects (ie. arduino and sensors) away from the water. This bridge will be made from clear, see-through material for now (material used for laminating). We will then fix the island in the middle of this bridge therefore placing the island right in the middle of the circular pool. We will attach an infra-red sensor to this which will point downwards and will detect when the winning boat floats under the island through an LED light which we will position on top of the island. The island will be designed by us and 3D printed. We will also attach a buzzer to emit sound when the winner wins. Through serial communication, the infra-red sensor will transmit from Arduino to Processing and thereby project a graphic on a laptop screen displaying who won and marking the end of the game. We will also time this and monitor how students drive their opponents away. The first boat to reach the island directly without being thrown off by the obstacles is the winner. Students can only move their boats forwards not backwards or sideways. If students miss their first try to reach the island due to an obstacle they cannot move their boats backwards and so will have to rotate around the circle, thereby forcing them to move physically move to where their opponents are standing. 

In order to empathize with our target group we will make sure the circle is big enough and students have enough space to walk around the circle. In addition to this, since it is an experiment we will try this with groups of friends, a mix of students and faculty and a number of mixed combinations to see how the outcome might change. By the end of this week we hope to build our circuits and ensure that our sensor is working. We also hope to finish designing the graphics for Processing and connecting Arduino to Processing through serial communication on Thursday. On Friday we hope to 3D print our boats and island. Next week, we will begin building the bridge and putting the components together. We hope to be done with the main components before Thanksgiving and leave the week before the Final to designing and improving the start and end sounds for the game etc.

Context and Significance: Most of the research I did focused on educational projects that could be used either to convey information to children or older students. After taking two Psychology courses as well as Economics courses here at NYU Shanghai, my Partner and I thought of how we could merge these together in a fun and interactive way while still contributing to the field of Psychology and Economics. We then stumbled across the “Tragedy of the Commons” concept first introduced by American ecologist Garrett Hardin which looks at how people will react in a situation where there exists limited resources in a specific area. This concept further aims to understand the individualistic and collective cultures of people (ie. two psychological concepts). Depending on an individual’s culture or country, some may care only for themselves whereas others may have to consider their family or others before themselves. Through this we hope to focus on how students interact with each other in our game/experiment and whether they will adopt an individualistic approach or collectivist approach in getting the treasure on the island. We are re-creating our midterm project and improving upon its design as well as concept. This could be helpful for students as they re-evaluate their roles in their day to day lives and what approach they choose. After successful completion, we could contribute to the first hand data we gather to a Social Science Psychology Research Journal. Our population/demographic will be unique because our school has a mixture of people from a huge number of countries each with their own unique culture. We could take this further and display various scenarios besides the “Pirate capturing treasure on an island” and look at how countries may fight over a specific resource in the future after climate change completely limits/reduces the availability of that specific resource. 

Most importantly, we wanted our project to be as interactive as possible. Referring back to my definition of interaction, I stated that I had originally seen interaction as a form of communication, however I added to this definition stating that it is not only a form of communication, but also a way of blending technology and human abilities together in the most natural way without undervaluing the capabilities of humans, to therefore fulfill a greater aim. After reading “A Brief Rant on the Future of Interaction Design” by Bret Victor, I began to think about the ways in which technology of today is fully set on only fulfilling the needs of humans. Bret Victor on his blog encourages us to think outside the box and go one step ahead in terms of how technology can be revolutionary. He encourages us to not restrict interaction to the use of a single finger on a touch screen which is why we decided to incorporate “blowing” and physical movement in our project. This therefore allows individuals to truly feel as though they are not being undervalued, with the computer doing all the work, but rather sets an equal balance between man and machine.

Recitation 8: Serial Communication – Audrey Samuel

During last week’s recitation, we were required to use Serial Communication to send data from Arduino to Processing and vice versa. This was a lot of work and it took quite some time before I was able to correctly input the right code. I found myself getting confused as to when certain lines of code should be typed in Arduino and when they should be typed in Processing but overall it was a success! 

Exercise 1:

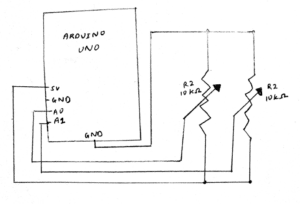
For this exercise we were asked to use Arduino to send two analog values to Processing. I first built my circuits with two potentiometers and connected this to my Arduino board. I had to keep in mind which pins I was using (ie. A0 and A1). After I had built my circuit I opened up the example code given to us and looked at how I could edit it. I first opened the “multiple values from Arduino to Processing” on Arduino and made sure I had only two sensors and that they were defined in my local variables underneath void loop(). I then opened up Processing and made sure I had changed the number of values to 2 since I was using only two sensors. I also had to change my Serial.list number to [1] depending on the order of my ports, which our professor showed us how to do in class. I then began to draw my two ellipsis that I would control with my potentiometers on Processing. I set up the size under void setup() and began to draw the ellipse under void draw(). I got some help from the learning assistants and learnt that I could write this code as “ellipse(sensorValues[0], sensorValues[1],50,50)” as I had already defined my sensor variables earlier. This made it easier to work with. I also set the background to black so that I could see the circle moving. The potentiometers worked and moved the circle based on its x and y positions. 

Circuit 1 Schematic

After I drew the circle, I was required to change this to a line and create a drawing similar to “etch a sketch”. I learnt that for this I would have to define new variables (previousX and previousY) so that my line would start drawing from its previous point each time I turned the potentiometer. Under void draw() I drew the line with the code: “line(previousX, previousY, sensorValues[0], sensorValues[1]).” I also had to make sure I equated the two “previous” variables to the appropriate “sensorValue” variables. This was quite interactive as I was designing my own etch a sketch on Processing using two potentiometers through Arduino. 

Exercise 2:

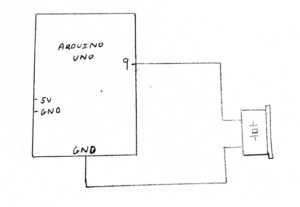
For the second exercise we were required to make a processing sketch that sends values to my Arduino based on my mouse’s x and y position. I had to make sure the Arduino code could read the serial values from Processing and translate this into music which would be heard through the buzzer. I had to use the tone() function to this exercise. I copied over the pitches.h file from tone() and inserted it into a new tab within my “multiple values from Processing to Arduino” code on Arduino. I then went to the main code and typed in #include “pitches.h” to let Arduino know I wanted my melody taken from that file. I also copied over the notes I wanted to be played. Next, I made a circuit and made sure my buzzer was connected to digital pin 9 on my Arduino. I then included this under void setup(). Under void loop() I only used the example code provided for “tone”.  I had to modify which sensorValues I was using. I then went to Processing and edited the code so it had 2 sensors and the appropriate Serial.list number. I then included an if function under void draw() which stated that if (mousePressed) values[0] = 1; else values[0] = 0.I also defined Values [1] = mouseX. This allowed me to change the sound emitted from the buzzer depending on where my mouse was placed on the x-axis in processing. I did the same for mouseY. This was interactive as I had to click on Processing using my mouse in order for sound to play from my buzzer through Arduino.

Circuit 2 Schematic